JF2A TRANSFER / 4WD / AWD TRANSFER SYSTEM 4WD Control Switch Circuit
WIRING DIAGRAM
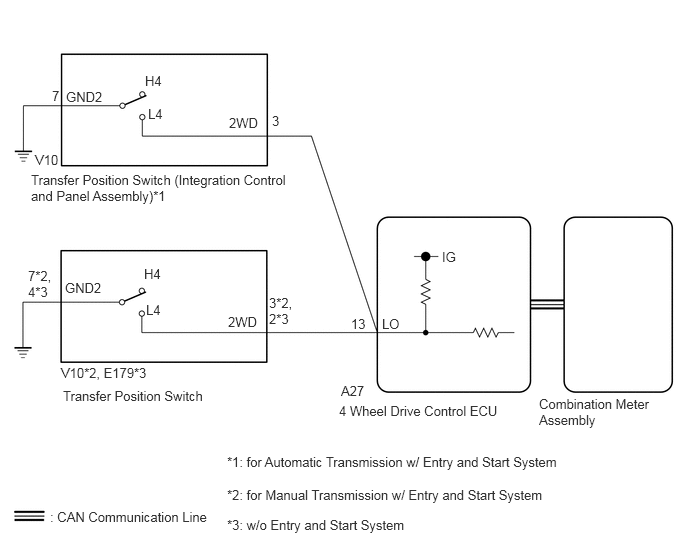
PROCEDURE
Confirm the problem symptoms.
| Result | Proceed to |
|---|---|
| The 4LO indicator light remains off after operating the transfer position switch (integration control and panel assembly) to L4*1
The 4LO indicator light remains off after operating the transfer position switch to L4*2, *3 |
A |
| The 4LO indicator light remains on after operating the transfer position switch to H4*1
The 4LO indicator light remains on after operating the transfer position switch (integration control and panel assembly) to H4*2, *3 |
B |
*1: for Automatic Transmission w/ Entry and Start System
*2: for Manual Transmission w/ Entry and Start System
*3: w/o Entry and Start System
A
B
- HINT:
-
Perform the following procedure with the vehicle stopped.
Turn the ignition switch to ON.
for Automatic Transmission:
Move the shift lever to N.
for Manual Transmission:
Depress the clutch pedal.
for Automatic Transmission w/ Entry and Start System:
Turn the transfer position switch (integration control and panel assembly) to L4.
for Manual Transmission w/ Entry and Start System:
Turn the transfer position switch to L4.
w/o Entry and Start System:
Turn the transfer position switch to L4.
Check the 4LO indicator light.
| Result | Proceed to |
|---|---|
| The 4LO indicator light remains off | A |
| The 4LO indicator light is blinking or illuminated | B |
Blinking: Blinks at 0.5 second intervals (0.5 seconds on and 0.5 seconds off)
A
B
Select "Bus Check" from the System Selection Menu screen, and follow the prompts on the screen to inspect the CAN bus (for LHD with Central Gateway ECU: See page Power Source / Network>NETWORKING>CAN COMMUNICATION SYSTEM (for LHD with Central Gateway ECU)>DIAGNOSIS SYSTEM, for LHD without Central Gateway ECU: See page Power Source / Network>NETWORKING>CAN COMMUNICATION SYSTEM (for LHD without Central Gateway ECU)>DIAGNOSIS SYSTEM, for RHD with Central Gateway ECU: See page Power Source / Network>NETWORKING>CAN COMMUNICATION SYSTEM (for RHD with Central Gateway ECU)>DIAGNOSIS SYSTEM, for RHD without Central Gateway ECU: See page Power Source / Network>NETWORKING>CAN COMMUNICATION SYSTEM (for RHD without Central Gateway ECU)>DIAGNOSIS SYSTEM).
- OK:
"Bus Check" indicates no malfunctions in CAN communication.
Result Result Proceed to DTC is not output A DTC is output for LHD with Central Gateway ECU B for LHD without Central Gateway ECU C for RHD with Central Gateway ECU D for RHD without Central Gateway ECU E
A
B
C
D
E
Turn the ignition switch off.
Connect the GTS to the DLC3.
Turn the GTS on.
Turn the ignition switch to ON.
Enter the following menus: Powertrain / Four Wheel Drive / Data List.
According to the display on the GTS, read the Data List.
| Tester Display | Measurement Item/Range | Normal Condition | Diagnostic Note |
|---|---|---|---|
| Transfer Position Control SW | Transfer position switch status/
ON or OFF |
ON: L4
OFF: H4 |
- |
- OK:
for Automatic Transmission w/ Entry and Start System:
Display changes according to transfer position switch (integration control and panel assembly) operation.
for Manual Transmission w/ Entry and Start System:
Display changes according to transfer position switch operation.
w/o Entry and Start System:
Display changes according to transfer position switch operation.
OK
NG
Turn the ignition switch off.
Perform an Active Test of the combination meter assembly using the GTS (See page Vehicle Interior>METER / GAUGE / DISPLAY>METER / GAUGE SYSTEM>DATA LIST / ACTIVE TEST).
Check the combination meter assembly.
- OK:
The 4LO indicator light turns on or off in accordance with the GTS.
- Result:
Result Proceed to OK for LHD A for RHD B NG C
A
B
C
(See pageVehicle Interior>METER / GAUGE / DISPLAY>METER / GAUGE SYSTEM>HOW TO PROCEED WITH TROUBLESHOOTING)
for Automatic Transmission w/ Entry and Start System:
Remove the transfer position switch (integration control and panel assembly) (See page Drivetrain>JF2A (TRANSFER / 4WD / AWD)>4WD CONTROL SWITCH(w/ Entry and Start System)>REMOVAL).
Inspect the transfer position switch (integration control and panel assembly) (See page Drivetrain>JF2A (TRANSFER / 4WD / AWD)>4WD CONTROL SWITCH(w/ Entry and Start System)>INSPECTION).
- OK:
The transfer position switch (integration control and panel assembly) operates normally.
for Manual Transmission w/ Entry and Start System:
Remove the transfer position switch (See page Drivetrain>JF2A (TRANSFER / 4WD / AWD)>4WD CONTROL SWITCH(w/ Entry and Start System)>REMOVAL).
Inspect the transfer position switch (See page Drivetrain>JF2A (TRANSFER / 4WD / AWD)>4WD CONTROL SWITCH(w/ Entry and Start System)>REMOVAL).
- OK:
The transfer position switch operates normally.
w/o Entry and Start System:
Remove the transfer position switch (See page Drivetrain>JF2A (TRANSFER / 4WD / AWD)>4WD CONTROL SWITCH(w/o Entry and Start System)>REMOVAL).
Inspect the transfer position switch (See page Drivetrain>JF2A (TRANSFER / 4WD / AWD)>4WD CONTROL SWITCH(w/o Entry and Start System)>INSPECTION).
- OK:
The transfer position switch operates normally.
- Result:
Result Proceed to OK A NG for Automatic Transmission w/ Entry and Start System B for Manual Transmission w/ Entry and Start System C w/o Entry and Start System D
A
B
(See pageDrivetrain>JF2A (TRANSFER / 4WD / AWD)>4WD CONTROL SWITCH(w/ Entry and Start System)>REMOVAL)
C
(See pageDrivetrain>JF2A (TRANSFER / 4WD / AWD)>4WD CONTROL SWITCH(w/ Entry and Start System)>REMOVAL)
D
(See pageDrivetrain>JF2A (TRANSFER / 4WD / AWD)>4WD CONTROL SWITCH(w/o Entry and Start System)>REMOVAL)
Disconnect the A27 4 wheel drive control ECU connector.
for Automatic Transmission w/ Entry and Start System:
Disconnect the V10 transfer position switch (integration control and panel assembly) connector.
for Manual Transmission w/ Entry and Start System:
Disconnect the V10 transfer position switch connector.
w/o Entry and Start System:
Disconnect the E179 transfer position switch connector.
Measure the resistance according to the value(s) in the table below.
- Standard Resistance:
for Automatic Transmission w/ Entry and Start System: Tester Connection Condition Specified Condition A27-13 (LO) - V10-3 (2WD) Always Below 1 Ω A27-13 (LO) or V10-3 (2WD) - Body ground Always 10 kΩ or higher V10-7 (GND2) - Body ground Always Below 1 Ω
for Manual Transmission w/ Entry and Start System: Tester Connection Condition Specified Condition A27-13 (LO) - V10-3 (2WD) Always Below 1 Ω A27-13 (LO) or V10-3 (2WD) - Body ground Always 10 kΩ or higher V10-7 (GND2) - Body ground Always Below 1 Ω
w/o Entry and Start System: Tester Connection Condition Specified Condition A27-13 (LO) - E179-2 (2WD) Always Below 1 Ω A27-13 (LO) or E179-2 (2WD) - Body ground Always 10 kΩ or higher E179-4 (GND2) - Body ground Always Below 1 Ω
- Result:
Result Proceed to OK for LHD A for RHD B NG C
A
B
C
- HINT:
-
Perform the following procedure with the vehicle stopped.
Turn the ignition switch to ON.
for Automatic Transmission:
Move the shift lever to N.
for Manual Transmission:
Depress the clutch pedal.
for Automatic Transmission w/ Entry and Start System:
Turn the transfer position switch (integration control and panel assembly) to H4.
for Manual Transmission w/ Entry and Start System:
Turn the transfer position switch to H4.
w/o Entry and Start System:
Turn the transfer position switch to H4.
Check the 4LO indicator light.
| Result | Proceed to |
|---|---|
| The 4LO indicator light remains illuminated | A |
| The 4LO indicator light is blinking or illuminated | B |
Blinking: Blinks at 0.5 second intervals (0.5 seconds on and 0.5 seconds off)
A
B
Select "Bus Check" from the System Selection Menu screen, and follow the prompts on the screen to inspect the CAN bus (for LHD with Central Gateway ECU: See page Power Source / Network>NETWORKING>CAN COMMUNICATION SYSTEM (for LHD with Central Gateway ECU)>DIAGNOSIS SYSTEM, for LHD without Central Gateway ECU: See page Power Source / Network>NETWORKING>CAN COMMUNICATION SYSTEM (for LHD without Central Gateway ECU)>DIAGNOSIS SYSTEM, for RHD with Central Gateway ECU: See page Power Source / Network>NETWORKING>CAN COMMUNICATION SYSTEM (for RHD with Central Gateway ECU)>DIAGNOSIS SYSTEM, for RHD without Central Gateway ECU: See page Power Source / Network>NETWORKING>CAN COMMUNICATION SYSTEM (for RHD without Central Gateway ECU)>DIAGNOSIS SYSTEM).
- OK:
"Bus Check" indicates no malfunctions in CAN communication.
Result Result Proceed to DTC is not output A DTC is output for LHD with Central Gateway ECU B for LHD without Central Gateway ECU C for RHD with Central Gateway ECU D for RHD without Central Gateway ECU E
A
B
C
D
E
Turn the ignition switch off.
Connect the GTS to the DLC3.
Turn the GTS on.
Turn the ignition switch to ON.
Enter the following menus: Powertrain / Four Wheel Drive / Data List.
According to the display on the GTS, read the Data List.
| Tester Display | Measurement Item/Range | Normal Condition | Diagnostic Note |
|---|---|---|---|
| L4 Indicator Request | 4LO indicator light request/
Blink3, Blink1, ON, OFF |
·
Blink3: Indicator light rapidly blinks ·
Blink1: Indicator light blinks ·
ON: Indicator light illuminates ·
OFF: Indicator light turns off |
·
Blinking: 0.5 second intervals (0.5 seconds on and 0.5 seconds off) ·
Rapidly blinking: 0.25 second intervals (0.25 seconds on and 0.25 seconds off) |
for Automatic Transmission w/ Entry and Start System:
Operate the transfer position switch (integration control and panel assembly) several times between H4 and L4, and then check the Techstream display condition of the 4LO indicator light.
for Manual Transmission w/ Entry and Start System:
Operate the transfer position switch several times between H4 and L4, and then check the Techstream display condition of the 4LO indicator light.
w/o Entry and Start System:
Operate the transfer position switch several times between H4 and L4, and then check the Techstream display condition of the 4LO indicator light.
- Result:
Result Proceed to Data List continues to display ON even when transfer position switch (integration control and panel assembly) is operated*1
Data List continues to display ON even when transfer position switch is operated*2, *3for LHD A for RHD B Data List display changes according to transfer position switch (integration control and panel assembly) operation*1
Data List display changes according to transfer position switch operation*2, *3C
*1: for Automatic Transmission w/ Entry and Start System
*2: for Manual Transmission w/ Entry and Start System
*3: w/o Entry and Start System
A
B
C
(See pageVehicle Interior>METER / GAUGE / DISPLAY>METER / GAUGE SYSTEM>HOW TO PROCEED WITH TROUBLESHOOTING)