Home › Audio / Visual / Telematics › AUDIO / VIDEO › AUDIO AND VISUAL SYSTEM(w/o Navigation System) › 2014.08–2015.08
RM2660E _56 Audio / Visual / Telematics _052828 AUDIO / VIDEO _0255479 AUDIO AND VISUAL SYSTEM(w/o Navigation System) J

AUDIO / VIDEO  AUDIO AND VISUAL SYSTEM(w/o Navigation System)  Multi-media Interface ECU Communication Error  


PROCEDURE

1.IDENTIFY COMPONENT SHOWN BY SUB-CODE
a.

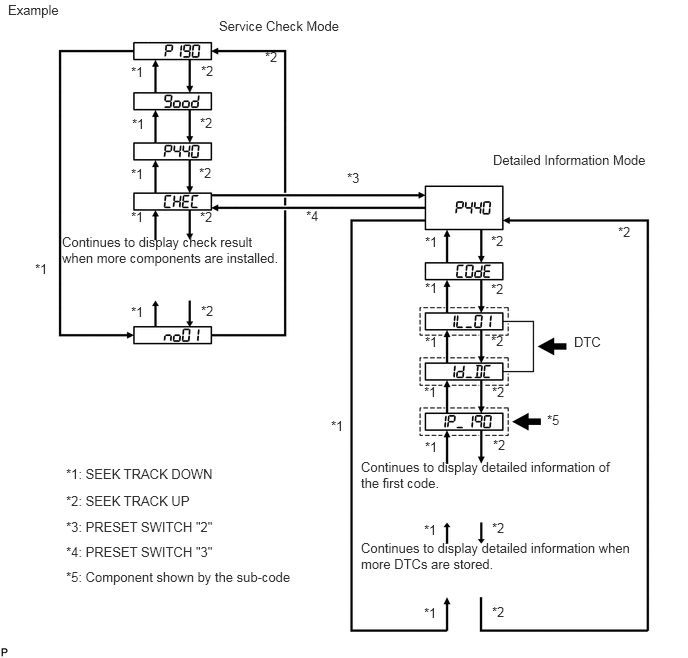
Enter diagnostic mode.

E110917E26
1.365,0.667 1.635,0.854 0.271,0.188 10 false *1 1.375,1.208 1.646,1.396 0.271,0.188 10 false *1 1.365,1.729 1.635,1.917 0.271,0.188 10 false *1 1.365,2.177 1.635,2.365 0.271,0.188 10 false *1 1.365,3.167 1.635,3.354 0.271,0.188 10 false *1 0.365,2.719 0.635,2.906 0.271,0.188 10 false *1 4.427,2.438 4.698,2.625 0.271,0.188 10 false *1 4.427,2.917 4.698,3.104 0.271,0.188 10 false *1 4.427,3.479 4.698,3.667 0.271,0.188 10 false *1 4.417,4 4.688,4.188 0.271,0.188 10 false *1 4.427,4.573 4.698,4.76 0.271,0.188 10 false *1 4.417,5.438 4.604,5.625 0.188,0.188 10 false *1 4.417,6.302 4.688,6.49 0.271,0.188 10 false *1 3.448,4.354 3.719,4.542 0.271,0.188 10 false *1 5.125,5.417 5.323,5.604 0.198,0.188 10 false *2 5.125,6.292 5.396,6.479 0.271,0.188 10 false *2 5.135,4.552 5.406,4.74 0.271,0.188 10 false *2 5.125,4 5.396,4.188 0.271,0.188 10 false *2 5.115,3.469 5.385,3.656 0.271,0.188 10 false *2 5.115,2.927 5.385,3.115 0.271,0.188 10 false *2 5.115,2.427 5.385,2.615 0.271,0.188 10 false *2 6.438,2.333 6.708,2.521 0.271,0.188 10 false *2 2.094,3.156 2.365,3.344 0.271,0.188 10 false *2 2.083,2.177 2.354,2.365 0.271,0.188 10 false *2 2.073,1.719 2.344,1.906 0.271,0.188 10 false *2 2.083,1.198 2.354,1.385 0.271,0.188 10 false *2 2.094,0.656 2.365,0.844 0.271,0.188 10 false *2 2.76,0.51 3.031,0.698 0.271,0.188 10 false *2 3.615,1.771 3.885,1.958 0.271,0.188 10 false *3 3.188,2.167 3.458,2.354 0.271,0.188 10 false *4 0.688,4.854 2.313,5.031 1.625,0.177 10 false *1: SEEK TRACK DOWN 0.688,5.135 2.083,5.313 1.396,0.177 10 false *2: SEEK TRACK UP 0.688,5.406 2.323,5.573 1.635,0.167 10 false *3: PRESET SWITCH "2" 0.688,5.667 2.323,5.833 1.635,0.167 10 false *4: PRESET SWITCH "3" 5.979,3.479 6.302,3.646 0.323,0.167 10 false DTC 0.688,5.927 3.135,6.104 2.448,0.177 10 false *5: Component shown by the sub-code 2.281,0.188 3.792,0.365 1.51,0.177 10 false Service Check Mode 5.135,1.583 7,1.76 1.865,0.177 10 false Detailed Information Mode 3.76,4.781 6.521,5.135 2.76,0.354 10 false Continues to display detailed information of the first code. 3.76,5.625 6.656,5.979 2.896,0.354 10 false Continues to display detailed information when more DTCs are stored. 0.646,2.438 2.99,2.771 2.344,0.333 10 false Continues to display check result when more components are installed. 0.083,0.021 0.75,0.198 0.667,0.177 10 false Example 5.698,4.292 6.01,4.521 0.313,0.229 10 false *5


b.

Press preset switch "2" to change to "Detailed Information Mode".


c.

Identify the component shown by the sub-code.

HINT:
·

"P190" set by the radio receiver assembly shown in the preceding illustration as an example.

·


NEXT

2.CHECK POWER SOURCE CIRCUIT OF COMPONENT SHOWN BY SUB-CODE
a.

Inspect the power source circuit of the component shown by the sub-code.

If the power source circuit is operating normally, proceed to the next step.

Component Table
Component Proceed to
Radio receiver assembly (190) Radio receiver power source circuit (See page (Click here))
Stereo component amplifier assembly (440) Stereo component amplifier power source circuit (See page (Click here))


NEXT

3.INSPECT RADIO RECEIVER ASSEMBLY
a.
U166127E01
0.12,0.1 0.276,0.287 0.156,0.186 10 *1 0.12,2.655 0.297,2.811 0.178,0.156 10 *2 1.56,0.497 1.790,0.671 0.230,0.174 10 F1 0.338,3.789 0.604,3.941 0.266,0.152 10 F55 0.51,0.613 0.902,0.752 0.392,0.139 10 ATX+ 2.263,2.391 2.663,2.569 0.400,0.178 10 ATX- 0.974,0.674 1.749,1.567 false 1.746,1.987 2.198,2.446 false 0.325,3.036 0.705,3.201 0.380,0.165 10 TXM- 2.648,4.125 3.071,4.287 0.423,0.162 10 TXM+ 0.775,3.111 1.551,3.888 false 1.81,3.967 2.582,4.201 false

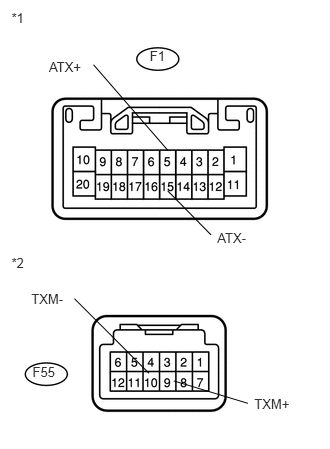
Disconnect the F1 and F55 radio receiver assembly connectors.


b.

Measure the resistance according to the value(s) in the table below.

Standard Resistance:
Tester Connection Condition Specified Condition
F1-5 (ATX+) - F1-15 (ATX-) Always 60 to 80 Ω
F55-9 (TXM+) - F55-10 (TXM-) Always 60 to 80 Ω


Text in Illustration
*1 Component without harness connected
(Radio Receiver Assembly)
*2 Component without harness connected
(Radio Receiver Assembly)


OK

4.CHECK HARNESS AND CONNECTOR (MULTI-MEDIA INTERFACE ECU - COMPONENT SHOWN BY SUB-CODE)

NG

4.CHECK HARNESS AND CONNECTOR (MULTI-MEDIA INTERFACE ECU - COMPONENT SHOWN BY SUB-CODE)
HINT:
·

Start the check from the circuit that is near the component shown by the sub-code first.

·

For details of the connectors, refer to Terminals of ECU (See page Audio / Visual / Telematics>AUDIO / VIDEO>AUDIO AND VISUAL SYSTEM(w/o Navigation System)>TERMINALS OF ECU).


a.

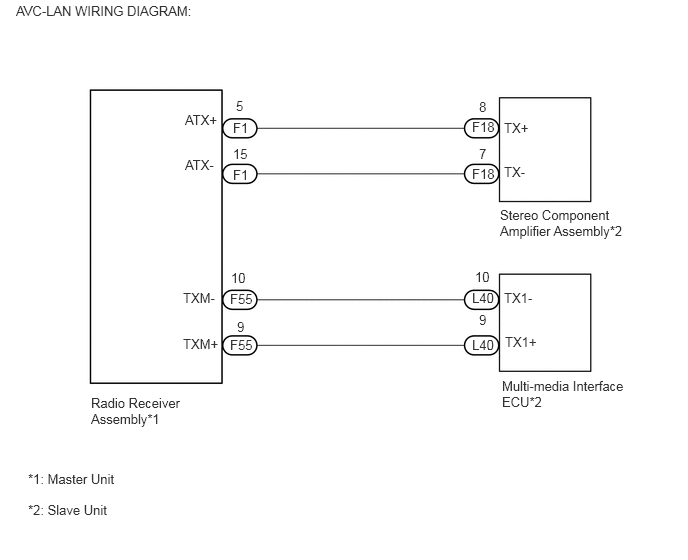
Referring to the AVC-LAN wiring diagram below, check the AVC-LAN circuit between the multi-media interface ECU and component shown by the sub-code.

i.

Disconnect all connectors between the multi-media interface ECU and component shown by the sub-code.


ii.

Check for an open or short in the AVC-LAN circuit between the multi-media interface ECU and component shown by the sub-code.

OK:

There is no open or short circuit.

E194159E11
5.229,3.938 6.552,4.365 1.323,0.427 10 false Multi-media Interface ECU*2 0.948,4.115 1.958,4.51 1.01,0.396 10 false Radio Receiver Assembly*1 2.427,1.25 2.823,1.469 0.396,0.219 10 false F1 2.427,1.74 2.823,1.958 0.396,0.219 10 false F1 1.927,1.167 2.323,1.385 0.396,0.219 10 false ATX+ 1.927,1.635 2.323,1.854 0.396,0.219 10 false ATX- 2.458,1.021 2.708,1.208 0.25,0.188 10 false 5 2.427,1.521 2.719,1.708 0.292,0.188 10 false 15 5.25,1.25 5.646,1.469 0.396,0.219 10 false TX+ 5.25,1.708 5.646,1.927 0.396,0.219 10 false TX- 4.917,1.24 5.177,1.417 0.26,0.177 10 false F18 4.917,1.729 5.188,1.896 0.271,0.167 10 false F18 4.917,3.021 5.188,3.198 0.271,0.177 10 false L40 4.917,3.51 5.188,3.667 0.271,0.156 10 false L40 5.25,3.021 5.646,3.24 0.396,0.219 10 false TX1- 5.26,3.479 5.656,3.698 0.396,0.219 10 false TX1+ 2.396,3.031 2.656,3.219 0.26,0.188 10 false F55 2.396,3.51 2.656,3.677 0.26,0.167 10 false F55 4.948,2.802 5.146,3.021 0.198,0.219 10 false 10 4.99,3.25 5.188,3.469 0.198,0.219 10 false 9 4.99,1.031 5.229,1.229 0.24,0.198 10 false 8 4.99,1.521 5.208,1.698 0.219,0.177 10 false 7 2.469,3.323 2.677,3.5 0.208,0.177 10 false 9 2.406,2.813 2.646,2.99 0.24,0.177 10 false 10 1.906,3.5 2.313,3.698 0.406,0.198 10 false TXM+ 1.906,3.021 2.271,3.24 0.365,0.219 10 false TXM- 0.292,4.906 1.563,5.146 1.271,0.24 10 false *1: Master Unit 0.292,5.229 1.563,5.469 1.271,0.24 10 false *2: Slave Unit 0.167,0.031 2.323,0.229 2.156,0.198 10 false AVC-LAN WIRING DIAGRAM: 5.208,2.156 6.625,2.49 1.417,0.333 10 false Stereo Component Amplifier Assembly*2


OK

5.REPLACE COMPONENT SHOWN BY SUB-CODE

NG

REPAIR OR REPLACE HARNESS OR CONNECTOR

5.REPLACE COMPONENT SHOWN BY SUB-CODE
a.

Replace the component shown by the sub-code with a known good one and check if the same problem occurs again.

OK:

Malfunction disappears.


OK

END

NG