AUDIO / VIDEO AUDIO AND VISUAL SYSTEM(w/ Multi-display) B15D0 MOST Communication Malfunction
DESCRIPTION
This DTC is stored when the MOST network cannot be established after the master unit is activated.
- HINT:
- ·
If a short occurs in a speaker circuit, the sound from the corresponding speaker will be low or almost impossible to hear. If the volume is turned up in this situation, to prevent excessive current flow due to the short circuit, the stereo component amplifier assembly stops operating when its output exceeds a certain level. When the operation of the stereo component amplifier assembly stops, the navigation system will not function normally. This is because MOST communication will stop due to the shutdown of the amplifier causing an error in the MOST network. The stereo component amplifier assembly will start operating again when the engine switch is turned off and back on (ACC) again. However, the amplifier will stop operating again if its output exceeds a certain level.
·When the stereo component amplifier assembly stops operating and a malfunction occurs in the navigation system due to a short in a speaker circuit, this DTC will be stored.
| DTC Code | DTC Detection Condition | Trouble Area |
|---|---|---|
| B15D0 | MOST network cannot be established. | ·
MOST line check ·
MOST communication line connector ·
MOST communication line ·
Multi-display controller sub-assembly (w/ Rear Seat Entertainment System) ·
Stereo component amplifier assembly ·
Multi-media module receiver assembly |
- HINT:
- ·
For the MOST network, the multi-media module receiver assembly is the master unit.
·Errors may occur in MOST communication between devices due to problems such as electrical noise.
WIRING DIAGRAM
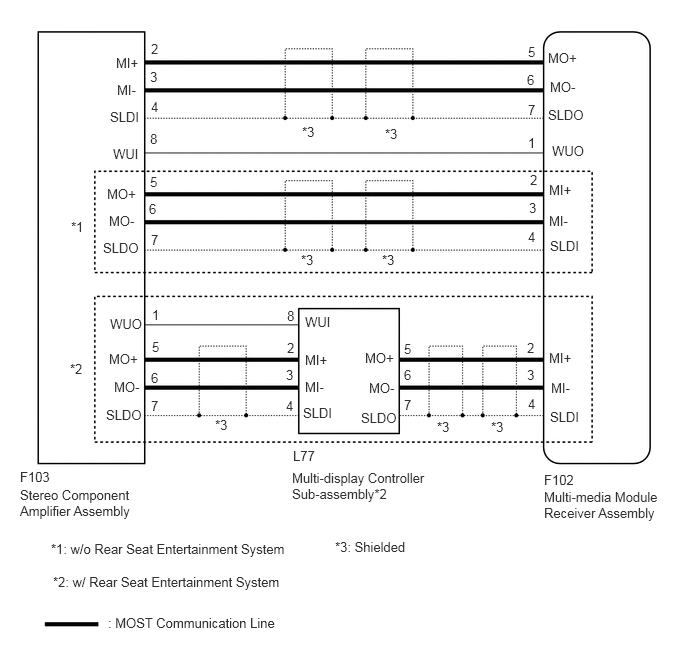
PROCEDURE
Check that optional components (including associated wiring) which generate radio waves are not installed.
| Result | Proceed to |
|---|---|
| Optional components (including associated wiring) are installed. | A |
| Optional components (including associated wiring) are not installed. | B |
- HINT:
- ·
Electrical noise from radio waves generated by optional components or the wiring for those components may affect MOST communication.
·This DTC may be stored when a MOST communication error occurs due to electrical noise.
A
B
Turn the engine switch off.
Remove optional components (including associated wiring).
- NOTICE:
-
Do not remove optional components or associated wiring without the permission of the customer.
Turn the engine switch on (ACC) and check if the audio system activates and if the speakers operate.
- HINT:
- ·
Choose a source such as the radio so that sound can be output from the speakers.
·If sound from the speakers is low, turn up the volume.
| Result | Proceed to |
|---|---|
| Even after the engine switch is turned on (ACC), the audio and visual system does not activate and sound is not output from the speakers. (w/o Rear Seat Entertainment System) | A |
| Even after the engine switch is turned on (ACC), the audio and visual system does not activate and sound is not output from the speakers. (w/ Rear Seat Entertainment System) | B |
| The audio and visual system activates when the engine switch is turned on (ACC) but the sound stops being output when the amplifier output exceeds a certain level. | C |
- HINT:
- ·
If a short occurs in a speaker circuit, the sound from the corresponding speaker will be low or almost impossible to hear. If the volume is turned up in this situation, to prevent excessive current flow due to the short circuit, the stereo component amplifier assembly stops operating when its output exceeds a certain level. When the operation of the stereo component amplifier assembly stops, the navigation system will not function normally. This is because MOST communication will stop due to the shutdown of the amplifier causing an error in the MOST network. The stereo component amplifier assembly will start operating again when the engine switch is turned off and back on (ACC) again. However, the amplifier will stop operating again if its output exceeds a certain level.
·When the stereo component amplifier assembly stops operating and a malfunction occurs in the navigation system due to a short in a speaker circuit, this DTC will be stored. In this case, check each speaker circuit and repair or replace malfunctioning parts, and then recheck for DTCs.
A
B
C
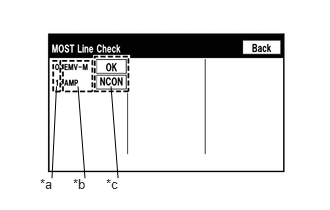
Display the "MOST Line Check" screen (See page Audio / Visual / Telematics>AUDIO / VIDEO>AUDIO AND VISUAL SYSTEM (w/ Multi-display)>DTC CHECK / CLEAR).
| *a | Node position number for devices that use MOST communication |
| *b | Device name |
| *c | Result |
Check the result on the "MOST Line Check" screen.
| Result | Proceed to |
|---|---|
| "NCON" is displayed for "AMP". | A |
| "OK" is displayed for all items. | B |
When "NCON" is displayed for more than 1 item, proceed to the step for the device that has the smallest node position number.
The "MOST Line Check" screen can be displayed only when DTC B15D0 is stored.
A
B
Check the MOST communication line connectors.
Check if the MOST communication line connector between the multi-media module receiver assembly and stereo component amplifier assembly has any connection problems (See page General>INTRODUCTION>HOW TO TROUBLESHOOT ECU CONTROLLED SYSTEMS>ELECTRONIC CIRCUIT INSPECTION PROCEDURE).
Display the "MOST Line Check" screen and check the result (See page Audio / Visual / Telematics>AUDIO / VIDEO>AUDIO AND VISUAL SYSTEM (w/ Multi-display)>DTC CHECK / CLEAR).
| Result | Proceed to |
|---|---|
| "NCON" is displayed for "AMP". | A |
| The screen cannot be changed to the "MOST Line Check" screen. | B |
- HINT:
-
When the malfunction in the MOST network is repaired, the screen cannot be changed to the "MOST Line Check" screen.
A
B
(See pageGeneral>INTRODUCTION>HOW TO TROUBLESHOOT ECU CONTROLLED SYSTEMS>HOW TO PROCEED WITH TROUBLESHOOTING)
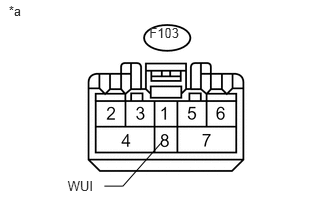
Disconnect the stereo component amplifier assembly connector.
Measure the voltage according to the value(s) in the table below.
- Standard Voltage:
Tester Connection Switch Condition Specified Condition F103-8 (WUI) - Body ground Engine switch on (ACC) 4.5 V or higher
| *a | Front view of wire harness connector
(to Stereo Component Amplifier Assembly) |
OK
NG
Disconnect the F102 multi-media module receiver assembly connector.
Disconnect the F103 stereo component amplifier assembly connector.
Measure the resistance according to the value(s) in the table below.
- Standard Resistance:
Tester Connection Condition Specified Condition F102-1 (WUO) - F103-8 (WUI) Always Below 1 Ω F102-1 (WUO) or F103-8 (WUI) - Body ground Always 10 kΩ or higher
OK
NG
Disconnect the F102 multi-media module receiver assembly connector.
Disconnect the F103 stereo component amplifier assembly connector.
Measure the resistance according to the value(s) in the table below.
- Standard Resistance:
Tester Connection Condition Specified Condition F102-2 (MI+) - F103-5 (MO+) Always Below 1 Ω F102-3 (MI-) - F103-6 (MO-) Always Below 1 Ω F102-4 (SLDI) - F103-7 (SLDO) Always Below 1 Ω F102-5 (MO+) - F103-2 (MI+) Always Below 1 Ω F102-6 (MO-) - F103-3 (MI-) Always Below 1 Ω F102-7 (SLDO) - F103-4 (SLDI) Always Below 1 Ω F102-2 (MI+) or F103-5 (MO+) - Body ground Always 10 kΩ or higher F102-3 (MI-) or F103-6 (MO-) - Body ground Always 10 kΩ or higher F102-4 (SLDI) or F103-7 (SLDO) - Body ground Always 10 kΩ or higher F102-5 (MO+) or F103-2 (MI+) - Body ground Always 10 kΩ or higher F102-6 (MO-) or F103-3 (MI-) - Body ground Always 10 kΩ or higher F102-7 (SLDO) or F103-4 (SLDI) - Body ground Always 10 kΩ or higher
OK
NG
Replace the stereo component amplifier assembly with a new or good one (See page Audio / Visual / Telematics>AUDIO / VIDEO>STEREO COMPONENT AMPLIFIER>REMOVAL).
NEXT
Clear the DTCs (See page Audio / Visual / Telematics>AUDIO / VIDEO>AUDIO AND VISUAL SYSTEM (w/ Multi-display)>DTC CHECK / CLEAR).
NEXT
Recheck for DTCs and check if the same DTC is output again (See page Audio / Visual / Telematics>AUDIO / VIDEO>AUDIO AND VISUAL SYSTEM (w/ Multi-display)>DTC CHECK / CLEAR).
- OK:
No DTCs are output
OK
NG
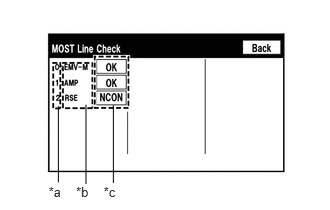
Display the "MOST Line Check" screen (See page Audio / Visual / Telematics>AUDIO / VIDEO>AUDIO AND VISUAL SYSTEM (w/ Multi-display)>DTC CHECK / CLEAR).
| *a | Node position number for devices that use MOST communication |
| *b | Device name |
| *c | Result |
Check the result on the "MOST Line Check" screen.
| Result | Proceed to |
|---|---|
| "NCON" is displayed for "AMP". | A |
| "NCON" is displayed for "RSE". | B |
| "OK" is displayed for all items. | C |
When "NCON" is displayed for more than 1 item, proceed to the step for the device that has the smallest node position number.
The "MOST Line Check" screen can be displayed only when DTC B15D0 is stored.
A
B
C
Check the MOST communication line connectors.
Check if the MOST communication line connector between the multi-media module receiver assembly and stereo component amplifier assembly has any connection problems (See page General>INTRODUCTION>HOW TO TROUBLESHOOT ECU CONTROLLED SYSTEMS>ELECTRONIC CIRCUIT INSPECTION PROCEDURE).
Display the "MOST Line Check" screen and check the result (See page Audio / Visual / Telematics>AUDIO / VIDEO>AUDIO AND VISUAL SYSTEM (w/ Multi-display)>DTC CHECK / CLEAR).
| Result | Proceed to |
|---|---|
| "NCON" is displayed for "AMP". | A |
| The screen cannot be changed to the "MOST Line Check" screen. | B |
- HINT:
-
When the malfunction in the MOST network is repaired, the screen cannot be changed to the "MOST Line Check" screen.
A
B
(See pageGeneral>INTRODUCTION>HOW TO TROUBLESHOOT ECU CONTROLLED SYSTEMS>HOW TO PROCEED WITH TROUBLESHOOTING)
Disconnect the stereo component amplifier assembly connector.
Measure the voltage according to the value(s) in the table below.
- Standard Voltage:
Tester Connection Switch Condition Specified Condition F103-8 (WUI) - Body ground Engine switch on (ACC) 4.5 V or higher
| *a | Front view of wire harness connector
(to Stereo Component Amplifier Assembly) |
OK
NG
Disconnect the F102 multi-media module receiver assembly connector.
Disconnect the F103 stereo component amplifier assembly connector.
Measure the resistance according to the value(s) in the table below.
- Standard Resistance:
Tester Connection Condition Specified Condition F102-1 (WUO) - F103-8 (WUI) Always Below 1 Ω F102-1 (WUO) or F103-8 (WUI) - Body ground Always 10 kΩ or higher
OK
NG
Check the MOST communication line connectors.
Check if the MOST communication line connector between the multi-media module receiver assembly and stereo component amplifier assembly has any connection problems (See page General>INTRODUCTION>HOW TO TROUBLESHOOT ECU CONTROLLED SYSTEMS>ELECTRONIC CIRCUIT INSPECTION PROCEDURE).
Display the "MOST Line Check" screen and check the result (See page Audio / Visual / Telematics>AUDIO / VIDEO>AUDIO AND VISUAL SYSTEM (w/ Multi-display)>DTC CHECK / CLEAR).
| Result | Proceed to |
|---|---|
| "NCON" is displayed for "RSE". | A |
| The screen cannot be changed to the "MOST Line Check" screen. | B |
- HINT:
-
When the malfunction in the MOST network is repaired, the screen cannot be changed to the "MOST Line Check" screen.
A
B
(See pageGeneral>INTRODUCTION>HOW TO TROUBLESHOOT ECU CONTROLLED SYSTEMS>HOW TO PROCEED WITH TROUBLESHOOTING)
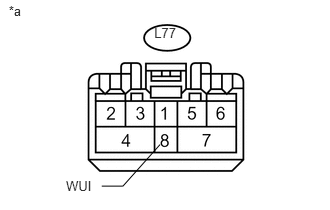
Disconnect the multi-display controller sub-assembly connector.
Measure the voltage according to the value(s) in the table below.
- Standard Voltage:
Tester Connection Switch Condition Specified Condition L77-8 (WUI) - Body ground Engine switch on (ACC) 4.5 V or higher
| *a | Front view of wire harness connector
(to Multi-display Controller Sub-assembly) |
OK
NG
Disconnect the F103 stereo component amplifier assembly connector.
Disconnect the L77 multi-display controller sub-assembly connector.
Measure the resistance according to the value(s) in the table below.
- Standard Resistance:
Tester Connection Condition Specified Condition F103-1 (WUO) - L77-8 (WUI) Always Below 1 Ω F103-1 (WUO) or L77-8 (WUI) - Body ground Always 10 kΩ or higher
OK
NG
Disconnect the F102 multi-media module receiver assembly connector.
Disconnect the F103 stereo component amplifier assembly connector.
Measure the resistance according to the value(s) in the table below.
- Standard Resistance:
Tester Connection Condition Specified Condition F102-5 (MO+) - F103-2 (MI+) Always Below 1 Ω F102-6 (MO-) - F103-3 (MI-) Always Below 1 Ω F102-7 (SLDO) - F103-4 (SLDI) Always Below 1 Ω F102-5 (MO+) or F103-2 (MI+) - Body ground Always 10 kΩ or higher F102-6 (MO-) or F103-3 (MI-) - Body ground Always 10 kΩ or higher F102-7 (SLDO) or F103-4 (SLDI) - Body ground Always 10 kΩ or higher
OK
NG
Disconnect the F103 stereo component amplifier assembly connector.
Disconnect the L77 multi-display controller sub-assembly connector.
Measure the resistance according to the value(s) in the table below.
- Standard Resistance:
Tester Connection Condition Specified Condition F103-5 (MO+) - L77-2 (MI+) Always Below 1 Ω F103-6 (MO-) - L77-3 (MI-) Always Below 1 Ω F103-7 (SLDO) - L77-4 (SLDI) Always Below 1 Ω F103-5 (MO+) or L77-2 (MI+) - Body ground Always 10 kΩ or higher F103-6 (MO-) or L77-3 (MI-) - Body ground Always 10 kΩ or higher F103-7 (SLDO) or L77-4 (SLDI) - Body ground Always 10 kΩ or higher
OK
NG
Disconnect the F102 multi-media module receiver assembly connector.
Disconnect the L77 multi-display controller sub-assembly connector.
Measure the resistance according to the value(s) in the table below.
- Standard Resistance:
Tester Connection Condition Specified Condition F102-2 (MI+) - L77-5 (MO+) Always Below 1 Ω F102-3 (MI-) - L77-6 (MO-) Always Below 1 Ω F102-4 (SLDI) - L77-7 (SLDO) Always Below 1 Ω F102-2 (MI+) or L77-5 (MO+) - Body ground Always 10 kΩ or higher F102-3 (MI-) or L77-6 (MO-) - Body ground Always 10 kΩ or higher F102-4 (SLDI) or L77-7 (SLDO) - Body ground Always 10 kΩ or higher
OK
NG
Replace the multi-display controller sub-assembly with a new or known good one (See page Audio / Visual / Telematics>AUDIO / VIDEO>REAR SEAT ENTERTAINMENT ECU>REMOVAL).
NEXT
Clear the DTCs (See page Audio / Visual / Telematics>AUDIO / VIDEO>AUDIO AND VISUAL SYSTEM (w/ Multi-display)>DTC CHECK / CLEAR).
NEXT
Recheck for DTCs and check if the same DTC is output again (See page Audio / Visual / Telematics>AUDIO / VIDEO>AUDIO AND VISUAL SYSTEM (w/ Multi-display)>DTC CHECK / CLEAR).
- OK:
No DTCs are output.
OK
NG