HEATING / AIR CONDITIONING AIR CONDITIONING SYSTEM B14227F Compressor Actuator Stuck Off
DESCRIPTION
The ECM sends the engine speed signal to the air conditioning amplifier assembly via CAN communication. The air conditioning amplifier assembly reads the difference between compressor speed and engine speed. When the difference becomes too large, the air conditioning amplifier assembly determines that the compressor is locked, and turns the magnetic clutch off.
| DTC No. | Detection Item | DTC Detection Condition | Trouble Area | Memory | DTC Output from | Priority |
|---|---|---|---|---|---|---|
| B14227F | Compressor Actuator Stuck Off | Diagnosis Condition: Compressor with magnet clutch operating Malfunction Status: Open or short in compressor circuit Detection Time: Continuously for 30 seconds or more |
·
Compressor with magnet clutch
·
Harness or connector
·
Semiconductor power integration ECU
·
ECM
·
Air conditioning amplifier assembly |
Memorized | Air Conditioner | A |
| Vehicle Condition | |||
|---|---|---|---|
| Pattern 1 | Pattern 2 | ||
| Diagnosis Condition | Compressor with magnet clutch operating | ○ | ○ |
| Malfunction Status | Open in compressor circuit | ○ | - |
| Short in compressor circuit | - | ○ | |
| Detection Time | Continuously for 30 seconds or more | Continuously for 30 seconds or more | |
- HINT:
-
If the conditions of either of these patterns are detected, a DTC will be stored.
WIRING DIAGRAM
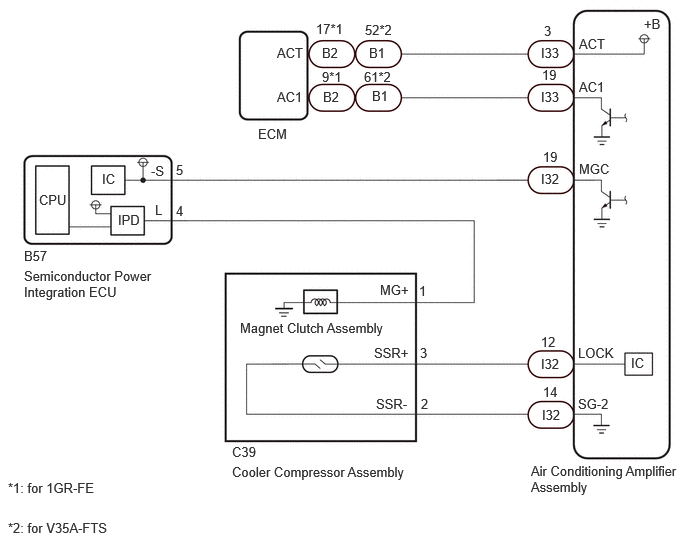
CAUTION / NOTICE / HINT
- NOTICE:
-
·
ECM malfunctions can affect the storage of this DTC. Therefore, check all ECM DTCs and confirm that the system is normal before performing the following inspection.
·The air conditioning system uses the CAN communication system. Inspect the communication function by following How to Proceed with Troubleshooting.
PROCEDURE
Pre-procedure1
Remove the air conditioning amplifier assembly with its connectors still connected.
Click hereVehicle Interior>HEATING / AIR CONDITIONING>AIR CONDITIONING AMPLIFIER>REMOVAL
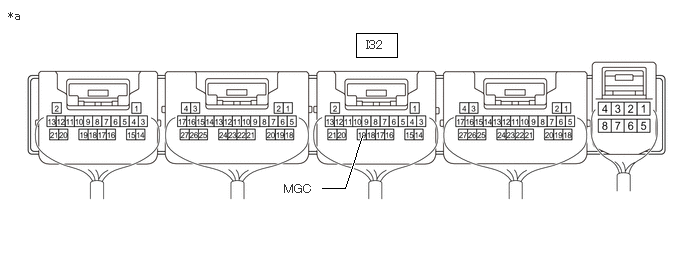
| *a | Component with harness connected (Air Conditioning Amplifier Assembly) |
- | - |
Procedure1
Measure the voltage according to the value(s) in the table below.
- Standard Voltage:
-
Tester Connection Condition Specified Condition Click Location & Routing(I32)Location & Routingewd_type=routing;type=c;code=I32
I32-19 (MGC) - Body ground ·Engine running
·Blower switch: LO
·A/C switch: On (magnet clutch on)
Below 1 V I32-19 (MGC) - Body ground ·Engine running
·Blower switch: LO
·A/C switch : Off or on (magnet clutch off)
11 to 14 V
- Result:
-
Proceed to OK NG
Post-procedure1
None
OK
NG
Read the Data List according to the display on the GTS.
- Body Electrical > Power Integration No.1 > Data List
-
Tester Display Measurement Item Range Normal Condition Diagnostic Note Magnetic Clutch Fuse Shut Off Status Magnet clutch assembly fuse shut off status OFF/ON OFF: Fuse has no shut off history
ON: Fuse has shut off history-
- Body Electrical > Power Integration No.1 > Data List
-
Tester Display Magnetic Clutch Fuse Shut Off Status - 50003 473 422
- OK:
-
OFF is displayed on the GTS.
- Result:
-
Proceed to OK NG
OK
NG
Read the Data List according to the display on the GTS.
- Body Electrical > Power Integration No.1 > Data List
-
Tester Display Measurement Item Range Normal Condition Diagnostic Note Magnetic Clutch Input Signal Magnet clutch assembly input signal OFF/ON OFF: Magnet clutch assembly signal not input
ON: Magnet clutch assembly signal input-
- Body Electrical > Power Integration No.1 > Data List
-
Tester Display Magnetic Clutch Input Signal - 50003 473 419
- OK:
-
ON is displayed on the GTS.
- Result:
-
Proceed to OK NG
OK
NG
Read the Data List according to the display on the GTS.
- Body Electrical > Power Integration No.1 > Data List
-
Tester Display Measurement Item Range Normal Condition Diagnostic Note Magnetic Clutch Output Signal Magnet clutch assembly output signal OFF/ON OFF: Magnet clutch assembly off
ON: Magnet clutch assembly on-
- Body Electrical > Power Integration No.1 > Data List
-
Tester Display Magnetic Clutch Output Signal - 50003 473 420
- OK:
-
ON is displayed on the GTS.
- Result:
-
Proceed to OK NG
OK
NG
- Result:
-
Proceed to OK NG
OK
NG
Pre-procedure1
Disconnect the C39 cooler compressor assembly connector.
Disconnect the B57 semiconductor power integration ECU connector.
Procedure1
Measure the resistance according to the value(s) in the table below.
- Standard Resistance:
-
Tester Connection Condition Specified Condition Click Location & Routing(C39,B57)Location & Routingewd_type=routing;type=c,c;code=C39,B57
C39-1 (MG+) - B57-4 (L) Always Below 1 Ω
- Result:
-
Proceed to OK NG
Post-procedure1
None
OK
NG
Pre-procedure1
Disconnect the C39 compressor with magnet clutch connector.
Procedure1
Read the Data List according to the display on the GTS.
- Body Electrical > Power Integration No.1 > Data List
-
Tester Display Measurement Item Range Normal Condition Diagnostic Note Magnetic Clutch Fuse Shut Off Status Magnet clutch assembly fuse shut off status OFF/ON OFF: Fuse has no shut off history
ON: Fuse has shut off history-
- Body Electrical > Power Integration No.1 > Data List
-
Tester Display Magnetic Clutch Fuse Shut Off Status - 50003 473 422
- OK:
-
OFF is displayed on the GTS.
- Result:
-
Proceed to OK NG
Post-procedure1
None
OK
NG
Pre-procedure1
Disconnect the C39 cooler compressor assembly connector.
Disconnect the B57 semiconductor power integration ECU connector.
Procedure1
Measure the resistance according to the value(s) in the table below.
- Standard Resistance:
-
Tester Connection Condition Specified Condition Click Location & Routing(C39,B57)Location & Routingewd_type=routing;type=c,c;code=C39,B57
C39-1 (MG+) or B57-4 (L) - Other terminals and body ground Always 10 kΩ or higher
- Result:
-
Proceed to OK NG
Post-procedure1
None
OK
NG
Pre-procedure1
Disconnect the I32 air conditioning amplifier assembly connector.
Disconnect the B57 semiconductor power integration ECU connector.
Procedure1
Measure the resistance according to the value(s) in the table below.
- Standard Resistance:
-
Tester Connection Condition Specified Condition Click Location & Routing(I32,B57)Location & Routingewd_type=routing;type=c,c;code=I32,B57
I32-19 (MGC) - B57-5 (MGC) Always Below 1 Ω I32-19 (MGC) or B57-5 (MGC) - Other terminals and body ground Always 10 kΩ or higher
- Result:
-
Proceed to OK NG
Post-procedure1
None
OK
NG
Pre-procedure1
Disconnect the I33 air conditioning amplifier assembly connector.
Disconnect the B2*1 or B1*2 ECM connector.
*1: for 1GR-FE
*2: for V35A-FTS
Procedure1
Measure the resistance according to the value(s) in the table below.
- Standard Resistance:
- for 1GR-FE:
-
Tester Connection Condition Specified Condition Click Location & Routing(I33,B2)Location & Routingewd_type=routing;type=c,c;code=I33,B2
I33-19 (AC1) - B2-9 (AC1) Always Below 1 Ω I33-3 (ACT) - B2-17 (ACT) Always Below 1 Ω I33-19 (AC1) or B2-9 (AC1) - Other terminals and body ground Always 10 kΩ or higher I33-3 (ACT) or B2-17 (ACT) - Other terminals and body ground Always 10 kΩ or higher
- for V35A-FTS:
-
Tester Connection Condition Specified Condition Click Location & Routing(I33,B1)Location & Routingewd_type=routing;type=c,c;code=I33,B1
I33-19 (AC1) - B1-61 (AC1) Always Below 1 Ω I33-3 (ACT) - B1-52 (ACT) Always Below 1 Ω I33-19 (AC1) or B1-61 (AC1) - Other terminals and body ground Always 10 kΩ or higher I33-3 (ACT) or B1-52 (ACT) - Other terminals and body ground Always 10 kΩ or higher
- Result:
-
Proceed to OK NG
Post-procedure1
None
OK
NG
Pre-procedure1
Remove the air conditioning amplifier assembly with its connectors still connected.
Click hereVehicle Interior>HEATING / AIR CONDITIONING>AIR CONDITIONING AMPLIFIER>REMOVAL
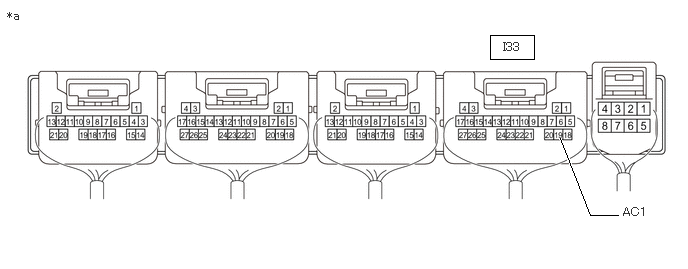
| *a | Component with harness connected (Air Conditioning Amplifier Assembly) |
- | - |
Procedure1
Measure the voltage according to the value(s) in the table below.
- Standard Voltage:
-
Tester Connection Condition Specified Condition Click Location & Routing(I33)Location & Routingewd_type=routing;type=c;code=I33
I33-19 (AC1) - Body ground ·Engine running
·Blower switch: On (LO level)
·A/C switch: On
Below 1 V I33-19 (AC1) - Body ground ·Engine running
·Blower switch: On (LO level)
·A/C switch: Off
11 to 14 V
- Result:
-
Proceed to OK NG
Post-procedure1
None
OK
NG
Pre-procedure1
Remove the air conditioning amplifier assembly with its connectors still connected.
Click hereVehicle Interior>HEATING / AIR CONDITIONING>AIR CONDITIONING AMPLIFIER>REMOVAL
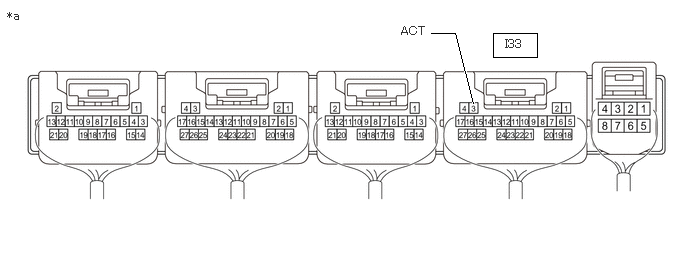
| *a | Component with harness connected (Air Conditioning Amplifier Assembly) |
- | - |
Procedure1
Measure the voltage according to the value(s) in the table below.
- Standard Voltage:
-
Tester Connection Condition Specified Condition Click Location & Routing(I33)Location & Routingewd_type=routing;type=c;code=I33
I33-3 (ACT) - Body ground ·Engine running
·Blower switch: LO
·A/C switch: Off or on (magnet clutch off)
Below 1 V I33-3 (ACT) - Body ground ·Engine running
·Blower switch: LO
·A/C switch: On (magnet clutch on)
4.5 to 5.5 V
- Result:
-
Proceed to OK NG
Post-procedure1
None
OK
NG
for 1GR-FE:Vehicle Interior>HEATING / AIR CONDITIONING>COMPRESSOR (for 1GR-FE)>INSPECTION
for V35A-FTS:Vehicle Interior>HEATING / AIR CONDITIONING>COMPRESSOR (for V35A-FTS)>INSPECTION
- Result:
-
Proceed to OK NG
OK
NG
Pre-procedure1
Remove the air conditioning amplifier assembly with its connectors still connected
Click hereVehicle Interior>HEATING / AIR CONDITIONING>AIR CONDITIONING AMPLIFIER>REMOVAL
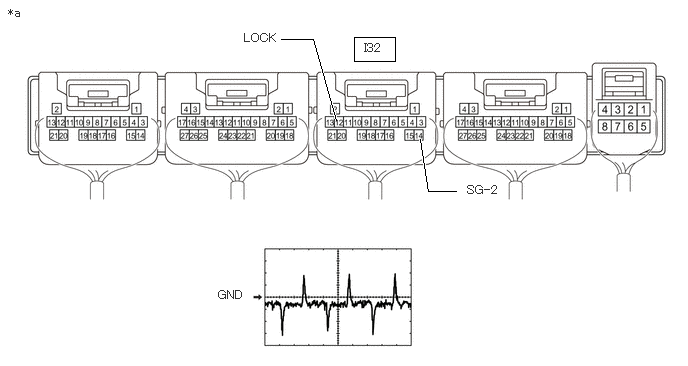
| *a | Component with harness connected (Air Conditioning Amplifier Assembly) |
- | - |
Procedure1
Using an oscilloscope, check the waveform.
| Tester Connection | Tool Setting | Condition |
|---|---|---|
Click Location & Routing(I32)Location & Routingewd_type=routing;type=c;code=I32 |
||
| I32-12 (LOCK) - I32-14 (SG-2) | 200 mV/DIV., 10 ms/DIV. |
·
Engine idling
·
A/C switch: On (magnet clutch on)
·
Blower switch: LO |
- OK:
-
Waveform is as shown in the illustration.
- Result:
-
Proceed to OK NG
Post-procedure1
None
OK
NG
Pre-procedure1
Disconnect the I32 air conditioning amplifier assembly connector.
Disconnect the C39 compressor with magnet clutch connector.
Procedure1
Measure the resistance according to the value(s) in the table below.
- Standard Resistance:
-
Tester Connection Condition Specified Condition Click Location & Routing(I32,C39)Location & Routingewd_type=routing;type=c,c;code=I32,C39
I32-12 (LOCK) - C39-3 (SSR+) Always Below 1 Ω I32-14 (SG-2) - C39-2 (SSR-) Always Below 1 Ω C39-3 (SSR+) - C39-2 (SSR-) Always 10 kΩ or higher I32-12 (LOCK) or C39-3 (SSR+) - Other terminals and body ground Always 10 kΩ or higher I32-14 (SG-2) or C39-2 (SSR-) - Other terminals and body ground Always 10 kΩ or higher
- Result:
-
Proceed to OK NG
Post-procedure1
None
OK
NG