DOOR / HATCH FRONT DOOR REASSEMBLY
CAUTION / NOTICE / HINT
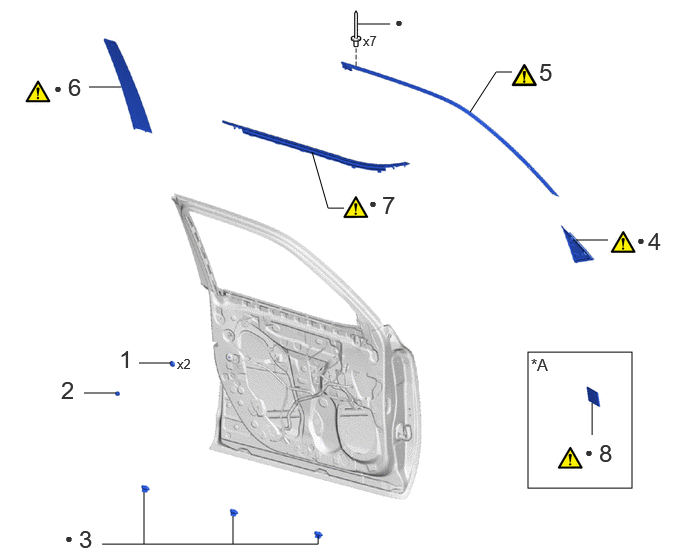
| Procedure | Part Name Code |

|

|

|
|
|---|---|---|---|---|---|
| 1 | HOLE COVER | - | - | - | - |
| 2 | FRONT DOOR PANEL CUSHION | 67001A | - | - | - |
| 3 | FRONT DOOR DUST PROOF SEAL | 67837B | - | - | - |
| 4 | FRONT DOOR FRONT LOWER FRAME UPPER COVER | 67496C | ( ) |
- | - |
| 5 | FRONT DOOR UPPER WINDOW FRAME MOULDING | 75754A | () |
- | - |
| 6 | FRONT DOOR REAR WINDOW FRAME MOULDING | 75756C | () |
- | - |
| 7 | FRONT DOOR BELT MOULDING ASSEMBLY | 75720 | () |
- | - |
| 8 | FRONT FENDER NO. 1 NAME PLATE | 75361A | () |
||
| *A | for GR SPORT | - | - |
| ● | Non-reusable part | - | - |
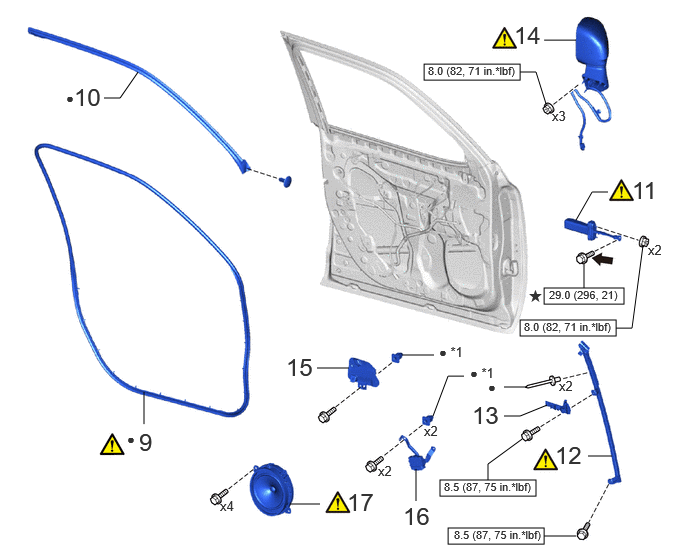
| Procedure | Part Name Code |
|
|
|
|
|---|---|---|---|---|---|
| 9 | FRONT DOOR WEATHERSTRIP | 67862 | () |
- | - |
| 10 | FRONT DOOR NO. 2 WEATHERSTRIP | 67864H | - | - | - |
| 11 | FRONT DOOR CHECK ASSEMBLY | 68620 | () |
- | - |
| 12 | FRONT DOOR FRONT LOWER FRAME SUB-ASSEMBLY | 67420F | () |
- | - |
| 13 | FRONT DOOR VENT SEAL | 67838D | - | - | - |
| 14 | OUTER REAR VIEW MIRROR ASSEMBLY | 87940 | () |
- | - |
| 15 | OUTER MIRROR INSTALL HOLE COVER | 87964 | - | - | - |
| 16 | OUTER MIRROR CONTROL ECU ASSEMBLY | 89430A | - | - | - |
| 17 | FRONT NO. 1 SPEAKER ASSEMBLY | 86160 | () |
- | - |
| *1 | GROMMET | - | - |

|
N*m (kgf*cm, ft.*lbf): Specified torque | ● | Non-reusable part |

|
Toyota Genuine Adhesive 1324, Three Bond 1324 or equivalent | ★ | Precoated part |
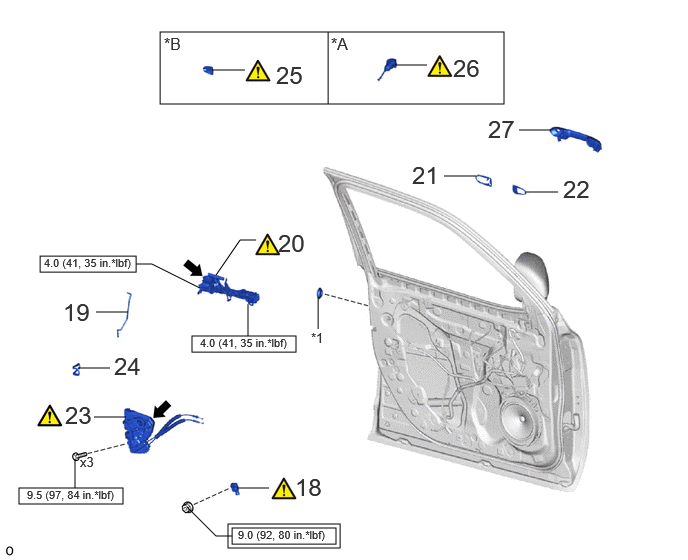
| Procedure | Part Name Code |
|
|
|
|
|---|---|---|---|---|---|
| 18 | SIDE AIRBAG PRESSURE SENSOR | 8983AA | () |
- | - |
| 19 | FRONT DOOR LOCK OPEN ROD | 69312 | - | - | - |
| 20 | FRONT DOOR OUTSIDE HANDLE FRAME SUB-ASSEMBLY | 69202A | () |
- | - |
| 21 | FRONT DOOR LOCK WITH MOTOR ASSEMBLY | 69040A | () |
- | - |
| 22 | DOOR LOCK COVER SET | 69032 | - | - | - |
| 23 | FRONT DOOR OUTSIDE HANDLE REAR PAD | 69242E | - | - | - |
| 24 | FRONT DOOR OUTSIDE HANDLE FRONT PAD | 69241H | - | - | - |
| 25 | FRONT DOOR OUTSIDE HANDLE COVER | 69217D | () |
- | - |
| 26 | FRONT DOOR LOCK CYLINDER ASSEMBLY | - | () |
- | - |
| 27 | FRONT DOOR OUTSIDE HANDLE ASSEMBLY | 69220 | - | - | - |
| *A | for Driver Side | *B | for Front Passenger Side |
| *1 | HOLE PLUG | - | - |

|
Tightening torque for "Major areas involving basic vehicle performance such as moving/turning/stopping" : N*m (kgf*cm, ft.*lbf) |
|
N*m (kgf*cm, ft.*lbf): Specified torque |
|
|
MP Grease | - | - |
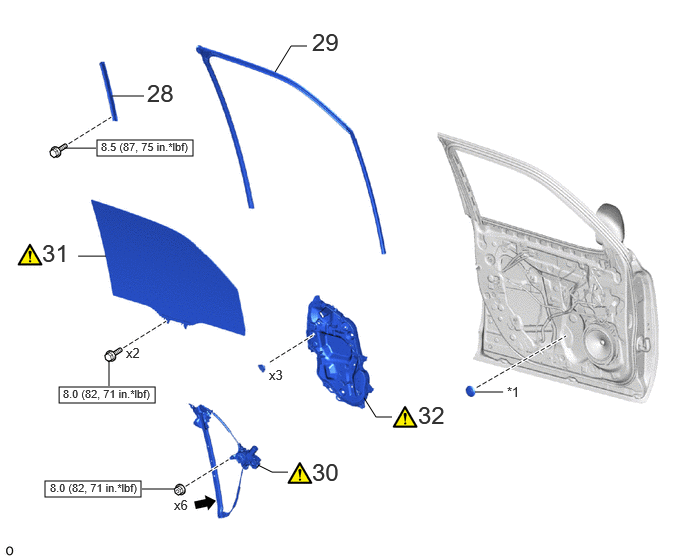
| Procedure | Part Name Code |
|
|
|
|
|---|---|---|---|---|---|
| 28 | FRONT DOOR REAR LOWER FRAME SUB-ASSEMBLY | 69802 | - | - | - |
| 29 | FRONT DOOR GLASS RUN | 68151E | - | - | - |
| 30 | FRONT DOOR WINDOW REGULATOR SUB-ASSEMBLY | 69802 | () |
- | - |
| 31 | FRONT DOOR GLASS SUB-ASSEMBLY | 68102 | () |
- | - |
| 32 | FRONT DOOR SERVICE HOLE COVER | 67832 | () |
- | - |
| *1 | HOLE PLUG | - | - |
|
|
N*m (kgf*cm, ft.*lbf): Specified torque |
|
MP Grease |
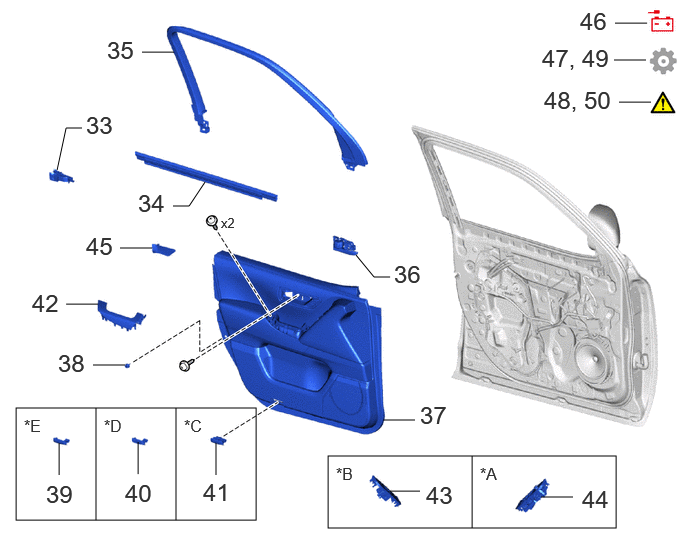
| Procedure | Part Name Code |
|
|
|
|
|---|---|---|---|---|---|
| 33 | FRONT DOOR PANEL PROTECTOR | 67856B | - | - | - |
| 34 | FRONT DOOR GLASS INNER WEATHERSTRIP | 68172A | - | - | - |
| 35 | DOOR FRAME GARNISH | 67664C | - | - | - |
| 36 | FRONT DOOR INSIDE HANDLE SUB-ASSEMBLY | 69206B | - | - | - |
| 37 | FRONT DOOR TRIM BOARD SUB-ASSEMBLY | 67602 | - | - | - |
| 38 | NO. 1 FRONT DOOR STIFFENER CUSHION | 67923E | - | - | - |
| 39 | FRONT DOOR HOLE COVER | 67811C | - | - | - |
| 40 | REFLEX REFLECTOR ASSEMBLY | 81580C | - | - | - |
| 41 | COURTESY LIGHT ASSEMBLY | 81230 | - | - | - |
| 42 | FRONT DOOR ARMREST COVER | 74222A | - | - | - |
| 43 | POWER WINDOW REGULATOR SWITCH ASSEMBLY WITH FRONT DOOR ARMREST BASE PANEL | - | - | - | - |
| 44 | MULTIPLEX NETWORK MASTER SWITCH ASSEMBLY WITH FRONT DOOR ARMREST BASE PANEL | - | - | - | - |
| 45 | FRONT DOOR TRIM UPPER COVER | 67782 | - | - | - |
| 46 | CONNECT CABLE TO NEGATIVE AUXILIARY BATTERY TERMINAL | - | - | - | - |
| 47 | INITIALIZATION AFTER RECONNECTING AUXILIARY BATTERY TERMINAL | - | - | - | () |
| 48 | INSPECT SRS WARNING LIGHT | - | () |
- | - |
| 49 | INITIALIZE POWER WINDOW CONTROL SYSTEM | - | - | - | () |
| 50 | INSPECT POWER WINDOW SYSTEM | - | () |
- | - |
| *A | for Drive Side | *B | for Front Passenger Side |
| *C | w/ Courtesy Light | *D | w/ Reflex Reflector Assembly |
| *E | w/ Cover | - | - |
CAUTION / NOTICE / HINT
- HINT:
-
·
Use the same procedure for the LH side and RH side.
·The following procedure is for the LH side.
PROCEDURE

 1.INSTALL HOLE COVER
67001A 2.INSTALL FRONT DOOR PANEL CUSHION
67837B 3.INSTALL FRONT DOOR DUST PROOF SEAL
67496C 4.INSTALL FRONT DOOR FRONT LOWER FRAME UPPER COVER
|
|
Click here() |
75754A 5.INSTALL FRONT DOOR UPPER WINDOW FRAME MOULDING
|
|
Click here() |
75756C 6.INSTALL FRONT DOOR REAR WINDOW FRAME MOULDING
|
|
Click here() |
75720 7.INSTALL FRONT DOOR BELT MOULDING ASSEMBLY
|
|
Click here() |
75361A 8.INSTALL FRONT FENDER NO. 1 NAME PLATE (for GR SPORT)
|
|
Click here() |
67862 9.INSTALL FRONT DOOR WEATHERSTRIP
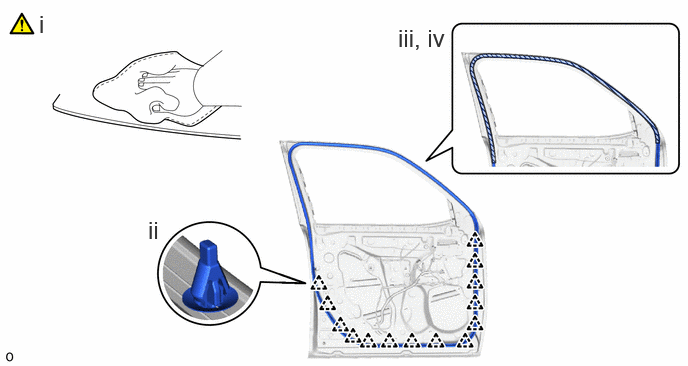
Clean vehicle installation surface.
Engage the clips to install a new front door weatherstrip.
Remove the release paper.
Press the double-side tape area of the front door weatherstrip.
67864H 10.INSTALL FRONT DOOR NO. 2 WEATHERSTRIP
68620 11.INSTALL FRONT DOOR CHECK ASSEMBLY
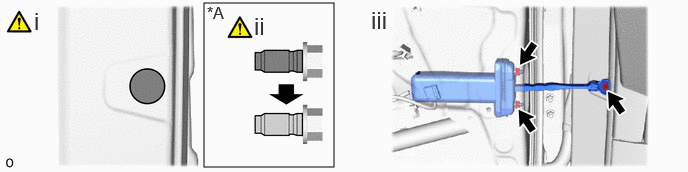
| *A | When reusing the bolt | - | - |

|
Clean the thread |

|
Apply Adhesive 1324 |
Clean the bolt hole in the vehicle body.
When reusing the bolt:
1. Clean the threads of the bolt.
2. Apply adhesive to the threads of the bolt.
- Adhesive:
-
Toyota Genuine Adhesive 1324, Three Bond 1324 or equivalent.
Install the front door check assembly with the 2 nuts and bolt.
- Torque:
- Bolt : 29.0 N*m (296 kgf*cm, 21 ft.*lbf)
- Nut : 8.0 N*m (82 kgf*cm, 71 in.*lbf)
67402F 12.INSTALL FRONT DOOR FRONT LOWER FRAME SUB-ASSEMBLY
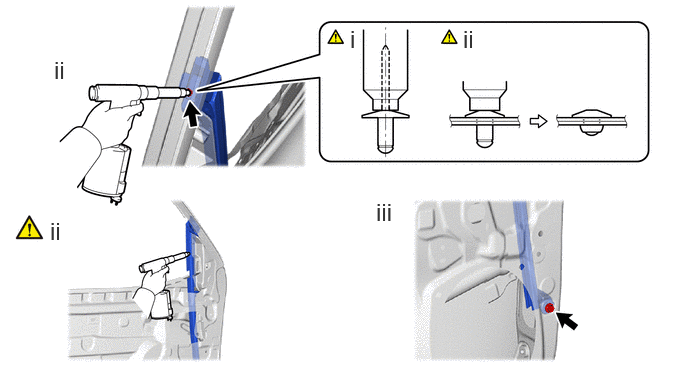
Install the No. 4 nose piece to an air riveter and insert the mandrel section of a new φ 4 mm rivet into the nose piece.
Press the rivets perpendicularly to the installation holes. Using the air riveter, install the front door front lower frame sub-assembly with the 2 rivets.
- NOTICE:
-
·
When installing the rivets to the panel surface, do not tilt the riveter.
·Do not leave a gap between the rivet head portion and the panel.
- HINT:
-
Pull the trigger again to cut off the rivet if it is not cut off.
Install the front door front lower frame sub-assembly with the bolt.
- Torque:
- 8.5 N*m (87 kgf*cm, 75 in.*lbf)
67838D 13.INSTALL FRONT DOOR VENT SEAL
- Torque:
- 8.5 N*m (87 kgf*cm, 75 in.*lbf)
87940 14.INSTALL OUTER REAR VIEW MIRROR ASSEMBLY
|
|
Click here() |
87964 15.INSTALL OUTER MIRROR INSTALL HOLE COVER
89430A 16.INSTALL OUTER MIRROR CONTROL ECU ASSEMBLY
86160 17.INSTALL FRONT NO. 1 SPEAKER ASSEMBLY
|
|
Click here() |
8983AA 18.INSTALL SIDE AIRBAG PRESSURE SENSOR
|
|
Click here() |
69312 19.INSTALL FRONT DOOR LOCK OPEN ROD
69202A 20.INSTALL FRONT DOOR OUTSIDE HANDLE FRAME SUB-ASSEMBLY
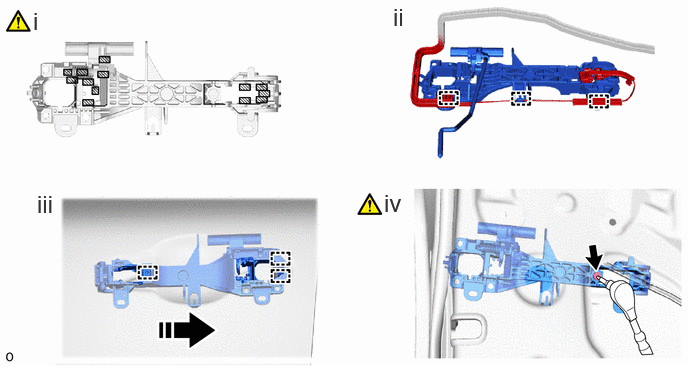

|
MP Grease |

|
Install in this Direction |
Apply MP grease to the sliding parts on the front door outside handle frame sub-assembly.
Engage the guide and clamps as shown in the illustration.
Engage the 3 guides.
Using a T30 "TORX" socket wrench, install the front door outside handle frame sub-assembly with the screw.
- Torque:
- 4.0 N*m (41 kgf*cm, 35 in.*lbf)
69242E 21.INSTALL FRONT DOOR OUTSIDE HANDLE REAR PAD
69241H 22.INSTALL FRONT DOOR OUTSIDE HANDLE FRONT PAD
69040A 23.INSTALL FRONT DOOR LOCK WITH MOTOR ASSEMBLY
|
|
Click here() |
69032 24.INSTALL DOOR LOCK COVER SET
69217D 25.INSTALL FRONT DOOR OUTSIDE HANDLE COVER (for Front Passenger Side)
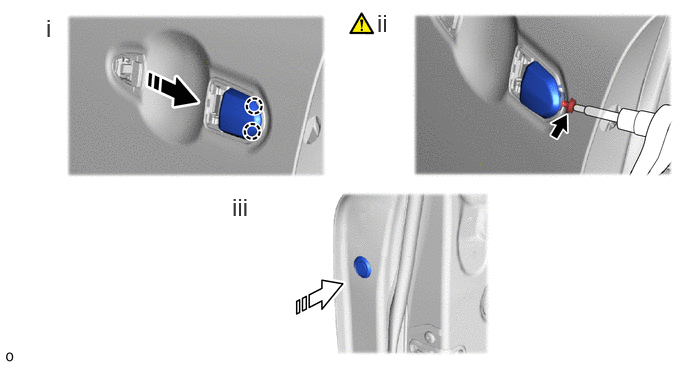
|
|
Install in this Direction (1) |

|
Install in this Direction (2) |
Engage the claws to install the front door outside handle cover as shown in the illustration.
Using a T30 "TORX" socket wrench, install the front door outside handle cover with "TORX" screw.
- Torque:
- 4.0 N*m (41 kgf*cm, 35 in.*lbf)
Install the hole plug.
26.INSTALL FRONT DOOR LOCK CYLINDER ASSEMBLY (for Driver Side)
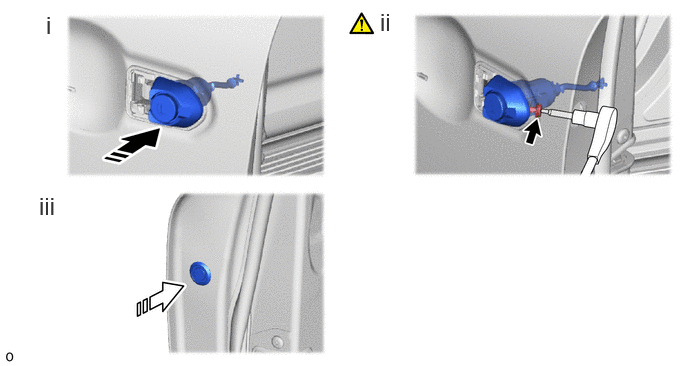
|
|
Install in this Direction (1) |
|
Install in this Direction (2) |
Install the front door lock cylinder assembly as shown in the illustration.
Using a T30 "TORX" socket wrench, install the front door lock cylinder assembly with "TORX" screw.
- Torque:
- 4.0 N*m (41 kgf*cm, 35 in.*lbf)
Install the hole plug.
69220 27.INSTALL FRONT DOOR OUTSIDE HANDLE ASSEMBLY
69802 28.INSTALL FRONT DOOR REAR LOWER FRAME SUB-ASSEMBLY
- Torque:
- 8.5 N*m (87 kgf*cm, 75 in.*lbf)
68151E 29.INSTALL FRONT DOOR GLASS RUN
69802 30.INSTALL FRONT DOOR WINDOW REGULATOR SUB-ASSEMBLY
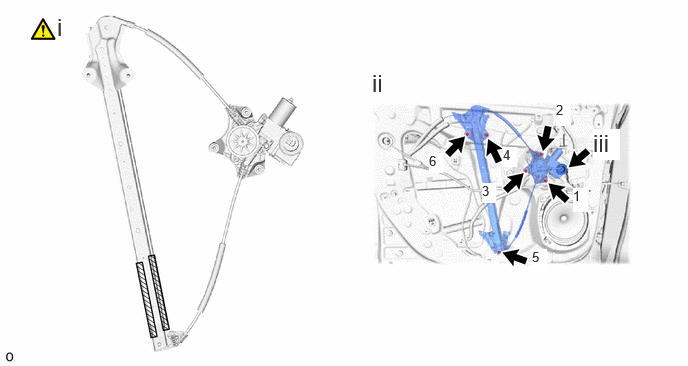
|
|
MP Grease | - | - |
Apply MP grease to the sliding parts of the front door window regulator assembly.
Tighten the nuts in the order shown in the illustration.
- Torque:
- 8.0 N*m (82 kgf*cm, 71 in.*lbf)
Connect the connector.
68102 31.INSTALL FRONT DOOR GLASS SUB-ASSEMBLY
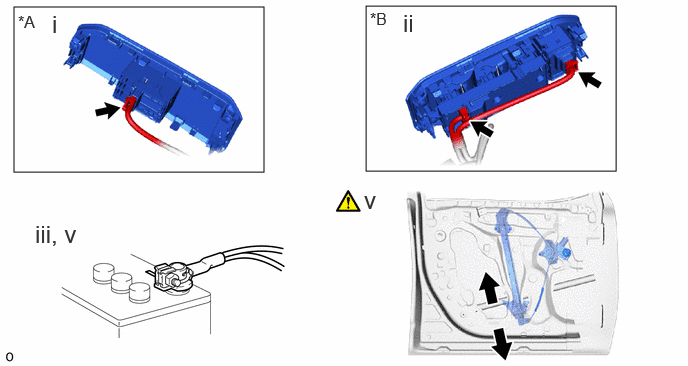
| *A | for Front Passenger Side | *B | for Driver Side |
for Front Passenger Side:
1. Connect the connector to the power window regulator switch assembly with front door armrest base panel.
for Driver Side:
1. Connect the 2 connectors to the multiplex network master switch assembly with front door armrest base panel.
Connect the cable to the negative (-) auxiliary battery terminal.
for 1GR-FE:
for V35A-FTS:
for F33A-FTV:
Turn the ignition switch to ON.
Move the front door window regulator assembly so that the door glass bolt holes can be seen and turn the ignition switch to OFF.
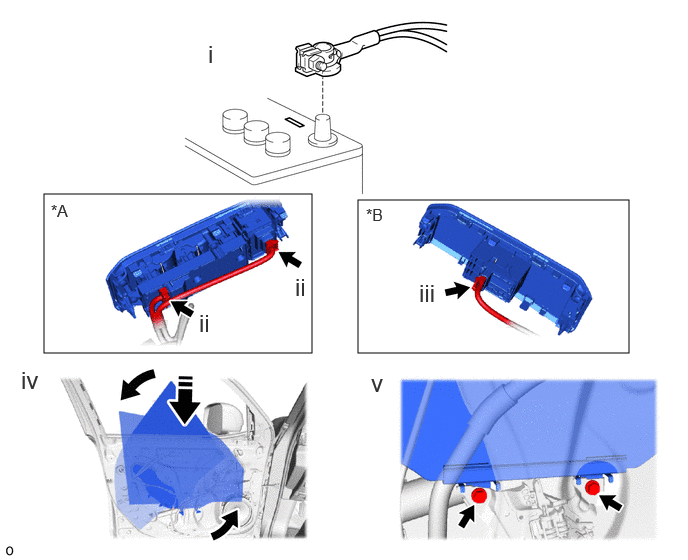
| *A | for Driver Side | *B | for Front Passenger Side |
|
|
Install in this Direction | - | - |
Disconnect the cable from the negative (-) auxiliary battery terminal.
for 1GR-FE:
for V35A-FTS:
for F33A-FTV:
for Driver Side:
1. Disconnect the 2 connectors form the multiplex network master switch assembly with front door armrest base panel LH.
for Front Passenger Side:
1. Disconnect the connector from the power window regulator switch assembly with front door armrest base panel RH.
Insert the front door glass sub-assembly into the front door panel along the front door glass run as shown in the illustration.
- CAUTION:
-
Do not damage to front door glass sub-assembly.
Install the front door glass sub-assembly with the 2 bolts.
- Torque:
- 8.0 N*m (82 kgf*cm, 71 in.*lbf)
67832 32.INSTALL FRONT DOOR SERVICE HOLE COVER
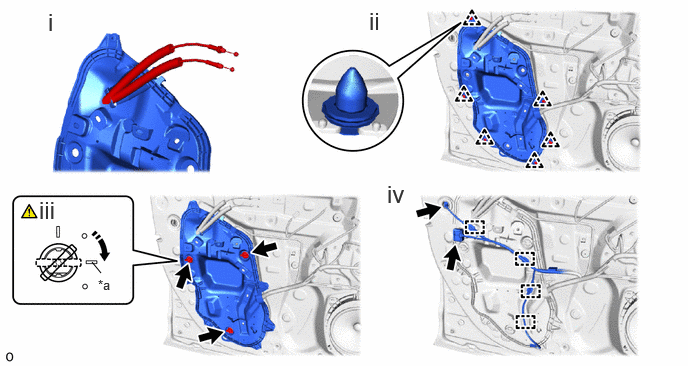
| *a | Bead Mark | - | - |
|
|
Turn in this Direction | - | - |
Pass the front door lock remote control cable assembly and front door inside locking cable assembly from the front door service hole cover.
Engage the 6 clips.
Insert the 3 front door service hole cover clips and turn them 45° as shown in the illustration.
Engage the 4 clamps and connect the 2 connectors.
67856B 33.INSTALL FRONT DOOR PANEL PROTECTOR
68172A 34.INSTALL FRONT DOOR GLASS INNER WEATHERSTRIP
67664C 35.INSTALL DOOR FRAME GARNISH
69206B 36.INSTALL FRONT DOOR INSIDE HANDLE SUB-ASSEMBLY
67602 37.INSTALL FRONT DOOR TRIM BOARD SUB-ASSEMBLY
67923E 38.INSTALL NO. 1 FRONT DOOR STIFFENER CUSHION
67811C 39.INSTALL FRONT DOOR HOLE COVER (w/ Cover)
81580C 40.INSTALL REFLEX REFLECTOR ASSEMBLY (w/ Reflex Reflector Assembly)
81230 41.INSTALL COURTESY LIGHT ASSEMBLY (w/ Courtesy Light)
74222A 42.INSTALL FRONT DOOR ARMREST COVER
43.INSTALL POWER WINDOW REGULATOR SWITCH ASSEMBLY WITH FRONT DOOR ARMREST BASE PANEL (for Front Passenger Side)
44.INSTALL MULTIPLEX NETWORK MASTER SWITCH ASSEMBLY WITH FRONT DOOR ARMREST BASE PANEL (for Driver Side)
67782 45.INSTALL FRONT DOOR TRIM UPPER COVER
46.CONNECT CABLE TO NEGATIVE AUXILIARY BATTERY TERMINAL
for 1GR-FE:
for V35A-FTS:
for F33A-FTV:
47. INITIALIZATION AFTER RECONNECTING AUXILIARY BATTERY TERMINAL
Click hereGeneral>SETUP>WHEN DISCONNECTING OR RECONNECTING BATTERY TERMINAL>WORK PROCEDURE
- HINT:
-
When disconnecting and reconnecting the battery, there is an automatic learning function that completes learning when the respective system is used.
-
Click hereGeneral>SETUP>WHEN DISCONNECTING OR RECONNECTING BATTERY TERMINAL>AUTOMATIC LEARNING CHART
48.INSPECT SRS WARNING LIGHT
49. INITIALIZE POWER WINDOW CONTROL SYSTEM
50.INSPECT POWER WINDOW SYSTEM