F33A-FTV ENGINE CONTROL ECD SYSTEM(w/ DPF) P023A15 Charge Air Cooler Coolant Pump Control Circuit Short to Battery or Open
DESCRIPTION
Refer to DTC P023A12.
Click hereEngine / Hybrid System>F33A-FTV (ENGINE CONTROL)>ECD SYSTEM (w/ DPF)>P023A12
| DTC No. | Detection Item | DTC Detection Condition | Trouble Area | MIL | Note |
|---|---|---|---|---|---|
| P023A15 | Charge Air Cooler Coolant Pump Control Circuit Short to Battery or Open | When the electric water pump assembly speed is below 10 rpm, the IWPI input is continuously equal to or more than the judgment value for 14.5 seconds or more. (1 trip detection logic) |
·
Open or short in electric water pump assembly circuit
·
Electric water pump assembly
·
EFI MAIN NO. 2 relay
·
ECM |
Comes on | SAE Code: P2CA1 |
| DTC No. | Data List |
|---|---|
| P023A15 |
·
Intercooler Water Pump Speed
·
Intercooler Water Pump |
MONITOR DESCRIPTION
The ECM calculates the speed of the electric water pump assembly by using the rotational duty signal (IWPI) sent from the electric water pump assembly.
A 4 Hz duty signal (IWPI) is output even when the pump is stopped. The ECM then converts the electric water pump assembly rotational duty signal (IWPI) into the speed and checks that it is 160 rpm when the pump is stopped.
If the electric water pump assembly speed is below 10 rpm and the IWPI input level is high this DTC is stored.
CONFIRMATION DRIVING PATTERN
| DTC No. | DTC Detection Drive Pattern |
|---|---|
| P023A15 | After fully warming up, increase and maintain the engine speed so that the intercooler water pump duty ratio is 30% or more for 3 seconds or longer. |
WIRING DIAGRAM
Refer to DTC P023A12.
Click hereEngine / Hybrid System>F33A-FTV (ENGINE CONTROL)>ECD SYSTEM (w/ DPF)>P023A12
CAUTION / NOTICE / HINT
- NOTICE:
-
·
Inspect the fuses for circuits related to this system before performing the following procedure.
·After replacing the ECM, the new ECM needs registration (Click here Engine / Hybrid System>F33A-FTV (ENGINE CONTROL)>ECD SYSTEM (w/ DPF)>REGISTRATION) and initialization (Click here Engine / Hybrid System>F33A-FTV (ENGINE CONTROL)>ECD SYSTEM (w/ DPF)>INITIALIZATION).
·After replacing the ECM and performing "LEARNING VALUES WRITE", select "PM Regenerate Mode" using Utility of the GTS to perform PM forced regeneration.
Click hereEngine / Hybrid System>F33A-FTV (EMISSION CONTROL)>EMISSION CONTROL SYSTEM>ON-VEHICLE INSPECTION
- HINT:
-
Read Freeze Frame Data using the GTS. The ECM records vehicle and driving condition information as Freeze Frame Data the moment a DTC is stored. When troubleshooting, Freeze Frame Data can help determine if the vehicle was moving or stationary, if the engine was warmed up or not, if the air fuel ratio was lean or rich, and other data from the time the malfunction occurred.
PROCEDURE
Enter the following menus: Powertrain / Engine / Active Test / Control the Intercooler Water Pump.
Perform the Active Test. Check that the electric water pump assembly is operating (vibrating).
- Powertrain > Engine > Active Test
-
Tester Display Control the Intercooler Water Pump - 50004 372 9
- OK:
-
The electric water pump assembly is operating (vibrating).
- HINT:
-
Use a sound scope if the operation is difficult to check.
- Result:
-
Proceed to OK NG
OK
NG
Disconnect the electric water pump assembly connector.
Measure the voltage according to the value(s) in the table below.
- Standard Voltage:
-
Tester Connection Switch Condition Specified Condition Click Location & Routing(B29)Location & Routingewd_type=routing;type=c;code=B29
B29-2 (NWP) - Body ground Ignition switch off Below 1 V B29-2 (NWP) - Body ground Ignition switch ON 11 to 14 V
- Result:
-
Proceed to OK NG
NG
OK
Disconnect the electric water pump assembly connector.
Disconnect the ECM connector.
Measure the resistance according to the value(s) in the table below.
- Standard Resistance:
-
Tester Connection Condition Specified Condition Click Location & Routing(B29,B70)Location & Routingewd_type=routing;type=c,c;code=B29,B70
B29-2 (NWP) - B70-38 (IWPI) Always Below 1 Ω B29-2 (NWP) or B70-38 (IWPI) - Body ground and other terminals Always 10 kΩ or higher
- Result:
-
Proceed to OK NG
OK
NG
Disconnect the electric water pump assembly connector.
Measure the resistance according to the value(s) in the table below.
- Standard Resistance:
-
Tester Connection Condition Specified Condition Click Location & Routing(B29)Location & Routingewd_type=routing;type=c;code=B29
B29-1 (GND) - Body ground Always Below 1 Ω
- Result:
-
Proceed to OK NG
OK
NG
Click hereEngine / Hybrid System>F33A-FTV (ENGINE CONTROL)>RELAY>ON-VEHICLE INSPECTION
- Result:
-
Proceed to OK NG
OK
NG
Disconnect the electric water pump assembly connector.
Turn the ignition switch to ON.
Measure the voltage according to the value(s) in the table below.
- Standard Voltage:
-
Tester Connection Switch Condition Specified Condition Click Location & Routing(B29)Location & Routingewd_type=routing;type=c;code=B29
B29-4 (+B) - Body ground Ignition switch ON 11 to 14 V
- Result:
-
Proceed to OK NG
OK
NG
Remove the EFI MAIN NO. 2 relay from the No. 4 engine room relay block and junction block assembly.
Disconnect the electric water pump assembly connector.
Measure the resistance according to the value(s) in the table below.
- Standard Resistance:
-
Tester Connection Condition Specified Condition Click Location & Routing(B29)Location & Routingewd_type=routing;type=c;code=B29
EFI MAIN NO. 2 relay terminal 3 - B29-4 (+B) Always Below 1 Ω EFI MAIN NO. 2 relay terminal 3 or B29-4 (+B) - Body ground and other terminals Always 10 kΩ or higher
- Result:
-
Proceed to OK NG
OK
NG
Remove the EFI MAIN NO. 2 relay from the No. 4 engine room relay block and junction block assembly.
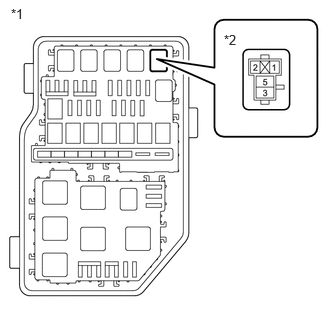
| *1 | No. 4 Engine Room Relay Block and Junction Block Assembly |
| *2 | EFI MAIN NO. 2 Relay |
Measure the voltage according to the value(s) in the table below.
- Standard Voltage:
-
Tester Connection Condition Specified Condition EFI MAIN NO. 2 relay terminal 5 - Body ground Always 11 to 14 V
- Result:
-
Proceed to OK NG
OK
NG
Remove the EFI MAIN NO. 2 relay from the No. 4 engine room relay block and junction block assembly.
Measure the resistance according to the value(s) in the table below.
- Standard Resistance:
-
Tester Connection Condition Specified Condition EFI MAIN NO. 2 relay terminal 2 - Body ground Always Below 1 Ω
- Result:
-
Proceed to OK NG
OK
NG
Remove the EFI MAIN NO. 2 relay from the No. 4 engine room relay block and junction block assembly.
Remove the EFI MAIN NO. 1 relay from the No. 3 engine room relay block and junction block assembly.
Measure the resistance according to the value(s) in the table below.
- Standard Resistance:
-
Tester Connection Condition Specified Condition EFI MAIN NO. 2 relay terminal 1 - EFI MAIN NO. 1 relay terminal 5 Always Below 1 Ω EFI MAIN NO. 2 relay terminal 1 or EFI MAIN NO. 1 relay terminal 5 - Body ground and other terminals Always 10 kΩ or higher
- Result:
-
Proceed to OK NG
OK
Click hereEngine / Hybrid System>F33A-FTV (ENGINE CONTROL)>ECD SYSTEM (w/ DPF)>ECM Power Source Circuit
NG