F33A-FTV EMISSION CONTROL EXHAUST GAS TEMPERATURE SENSOR(for DPF) REMOVAL
CAUTION / NOTICE / HINT
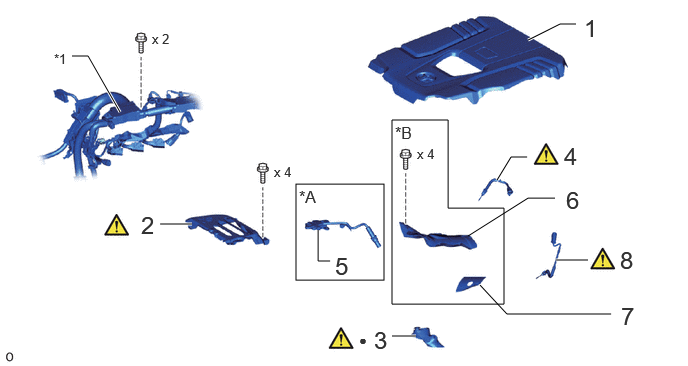
| Procedure | Part Name Code |

|

|

|
|
|---|---|---|---|---|---|
| 1 | NO. 1 ENGINE COVER SUB-ASSEMBLY | 12601B | - | - | - |
| 2 | INTERCOOLER INSULATOR | 17951 | ( ) |
- | - |
| 3 | EXHAUST FUEL ADDITION INJECTOR HEAT INSULATOR | 23600G | () |
- | - |
| 4 | EXHAUST GAS TEMPERATURE SENSOR | 89425 | () |
- | |
| 5 | NO. 1 NITROGEN OXIDES SENSOR | 89463C | () |
- | - |
| 6 | INTAKE PIPE INSULATOR | 17117A | - | - | - |
| 7 | NO. 3 EXHAUST MANIFOLD HEAT INSULATOR | 17169 | () |
- | - |
| 8 | NO. 2 EXHAUST GAS TEMPERATURE SENSOR | 89425A | () |
- | - |
| *A | w/ Urea SCR System | *B | w/o Urea SCR System |
| *1 | Engine wire | - | - |
| ● | Non-reusable part | - | - |
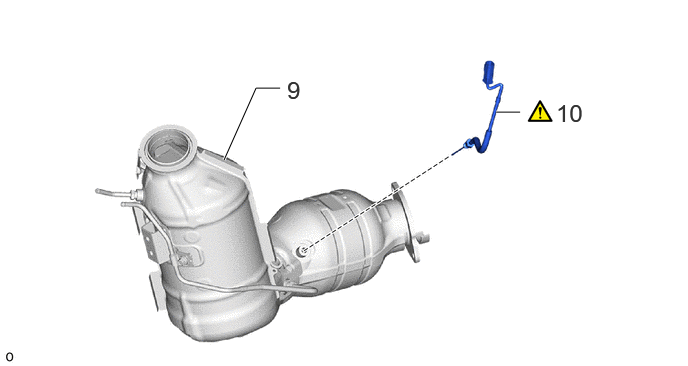
| Procedure | Part Name Code |
|
|
|
|
|---|---|---|---|---|---|
| 9 | FRONT EXHAUST PIPE ASSEMBLY | 17410 | - | - | - |
| 10 | NO. 3 EXHAUST GAS TEMPERATURE SENSOR | 89425B | () |
- | - |
The necessary procedures (adjustment, calibration, initialization, or registration) that must be performed after parts are removed, installed, or replaced during the No. 3 exhaust gas temperature sensor removal/installation are shown below.
| Replacement Part or Procedure | Necessary Procedures | Effects/Inoperative when not Performed | Link |
|---|---|---|---|
| Front exhaust pipe sub-assembly |
·
Catalyst Deterioration Learning Value Clear
·
DPF Deposition Value Clear |
DTC P246300 is output | () |
| Nitrogen oxides sensor (w/ Urea SCR System) | A/F sensor Leaning Value Clear | - |
- CAUTION:
-
To prevent burns, do not touch the engine, exhaust manifold or other high temperature components while the engine is hot.
PROCEDURE

 12601B 1.REMOVE NO. 1 ENGINE COVER SUB-ASSEMBLY
17951 2.REMOVE INTERCOOLER INSULATOR
|
|
|
23600G 3.REMOVE EXHAUST FUEL ADDITION INJECTOR HEAT INSULATOR
|
|
|
89425 4.REMOVE EXHAUST GAS TEMPERATURE SENSOR
|
|
|
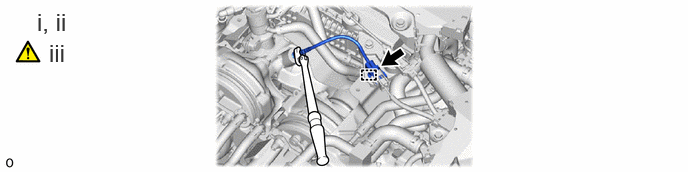
Disconnect the connector.
Detach the clamp.
Using a 14 mm union nut wrench, remove the exhaust gas temperature sensor from the exhaust manifold converter sub-assembly.
- NOTICE:
-
If the exhaust gas temperature sensor has been struck or dropped, replace it.
89463C 5.REMOVE NO. 1 NITROGEN OXIDES SENSOR (w/ Urea SCR System)
17117A 6.REMOVE INTAKE PIPE INSULATOR (w/o Urea SCR System)
17169 7.REMOVE NO. 3 EXHAUST MANIFOLD HEAT INSULATOR (w/o Urea SCR System)

89425A 8.REMOVE NO. 2 EXHAUST GAS TEMPERATURE SENSOR
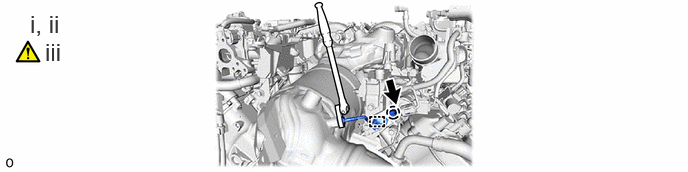
Disconnect the connector.
Detach the clamp.
Using a 14 mm union nut wrench, remove the No. 2 exhaust gas temperature sensor from the exhaust manifold converter sub-assembly.
- NOTICE:
-
If the exhaust gas temperature sensor has been struck or dropped, replace it.
17410 9.REMOVE FRONT EXHAUST PIPE ASSEMBLY
89425B 10.REMOVE NO. 3 EXHAUST GAS TEMPERATURE SENSOR
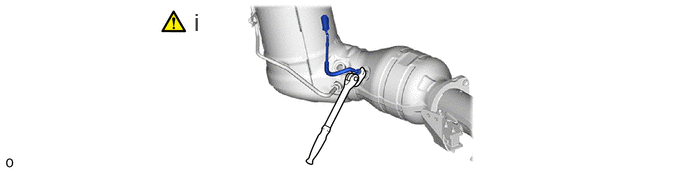
Using a 14 mm union nut wrench, remove the No. 3 exhaust gas temperature sensor.
- NOTICE:
-
If the exhaust gas temperature sensor has been struck or dropped, replace it.