STEERING GEAR / LINKAGE STEERING GEAR REMOVAL
CAUTION / NOTICE / HINT
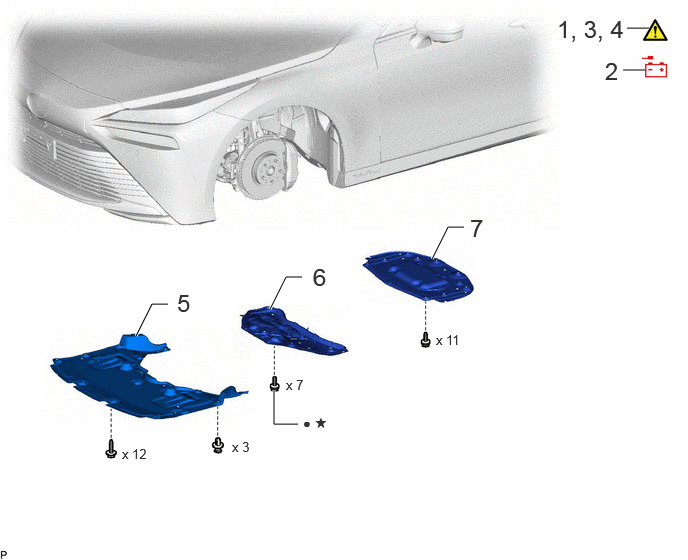
| Procedure | Part Name Code | 
|

|

|
|
|---|---|---|---|---|---|
| 1 | PRECAUTION | - | ( ) |
- | - |
| 2 | DISCONNECT CABLE FROM NEGATIVE AUXILIARY BATTERY TERMINAL | - | - | - | - |
| 3 | ALIGN FRONT WHEELS FACING STRAIGHT AHEAD | - | - | - | - |
| 4 | SECURE STEERING WHEEL | - | ()
|
- | - |
| 5 | FRONT COMPARTMENT UNDER COVER | 51441N | - | - | - |
| 6 | FRONT LOWER SUSPENSION MEMBER PROTECTOR | 51219 | - | - | - |
| 7 | FRONT COMPARTMEMT UNDER COVER ASSEMBLY | 51420A | - | - | - |
| ● | Non-reusable part | ★ | Precoated part |
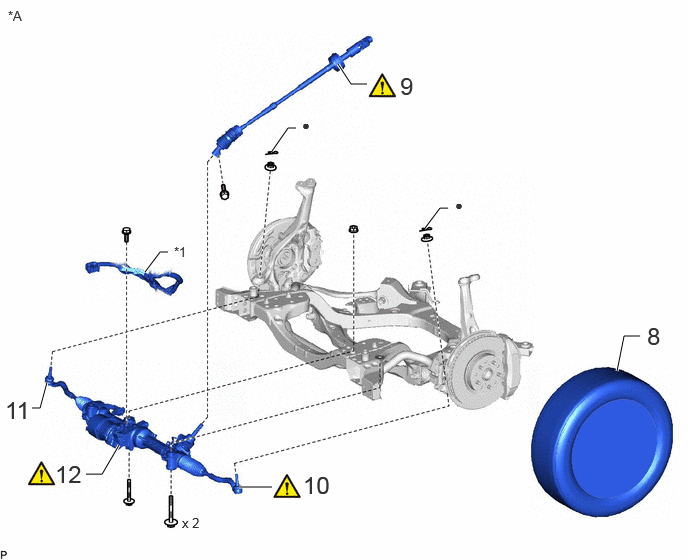
| Procedure | Part Name Code |
|
|
|
|
|---|---|---|---|---|---|
| 8 | FRONT WHEEL | - | - | - | - |
| 9 | NO. 2 STEERING INTERMEDIATE SHAFT ASSEMBLY | 45260 | ()
|
- | - |
| 10 | TIE ROD ASSEMBLY LH | 45470 | ()
|
- | - |
| 11 | TIE ROD ASSEMBLY RH | 45460 | - | - | - |
| 12 | RACK AND PINION POWER STEERING GEAR ASSEMBLY | 44250 | ()
|
- | - |
| *A | for LHD | - | - |
| *1 | MOTOR COMPARTMENT MAIN WIRE | - | - |
| ● | Non-reusable part | - | - |
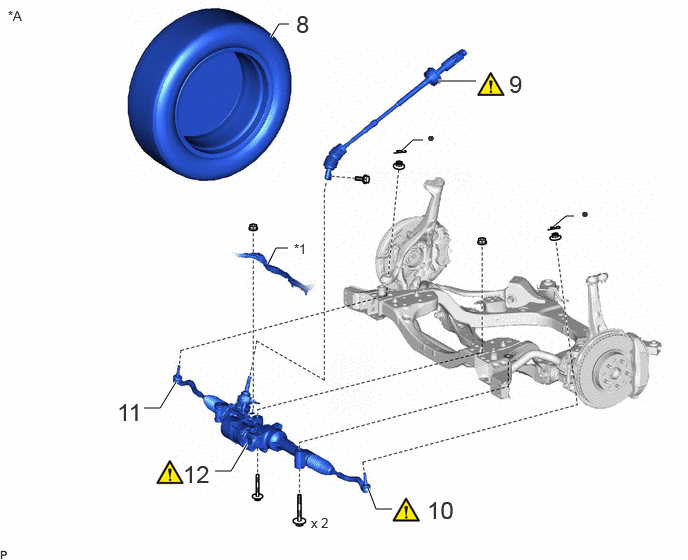
| Procedure | Part Name Code |
|
|
|
|
|---|---|---|---|---|---|
| 8 | FRONT WHEEL RH | - | - | - | |
| 9 | NO. 2 STEERING INTERMEDIATE SHAFT ASSEMBLY | 45260 | ()
|
- | - |
| 10 | TIE ROD ASSEMBLY LH | 45470 | ()
|
- | - |
| 11 | TIE ROD ASSEMBLY RH | 45460 | - | - | - |
| 12 | RACK AND PINION POWER STEERING GEAR ASSEMBLY | 44250 | ()
|
- | - |
| *A | for RHD | - | - |
| *1 | MOTOR COMPARTMENT MAIN WIRE | - | - |
| ● | Non-reusable part | - | - |
CAUTION / NOTICE / HINT
The necessary procedures (adjustment, calibration, initialization, or registration) that must be performed after parts are removed, installed, or replaced during the rack and pinion power steering gear assembly removal/installation are shown below.
- Necessary Procedure After Parts Removed/Installed/Replaced:
Replacement Part or Procedure Necessary Procedures Effects/Inoperative when not Performed Link Front wheel alignment adjustment Perform "Calibration" VSC malfunctioning ( )
Rack and pinion power steering gear assembly Update ECU security key Vehicle control history (Rob) are stored ( )
Power steering ECU initial setting ( )
Disconnect cable from negative auxiliary battery terminal Memorize steering angle neutral point Parking assist monitor system ( )
Panoramic view monitor system ( )
- HINT:
-
When the cable is disconnected/reconnected to the auxiliary battery terminal, systems temporarily stop operating. However, each system has a function that completes learning the first time the system is used.
- ·
Learning completes when vehicle is driven
Effect/Inoperative Function When Necessary Procedures are not Performed Necessary Procedures Link Lane tracing assist system Drive the vehicle straight ahead at 35 km/h (22 mph) or more for 5 seconds or more. ( )
Pre-collision system Adaptive high beam system
·Learning completes when vehicle is operated normally
Effect/Inoperative Function When Necessary Procedures are not Performed Necessary Procedures Link Air conditioning system After the ignition switch is turned to ON, theservo motor and expansion valve standardposition is recognized. -
·Use the same procedure for RHD and LHD vehicles.
·The procedure listed below is for LHD vehicles.
PROCEDURE

 1. PRECAUTION
|
|
|
2.DISCONNECT CABLE FROM NEGATIVE AUXILIARY BATTERY TERMINAL
3.ALIGN FRONT WHEELS FACING STRAIGHT AHEAD
4. SECURE STEERING WHEEL
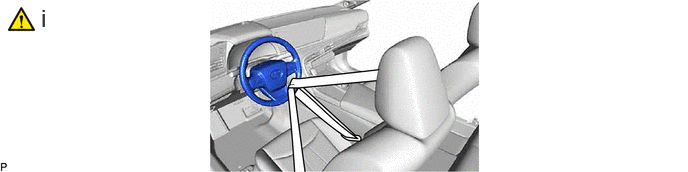
Secure the steering wheel with the seat belt in order to prevent rotation.
- HINT:
-
This operation is useful to prevent damage to the spiral cable.
51441N
5.REMOVE FRONT COMPARTMENT UNDER COVER
51219
6.REMOVE FRONT LOWER SUSPENSION MEMBER PROTECTOR
51420A
7.REMOVE FRONT COMPARTMEMT UNDER COVER ASSEMBLY
8.REMOVE FRONT WHEEL
45260
9.DISCONNECT NO. 2 STEERING INTERMEDIATE SHAFT ASSEMBLY
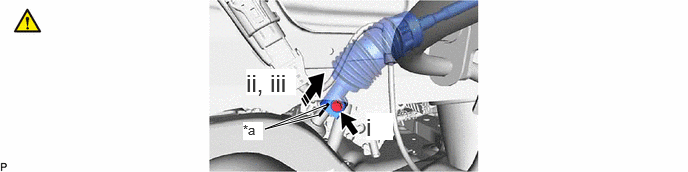
| *a | Matchmark | - | - |

|
Slide | - | - |
Remove the bolt.
Slide the No. 2 steering intermediate shaft assembly and put matchmarks on the No. 2 steering intermediate shaft assembly and the rack and pinion power steering gear assembly.
Disconnect the No. 2 steering intermediate shaft assembly from the rack and pinion power steering gear assembly.
45470
10.DISCONNECT TIE ROD ASSEMBLY LH
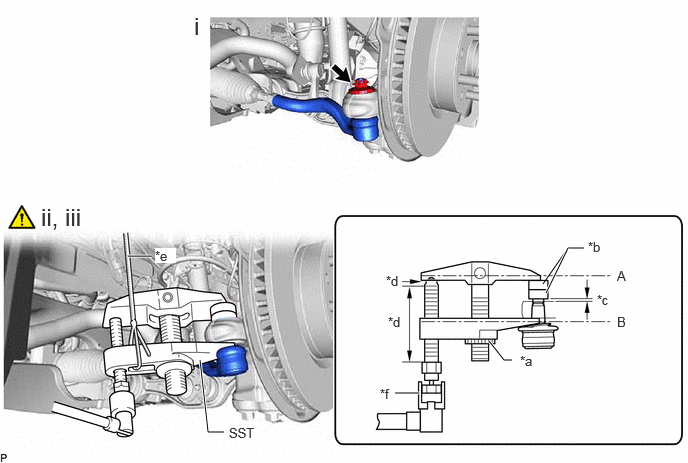
| *a | Center Nut | *b | SST (Spacer B) |
| *c | 1 mm (0.0394 in.) | *d | Molybdenum grease application area |
| *e | String | *f | Place wrench here |
Remove the clip and nut.
Install 2 spacers (SST spacer B) to the steering knuckle LH as shown in the illustration.
- SST
- 09960-20010 (09961-02060)
- NOTICE:
-
Make sure that the clearance between the tie rod assembly LH and spacers (SST spacer B) is 1 mm (0.0394 in.) or more to prevent damage to SST.
Using SST, disconnect the tie rod assembly LH from steering knuckle LH.
- SST
- 09960-20010 (09961-02010)
- CAUTION:
-
Apply molybdenum grease to the bolt threads and the tip of SST.
- NOTICE:
- ·
Be sure to tighten the string firmly to secure SST to the steering knuckle to prevent SST from falling off.
·Install SST so that (A) and (B) shown in the illustration are parallel. Otherwise, the ball joint dust cover may be damaged.
·Be sure to place the wrench on the part shown in the illustration.
·Do not damage the ball joint dust cover.
·Do not damage the steering knuckle.
·Do not damage the front disc brake dust cover.
45460
11.DISCONNECT TIE ROD ASSEMBLY RH
Perform the same procedure as for the LH side.
44250
12.REMOVE RACK AND PINION POWER STEERING GEAR ASSEMBLY
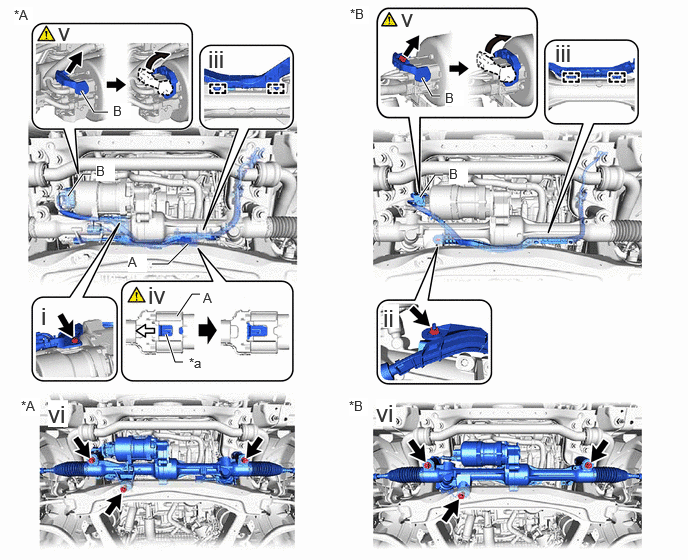
| *A | for LHD | *B | for RHD |
| *a | Green Lock | - | - |

|
Slide | - | - |
for LHD:
Remove the bolt.
for RHD:
Remove the nut.
Detach the 2 clamps.
for LHD:
Release the green lock of the connector (A) and disconnect the connector (A) as shown in the illustration.
Disconnect the connector (B) and disconnect the motor compartment main wire from the rack and pinion power steering gear assembly.
- HINT:
-
Disconnect the connector with the lock lever by pulling out the lock and moving the lock lever as shown in the illustration.
Remove the 3 bolts, nut and rack and pinion power steering gear assembly from the front suspension crossmember sub-assembly.