BRAKE SYSTEM (OTHER) BRAKE BOOSTER(for RHD) REMOVAL
CAUTION / NOTICE / HINT
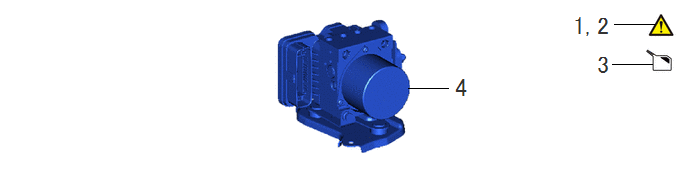
| Procedure | Part Name Code | 
|

|

|
|
|---|---|---|---|---|---|
| 1 | PRECAUTION | - | ( ) |
- | - |
| 2 | ACCUMULATOR PRESSURE ZERO DOWN | - | ()
|
- | - |
| 3 | DRAIN BRAKE FLUID | - | - | ()
|
- |
| 4 | BRAKE ACTUATOR WITH BRACKET | - | - | - | - |
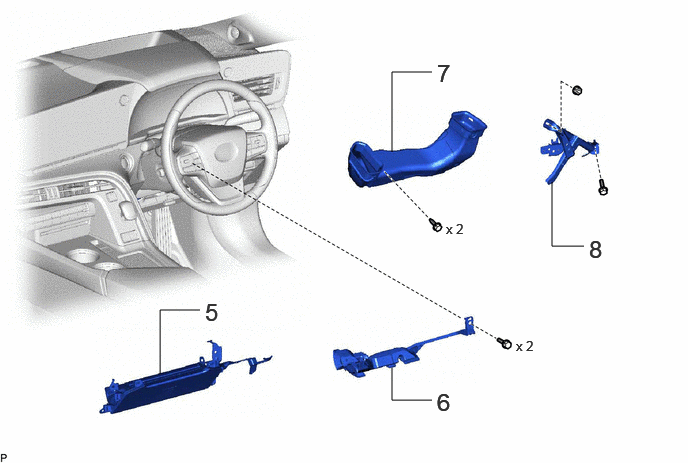
| Procedure | Part Name Code |
|
|
|
|
|---|---|---|---|---|---|
| 5 | LOWER NO. 1 INSTRUMENT PANEL AIRBAG ASSEMBLY | 73900 | - | - | - |
| 6 | AIR DUCT SUB-ASSEMBLY | - | - | - | - |
| 7 | NO. 2 HEATER TO REGISTER DUCT | 55844 | - | - | - |
| 8 | NO. 3 INSTRUMENT PANEL TO COWL BRACE SUB-ASSEMBLY | 55308B | - | - | - |
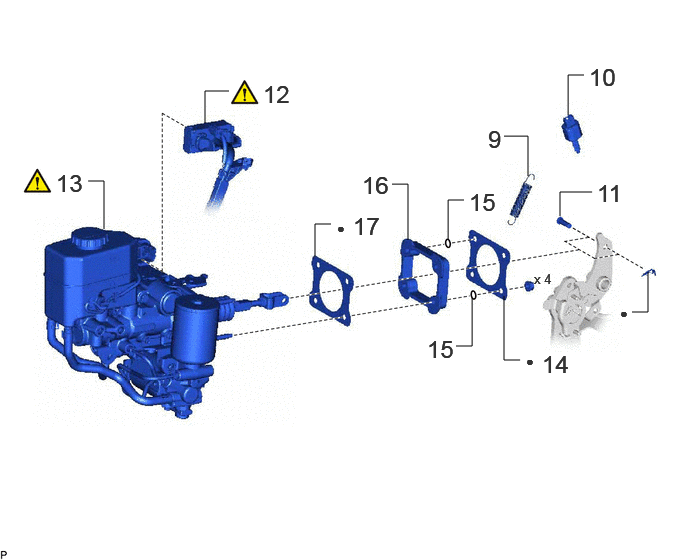
| Procedure | Part Name Code |
|
|
|
|
|---|---|---|---|---|---|
| 9 | BRAKE PEDAL RETURN SPRING | 47101A | - | - | - |
| 10 | STOP LIGHT SWITCH ASSEMBLY | 84340 | - | - | - |
| 11 | PUSH ROD PIN | 47264A | - | - | - |
| 12 | FRONT COMPARTMENT MAIN WIRE | 82111C | ()
|
- | - |
| 13 | BRAKE BOOSTER WITH MASTER CYLINDER ASSEMBLY | 47210L | ()
|
- | - |
| 14 | BRAKE MASTER CYLINDER GASKET | 44785D | - | - | - |
| 15 | BOOSTER BRACKET STOPPER RING | - | - | - | - |
| 16 | BRAKE BOOSTER BRACKET | - | - | - | - |
| 17 | BRAKE MASTER CYLINDER GASKET | 44785D | - | - | - |
| ● | Non-reusable part | - | - |
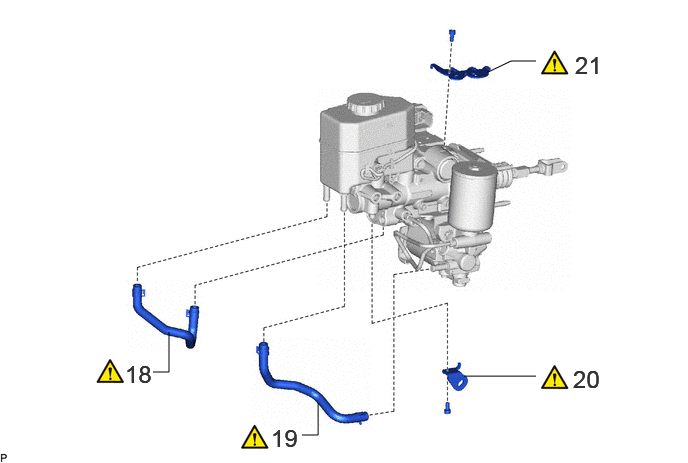
| Procedure | Part Name Code |
|
|
|
|
|---|---|---|---|---|---|
| 18 | NO. 1 RESERVOIR HOSE | - | ()
|
- | - |
| 19 | NO. 2 RESERVOIR HOSE | - | ()
|
- | - |
| 20 | WIRE CLAMP BRACKET | - | ()
|
- | - |
| 21 | NO. 1 WIRE CLAMP BRACKET | - | ()
|
- | - |
CAUTION / NOTICE / HINT
The necessary procedures (adjustment, calibration, initialization, or registration) that must be performed after parts are removed and installed, or replaced during brake booster with master cylinder assembly removal/installation are shown below.
| Replaced Part or Performed Procedure | Necessary Procedure | Effect/Inoperative Function when Necessary Procedure not Performed | Link |
|---|---|---|---|
| Disconnect cable from negative (-) auxiliary battery terminal | Memorize steering angle neutral point | Parking assist monitor system | ()
|
| Panoramic view monitor system | ()
|
||
| No. 1 Skid control ECU (brake booster with master cylinder assembly) | Update ECU security key | Vehicle control history (RoB) are stored | ()
|
1.
Bleed air 2.
Perform "Calibration" |
·
DTCs are stored ·
ABS warning light illuminates ·
Brake system warning light (yellow indicator) illuminates ·
Slip indicator light illuminates ·
Electronically controlled brake system disabled or malfunctions |
()
|
- HINT:
-
When the cable is disconnected/reconnected to the auxiliary battery terminal, systems temporarily stop operating. However, each system has a function that completes learning the first time the system is used.
- ·
Learning completes when vehicle is driven
Effect/Inoperative Function When Necessary Procedures are not Performed Necessary Procedures Link Lane tracing assist system Drive the vehicle straight ahead at 35 km/h (22 mph) or more for 5 seconds or more. ( )
Pre-collision system Adaptive high beam system
·Learning completes when vehicle is operated normally
Effect/Inoperative Function When Necessary Procedures are not Performed Necessary Procedures Link Air conditioning system After the ignition switch is turned to ON, theservo motor and expansion valve standardposition is recognized. -
CAUTION / NOTICE / HINT
- NOTICE:
- ·
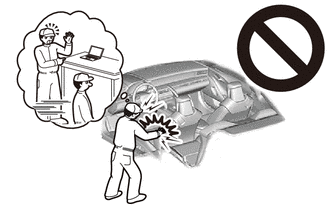
While the auxiliary battery is connected, even if the ignition switch is off, the brake control system activates when the brake pedal is depressed or any door courtesy switch turns on. Therefore, when servicing the brake system components, do not operate the brake pedal or open/close the doors while the auxiliary battery is connected.
·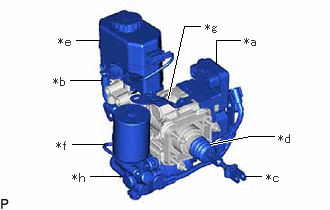 2.25,0.667 2.25,0.417 2.25,0.417 2.5,0.417 false 2.552,1.833 2.719,1.833 false 2.188,1.5 2.604,1.417 2.604,1.417 2.854,1.417 true 0.792,0.417 1.042,0.417 false 0.75,1.5 1.083,1.5 false 0.729,0.833 1.063,0.833 false 1.75,1.021 1.917,0.271 1.917,0.271 2.083,0.271 true 0.938,1.833 1.271,1.833 false 2.542,0.365 2.792,0.531 0.25,0.167 10 false *a 0.552,0.781 0.802,0.948 0.25,0.167 10 false *b 2.771,1.781 3.021,2.031 0.25,0.25 10 false *c 2.896,1.375 3.229,1.708 0.333,0.333 10 false *d 0.604,0.365 0.854,0.615 0.25,0.25 10 false *e 0.583,1.448 0.917,1.698 0.333,0.25 10 false *f 2.135,0.219 2.385,0.469 0.25,0.25 10 false *g 0.75,1.781 1.083,2.031 0.333,0.25 10 false *h
*a No. 1 Skid Control ECU *b No. 1 Reservoir Hose and No. 2 Reservoir Hose *c Master Cylinder Push Rod Clevis *d Boot *e Brake Master Cylinder Reservoir *f No. 1 Brake Actuator Tube *g No. 1 Wire Clamp Bracket *h Brake Booster with Accumulator Pump Assembly
Do not carry the brake booster with master cylinder assembly by the parts shown in the illustration.
PROCEDURE

 1. PRECAUTION
|
|
|
2.PERFORM ACCUMULATOR PRESSURE ZERO DOWN
|
|
Click here()
|
3.DRAIN BRAKE FLUID
|
|
|
4.REMOVE BRAKE ACTUATOR WITH BRACKET
73900
5.REMOVE LOWER NO. 1 INSTRUMENT PANEL AIRBAG ASSEMBLY
6.REMOVE AIR DUCT SUB-ASSEMBLY
55844
7.REMOVE NO. 2 HEATER TO REGISTER DUCT
55308B
8.REMOVE NO. 3 INSTRUMENT PANEL TO COWL BRACE SUB-ASSEMBLY
47101A
9.REMOVE BRAKE PEDAL RETURN SPRING
84340
10.REMOVE STOP LIGHT SWITCH ASSEMBLY
47264A
11.REMOVE PUSH ROD PIN
82111C
12.DISCONNECT FRONT COMPARTMENT MAIN WIRE


|
Release the lock lever | 
|
Disconnect the connector |
Disconnect the brake fluid level warning switch connector.
- NOTICE:
-
Be careful not to allow any brake fluid to enter the connector.
Disengage the 2 clamps to disconnect the front compartment main wire from the brake booster with master cylinder assembly.
Release the lock lever and disconnect the connector from the brake booster with master cylinder assembly.
- NOTICE:
-
Be careful not to allow any brake fluid to enter the connector.
47210L
13.REMOVE BRAKE BOOSTER WITH MASTER CYLINDER ASSEMBLY
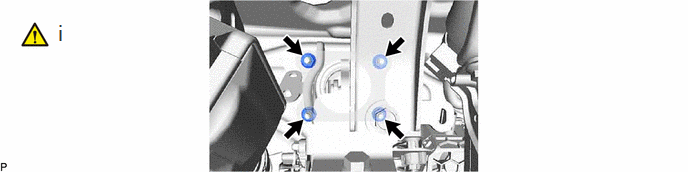
Remove the 4 nuts and brake booster with master cylinder assembly.
- NOTICE:
- ·
Do not apply excessive force to the brake lines.
·Be careful not to allow any brake fluid to enter the connector.
·
2.25,0.667 2.25,0.417 2.25,0.417 2.5,0.417 false 2.552,1.833 2.719,1.833 false 2.188,1.5 2.604,1.417 2.604,1.417 2.854,1.417 true 0.792,0.417 1.042,0.417 false 0.75,1.5 1.083,1.5 false 0.729,0.833 1.063,0.833 false 1.75,1.021 1.917,0.271 1.917,0.271 2.083,0.271 true 0.938,1.833 1.271,1.833 false 2.542,0.365 2.792,0.531 0.25,0.167 10 false *a 0.552,0.781 0.802,0.948 0.25,0.167 10 false *b 2.771,1.781 3.021,2.031 0.25,0.25 10 false *c 2.896,1.375 3.229,1.708 0.333,0.333 10 false *d 0.604,0.365 0.854,0.615 0.25,0.25 10 false *e 0.583,1.448 0.917,1.698 0.333,0.25 10 false *f 2.135,0.219 2.385,0.469 0.25,0.25 10 false *g 0.75,1.781 1.083,2.031 0.333,0.25 10 false *h*a No. 1 Skid Control ECU *b No. 1 Reservoir Hose and No. 2 Reservoir Hose *c Master Cylinder Push Rod Clevis *d Boot *e Brake Master Cylinder Reservoir *f No. 1 Brake Actuator Tube *g No. 1 Wire Clamp Bracket *h Brake Booster with Accumulator Pump Assembly
Do not carry the brake booster with master cylinder assembly by the parts shown in the illustration.
44785D
14.REMOVE BRAKE MASTER CYLINDER GASKET

15.REMOVE BOOSTER BRACKET STOPPER RING

16.REMOVE BRAKE BOOSTER BRACKET

44785D
17.REMOVE BRAKE MASTER CYLINDER GASKET

18.REMOVE NO. 1 RESERVOIR HOSE
|
|
|
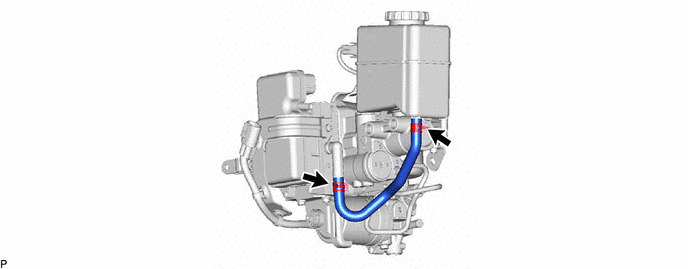
19.REMOVE NO. 2 RESERVOIR HOSE
|
|
|
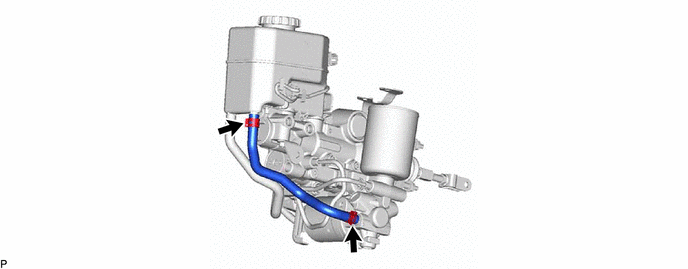
20.REMOVE WIRE CLAMP BRACKET
|
|
|
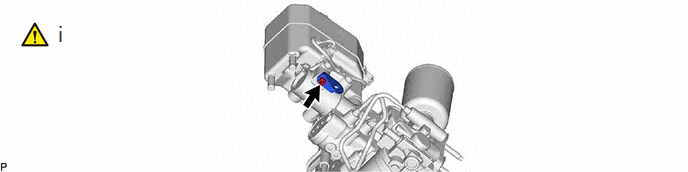
Using a 5 mm long hexagon socket wrench, remove the bolt and wire clamp bracket.
21.REMOVE NO. 1 WIRE CLAMP BRACKET
|
|
|
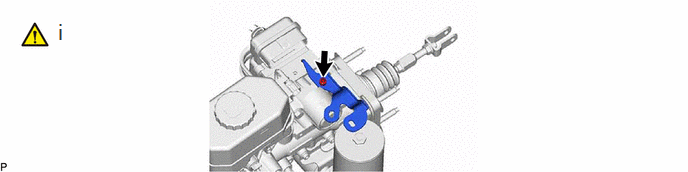
Using a 5 mm long hexagon socket wrench, remove the bolt and No. 1 wire clamp bracket.