DOOR / HATCH FUEL LID OPENER SYSTEM Fuel Lid Opener does not Operate
DESCRIPTION
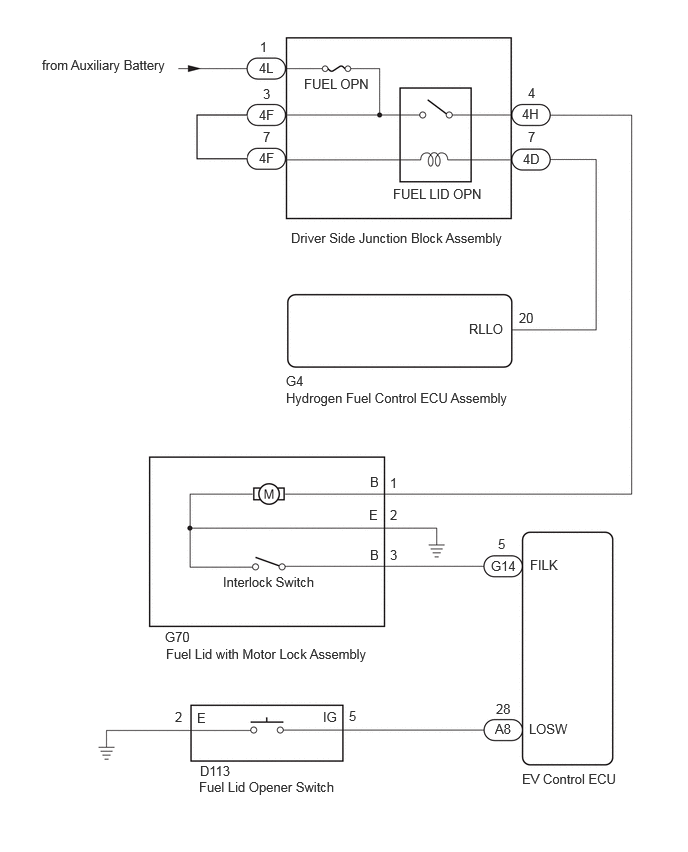
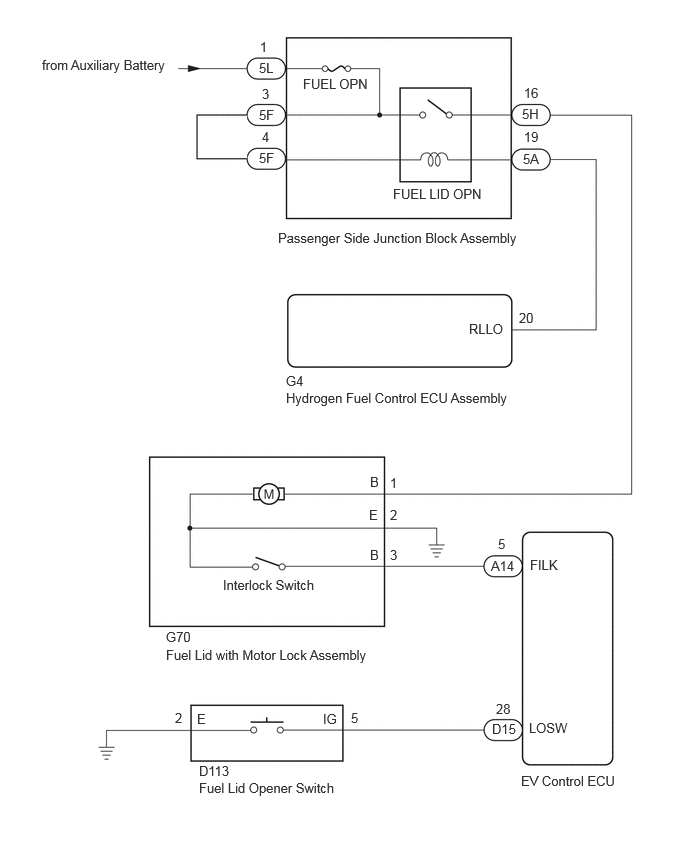
When the fuel lid opener switch is pressed, an operation request signal is sent to the EV control ECU.
W hen a fuel lid opener switch signal is input, the EV control ECU performs a lid open permission judgment and then sends a fuel lid opener operation request signal to the hydrogen fuel control ECU assembly.
According to the received fuel lid opener operation request signal, the hydrogen fuel control ECU assembly turns on the driver side junction block assembly (FUEL LID OPN relay)*1 or passenger side junction block assembly (FUEL LID OPN relay)*2 and operates the fuel lid with motor lock assembly.
*1: for LHD
*2: for RHD
WIRING DIAGRAM
for LHD:
for RHD:
CAUTION / NOTICE / HINT
- NOTICE:
- ·
When the EV control ECU is replaced, write the VIN (Vehicle Identification Number).
·The fuel lid opener system uses the CAN communication system. First, confirm that there is no malfunction in the CAN communication system. Refer to the How to Proceed with Troubleshooting procedure.
Click herePower Source / Network>NETWORKING>CAN COMMUNICATION SYSTEM>HOW TO PROCEED WITH TROUBLESHOOTING
PROCEDURE
Check vehicle type.
- Result:
Result Proceed to for LHD A for RHD B
A
B
Read the Data List according to the display on the GTS.
- Powertrain > EV > Data List
-
Tester Display Measurement Item Range Normal Condition Diagnostic Note Fuel Lid Interlock Switch Fuel lid interlock switch condition OFF/ON OFF: Fuel lid fully closed
ON: Fuel lid open-
- Powertrain > EV > Data List
-
Tester Display Fuel Lid Interlock Switch - 50003 397 1011
- OK:
On the GTS screen, ON or OFF is displayed accordingly.
- Result:
Proceed to OK NG
OK
NG
Click hereVehicle Exterior>DOOR / HATCH>FUEL LID OPENER MOTOR ASSEMBLY>INSPECTION
- Result:
Proceed to OK NG
OK
NG
Disconnect the G70 fuel lid with motor lock assembly connector.
Disconnect the 4H driver side junction block assembly connector.
Measure the resistance according to the value(s) in the table below.
- Standard Resistance:
Tester Connection Condition Specified Condition Click Location & Routing(G70)Location & Routingewd_type=routing;type=c;code=G70
Click Connector(G70)Body>Floor Wire / No. 3 Floor Wire>Fuel Lid Lock with Motor Assemblyewd_type=component;type=c;code=G70;pinno=1,2
G70-1 (B) - 4H-4 Always Below 1 Ω G70-2 (E) - Body ground Always Below 1 Ω G70-1 (B) or 4H-4 - Body ground Always 10 kΩ or higher
- Result:
Proceed to OK NG
OK
NG
Disconnect the G70 fuel lid with motor lock assembly connector.
Disconnect the G14 EV control ECU connector.
Measure the resistance according to the value(s) in the table below.
- Standard Resistance:
Tester Connection Condition Specified Condition Click Location & Routing(G70,G14)Location & Routingewd_type=routing;type=c,c;code=G70,G14
Click Connector(G70)Body>Floor Wire / No. 3 Floor Wire>Fuel Lid Lock with Motor Assemblyewd_type=component;type=c;code=G70;pinno=3,2
Click Connector(G14)Instrument Panel>Floor Wire>EV Control ECUewd_type=component;type=c;code=G14;pinno=5
G70-3 (B) - G14-5 (FILK) Always Below 1 Ω G70-2 (E) - Body ground Always Below 1 Ω G70-3 (B) or G14-5 (FILK) - Body ground Always 10 kΩ or higher
- Result:
Proceed to OK NG
OK
NG
Disconnect the 4D driver side junction block assembly connector.
Disconnect the G4 hydrogen fuel control ECU assembly connector.
Measure the resistance according to the value(s) in the table below.
- Standard Resistance:
Tester Connection Condition Specified Condition Click Location & Routing(G4)Location & Routingewd_type=routing;type=c;code=G4
Click Connector(G4)Body>Floor Wire / No. 3 Floor Wire>Hydrogen Fuel Control ECU Assemblyewd_type=component;type=c;code=G4;pinno=20
4D-7 - G4-20 (RLLO) Always Below 1 Ω 4D-7 or G4-20 (RLLO) - Body ground Always 10 kΩ or higher
- Result:
Proceed to OK NG
OK
NG
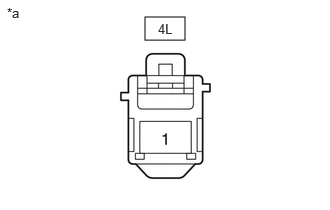
| *a | Front view of wire harness connector
(to Driver Side Junction Block Assembly) |
Disconnect the driver side junction block assembly connector.
Measure the voltage according to the value(s) in the table below.
- Standard Voltage:
Tester Connection Switch Condition Specified Condition 4L-1 - Body ground Ignition switch off 11 to 14 V
- Result:
Proceed to OK NG
OK
NG
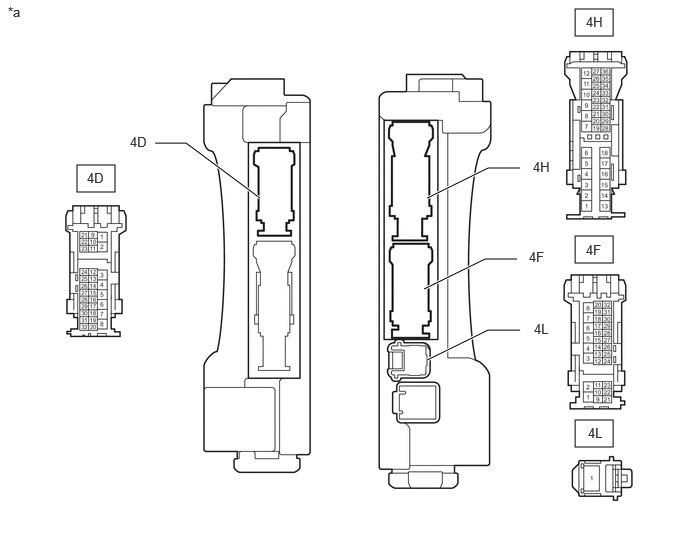
| *a | Component without harness connected
(Driver Side Junction Block Assembly) |
- | - |
Remove the driver side junction block assembly.
Remove the main body ECU (multiplex network body ECU) from the driver side junction block assembly.
Measure the resistance according to the value(s) in the table below.
- Standard Resistance:
Tester Connection Condition Specified Condition 4L-1 - 4H-4 Voltage not applied between terminals 4F-7 and 4D-7 10 kΩ or higher Voltage applied between terminals 4F-7 and 4D-7 Below 1 Ω 4L-1 - 4H-4 Always Below 1 Ω
- Result:
Proceed to OK NG
OK
NG
Read the Data List according to the display on the GTS.
- Powertrain > EV > Data List
-
Tester Display Measurement Item Range Normal Condition Diagnostic Note Fuel Lid Interlock Switch Fuel lid interlock switch condition OFF/ON OFF: Fuel lid fully closed
ON: Fuel lid open-
- Powertrain > EV > Data List
-
Tester Display Fuel Lid Interlock Switch - 50003 397 1011
- OK:
On the GTS screen, ON or OFF is displayed accordingly.
- Result:
Proceed to OK NG
OK
NG
Click hereVehicle Exterior>DOOR / HATCH>FUEL LID OPENER MOTOR ASSEMBLY>INSPECTION
- Result:
Proceed to OK NG
OK
NG
Disconnect the G70 fuel lid with motor lock assembly connector.
Disconnect the 5H passenger side junction block assembly connector.
Measure the resistance according to the value(s) in the table below.
- Standard Resistance:
Tester Connection Condition Specified Condition Click Location & Routing(G70)Location & Routingewd_type=routing;type=c;code=G70
Click Connector(G70)Body>Floor Wire / No. 3 Floor Wire>Fuel Lid Lock with Motor Assemblyewd_type=component;type=c;code=G70;pinno=1,2
G70-1 (B) - 5H-16 Always Below 1 Ω G70-2 (E) - Body ground Always Below 1 Ω G70-1 (B) or 5H-16 - Body ground Always 10 kΩ or higher
- Result:
Proceed to OK NG
OK
NG
Disconnect the G70 fuel lid with motor lock assembly connector.
Disconnect the A14 EV control ECU connector.
Measure the resistance according to the value(s) in the table below.
- Standard Resistance:
Tester Connection Condition Specified Condition Click Location & Routing(G70,A14)Location & Routingewd_type=routing;type=c,c;code=G70,A14
Click Connector(G70)Body>Floor Wire / No. 3 Floor Wire>Fuel Lid Lock with Motor Assemblyewd_type=component;type=c;code=G70;pinno=3,2
Click Connector(A14)Instrument Panel>Front Compartment Main Wire>EV Control ECUewd_type=component;type=c;code=A14;pinno=5
G70-3 (B) - A14-5 (FILK) Always Below 1 Ω G70-2 (E) - Body ground Always Below 1 Ω G70-3 (B) or A14-5 (FILK) - Body ground Always 10 kΩ or higher
- Result:
Proceed to OK NG
OK
NG
Disconnect the 5A passenger side junction block assembly connector.
Disconnect the G4 hydrogen fuel control ECU assembly connector.
Measure the resistance according to the value(s) in the table below.
- Standard Resistance:
Tester Connection Condition Specified Condition Click Location & Routing(G4)Location & Routingewd_type=routing;type=c;code=G4
Click Connector(G4)Body>Floor Wire / No. 3 Floor Wire>Hydrogen Fuel Control ECU Assemblyewd_type=component;type=c;code=G4;pinno=20
5A-19 - G4-20 (RLLO) Always Below 1 Ω 5A-19 or G4-20 (RLLO) - Body ground Always 10 kΩ or higher
- Result:
Proceed to OK NG
OK
NG
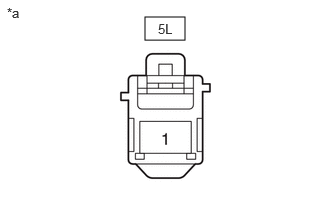
| *a | Front view of wire harness connector
(to Passenger Side Junction Block Assembly ) |
Disconnect the passenger side junction block assembly connector.
Measure the voltage according to the value(s) in the table below.
- Standard Voltage:
Tester Connection Switch Condition Specified Condition 5L-1 - Body ground Ignition switch off 11 to 14 V
- Result:
Proceed to OK NG
OK
NG
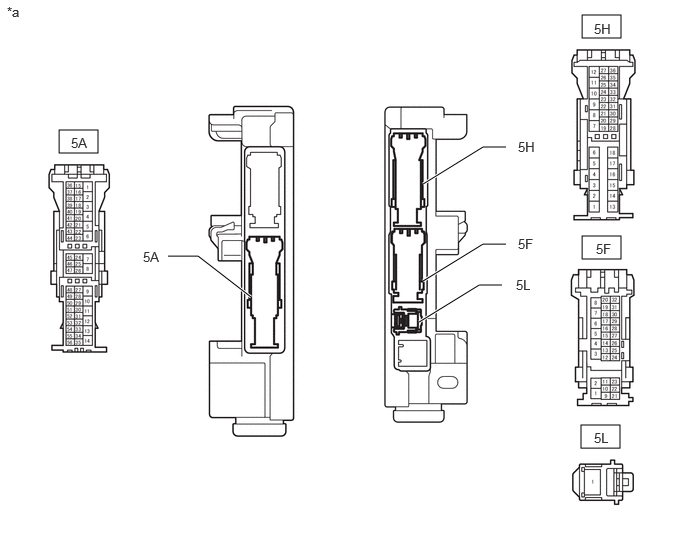
| *a | Component without harness connected
(Passenger Side Junction Block Assembly) |
- | - |
Remove the passenger side junction block assembly.
Measure the resistance according to the value(s) in the table below.
- Standard Resistance:
Tester Connection Condition Specified Condition 5L-1 - 5H-16 Voltage not applied between terminals 5F-4 and 5A-19 10 kΩ or higher Voltage applied between terminals 5F-4 and 5A-19 Below 1 Ω 5L-1 - 5F-3 Always Below 1 Ω
- Result:
Proceed to OK NG
OK
NG
Read the Data List according to the display on the GTS.
- Powertrain > EV > Data List
-
Tester Display Measurement Item Range Normal Condition Diagnostic Note Fuel Lid Open Switch Fuel lid opener switch status OFF or ON OFF: Fuel lid opener switch not pushed
ON: Fuel lid opener switch pushed-
- Powertrain > EV > Data List
-
Tester Display Fuel Lid Open Switch - 50003 397 1012
- OK:
On the GTS screen, ON or OFF is displayed accordingly.
- Result:
Proceed to OK NG
OK
NG
OK
NG
Disconnect the D113 fuel lid opener switch connector.
Disconnect the A8*1 or D15*2 EV control ECU connector.
*1: for LHD
*2: for RHD
Measure the resistance according to the value(s) in the table below.
- Standard Resistance:
for LHD Tester Connection Condition Specified Condition Click Location & Routing(D113,A8)Location & Routingewd_type=routing;type=c,c;code=D113,A8
Click Connector(D113)Instrument Panel>Instrument Panel Wire>Fuel Lid Opener Switchewd_type=component;type=c;code=D113;pinno=5,2
Click Connector(A8)Instrument Panel>Front Compartment Main Wire>EV Control ECUewd_type=component;type=c;code=A8;pinno=28
D113-5 (IG) - A8-28 (LOSW) Always Below 1 Ω D113-2 (E) - Body ground Always Below 1 Ω D113-5 (IG) or A8-28 (LOSW) - Body ground Always 10 kΩ or higher
| Tester Connection | Condition | Specified Condition |
|---|---|---|
|
Click Location & Routing(D113,D15)Location & Routingewd_type=routing;type=c,c;code=D113,D15 Click Connector(D113)Instrument Panel>Instrument Panel Wire>Fuel Lid Opener Switchewd_type=component;type=c;code=D113;pinno=5,2 Click Connector(D15)Instrument Panel>Instrument Panel Wire>EV Control ECUewd_type=component;type=c;code=D15;pinno=28 |
||
| D113-5 (IG) - D15-28 (LOSW) | Always | Below 1 Ω |
| D113-2 (E) - Body ground | Always | Below 1 Ω |
| D113-5 (IG) or D15-28 (LOSW) - Body ground | Always | 10 kΩ or higher |
- Result:
Proceed to OK NG
OK
NG