PARK ASSIST / MONITORING BLIND SPOT MONITOR SYSTEM C1AB4 Open in Outer Mirror Indicator(Master)
DESCRIPTION
This DTC is stored when the blind spot monitor sensor RH detects an open in the outer rear view mirror indicator RH.
| DTC No. | Detection Item | DTC Detection Condition | Trouble Area | DTC Output from | Priority |
|---|---|---|---|---|---|
| C1AB4 | Open in Outer Mirror Indicator(Master) | Both of the following conditions are met:
·
The blind spot monitor system is on ·
The current flowing to the indicator is below a specified value when indicator operation voltage is being sent to the indicator |
·
outer mirror RH (outer rear view mirror indicator RH) ·
Outer mirror retractor RH ·
Harness or connector ·
Blind spot monitor sensor RH ·
Front multiplex network door ECU RH |
Blind Spot Monitor Master | A |
WIRING DIAGRAM
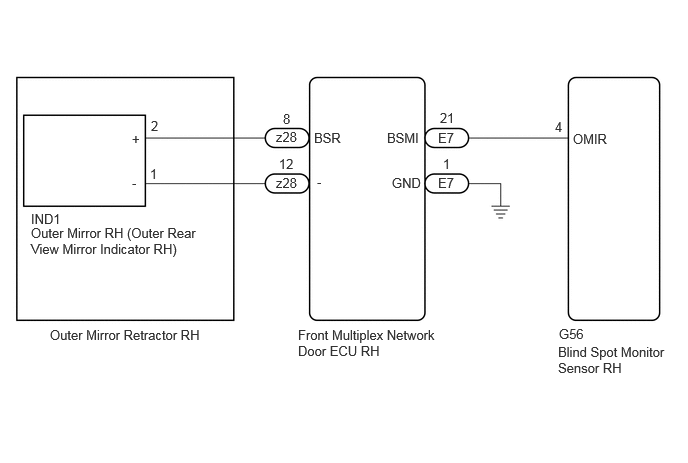
CAUTION / NOTICE / HINT
- NOTICE:
-
When checking for DTCs, make sure that the blind spot monitor system is turned on.
PROCEDURE
Check for DTCs.
- Body Electrical > Blind Spot Monitor Master > Trouble Codes
- 50001 313
- Result:
Result Proceed to C1AB4 is not output A C1AB4 is output B
A
Click hereGeneral>INTRODUCTION>HOW TO TROUBLESHOOT ECU CONTROLLED SYSTEMS>HOW TO PROCEED WITH TROUBLESHOOTING
B
Pre-procedure1
Disconnect the G56 blind spot monitor sensor RH connector.
Disconnect the E7 front multiplex network door ECU RH connector.
Procedure1
Measure the resistance according to the value(s) in the table below.
- Standard Resistance:
Tester Connection Condition Specified Condition Click Location & Routing(G56,E7)Location & Routingewd_type=routing;type=c,c;code=G56,E7
Click Connector(G56)Body>Floor Wire / No. 3 Floor Wire>Blind Spot Monitor Sensor RHewd_type=component;type=c;code=G56;pinno=4
Click Connector(E7)Body>Front Door Wire LH / Front Door Wire RH>Front Multiplex Network Door ECU RHewd_type=component;type=c;code=E7;pinno=21,1
G56-4 (OMIR) - E7-21 (BSMI) Always Below 1 Ω E7-1 (GND) - Body ground Always Below 1 Ω
- Result:
Proceed to OK NG
Post-procedure1
None
OK
NG
Pre-procedure1
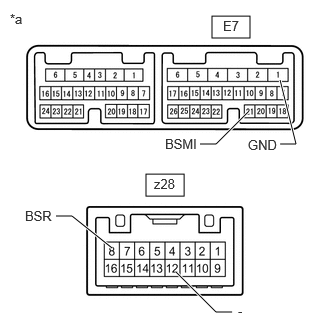
| *a | Component without harness connected
(Front Multiplex Network Door ECU RH) |
Disconnect the front multiplex network door ECU RH connectors.
Procedure1
Measure the resistance according to the value(s) in the table below.
- Standard Resistance:
Tester Connection Condition Specified Condition Click Location & Routing(E7,z28)Location & Routingewd_type=routing;type=c,c;code=E7,z28
Click Connector(E7)Body>Front Door Wire LH / Front Door Wire RH>Front Multiplex Network Door ECU RHewd_type=component;type=c;code=E7;pinno=21,1
Click Connector(z28)Body>other>Outer Rear View Mirror Assembly RH , Front Multiplex Network Door ECU RHewd_type=component;type=c;code=z28;pinno=8,12
E7-21 (BSMI) - z28-8 (BSR) Always Below 1 Ω E7-1 (GND) - z28-12 (-) Always Below 1 Ω
- Result:
Proceed to OK NG
Post-procedure1
None
OK
NG
Pre-procedure1
Disconnect the z28 outer mirror actuator assembly RH connector.
Disconnect the IND1 outer mirror RH (outer rear view mirror indicator RH) connector.
Procedure1
Measure the resistance according to the value(s) in the table below.
- Standard Resistance:
Tester Connection Condition Specified Condition Click Location & Routing(z28)Location & Routingewd_type=routing;type=c;code=z28
Click Connector(z28)Body>other>Outer Rear View Mirror Assembly RH , Front Multiplex Network Door ECU RHewd_type=component;type=c;code=z28;pinno=8,12
z28-8 (BSR) - IND 1-2 (+) Always Below 1 Ω z28-12 (-) - IND 1-1 (-) Always Below 1 Ω
- Result:
Proceed to OK NG
Post-procedure1
None
OK
NG
Click hereVehicle Exterior>MIRROR (EXT)>OUTER REAR VIEW MIRROR GLASS>INSPECTION
- Result:
Proceed to OK NG
OK
NG