HYBRID / BATTERY CONTROL HYBRID BATTERY SYSTEM U115087 Lost Communication with Hybrid Powertrain Control Module (Hybrid/EV Battery Local Bus) Missing Message
DESCRIPTION
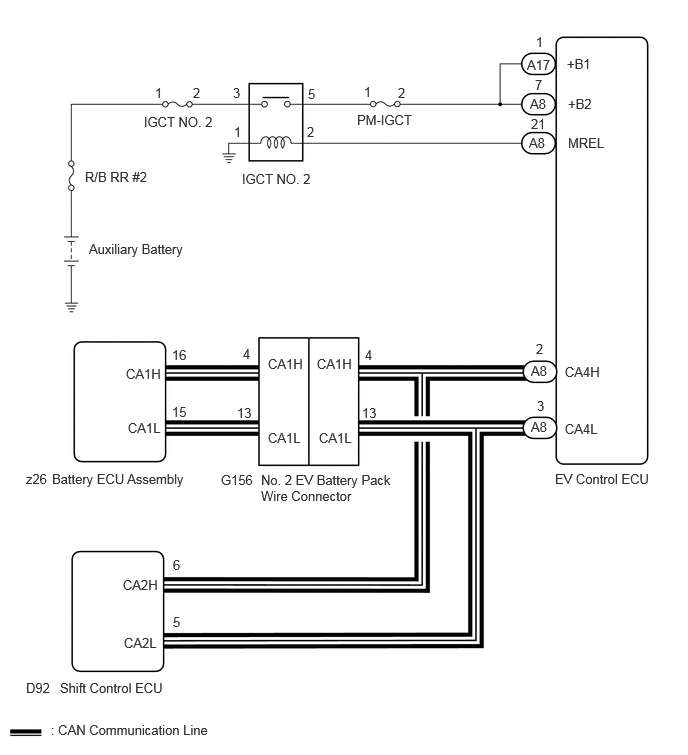
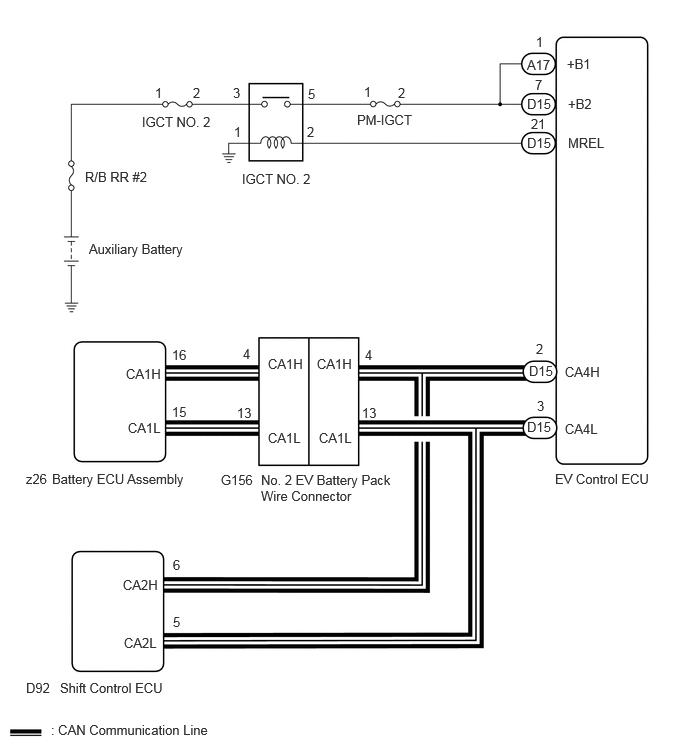
The battery ECU assembly transmits and receives signals via CAN communication to and from the EV control ECU.
| DTC No. | Detection Item | DTC Detection Condition | Trouble Area | Warning Indicate | DTC Output from | Priority |
|---|---|---|---|---|---|---|
| U115087 | Lost Communication with Hybrid Powertrain Control Module (Hybrid/EV Battery Local Bus) Missing Message | The battery ECU assembly does not receive any signals from the EV control ECU for 1 second or more.
(1 trip detection logic) |
·
Battery ECU assembly ·
EV control ECU ·
Wire harness or connector |
Master Warning:
Comes on |
EV Battery | B |
CONFIRMATION DRIVING PATTERN
- HINT:
-
After repair has been completed, clear the DTC and then check that the vehicle has returned to normal by performing the following All Readiness check procedure.
-
Click hereEngine / Hybrid System>HYBRID / BATTERY CONTROL>HYBRID BATTERY SYSTEM>UTILITY
Clear the DTCs (even if no DTCs are stored, perform the clear DTC procedure).
Turn the ignition switch off and wait for 10 minutes or more.
Turn the ignition switch to ON and wait for 2 minutes or more.
Enter the following menus: Powertrain / EV Battery / Utility / All Readiness.
Check the DTC judgment result.
- HINT:
- ·
If the judgment result shows NORMAL, the system is normal.
·If the judgment result shows ABNORMAL, the system has a malfunction.
·If the judgment result shows INCOMPLETE, perform driving pattern again.
WIRING DIAGRAM
CAUTION / NOTICE / HINT
- CAUTION:
- ·
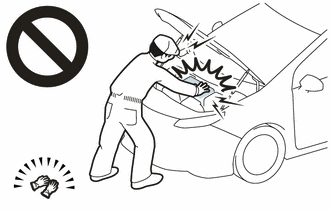
Before the following operations are conducted, take precautions to prevent electric shock by turning the ignition switch off, wearing insulated gloves, and removing the EV battery service plug grip and FC converter power outlet cable on FC converter side.
Make sure to remove the service plug grip first.
-Inspecting the high-voltage system
-Disconnecting the low voltage connector of the inverter with converter assembly
-Disconnecting the low voltage connector of the EV supply battery assembly
-Disconnecting the low voltage connector of the FC converter assembly
·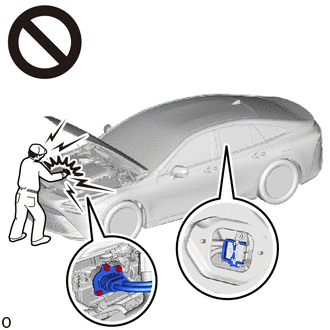
To prevent electric shock, make sure to remove the EV battery service plug grip and FC converter power outlet cable on FC converter side to cut off the high voltage circuit before servicing the vehicle.
·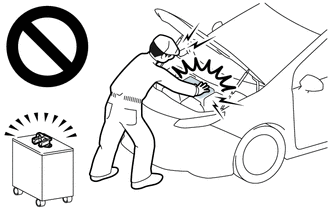
After removing the EV battery service plug grip and FC converter power outlet cable on FC converter side, store them according to the following guidelines to prevent other technicians from accidentally reconnecting them while work is being performed on the high voltage systems.
-The technician performing the work should put the EV battery service plug grip in their pocket and carry it with them.
-Remove the FC converter power outlet cable on FC converter side with a "HIGH-VOLTAGE, DO NOT TOUCH" caution tag attached to it for other technicians.
·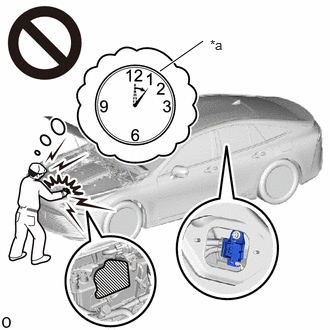 1.667,0.74 2.115,0.427 true 2.188,0.385 2.448,0.552 0.26,0.167 10 false *a
*a Without waiting for 10 minutes
After removing the EV battery service plug grip and FC converter power outlet cable on FC converter side, wait for at least 10 minutes before touching any of the high-voltage connectors or terminals. After waiting for 10 minutes, check the voltage at the terminals in the inspection point in the inverter with converter assembly. The voltage should be 0 V before beginning work.
Click hereEngine / Hybrid System>HYBRID / BATTERY CONTROL>HYBRID BATTERY SYSTEM>PRECAUTION
- HINT:
-
Waiting for at least 10 minutes is required to discharge the high-voltage capacitor inside the inverter with converter assembly and the FC converter assembly.
·Make sure to insulate the high-voltage connectors and terminals of the EV supply battery assembly with insulating tape after removing it.
If the EV supply battery assembly stored without insulating the connectors and terminals, electric shock or fire may result.
- NOTICE:
- ·
After turning the ignition switch off, there may be a waiting time before disconnecting the auxiliary negative (-) battery terminal.
Click hereGeneral>SETUP>WHEN DISCONNECTING OR RECONNECTING BATTERY TERMINAL>BEFORE DISCONNECTING BATTERY
·When disconnecting and reconnecting the auxiliary battery.
Click hereGeneral>SETUP>WHEN DISCONNECTING OR RECONNECTING BATTERY TERMINAL>WORK PROCEDURE
- HINT:
-
When disconnecting and reconnecting the auxiliary battery, there is an automatic learning function that completes learning when the respective system is used.
-
Click hereGeneral>SETUP>WHEN DISCONNECTING OR RECONNECTING BATTERY TERMINAL>AUTOMATIC LEARNING CHART
·This vehicle performs FC system shutdown process after turning the ignition switch off from ON (READY). Therefore, after the ignition switch is turned off from ON (READY), do not perform any work on the electrical system for at least 10 minutes including removing connectors or disconnecting the negative (-) auxiliary battery terminal.
·When the EV control ECU determines that the temperature of FC system components is below 0°C (32°F) when the vehicle is parked with the ignition switch off, it operates the FC air compressor, hydrogen pump and FC cooling water pump for a maximum of 180 seconds to drain the FC stack assembly. When performing inspection or repairs with the ignition switch off (not ON or ON (READY)), disconnect the cable from the negative (-) auxiliary battery terminal before performing work. (If the auxiliary battery voltage is needed to conduct inspection, perform the inspection in an environment with an ambient temperature of 10°C (50°F) or higher.)
PROCEDURE
Pre-procedure1
None.
Procedure1
Check for DTCs.
- Powertrain > EV > Trouble Codes
- 50001 397
- Result:
Result Proceed to DTCs are not output A DTCs are output B
Post-procedure1
Turn the ignition switch off.
A
B
Click hereEngine / Hybrid System>HYBRID / BATTERY CONTROL>HYBRID CONTROL SYSTEM>DIAGNOSTIC TROUBLE CODE CHART
Choose the model to be inspected.
- Result:
Result Proceed to for LHD A for RHD B
A
B
Pre-procedure1
Turn the ignition switch to ON.
Procedure1
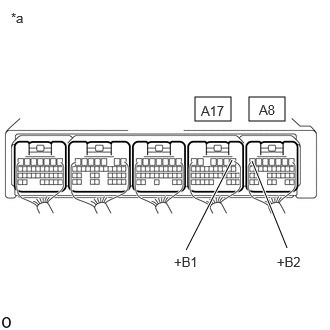
| *a | Component with harness connected
(EV Control ECU) |
Measure the voltage according to the value(s) in the table below.
- Standard Voltage:
Tester Connection Condition Specified Condition Click Location & Routing(A17,A8)Location & Routingewd_type=routing;type=c,c;code=A17,A8
Click Connector(A17)Instrument Panel>Front Compartment Main Wire>EV Control ECUewd_type=component;type=c;code=A17;pinno=1
Click Connector(A8)Instrument Panel>Front Compartment Main Wire>EV Control ECUewd_type=component;type=c;code=A8;pinno=7
A17-1 (+B1) - Body ground Ignition switch ON 11 to 14 V A8-7 (+B2) - Body ground Ignition switch ON 11 to 14 V
- Result:
Proceed to OK NG
Post-procedure1
Turn the ignition switch off.
OK
NG
- CAUTION:
-
Be sure to wear insulated gloves and protective goggles.
Pre-procedure1
Check that the service plug grip and FC converter power outlet cable are not installed.
- NOTICE:
-
After removing the service plug grip and FC converter power outlet cable, do not turn the ignition switch to ON (READY), unless instructed by the repair manual because this may cause a malfunction.
Remove the center No. 2 floor to brace extension.
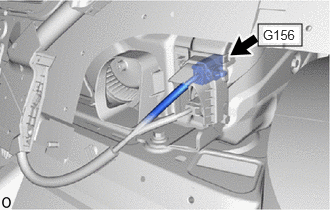
Disconnect the G156 No. 2 EV battery pack wire connector.
- NOTICE:
- ·
Before disconnecting the connector, check that it is not loose or disconnected.
·Check the terminals of the connector for deformation and corrosion.
Procedure1
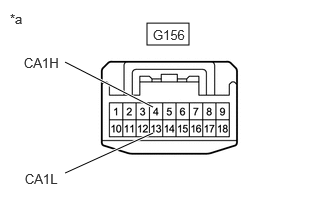
| *a | Front view of wire harness connector
(No. 2 EV Battery Pack Wire Connector) |
Measure the resistance according to the value(s) in the table below.
- Standard Resistance:
Tester Connection Condition Specified Condition Click Location & Routing(G156)Location & Routingewd_type=routing;type=c;code=G156
Click Connector(G156)Body>Floor Wire / No. 3 Floor Wire>EV Supply Battery Assemblyewd_type=component;type=c;code=G156;pinno=4,13
G156-4 (CA1H) - G156-13 (CA1L) Ignition switch off 108 to 132 Ω
- Result:
Proceed to OK NG
Post-procedure1
Reconnect the G156 No. 2 EV battery pack wire connector.
Install the center No. 2 floor to brace extension.
OK
NG
- CAUTION:
-
Be sure to wear insulated gloves and protective goggles.
Pre-procedure1
Check that the service plug grip and FC converter power outlet cable are not installed.
- NOTICE:
-
After removing the service plug grip and FC converter power outlet cable, do not turn the ignition switch to ON (READY), unless instructed by the repair manual because this may cause a malfunction.
Remove the upper No. 1 EV battery cover sub-assembly.
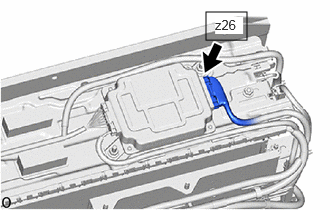
Disconnect the z26 battery ECU assembly connector.
- NOTICE:
- ·
Before disconnecting the connector, check that it is not loose or disconnected.
·Check the terminals of the connector for deformation and corrosion.
Procedure1
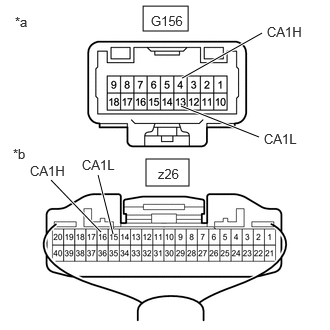
| *a | Front view of wire harness connector
(No. 2 EV Battery Pack Wire Connector) |
| *b | Rear view of wire harness connector
(to Battery ECU Assembly) |
Measure the resistance according to the value(s) in the table below.
- Standard Resistance:
Tester Connection Condition Specified Condition Click Location & Routing(z26,G156)Location & Routingewd_type=routing;type=c,c;code=z26,G156
Click Connector(z26)Body>other>EV Supply Battery Assembly , Battery ECU Assemblyewd_type=component;type=c;code=z26;pinno=16,15
Click Connector(G156)Body>Floor Wire / No. 3 Floor Wire>EV Supply Battery Assemblyewd_type=component;type=c;code=G156;pinno=4,13
z26-16 (CA1H) - G156-4 (CA1H) Always Below 1 Ω z26-15 (CA1L) - G156-13 (CA1L) Always Below 1 Ω z26-16 (CA1H) or G156-4 (CA1H) - Body ground and other terminals Always 10 kΩ or higher z26-15 (CA1L) or G156-13 (CA1L) - Body ground and other terminals Always 10 kΩ or higher
- Result:
Proceed to OK NG
Post-procedure1
Reconnect the z26 battery ECU assembly connector.
Install the upper No. 1 EV battery cover sub-assembly.
OK
NG
- CAUTION:
-
Be sure to wear insulated gloves and protective goggles.
Pre-procedure1
Check that the service plug grip and FC converter power outlet cable are not installed.
- NOTICE:
-
After removing the service plug grip and FC converter power outlet cable, do not turn the ignition switch to ON (READY), unless instructed by the repair manual because this may cause a malfunction.
Disconnect the A8 EV control ECU connector.
- NOTICE:
- ·
Before disconnecting the connector, check that it is not loose or disconnected.
·Check that each connector between the EV control ECU and battery ECU assembly is not loose or disconnected.
Disconnect the D92 shift control ECU connector.
- NOTICE:
-
Before disconnecting the connector, check that it is not loose or disconnected.
Remove the center No. 2 floor to brace extension.
Disconnect the G156 No. 2 EV battery pack wire connector.
- NOTICE:
- ·
Before disconnecting the connector, check that it is not loose or disconnected.
·Check the terminals of the connector for deformation and corrosion.
Procedure1
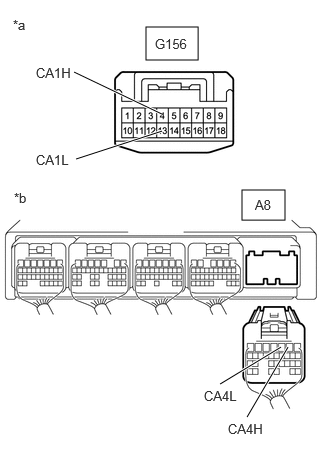
| *a | Front view of wire harness connector
(No. 2 EV Battery Pack Wire Connector) |
| *b | Rear view of wire harness connector
(to EV Control ECU) |
Measure the resistance according to the value(s) in the table below.
- Standard Resistance:
Tester Connection Condition Specified Condition Click Location & Routing(G156,A8)Location & Routingewd_type=routing;type=c,c;code=G156,A8
Click Connector(G156)Body>Floor Wire / No. 3 Floor Wire>EV Supply Battery Assemblyewd_type=component;type=c;code=G156;pinno=4,13
Click Connector(A8)Instrument Panel>Front Compartment Main Wire>EV Control ECUewd_type=component;type=c;code=A8;pinno=2,3
G156-4 (CA1H) - A8-2 (CA4H) Ignition switch off Below 1 Ω G156-13 (CA1L) - A8-3 (CA4L) Ignition switch off Below 1 Ω G156-4 (CA1H) or A8-2 (CA4H) - Other terminals and body ground Ignition switch off 10 kΩ or higher G156-13 (CA1L) or A8-3 (CA4L) - Other terminals and body ground Ignition switch off 10 kΩ or higher
- NOTICE:
-
Make sure that each connector between the battery ECU assembly and EV control ECU is not loose or disconnected and its terminals are not deformed or corroded.
- Result:
Proceed to OK NG
Post-procedure1
Reconnect the G156 No. 2 EV battery pack wire connector.
Install the center No. 2 floor to brace extension.
Reconnect the D92 shift control ECU connector.
Reconnect the A8 EV control ECU connector.
OK
NG
Pre-procedure1
Turn the ignition switch to ON.
Procedure1
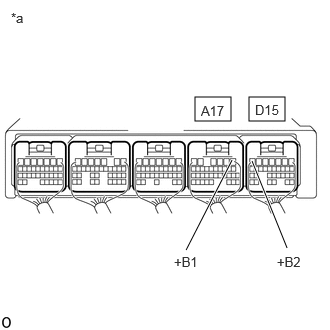
| *a | Component with harness connected
(EV Control ECU) |
Measure the voltage according to the value(s) in the table below.
- Standard Voltage:
Tester Connection Condition Specified Condition Click Location & Routing(A17,D15)Location & Routingewd_type=routing;type=c,c;code=A17,D15
Click Connector(A17)Instrument Panel>Front Compartment Main Wire>EV Control ECUewd_type=component;type=c;code=A17;pinno=1
Click Connector(D15)Instrument Panel>Instrument Panel Wire>EV Control ECUewd_type=component;type=c;code=D15;pinno=7
A17-1 (+B1) - Body ground Ignition switch ON 11 to 14 V D15-7 (+B2) - Body ground Ignition switch ON 11 to 14 V
- Result:
Proceed to OK NG
Post-procedure1
Turn the ignition switch off.
OK
NG
- CAUTION:
-
Be sure to wear insulated gloves and protective goggles.
Pre-procedure1
Check that the service plug grip and FC converter power outlet cable are not installed.
- NOTICE:
-
After removing the service plug grip and FC converter power outlet cable, do not turn the ignition switch to ON (READY), unless instructed by the repair manual because this may cause a malfunction.
Remove the center No. 2 floor to brace extension.
Disconnect the G156 No. 2 EV battery pack wire connector.
- NOTICE:
- ·
Before disconnecting the connector, check that it is not loose or disconnected.
·Check the terminals of the connector for deformation and corrosion.
Procedure1
| *a | Front view of wire harness connector
(No. 2 EV Battery Pack Wire Connector) |
Measure the resistance according to the value(s) in the table below.
- Standard Resistance:
Tester Connection Condition Specified Condition Click Location & Routing(G156)Location & Routingewd_type=routing;type=c;code=G156
Click Connector(G156)Body>Floor Wire / No. 3 Floor Wire>EV Supply Battery Assemblyewd_type=component;type=c;code=G156;pinno=4,13
G156-4 (CA1H) - G156-13 (CA1L) Ignition switch off 108 to 132 Ω
- Result:
Proceed to OK NG
Post-procedure1
Reconnect the G156 No. 2 EV battery pack wire connector.
Install the center No. 2 floor to brace extension.
OK
NG
- CAUTION:
-
Be sure to wear insulated gloves and protective goggles.
Pre-procedure1
Check that the service plug grip and FC converter power outlet cable are not installed.
- NOTICE:
-
After removing the service plug grip and FC converter power outlet cable, do not turn the ignition switch to ON (READY), unless instructed by the repair manual because this may cause a malfunction.
Remove the upper No. 1 EV battery cover sub-assembly.
Disconnect the z26 battery ECU assembly connector.
- NOTICE:
- ·
Before disconnecting the connector, check that it is not loose or disconnected.
·Check the terminals of the connector for deformation and corrosion.
Procedure1
| *a | Front view of wire harness connector
(No. 2 EV Battery Pack Wire Connector) |
| *b | Rear view of wire harness connector
(to Battery ECU Assembly) |
Measure the resistance according to the value(s) in the table below.
- Standard Resistance:
Tester Connection Condition Specified Condition Click Location & Routing(z26,G156)Location & Routingewd_type=routing;type=c,c;code=z26,G156
Click Connector(z26)Body>other>EV Supply Battery Assembly , Battery ECU Assemblyewd_type=component;type=c;code=z26;pinno=16,15
Click Connector(G156)Body>Floor Wire / No. 3 Floor Wire>EV Supply Battery Assemblyewd_type=component;type=c;code=G156;pinno=4,13
z26-16 (CA1H) - G156-4 (CA1H) Always Below 1 Ω z26-15 (CA1L) - G156-13 (CA1L) Always Below 1 Ω z26-16 (CA1H) or G156-4 (CA1H) - Body ground and other terminals Always 10 kΩ or higher z26-15 (CA1L) or G156-13 (CA1L) - Body ground and other terminals Always 10 kΩ or higher
- Result:
Proceed to OK NG
Post-procedure1
Reconnect the z26 battery ECU assembly connector.
Install the upper No. 1 EV battery cover sub-assembly.
OK
NG
- CAUTION:
-
Be sure to wear insulated gloves and protective goggles.
Pre-procedure1
Check that the service plug grip and FC converter power outlet cable are not installed.
- NOTICE:
-
After removing the service plug grip and FC converter power outlet cable, do not turn the ignition switch to ON (READY), unless instructed by the repair manual because this may cause a malfunction.
Disconnect the D15 EV control ECU connector.
- NOTICE:
- ·
Before disconnecting the connector, check that it is not loose or disconnected.
·Check that each connector between the EV control ECU and battery ECU assembly is not loose or disconnected.
Disconnect the D92 shift control ECU connector.
- NOTICE:
-
Before disconnecting the connector, check that it is not loose or disconnected.
Remove the center No. 2 floor to brace extension.
Disconnect the G156 No. 2 EV battery pack wire connector.
- NOTICE:
- ·
Before disconnecting the connector, check that it is not loose or disconnected.
·Check the terminals of the connector for deformation and corrosion.
Procedure1
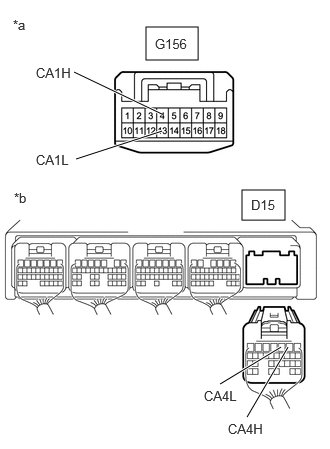
| *a | Front view of wire harness connector
(No. 2 EV Battery Pack Wire Connector) |
| *b | Rear view of wire harness connector
(to EV Control ECU) |
Measure the resistance according to the value(s) in the table below.
- Standard Resistance:
Tester Connection Condition Specified Condition Click Location & Routing(G156,D15)Location & Routingewd_type=routing;type=c,c;code=G156,D15
Click Connector(G156)Body>Floor Wire / No. 3 Floor Wire>EV Supply Battery Assemblyewd_type=component;type=c;code=G156;pinno=4,13
Click Connector(D15)Instrument Panel>Instrument Panel Wire>EV Control ECUewd_type=component;type=c;code=D15;pinno=2,3
G156-4 (CA1H) - D15-2 (CA4H) Ignition switch off Below 1 Ω G156-13 (CA1L) - D15-3 (CA4L) Ignition switch off Below 1 Ω G156-4 (CA1H) or D15-2 (CA4H) - Other terminals and body ground Ignition switch off 10 kΩ or higher G156-13 (CA1L) or D15-3 (CA4L) - Other terminals and body ground Ignition switch off 10 kΩ or higher
- NOTICE:
-
Make sure that each connector between the battery ECU assembly and EV control ECU is not loose or disconnected and its terminals are not deformed or corroded.
- Result:
Proceed to OK NG
Post-procedure1
Reconnect the G156 No. 2 EV battery pack wire connector.
Install the center No. 2 floor to brace extension.
Reconnect the D92 shift control ECU connector.
Reconnect the D15 EV control ECU connector.
OK
NG