FC CONTROL FC CONTROL SYSTEM P1DCF96 Cell Monitor Component Internal Failure
DESCRIPTION
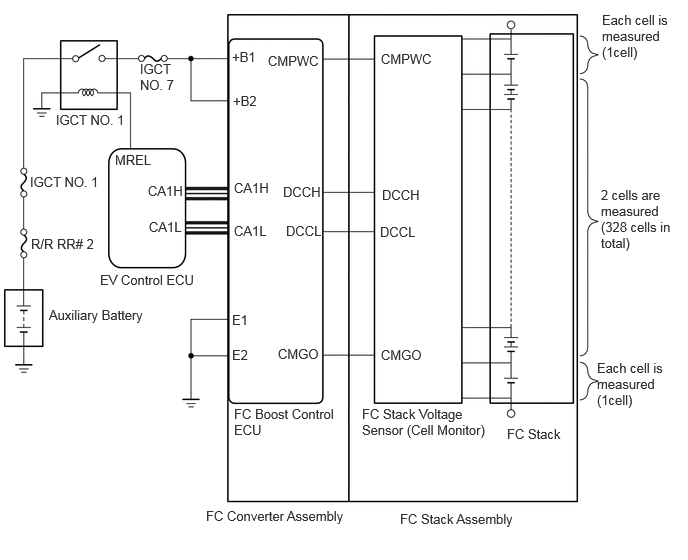
The FC stack consists of 330 cells that are connected in series. In order to measure a voltage at both ends of the FC stack cells individually or as a pair, the cell monitor is constructed as shown in the illustration below.
The cell monitor measures a voltage for each cell, and always monitors the power generated by the cells individually or as a pair (all cells are monitored individually using estimated values). When a generated power voltage deviates from an appropriate range, it forces the EV control ECU to apply feedback control to each of the hydrogen, air and cooling systems.
If the cell monitor finds an error in the microcomputer itself, or abnormalities in the cell monitor power voltage, it informs the EV control ECU of such information, causing the EV control ECU to store this DTC.
| DTC No. | Detection Item | DTC Detection Condition | Trouble Area | Warning Indicate | DTC Output from | Priority |
|---|---|---|---|---|---|---|
| P1DCF96 | Cell Monitor Component Internal Failure | During power generation (except when in cell monitor sleep mode), the cell monitor constantly detects malfunctions in the cell monitor itself or in the cell monitor circuit or input voltage, and sends this data to the EV control ECU.
The cell monitor watches the performance by measuring an output from each 1 or 2 of the 330 cells in the FC stack. Upon receiving a signal from the cell monitor, the EV control ECU interprets that the cell monitor is unable to monitor the cells. (1 trip detection logic) |
·
FC stack assembly ·
Wire harness or connector (Cell monitor power supply) ·
IGCT NO. 1 relay ·
FC boost control ECU ·
Cell monitor (FC stack voltage sensor) ·
No. 3 FC converter wire ·
FC stack monitor wire |
Master Warning: Comes on | EV | B |
| Vehicle Condition | FC shutdown
(ignition switch ON) |
FC startup process | FC intermittent operation | FC is generating power
(vehicle is in stationary) |
FC is generating power
(vehicle is traveling) |
FC shutdown process |
|---|---|---|---|---|---|---|
| Data List
"FC Work Mode" |
Stop | Startup | Working | Finishing | ||
| Data List
"FC Intermittent Operation" |
OFF | ON | OFF | OFF | ||
| DTC Detection | - | - | ○ | ○ | ○ | - |
| DTC No. | Data List |
|---|---|
| P1DCF96 | ·
Cell Monitor AD Abnormal ·
Cell Monitor ROM Abnormal ·
Cell Monitor RAM Abnormal ·
Cell Monitor Abnormal 2 ·
Cell Monitor Power Supply Voltage Low |
WIRING DIAGRAM
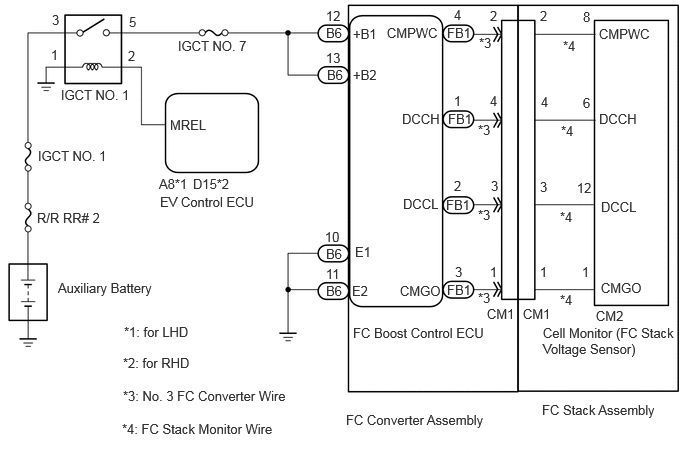
CAUTION / NOTICE / HINT
- CAUTION:
- ·
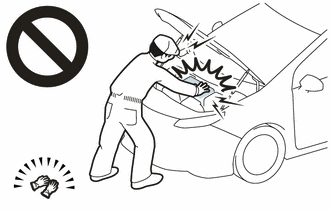
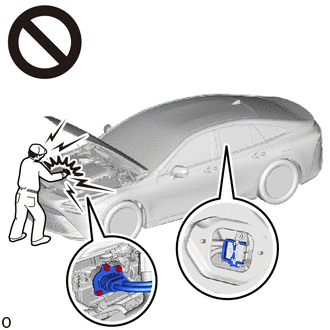
Before the following operations are conducted, take precautions to prevent electric shock by turning the ignition switch off, wearing insulated gloves, and removing the EV supply battery assembly service plug grip and FC converter power outlet cable (inverter with converter assembly) on FC converter side.
Make sure to remove the EV supply battery assembly service plug grip first.
-Inspecting the high-voltage system
-Disconnecting the low voltage connector of the inverter with converter assembly
-Disconnecting the low voltage connector of the EV supply battery assembly
-Disconnecting the low voltage connector of the FC converter assembly
·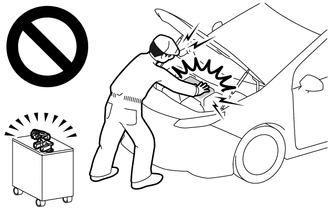
After removing the service plug grip from the EV supply battery assembly, put it in your pocket to prevent other technicians from accidentally reconnecting it while you are working on the high-voltage system. After removing the FC converter power outlet cable (inverter with converter assembly) on FC converter side and use the "HIGH-VOLTAGE, DO NOT TOUCH" sign to notify other technicians that you are working on the high-voltage system.
·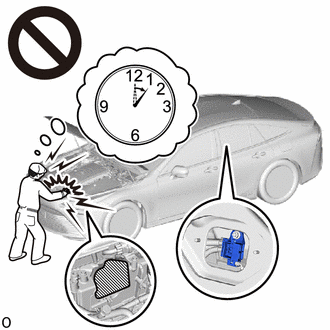
After removal of the EV supply battery assembly service plug grip and FC converter power outlet cable (inverter with converter assembly) on FC converter side, wait for at least 10 minutes before touching the high-voltage connectors and terminals. After waiting for 10 minutes, check the voltage at the terminals in the inspection point in the inverter with converter assembly. The voltage should be 0 V before beginning work.
Click hereEngine / Hybrid System>FC CONTROL>FC CONTROL SYSTEM>PRECAUTION
- HINT:
-
At least 10 minutes are necessary to discharge the high-voltage capacitors inside the inverter with converter assembly and FC stack assembly.
·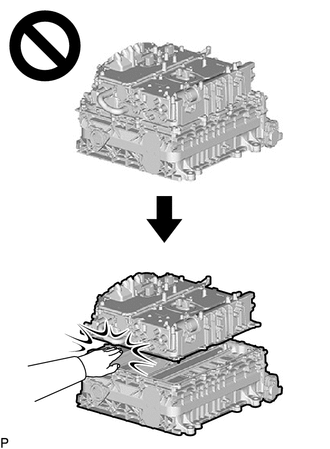
Since high voltage accumulates within the FC stack assembly with FC converter, never perform the work of separating the FC stack assembly with FC converter into the FC converter assembly and FC stack assembly without first performing electrical charge discharge (forced electrical charge discharge or electrical charge self-discharge), because doing so is dangerous.
Click hereEngine / Hybrid System>FC CONTROL>FC STACK>REMOVAL
·Removing and installing the FC stack assembly without first discharging the electrical charge may result in an electric shock due to the high voltage circuit.
- NOTICE:
- ·
When reinstalling the service plug grip to the EV supply battery assembly, after lowering the EV supply battery assembly service plug grip 90°, securely slide it until a "click" sound is heard.
Click hereEngine / Hybrid System>FC CONTROL>FC CONTROL SYSTEM>PRECAUTION
·This vehicle performs FC system shutdown process after turning the ignition switch off from ON (READY). Therefore, after the ignition switch is turned off from ON (READY), do not perform any work on the electrical system for at least 10 minutes including removing connectors or disconnecting the negative (-) auxiliary battery terminal.
·When the EV control ECU determines that the temperature of FC system components is below 0°C (32°F) when the vehicle is parked with the ignition switch off, it operates the FC air compressor, hydrogen pump and FC cooling water pump for a maximum of 180 seconds to drain the FC stack assembly. When performing inspection or repairs with the ignition switch off (not ON or ON (READY)), disconnect the cable from the negative (-) auxiliary battery terminal before performing work. (If the auxiliary battery voltage is needed to conduct inspection, perform the inspection in an environment with an ambient temperature of 10°C (50°F) or higher.)
- HINT:
- ·
Forcing the SOC of the EV supply battery assembly to decrease by applying electrical loads such as turning on the air conditioning (HOT MAX, maximum airflow), or depressing the accelerator pedal with the shift state in park (P), the "FC Intermittent Operation" of the Data List is easily to enter OFF (power generation mode).
-
After the repair, clear the DTCs and perform the following procedure to check that DTCs are not output.
- 1.
Connect the GTS to the DLC3.
2.Turn the ignition switch to ON.
3.Turn the ignition switch to ON (READY) with the shift state in park (P), and wait for at least 2 minutes. If no DTCs are output in this step, drive the vehicle in city streets for approximately 10 minutes by referring to the applicable freeze frame data (Vehicle Speed, Accelerator Degree, etc.).
- CAUTION:
-
Perform this road test only in an appropriate safe location, in accordance with all local laws.
PROCEDURE
- NOTICE:
-
The freeze frame data is cleared when DTCs are cleared. Be sure to make a note of necessary data in advance.
Pre-procedure1
None
Procedure1
According to the display on the GTS, check for DTCs in the Health Check.
- Result:
Result Proceed to Only P1DCF96 is output A P1DCF96 is output and DTCs other than the DTCs in the table below are output B P1DCF96 is output and any DTCs in the table below are output C
Malfunction Content Relevant DTC Communication system malfunction P1D5F87 (FCDC) Lost Communication with Cell Monitor Missing Message Sensor and actuator circuit malfunction P0A0812 (Hybrid (EV) Control System) DC/DC Converter Status Circuit Short to Auxiliary Battery P0A0814 (Hybrid (EV) Control System) DC/DC Converter Status Circuit Short to Ground or Open P0A1112 (Hybrid (EV) Control System) DC/DC Converter Enable Circuit Short to Auxiliary Battery P0A1114 (Hybrid (EV) Control System) DC/DC Converter Enable Circuit Short to Ground or Open P1CCC96 (Hybrid (EV) Control System) DC/DC Converter Enable Circuit Component Internal Failure P1F3712 (Hybrid (EV) Control System) DC/DC Converter "C" Enable Circuit Short to Battery P1F3714 (Hybrid (EV) Control System) DC/DC Converter "C" Enable Circuit Short to Ground or Open P1F3A12 (Hybrid (EV) Control System) DC/DC Converter "C" Status Circuit Short to Battery P1F3A14 (Hybrid (EV) Control System) DC/DC Converter "C" Status Circuit Short to Ground or Open P1F3F31 (Hybrid (EV) Control System) DC/DC Converter "C" Status Circuit "B" No Signal P1F6396 (Hybrid (EV) Control System) DC/DC Converter "C" Component Internal Failure P1F6400 (Hybrid (EV) Control System) DC/DC Converter "C" Cooling System Performance
- HINT:
-
P1DCF96 may be store due to problems that cause the DTCs shown above to be output. If such happens, troubleshoot the suspected area(s) corresponding to the output DTC(s) in order starting with the listed DTCs shown in the table above.
Post-procedure1
Turn the ignition switch off.
A
B
C
Hybrid (EV) Control System:
Click hereEngine / Hybrid System>HYBRID / BATTERY CONTROL>HYBRID CONTROL SYSTEM>DIAGNOSTIC TROUBLE CODE CHART
- NOTICE:
-
The freeze frame data is cleared when DTCs are cleared. Be sure to make a note of necessary data in advance.
Pre-procedure1
None
Procedure1
Read the freeze frame data of DTC P1DCF96.
- Powertrain > EV > DTC(P1DCF96) > Freeze Frame Data
-
Tester Display Cell Monitor AD Abnormal Cell Monitor ROM Abnormal Cell Monitor RAM Abnormal Cell Monitor Abnormal 2 - 50040 397 832,833,834,842 P1DCF96
- Result:
Result Proceed to Either "Cell Monitor AD Abnormal", "Cell Monitor ROM Abnormal" or "Cell Monitor RAM Abnormal" is ON A "Cell Monitor Abnormal 2" is ON B Other than above. C
Post-procedure1
Turn the ignition switch off.
A
B
C
Pre-procedure1
None
Procedure1
Clear the DTCs.
- Powertrain > EV > Clear DTCs
- 50002 397
- Result:
Proceed to NEXT
Post-procedure1
Turn the ignition switch off and wait for 10 minutes or more.
NEXT
Turn the ignition switch to ON (READY) with the state in park (P), and check that the Data List "FC Work Mode" is Working and "FC Intermittent Operation" is OFF. Then, wait for 2 minutes or more.
- Powertrain > EV > Data List
-
Tester Display FC Work Mode FC Intermittent Operation - 50003 397 962,872
- Result:
Proceed to NEXT
NEXT
Pre-procedure1
None
Procedure1
Check for DTCs.
- Powertrain > EV > Trouble Codes
- 50001 397
- Result:
Result Proceed to DTCs are not output A P1DCF96 is output B
P1DCF96 is output: The cell monitor (FC stack voltage sensor) is malfunctioning
Post-procedure1
Turn the ignition switch off.
A
B
Replace the FC converter and FC stack assembly components listed below.
Click hereEngine / Hybrid System>FC CONTROL>CONVERTER ASSEMBLY>REMOVAL
Cell monitor (FC stack voltage sensor)
- HINT:
- ·
Refer to the parts location for the FC converter and FC stack assembly components.
Click hereEngine / Hybrid System>FC CONTROL>FC CONTROL SYSTEM>PARTS LOCATION
·Refer to the system description for the parts location of the FC converter and FC stack assembly components.
Click hereEngine / Hybrid System>FC CONTROL>FC CONTROL SYSTEM>SYSTEM DESCRIPTION
Pre-procedure1
Drive the vehicle for 10 minutes according to the freeze frame data (Vehicle Speed, Accelerator Degree, etc.)
- CAUTION:
-
Perform this road test only in an appropriate safe location, in accordance with all local laws.
- HINT:
-
If vehicle speeds, accelerator pedal positions, road conditions, ambient temperatures and climates at the time the malfunction occurred can be found out, take them into account.
Procedure1
Check for DTCs.
- Powertrain > EV > Trouble Codes
- 50001 397
- Result:
Result Proceed to DTCs are not output A P1DCF96 is output B
P1DCF96 is output: The cell monitor (FC stack voltage sensor) is malfunctioning
Post-procedure1
Turn the ignition switch off.
A
Click hereGeneral>INTRODUCTION>HOW TO TROUBLESHOOT ECU CONTROLLED SYSTEMS>HOW TO PROCEED WITH TROUBLESHOOTING
B
Replace the FC converter and FC stack assembly components listed below.
Click hereEngine / Hybrid System>FC CONTROL>CONVERTER ASSEMBLY>REMOVAL
Cell monitor (FC stack voltage sensor)
- HINT:
- ·
Refer to the parts location for the FC converter and FC stack assembly components.
Click hereEngine / Hybrid System>FC CONTROL>FC CONTROL SYSTEM>PARTS LOCATION
·Refer to the system description for the parts location of the FC converter and FC stack assembly components.
Click hereEngine / Hybrid System>FC CONTROL>FC CONTROL SYSTEM>SYSTEM DESCRIPTION
Check the auxiliary battery.
- Result:
Proceed to OK NG
OK
NG
- CAUTION:
-
Be sure to wear insulated gloves.
Pre-procedure1
Check that the service plug grip is not installed to EV supply battery assembly and the FC converter power outlet cable (inverter with converter assembly) is not connected to the FC converter assembly.
- NOTICE:
-
After removing the EV supply battery assembly service plug grip and FC converter power outlet cable (inverter with converter assembly) on FC converter side, do not turn the ignition switch to ON (READY), unless instructed by the repair manual because this may cause a malfunction.
Remove the electric heater sub-assembly.
Procedure1
Disconnect the FC converter assembly (FC boost control ECU) connector.
Measure the resistance according to the value(s) in the table below.
- Standard Resistance:
Tester Connection Condition Specified Condition Click Location & Routing(B6)Location & Routingewd_type=routing;type=c;code=B6
Click Connector(B6)Engine Compartment>No. 2 Stack Wire>FC Converter Assemblyewd_type=component;type=c;code=B6;pinno=10,11
B6-10 (E1) - Body ground Ignition switch off Below 1 Ω B6-11 (E2) - Body ground Ignition switch off Below 1 Ω
- Result:
Proceed to OK NG
Post-procedure1
Reconnect the FC converter assembly (FC boost control ECU) connector.
OK
NG
- CAUTION:
-
Be sure to wear insulated gloves.
Pre-procedure1
Check that the service plug grip is not installed to EV supply battery assembly and the FC converter power outlet cable (inverter with converter assembly) is not connected to the FC converter assembly.
- NOTICE:
-
After removing the EV supply battery assembly service plug grip and FC converter power outlet cable (inverter with converter assembly) on FC converter side, do not turn the ignition switch to ON (READY), unless instructed by the repair manual because this may cause a malfunction.
Remove the electric heater sub-assembly.
Procedure1
Disconnect the FC converter assembly (FC boost control ECU) connector.
Turn the ignition switch to ON.
Measure the voltage according to the value(s) in the table below.
- Standard Voltage:
Tester Connection Condition Specified Condition Click Location & Routing(B6)Location & Routingewd_type=routing;type=c;code=B6
Click Connector(B6)Engine Compartment>No. 2 Stack Wire>FC Converter Assemblyewd_type=component;type=c;code=B6;pinno=12,13
B6-12 (+B1) - Body ground Ignition switch ON 11 to 15.5 V B6-13 (+B2) - Body ground Ignition switch ON 11 to 15.5 V
- Result:
Proceed to OK NG
Post-procedure1
Turn the ignition switch off.
Reconnect the FC converter assembly (FC boost control ECU) connector.
OK
NG
Inspect the IGCT NO.1 relay.
Click hereEngine / Hybrid System>HYBRID / BATTERY CONTROL>RELAY>ON-VEHICLE INSPECTION
- Result:
Proceed to OK NG
OK
NG
- CAUTION:
-
Be sure to wear insulated gloves.
Pre-procedure1
Check that the service plug grip is not installed to EV supply battery assembly and the FC converter power outlet cable (inverter with converter assembly) is not connected to the FC converter assembly.
- NOTICE:
-
After removing the EV supply battery assembly service plug grip and FC converter power outlet cable (inverter with converter assembly) on FC converter side, do not turn the ignition switch to ON (READY), unless instructed by the repair manual because this may cause a malfunction.
Remove the electric heater sub-assembly.
Procedure1
Disconnect the FC boost control ECU (FC converter assembly) connector.
Remove the IGCT NO. 1 relay from the luggage room relay block.
Measure the resistance according to the value(s) in the table below.
- Standard Resistance:
Tester Connection Condition Specified Condition Click Location & Routing(B6)Location & Routingewd_type=routing;type=c;code=B6
Click Connector(B6)Engine Compartment>No. 2 Stack Wire>FC Converter Assemblyewd_type=component;type=c;code=B6;pinno=12,13
B6-12 (+B1) - 5 (IGCT NO. 1 relay holder) Ignition switch off Below 1 Ω B6-13 (+B2) - 5 (IGCT NO. 1 relay holder) Ignition switch off Below 1 Ω B6-12 (+B1), B6-13 (+B2) or 5 (IGCT NO. 2 relay holder) - Body ground and other terminals Ignition switch off 10 kΩ or higher
Post-procedure1
Reinstall the IGCT NO. 1 relay.
Reconnect the FC boost control ECU (FC converter assembly) connector.
Install the electric heater sub-assembly.
- Result:
Proceed to OK NG
OK
NG
Pre-procedure1
Remove the IGCT NO. 1 relay from the luggage room relay block.
Disconnect the cable from the negative (-) auxiliary battery terminal.
Disconnect the cable from the positive (+) auxiliary battery terminal.
Procedure1
Measure the resistance according to the value(s) in the table below.
- Standard Resistance:
Tester Connection Condition Specified Condition 3 (IGCT NO. 1 relay holder) - positive (+) auxiliary battery terminal Ignition switch off Below 1 Ω 3 (IGCT NO. 1 relay holder) or positive (+) auxiliary battery terminal - Body ground and other terminals Ignition switch off 10 kΩ or higher
- Result:
Proceed to OK NG
Post-procedure1
Reinstall the IGCT NO. 1 relay.
Reconnect the cable from the positive (+) auxiliary battery terminal.
Reconnect the cable from the negative (-) auxiliary battery terminal.
OK
NG
Pre-procedure1
Drive the vehicle for 10 minutes according to the freeze frame data (Vehicle Speed, Accelerator Degree, etc.)
- CAUTION:
-
Perform this road test only in an appropriate safe location, in accordance with all local laws.
- HINT:
-
If vehicle speeds, accelerator pedal positions, road conditions, ambient temperatures and climates at the time the malfunction occurred can be found out, take them into account.
Procedure1
Check for DTCs.
- Powertrain > EV > Trouble Codes
- 50001 397
- Result:
Result Proceed to DTCs are not output A P1DCF96 is output B
Post-procedure1
Turn the ignition switch off.
A
Click hereGeneral>INTRODUCTION>HOW TO TROUBLESHOOT ECU CONTROLLED SYSTEMS>HOW TO PROCEED WITH TROUBLESHOOTING
B
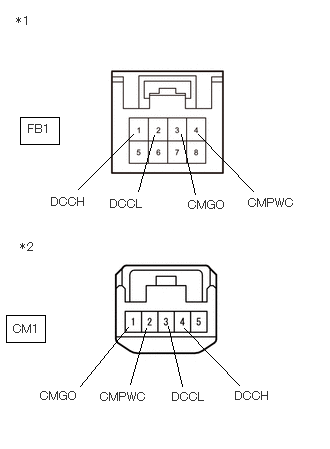
| *1 | No. 3 FC Converter Wire
(FC boost control ECU Side) |
| *2 | No. 3 FC Converter Wire
(Cell Monitor (FC Stack Voltage Sensor) Side) |
- CAUTION:
-
Be sure to wear insulated gloves.
Pre-procedure1
Check that the service plug grip is not installed to EV supply battery assembly and the FC converter power outlet cable (inverter with converter assembly) is not connected to the FC converter assembly.
- NOTICE:
-
After removing the EV supply battery assembly service plug grip and FC converter power outlet cable (inverter with converter assembly) on FC converter side, do not turn the ignition switch to ON (READY), unless instructed by the repair manual because this may cause a malfunction.
Remove the FC stack assembly from the vehicle.
- HINT:
-
Click hereEngine / Hybrid System>FC CONTROL>FC STACK>REMOVAL
Remove the FC converter assembly from the FC stack assembly.
- HINT:
-
Click hereEngine / Hybrid System>FC CONTROL>CONVERTER ASSEMBLY>REMOVAL
Remove the No. 3 FC converter wire from the FC converter assembly.
Procedure1
Measure the resistance according to the value(s) in the table below.
- Standard Resistance:
Tester Connection Condition Specified Condition FB1-[4] (CMPWC) - CM1-[2] (CMPWC) Ignition switch off Below 1 Ω FB1-[1] (DCCH) - CM1-[4] (DCCH) Ignition switch off Below 1 Ω FB1-[2] (DCCL) - CM1-[3] (DCCL) Ignition switch off Below 1 Ω FB1-[3] (CMGO) - CM1-[1] (CMGO) Ignition switch off Below 1 Ω FB1-[4] (CMPWC) or CM1-[2] (CMPWC) - Body ground and other terminals Ignition switch off 10 kΩ or higher FB1-[1] (DCCH) or CM1-[4] (DCCH) - Body ground and other terminals Ignition switch off 10 kΩ or higher FB1-[2] (DCCL) or CM1-[3] (DCCL) - Body ground and other terminals Ignition switch off 10 kΩ or higher FB1-[3] (CMGO) or CM1-[1] (CMGO) - Body ground and other terminals Ignition switch off 10 kΩ or higher
- Result:
Proceed to OK NG
Post-procedure1
Install the No. 3 FC converter wire to the FC converter assembly.
OK
NG
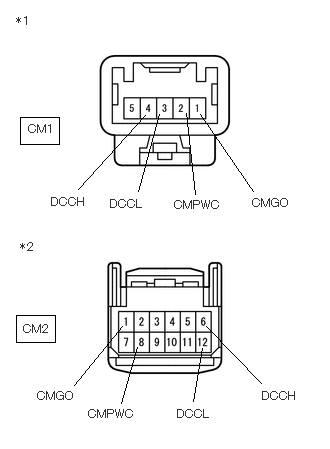
| *1 | FC Stack Monitor Wire
(FC boost control ECU Side) |
| *2 | FC Stack Monitor Wire
(Cell Monitor (FC Stack Voltage Sensor) Side) |
- CAUTION:
-
Be sure to wear insulated gloves.
Pre-procedure1
Check that the service plug grip is not installed to EV supply battery assembly and the FC converter power outlet cable (inverter with converter assembly) is not connected to the FC converter assembly.
- NOTICE:
-
After removing the EV supply battery assembly service plug grip and FC converter power outlet cable (inverter with converter assembly) on FC converter side, do not turn the ignition switch to ON (READY), unless instructed by the repair manual because this may cause a malfunction.
Remove the FC stack monitor wire from the FC converter assembly.
Procedure1
Measure the resistance according to the value(s) in the table below.
- Standard Resistance:
Tester Connection Condition Specified Condition CM1-[2] (CMPWC) - CM2-[8] (CMPWC) Ignition switch off Below 1 Ω CM1-[4] (DCCH) - CM2-[6] (DCCH) Ignition switch off Below 1 Ω CM1-[3] (DCCL) - CM2-[12] (DCCL) Ignition switch off Below 1 Ω CM1-[1] (CMGO) - CM2-[1] (CMGO) Ignition switch off Below 1 Ω CM1-[2] (CMPWC) or CM2-[8] (CMPWC) - Body ground and other terminals Ignition switch off 10 kΩ or higher CM1-[4] (DCCH) or CM2-[6] (DCCH) - Body ground and other terminals Ignition switch off 10 kΩ or higher CM1-[3] (DCCL) or CM2-[12] (DCCL) - Body ground and other terminals Ignition switch off 10 kΩ or higher CM1-[1] (CMGO) or CM2-[1] (CMGO) - Body ground and other terminals Ignition switch off 10 kΩ or higher
- Result:
Proceed to OK NG
Post-procedure1
Install the FC stack monitor wire to the FC converter assembly.
Install the FC converter assembly to the FC stack assembly.
Install the FC stack assembly to the vehicle.
OK
Replace the FC converter and FC stack assembly components listed below.
Click hereEngine / Hybrid System>FC CONTROL>CONVERTER ASSEMBLY>REMOVAL
FC boost control ECU
Cell monitor (FC stack voltage sensor)
- HINT:
- ·
Refer to the parts location for the FC converter and FC stack assembly components.
Click hereEngine / Hybrid System>FC CONTROL>FC CONTROL SYSTEM>PARTS LOCATION
·Refer to the system description for the parts location of the FC converter and FC stack assembly components.
Click hereEngine / Hybrid System>FC CONTROL>FC CONTROL SYSTEM>SYSTEM DESCRIPTION
NG
Pre-procedure1
None
Procedure1
Clear the DTCs.
- Powertrain > EV > Clear DTCs
- 50002 397
- Result:
Proceed to NEXT
Post-procedure1
Turn the ignition switch off and wait for 10 minutes or more.
NEXT
Turn the ignition switch to ON (READY) with the shift state in park (P), and check that the Data List "FC Work Mode" is Working and "FC Intermittent Operation" is OFF. Then, wait for 2 minutes or more.
- Powertrain > EV > Data List
-
Tester Display FC Work Mode FC Intermittent Operation - 50003 397 962,872
- Result:
Proceed to NEXT
NEXT
Pre-procedure1
None
Procedure1
Check for DTCs.
- Powertrain > EV > Trouble Codes
- 50001 397
- Result:
Result Proceed to DTCs are not output A P1DCF96 is output B
Post-procedure1
Turn the ignition switch off.
A
B
Pre-procedure1
Drive the vehicle for 10 minutes according to the freeze frame data (Vehicle Speed, Accelerator Degree, etc.)
- CAUTION:
-
Perform this road test only in an appropriate safe location, in accordance with all local laws.
- HINT:
-
If vehicle speeds, accelerator pedal positions, road conditions, ambient temperatures and climates at the time the malfunction occurred can be found out, take them into account.
Procedure1
Check for DTCs.
- Powertrain > EV > Trouble Codes
- 50001 397
- Result:
Result Proceed to DTCs are not output A P1DCF96 is output B
Post-procedure1
Turn the ignition switch off.
A
Click hereGeneral>INTRODUCTION>HOW TO TROUBLESHOOT ECU CONTROLLED SYSTEMS>HOW TO PROCEED WITH TROUBLESHOOTING
B
| *1 | No. 3 FC Converter Wire
(FC boost control ECU Side) |
| *2 | No. 3 FC Converter Wire
(Cell Monitor (FC Stack Voltage Sensor) Side) |
- CAUTION:
-
Be sure to wear insulated gloves.
Pre-procedure1
Check that the service plug grip is not installed to EV supply battery assembly and the FC converter power outlet cable (inverter with converter assembly) is not connected to the FC converter assembly.
- NOTICE:
-
After removing the EV supply battery assembly service plug grip and FC converter power outlet cable (inverter with converter assembly) on FC converter side, do not turn the ignition switch to ON (READY), unless instructed by the repair manual because this may cause a malfunction.
Remove the FC stack assembly from the vehicle.
- HINT:
-
Click hereEngine / Hybrid System>FC CONTROL>FC STACK>REMOVAL
Remove the FC converter assembly from the FC stack assembly.
- HINT:
-
Click hereEngine / Hybrid System>FC CONTROL>CONVERTER ASSEMBLY>REMOVAL
Remove the No. 3 FC converter wire from the FC converter assembly.
Procedure1
Measure the resistance according to the value(s) in the table below.
- Standard Resistance:
Tester Connection Condition Specified Condition FB1-[4] (CMPWC) - CM1-[2] (CMPWC) Ignition switch off Below 1 Ω FB1-[1] (DCCH) - CM1-[4] (DCCH) Ignition switch off Below 1 Ω FB1-[2] (DCCL) - CM1-[3] (DCCL) Ignition switch off Below 1 Ω FB1-[3] (CMGO) - CM1-[1] (CMGO) Ignition switch off Below 1 Ω FB1-[4] (CMPWC) or CM1-[2] (CMPWC) - Body ground and other terminals Ignition switch off 10 kΩ or higher FB1-[1] (DCCH) or CM1-[4] (DCCH) - Body ground and other terminals Ignition switch off 10 kΩ or higher FB1-[2] (DCCL) or CM1-[3] (DCCL) - Body ground and other terminals Ignition switch off 10 kΩ or higher FB1-[3] (CMGO) or CM1-[1] (CMGO) - Body ground and other terminals Ignition switch off 10 kΩ or higher
- Result:
Proceed to OK NG
Post-procedure1
Install the No. 3 FC converter wire to the FC converter assembly.
OK
NG
| *1 | FC Stack Monitor Wire
(FC boost control ECU Side) |
| *2 | FC Stack Monitor Wire
(Cell Monitor (FC Stack Voltage Sensor) Side) |
- CAUTION:
-
Be sure to wear insulated gloves.
Pre-procedure1
Check that the service plug grip is not installed to EV supply battery assembly and the FC converter power outlet cable (inverter with converter assembly) is not connected to the FC converter assembly.
- NOTICE:
-
After removing the EV supply battery assembly service plug grip and FC converter power outlet cable (inverter with converter assembly) on FC converter side, do not turn the ignition switch to ON (READY), unless instructed by the repair manual because this may cause a malfunction.
Remove the FC stack monitor wire from the FC converter assembly.
Procedure1
Measure the resistance according to the value(s) in the table below.
- Standard Resistance:
Tester Connection Condition Specified Condition CM1-[2] (CMPWC) - CM2-[8] (CMPWC) Ignition switch off Below 1 Ω CM1-[4] (DCCH) - CM2-[6] (DCCH) Ignition switch off Below 1 Ω CM1-[3] (DCCL) - CM2-[12] (DCCL) Ignition switch off Below 1 Ω CM1-[1] (CMGO) - CM2-[1] (CMGO) Ignition switch off Below 1 Ω CM1-[2] (CMPWC) or CM2-[8] (CMPWC) - Body ground and other terminals Ignition switch off 10 kΩ or higher CM1-[4] (DCCH) or CM2-[6] (DCCH) - Body ground and other terminals Ignition switch off 10 kΩ or higher CM1-[3] (DCCL) or CM2-[12] (DCCL) - Body ground and other terminals Ignition switch off 10 kΩ or higher CM1-[1] (CMGO) or CM2-[1] (CMGO) - Body ground and other terminals Ignition switch off 10 kΩ or higher
- Result:
Proceed to OK NG
Post-procedure1
Install the FC stack monitor wire to the FC converter assembly.
Install the FC converter assembly to the FC stack assembly.
Install the FC stack assembly to the vehicle.
OK
NG
| *1 | No. 3 FC Converter Wire
(FC boost control ECU Side) |
| *2 | No. 3 FC Converter Wire
(Cell Monitor (FC Stack Voltage Sensor) Side) |
- CAUTION:
-
Be sure to wear insulated gloves.
Pre-procedure1
Check that the service plug grip is not installed to EV supply battery assembly and the FC converter power outlet cable (inverter with converter assembly) is not connected to the FC converter assembly.
- NOTICE:
-
After removing the EV supply battery assembly service plug grip and FC converter power outlet cable (inverter with converter assembly) on FC converter side, do not turn the ignition switch to ON (READY), unless instructed by the repair manual because this may cause a malfunction.
Remove the FC stack assembly from the vehicle.
- HINT:
-
Click hereEngine / Hybrid System>FC CONTROL>FC STACK>REMOVAL
Remove the FC converter assembly from the FC stack assembly.
- HINT:
-
Click hereEngine / Hybrid System>FC CONTROL>CONVERTER ASSEMBLY>REMOVAL
Remove the No. 3 FC converter wire from the FC converter assembly.
Procedure1
Measure the resistance according to the value(s) in the table below.
- Standard Resistance:
Tester Connection Condition Specified Condition FB1-[4] (CMPWC) - CM1-[2] (CMPWC) Ignition switch off Below 1 Ω FB1-[1] (DCCH) - CM1-[4] (DCCH) Ignition switch off Below 1 Ω FB1-[2] (DCCL) - CM1-[3] (DCCL) Ignition switch off Below 1 Ω FB1-[3] (CMGO) - CM1-[1] (CMGO) Ignition switch off Below 1 Ω FB1-[4] (CMPWC) or CM1-[2] (CMPWC) - Body ground and other terminals Ignition switch off 10 kΩ or higher FB1-[1] (DCCH) or CM1-[4] (DCCH) - Body ground and other terminals Ignition switch off 10 kΩ or higher FB1-[2] (DCCL) or CM1-[3] (DCCL) - Body ground and other terminals Ignition switch off 10 kΩ or higher FB1-[3] (CMGO) or CM1-[1] (CMGO) - Body ground and other terminals Ignition switch off 10 kΩ or higher
- Result:
Proceed to OK NG
Post-procedure1
Install the No. 3 FC converter wire to the FC converter assembly.
OK
NG
| *1 | FC Stack Monitor Wire
(FC boost control ECU Side) |
| *2 | FC Stack Monitor Wire
(Cell Monitor (FC Stack Voltage Sensor) Side) |
- CAUTION:
-
Be sure to wear insulated gloves.
Pre-procedure1
Check that the service plug grip is not installed to EV supply battery assembly and the FC converter power outlet cable (inverter with converter assembly) is not connected to the FC converter assembly.
- NOTICE:
-
After removing the EV supply battery assembly service plug grip and FC converter power outlet cable (inverter with converter assembly) on FC converter side, do not turn the ignition switch to ON (READY), unless instructed by the repair manual because this may cause a malfunction.
Remove the FC stack monitor wire from the FC converter assembly.
Procedure1
Measure the resistance according to the value(s) in the table below.
- Standard Resistance:
Tester Connection Condition Specified Condition CM1-[2] (CMPWC) - CM2-[8] (CMPWC) Ignition switch off Below 1 Ω CM1-[4] (DCCH) - CM2-[6] (DCCH) Ignition switch off Below 1 Ω CM1-[3] (DCCL) - CM2-[12] (DCCL) Ignition switch off Below 1 Ω CM1-[1] (CMGO) - CM2-[1] (CMGO) Ignition switch off Below 1 Ω CM1-[2] (CMPWC) or CM2-[8] (CMPWC) - Body ground and other terminals Ignition switch off 10 kΩ or higher CM1-[4] (DCCH) or CM2-[6] (DCCH) - Body ground and other terminals Ignition switch off 10 kΩ or higher CM1-[3] (DCCL) or CM2-[12] (DCCL) - Body ground and other terminals Ignition switch off 10 kΩ or higher CM1-[1] (CMGO) or CM2-[1] (CMGO) - Body ground and other terminals Ignition switch off 10 kΩ or higher
- Result:
Proceed to OK NG
Post-procedure1
Install the FC stack monitor wire to the FC converter assembly.
Install the FC converter assembly to the FC stack assembly.
Install the FC stack assembly to the vehicle.
OK
NG