TELEMATICS TELEMATICS SYSTEM(for TOYOTA Connect) Telematics Transceiver Malfunction
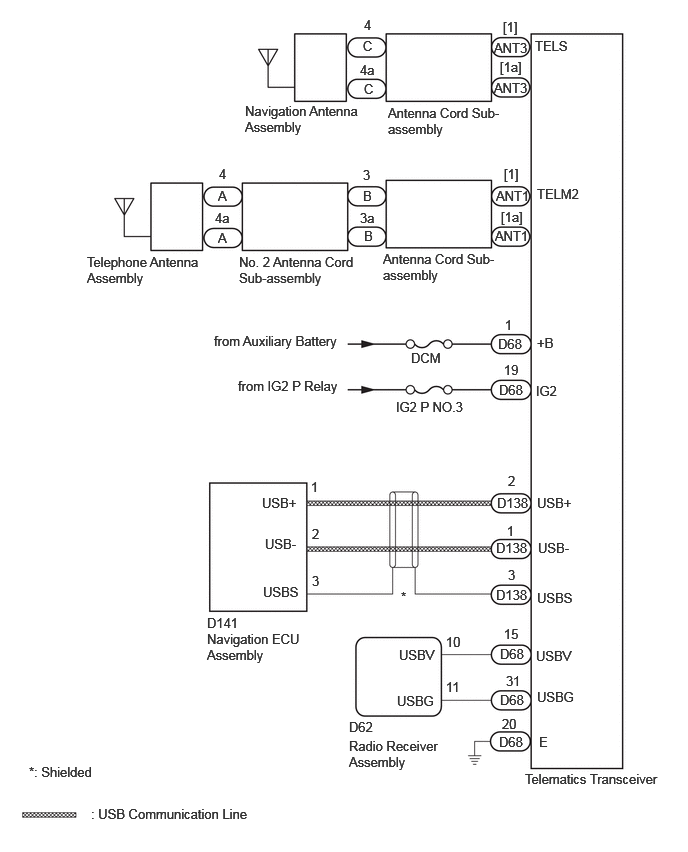
WIRING DIAGRAM
CAUTION / NOTICE / HINT
- NOTICE:
- ·
Inspect the fuses for circuits related to this system before performing the following procedure.
·Depending on the parts that are replaced during vehicle inspection or maintenance, performing initialization, registration or calibration may be needed. Refer to Precaution for Telematics System (for TOYOTA Connect).
Click hereAudio / Visual / Telematics>TELEMATICS>TELEMATICS SYSTEM (for TOYOTA Connect)>PRECAUTION
·When replacing the telematics transceiver, make sure to replace it with a new one.
PROCEDURE
If the vehicle is outside the communication service area, move the vehicle into a communication service area, wait for a while and perform the operation again.
- Result:
Proceed to NEXT
NEXT
Clear the DTCs.
- Body Electrical > Telematics > Clear DTCs
- 50002 459
Recheck for DTCs and check if the same DTC is output again.
- Body Electrical > Telematics > Trouble Codes
- 50001 459
- Result:
Result Proceed to No DTCs are output. A DTCs are output. B
A
B
According to the display on the GTS, read the "Data List".
- Body Electrical > Telematics > Data List
-
Tester Display Measurement Item Range Normal Condition Diagnostic Note IMEI IMEI of telematics transceiver 15 digits - - Telematics Activation Status DCM activation status Shipping or Active Shipping: Not activated
Active: Activated-
- Body Electrical > Telematics > Data List
-
Tester Display IMEI Telematics Activation Status - 50003 459 21,38
Contact the TOYOTA Connect support center.
Contact the TOYOTA Connect support center and inform them of the following:
Phenomenon: Communication has been initialized but communication is not possible.
Telematics Activation Status
IMEI
VIN
- HINT:
-
The TOYOTA Connect support center will perform an investigation and provide the results.
Check for problem symptoms after receiving a call from the TOYOTA Connect support center.
- Result:
Result Proceed to System returns to normal. A Problem symptom recurs. B
A
B
Disconnect the D68 telematics transceiver connector.
Measure the resistance according to the value(s) in the table below.
- Standard Resistance:
Tester Connection Condition Specified Condition Click Location & Routing(D68)Location & Routingewd_type=routing;type=c;code=D68
Click Connector(D68)Instrument Panel>Instrument Panel Wire>Telematics Transceiverewd_type=component;type=c;code=D68;pinno=20
D68-20 (E) - Body ground Always Below 1 Ω
Measure the voltage according to the value(s) in the table below.
- Standard Voltage:
Tester Connection Switch Condition Specified Condition Click Location & Routing(D68)Location & Routingewd_type=routing;type=c;code=D68
Click Connector(D68)Instrument Panel>Instrument Panel Wire>Telematics Transceiverewd_type=component;type=c;code=D68;pinno=1,19
D68-1 (+B) - Body ground Ignition switch off 11 to 14 V D68-19 (IG2) - Body ground Ignition switch ON 11 to 14 V
- Result:
Proceed to OK NG
OK
NG
Disconnect the D62 radio receiver assembly connector.
Disconnect the D68 telematics transceiver connector.
Measure the resistance according to the value(s) in the table below.
- Standard Resistance:
Tester Connection Condition Specified Condition Click Location & Routing(D62,D68)Location & Routingewd_type=routing;type=c,c;code=D62,D68
Click Connector(D62)Instrument Panel>Instrument Panel Wire>Radio Receiver Assemblyewd_type=component;type=c;code=D62;pinno=10,11
Click Connector(D68)Instrument Panel>Instrument Panel Wire>Telematics Transceiverewd_type=component;type=c;code=D68;pinno=15,31
D62-10 (USBV) - D68-15 (USBV) Always Below 1 Ω D62-11 (USBG) - D68-31 (USBG) Always Below 1 Ω D62-10 (USBV) - Body ground Always 10 kΩ or higher D62-11 (USBG) - Body ground Always 10 kΩ or higher
- Result:
Proceed to OK NG
OK
NG
Disconnect the D68 telematics transceiver connector.
Measure the voltage according to the value(s) in the table below.
- Standard Voltage:
Tester Connection Switch Condition Specified Condition Click Location & Routing(D68)Location & Routingewd_type=routing;type=c;code=D68
Click Connector(D68)Instrument Panel>Instrument Panel Wire>Telematics Transceiverewd_type=component;type=c;code=D68;pinno=15,31
D68-15 (USBV) - D68-31 (USBG) Ignition switch ON 4.75 to 5.25 V
Measure the resistance according to the value(s) in the table below.
- Standard Resistance:
Tester Connection Condition Specified Condition Click Location & Routing(D68)Location & Routingewd_type=routing;type=c;code=D68
Click Connector(D68)Instrument Panel>Instrument Panel Wire>Telematics Transceiverewd_type=component;type=c;code=D68;pinno=31
D68-31 (USBG) - Body ground Always Below 1 Ω
- Result:
Proceed to OK NG
OK
NG
Disconnect the D138 telematics transceiver connector.
Disconnect the D141 navigation ECU assembly connector.
Measure the resistance according to the value(s) in the table below.
- Standard Resistance:
Tester Connection Condition Specified Condition Click Location & Routing(D138,D141)Location & Routingewd_type=routing;type=c,c;code=D138,D141
Click Connector(D138)Instrument Panel>Instrument Panel Wire>Telematics Transceiverewd_type=component;type=c;code=D138;pinno=2,1,3
Click Connector(D141)Instrument Panel>Instrument Panel Wire>Navigation ECU Assemblyewd_type=component;type=c;code=D141;pinno=1,2,3
D138-2 (USB+) - D141-1 (USB+) Always Below 1 Ω D138-1 (USB-) - D141-2 (USB-) Always Below 1 Ω D138-3 (USBS) - D141-3 (USBS) Always Below 1 Ω D138-2 (USB+) - Body ground Always 10 kΩ or higher D138-1 (USB-) - Body ground Always 10 kΩ or higher D138-3 (USBS) - Body ground Always 10 kΩ or higher
- Result:
Proceed to OK NG
OK
NG
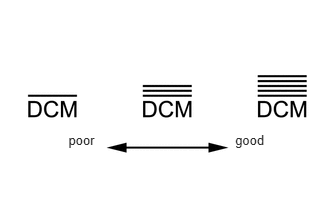
Check the reception level.
Check the reception level of the telematics transceiver.
- HINT:
- ·
Check if the reception level is significantly lower by comparing it to a China Telecom cellular phone.
·If there is no China Telecom cellular phone available, move the vehicle to a location where the reception level indicator shows 3 bars or more.
·If a problem occurred because the TOYOTA Connect contract has not been completed, proceed to the contract procedure and check the telematics transceiver reception level on the screen during the contract procedure.
- Result:
Result Proceed to ·The reception level is not lower than a China Telecom cellular phone.
·3 or more bars are displayed for the reception level.
A ·The reception level is lower than a China Telecom cellular phone.
·Cannot reach 3 or more bars for the reception level even after moving the vehicle.
B
A
B
Disconnect the antenna connector from the telephone antenna assembly.
Disconnect the antenna connector from the antenna cord sub-assembly.
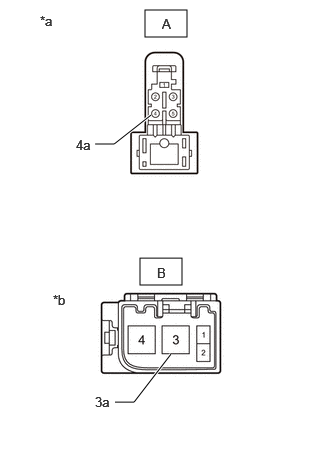
| *a | Front view of wire harness connector
(to Telephone Antenna Assembly) |
| *b | Front view of wire harness connector
(to Antenna Cord Sub-assembly) |
Measure the resistance according to the value(s) in the table below.
- Standard Resistance:
Tester Connection Condition Specified Condition A-4 - B-3 Always Below 1 Ω A-4a - B-3a Always Below 1 Ω A-4 - Body ground Always 10 kΩ or higher
- Result:
Proceed to OK NG
OK
NG
Disconnect the antenna connector from the No. 2 antenna cord sub-assembly.
Disconnect the antenna connector from the telematics transceiver.
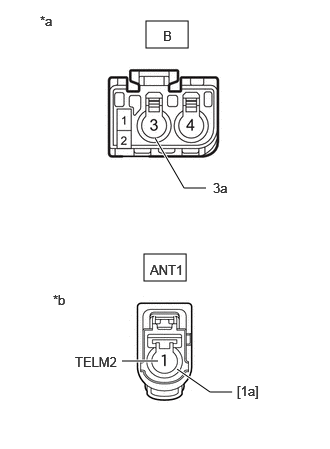
| *a | Front view of wire harness connector
(to No. 2 Antenna Cord Sub-assembly) |
| *b | Front view of wire harness connector
(to Telematics Transceiver) |
Measure the resistance according to the value(s) in the table below.
- Standard Resistance:
Tester Connection Condition Specified Condition B-3 - ANT1-[1](TELM2) Always Below 1 Ω B-3a - ANT1-[1a] Always Below 1 Ω B-3 - Body ground Always 10 kΩ or higher
- Result:
Proceed to OK NG
OK
NG
Click hereAudio / Visual / Telematics>AUDIO / VIDEO>RADIO ANTENNA CORD (for Instrument Panel)>REMOVAL
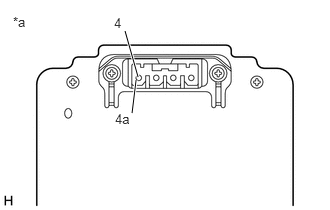
| *a | Component without harness connected
(Navigation Antenna Assembly) |
Remove the navigation antenna assembly.
- HINT:
-
Click hereAudio / Visual / Telematics>NAVIGATION / MULTI INFO DISPLAY>NAVIGATION ANTENNA>REMOVAL
Measure the resistance according to the value(s) in the table below.
- Standard Resistance:
Tester Connection Condition Specified Condition 4 - 4a Always 9 to 11 kΩ
- Result:
Proceed to OK NG
OK
NG
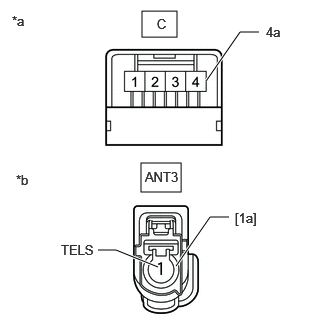
| *a | Front view of wire harness connector
(to Navigation Antenna Assembly) |
| *b | Front view of wire harness connector
(to Telematics Transceiver) |
Disconnect the antenna connector from the navigation antenna assembly.
Disconnect the antenna connector from the telematics transceiver.
Measure the resistance according to the value(s) in the table below.
- Standard Resistance:
Tester Connection Condition Specified Condition C-4 - ANT3-[1] (TELS) Always Below 1 Ω C-4a - ANT3-[1a] Always Below 1 Ω C-4 - Body ground Always 10 kΩ or higher
- Result:
Proceed to OK NG
OK
NG
Click hereAudio / Visual / Telematics>AUDIO / VIDEO>RADIO ANTENNA CORD (for Instrument Panel)>REMOVAL
Replace the telephone antenna assembly with a new or known good one.
- HINT:
-
Click hereAudio / Visual / Telematics>TELEMATICS>TELEPHONE ANTENNA>REMOVAL
- OK:
Same problem does not occur.
- Result:
Proceed to OK NG
OK
NG
Replace the telematics transceiver with a new one and check if the same problem occurs again.
Click hereAudio / Visual / Telematics>TELEMATICS>TELEMATICS TRANSCEIVER>REMOVAL
- OK:
Same problem does not occur.
- Result:
Proceed to OK NG
OK
Click hereAudio / Visual / Telematics>TELEMATICS>TELEMATICS SYSTEM (for TOYOTA Connect)>REGISTRATION
NG