 |
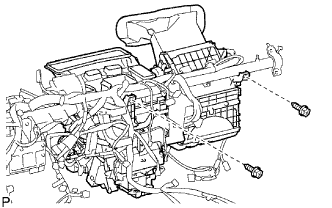
Install the air conditioning unit to the instrument panel reinforcement with the 2 screws.
- HINT:
- Use repair screws (part No. 90159-70003) if the screws removed before cannot be tightened.
AIR CONDITIONING UNIT > INSTALLATION |
| 1. INSTALL AIR CONDITIONING UNIT ASSEMBLY |
|
Install the air conditioning unit to the instrument panel reinforcement with the 2 screws.
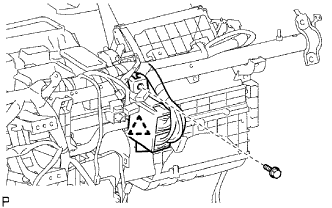 |
Attach the clamp to connect the junction connector.
Install the bolt.
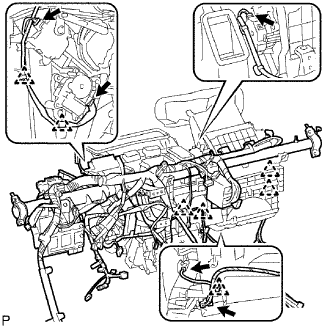 |
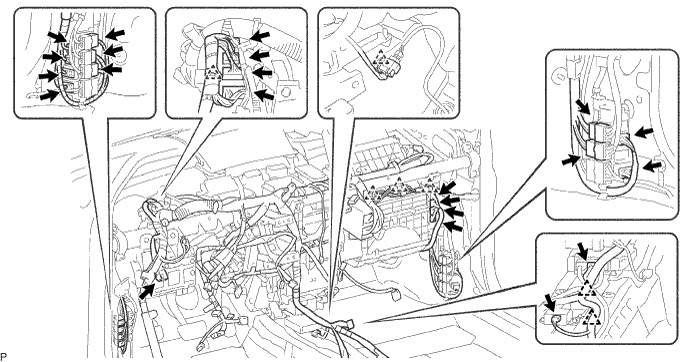
Attach the 9 clamps to connect the instrument panel wire harness.
Connect the 5 connectors.
| 2. INSTALL INSTRUMENT PANEL REINFORCEMENT ASSEMBLY |
Install the instrument panel reinforcement with the 7 bolts.
Install the 2 nuts to the air conditioning unit and temporarily tighten them.
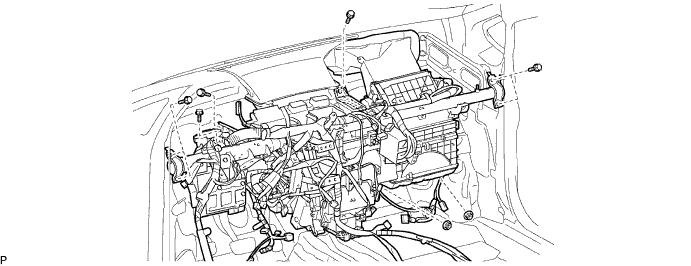
Connect each connector and install each clamp. Then connect the wire harness.
| 3. INSTALL AIR CONDITIONING AMPLIFIER ASSEMBLY |
Install the air conditioning amplifier (Click here).
| 4. INSTALL STEERING COLUMN ASSEMBLY |
Install the steering column (Click here).
| 5. INSTALL NO. 1 INSTRUMENT PANEL BRACE SUB-ASSEMBLY |
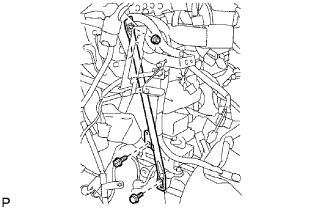 |
Install the instrument panel brace with the 2 bolts and nut.
Attach the clamp to connect the harness.
| 6. FULLY TIGHTEN AIR CONDITIONING UNIT ASSEMBLY |
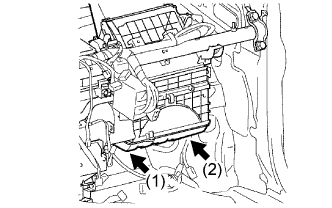 |
Fully tighten the air conditioning unit with the 2 nuts.
| 7. INSTALL NETWORK GATEWAY ECU |
| 8. INSTALL ECM |
| 9. INSTALL TRANSMISSION CONTROL ECU ASSEMBLY |
| 10. INSTALL DEFROSTER NOZZLE ASSEMBLY |
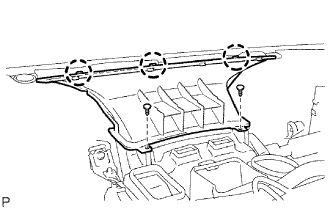 |
Install the defroster nozzle and attach the 3 claws.
Install the 2 clips.
| 11. INSTALL NO. 2 HEATER TO REGISTER DUCT |
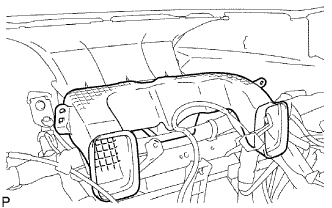 |
| 12. INSTALL NO. 1 HEATER TO REGISTER DUCT |
Install the duct with the No. 1 side defroster nozzle duct.
| 13. INSTALL NO. 3 HEATER TO REGISTER DUCT |
Install the clip and then the duct with the No. 2 side defroster nozzle duct.
| 14. INSTALL NO. 3 AIR DUCT REAR |
Attach the 10 claws to install the No. 3 air duct rear.
Return the carpet to its original position.
| 15. INSTALL INSTRUMENT PANEL SUB-ASSEMBLY LOWER |
| 16. INSTALL INSTRUMENT PANEL SUB-ASSEMBLY WITH PASSENGER AIRBAG ASSEMBLY |
| 17. CONNECT HEATER WATER HOSE A |
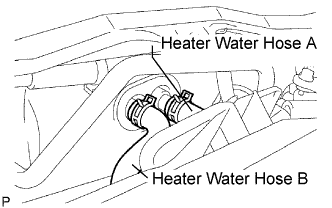 |
Connect the heater water hose A and slide the clip.
| 18. CONNECT HEATER WATER HOSE B |
Connect the heater water hose B and slide the clip.
| 19. CONNECT COOLER REFRIGERANT LIQUID PIPE E (TO COOLER UNIT) |
Remove the attached vinyl tape from the pipe's disconnected part.
Sufficiently apply compressor oil (ND-OIL 11) to 2 new O-rings and the pipe's connecting part.
Install the O-rings to the pipe.
Insert the pipe joint into the cooler unit fitting hole securely.
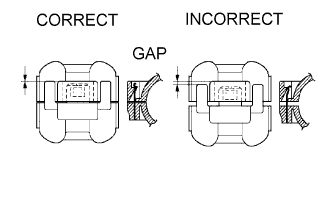 |
Using the piping clamp, connect the cooler unit refrigerant liquid pipe E.
| 20. CONNECT SUCTION HOSE SUB-ASSEMBLY |
| 21. INSPECT LEAKAGE OF REFRIGERANT |
After recharging the refrigerant gas, inspect for refrigerant leak gas using a halogen leak detector.
After recharging the refrigerant gas, prepare the vehicle for a refrigerant gas leakage check by making sure the following conditions are met.
The ignition switch is OFF.
The vehicle is in a place with good air ventilation and without any volatile gases, such as evaporated gasoline or exhaust gas. The detector is very sensitive to volatile gases. If volatile gases are unavoidable, the vehicle must be lifted up.
Some refrigerant remains in the refrigerant system.
The compressor is OFF and its pressure is approximately 392 to 588 kPa (4 to 6 kgf/cm2).
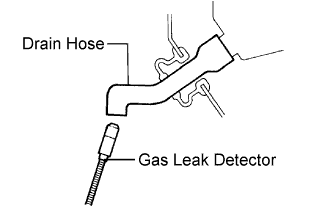 |
Bring the gas leak detector close to the drain hose with the detector's power off.
If a gas leak is not detected on the drain hose, remove the blower motor control from the cooling unit. Insert the gas leak detector sensor into the unit and perform the test.
Disconnect the pressure switch connector and wait for approximately 20 minutes. Bring the gas leak detector close to the pressure switch and perform the test.
| 22. ADD ENGINE COOLANT |
Tighten the drain cock plug of the coolant heat storage tank, then disconnect the vinyl hose.
Tighten the drain cock plug of the engine, then disconnect the vinyl hose.
Tighten the drain cock plug of the radiator, then disconnect the vinyl hose.
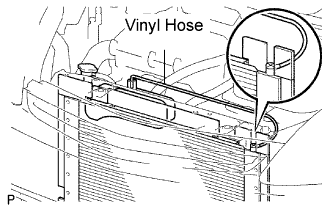 |
Connect a vinyl hose to the bleeder plug of the radiator assembly and the radiator reservoir.
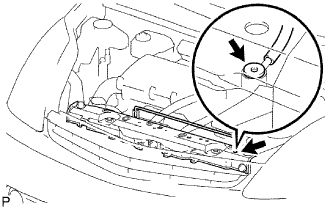 |
Using a 6 mm socket hexagon wrench, loosen the radiator bleeder plug from the radiator support service hole.
Fill the radiator with coolant up to the fill port.
Using a 6 mm socket hexagon wrench, tighten the radiator bleeder plug.
Install the radiator cop.
Fill the radiator reservoir tank with coolant to the full level.
Connect the coolant heat storage water pump connector.
Connect the Techstream to the DLC3.
Turn the power switch ON (IG).
Select the item:
Powertrain / Engine and ECT / Data List/Activate the Water Pump
|
Using a 6 mm socket hexagon wrench, loosen the radiator bleeder plug from the radiator support service hole.
Remove the radiator cap, then fill the radiator with coolant up to the fill port.
Using a 6 mm socket hexagon wrench, tighten the radiator bleeder plug.
Install the radiator cap.
Slowly pour coolant into the radiator reservoir until it reaches the full line.
Disconnect the vinyl hose between the bleeder plug of the radiator assembly and the radiator reservoir tank.
Set the vehicle to inspection mode (Click here).
Warm up the engine until the thermostat is open.
Stop the engine, then wait until the coolant becomes cold. Remove the radiator cap and check the coolant level.
When the coolant level stops going down, add coolant to the radiator reservoir tank up to the full level.
| 23. CHECK FOR ENGINE COOLANT LEAKS |
Fill the radiator with engine coolant and attach a radiator cap tester.
Pump the tester to 137 kPa (1.4 kgf/cm2, 19.9 psi) and check for leakage.
| 24. WARM UP COMPRESSOR |
Turn the A/C switch on for at least 1 minute to warm up the compressor.
| 25. INSPECT FOR REFRIGERANT LEAK |
After recharging the refrigerant gas, inspect for refrigerant leak gas using a halogen leak detector.
After recharging the refrigerant gas, prepare the vehicle for a refrigerant gas leakage check by making sure the following conditions are met.
The ignition switch is OFF.
The vehicle is in a place with good air ventilation and without any volatile gases, such as evaporated gasoline or exhaust gas. The detector is very sensitive to volatile gases. If volatile gases are unavoidable, the vehicle must be lifted up.
Some refrigerant remains in the refrigerant system.
The compressor is OFF and its pressure is approximately 392 to 588 kPa (4 to 6 kgf/cm2).
|
Bring the gas leak detector close to the drain hose with the detector's power off.
If a gas leak is not detected on the drain hose, remove the blower motor control from the cooling unit. Insert the gas leak detector sensor into the unit and perform the test.
Disconnect the pressure switch connector and wait for approximately 20 minutes. Bring the gas leak detector close to the pressure switch and perform the test.
| 26. PERFORM CALIBRATION |
Perform calibration (Click here).