REAR SUSPENSION REAR AXLE BEAM REMOVAL
CAUTION / NOTICE / HINT
- CAUTION:
-
Before removing the rear axle beam assembly, make sure to support the front suspension crossmember sub-assembly using a transmission jack or equivalent. If the rear axle beam assembly is removed without the vehicle supported, the front-to-rear weight distribution will become unbalanced and may cause the vehicle to fall off the lift.
- NOTICE:
- ·
When the brake pedal is first depressed after replacing the brake shoes or pushing back the wheel brake cylinder piston, DTC C1214 may be output. As there is no malfunction, clear the DTC
·While the auxiliary battery is connected, even if the power switch is off, the brake control system activates when the brake pedal is depressed or the door courtesy switch is turned on. Therefore, even if only brake shoes are to be removed and installed, be sure to perform the Disable Brake Control procedure and disconnect the cable from the negative (-) terminal of the auxiliary battery before beginning work.
PROCEDURE

 1. PRECAUTION
- NOTICE:
-
After turning the power switch off, waiting time may be required before disconnecting the cable from the negative (-) auxiliary battery terminal. Therefore, make sure to read the disconnecting the cable from the negative (-) auxiliary battery terminal notice before proceeding with work (See page General>INTRODUCTION>REPAIR INSTRUCTION>PRECAUTION).
2.DISABLE BRAKE CONTROL
3.REMOVE REAR WHEELS
4.DRAIN BRAKE FLUID
- NOTICE:
-
Immediately wash off any brake fluid that comes into contact with any painted surfaces.
89407A
5.REMOVE REAR HEIGHT CONTROL SENSOR SUB-ASSEMBLY (w/ Height Control Sensor)
89516D
6.DISCONNECT SKID CONTROL SENSOR WIRE LH
89516C
7.DISCONNECT SKID CONTROL SENSOR WIRE RH
- HINT:
-
Perform the same procedure as the LH side.
89516D
8.SEPARATE SKID CONTROL SENSOR WIRE LH
89516C
9.SEPARATE SKID CONTROL SENSOR WIRE RH
- HINT:
-
Perform the same procedure as the LH side.
47324
10.SEPARATE NO. 4 REAR BRAKE TUBE
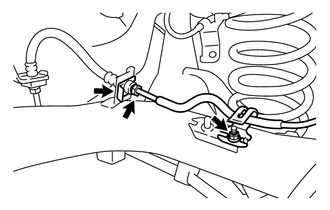
Using a union nut wrench, separate the No. 4 rear brake tube while holding the rear flexible hose LH with a wrench.
- NOTICE:
- ·
Do not bend or damage the brake line.
·Do not allow any foreign matter such as dirt and dust to enter the brake line from the connecting points.
Remove the clip and separate the rear flexible hose LH from the rear axle beam assembly.
Remove the nut and separate the No. 4 rear brake tube.
47323
11.SEPARATE NO. 3 REAR BRAKE TUBE
- HINT:
-
Perform the same procedure as for the No. 4 rear brake tube.
46430
12.SEPARATE NO. 3 PARKING BRAKE CABLE ASSEMBLY
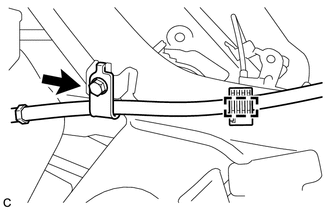
Separate the No. 1 parking brake cable clamp from the rear axle beam assembly.
Remove the bolt and separate the No. 3 parking brake cable assembly.
Remove the No. 1 parking brake cable clamp from the No. 3 parking brake cable assembly (See page Brake>PARKING BRAKE>PARKING BRAKE CABLE>REMOVAL).
- HINT:
-
Replace the clamp with a new one when installing the No. 3 parking brake cable assembly.
46420
13.SEPARATE NO. 2 PARKING BRAKE CABLE ASSEMBLY
- HINT:
-
Perform the same procedure as for the No. 3 parking brake cable assembly.
42403
14.REMOVE REAR BRAKE DRUM SUB-ASSEMBLY
Remove the 2 rear brake drum sub-assemblies (See page Brake>BRAKE (REAR)>REAR BRAKE>REMOVAL).
42450B
15.REMOVE REAR AXLE HUB AND BEARING ASSEMBLY LH
42450A
16.REMOVE REAR AXLE HUB AND BEARING ASSEMBLY RH
- HINT:
-
Perform the same procedure as the LH side.
42110F
17.LOOSEN REAR AXLE BEAM ASSEMBLY
48231B
18.REMOVE REAR COIL SPRING LH
48231A
19.REMOVE REAR COIL SPRING RH
- HINT:
-
Perform the same procedure as the LH side.
48259A
20.REMOVE REAR UPPER COIL SPRING INSULATOR LH
48257C
21.REMOVE REAR UPPER COIL SPRING INSULATOR RH
48258C
22.REMOVE REAR LOWER COIL SPRING INSULATOR LH
48258B
23.REMOVE REAR LOWER COIL SPRING INSULATOR RH
42110F
24.REMOVE REAR AXLE BEAM ASSEMBLY
Support the rear axle beam assembly with an engine lifter using 2 wooden blocks and 2 attachments or equivalent tools as shown in the illustration.
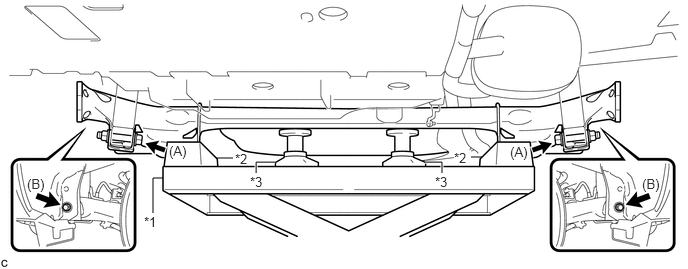
| *1 | Engine Lifter | *2 | Wooden Block |
| *3 | Attachment | - | - |
- NOTICE:
-
Make sure to secure the rear axle beam assembly to prevent it from dropping.
Remove the 2 bolts (A) and 2 nuts while holding the 2 nuts and separate the rear axle beam assembly from the rear shock absorber assemblies LH and RH.
- NOTICE:
-
Since stopper nuts are used, turn the bolts.
Remove the 2 bolts (B) and rear axle beam assembly.