HEATING / AIR CONDITIONING COOLER EXPANSION VALVE INSTALLATION
CAUTION / NOTICE / HINT
- NOTICE:
-
When removing the cooler expansion valve by itself, be sure to install a new cooler expansion valve and new bolt for suction pipe sub-assembly.
PROCEDURE

 88515
1.INSTALL COOLER EXPANSION VALVE
Apply sufficient compressor oil to 2 new O-rings and the fitting surfaces of the cooler expansion valve.
- Compressor oil:
ND-OIL 11 or equivalent
Install the 2 O-rings onto the No. 1 cooler evaporator sub-assembly.
Using a 4 mm hexagon wrench, install a new cooler expansion valve with the 2 hexagon bolts.
- Torque:
- 3.5 N*m (36 kgf*cm, 31 in.*lbf)
88706
2.CONNECT LIQUID PIPE SUB-ASSEMBLY
88707
3.CONNECT SUCTION PIPE SUB-ASSEMBLY
Remove the vinyl tape from the pipe.
Sufficiently apply compressor oil to a new O-ring and the fitting surface of the suction pipe sub-assembly.
- Compressor oil:
ND-OIL 11 or equivalent
Install the O-ring onto the suction pipe sub-assembly.
Connect the suction pipe sub-assembly.
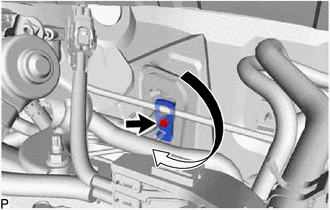
Rotate the hook connector in the direction indicated by the arrow in the illustration.
Insert the pipe joint into the fitting hole securely and tighten a new bolt.
- Torque:
- 9.8 N*m (100 kgf*cm, 87 in.*lbf)
55701J
4.INSTALL OUTER COWL TOP PANEL SUB-ASSEMBLY (for LHD)
55701J
5.INSTALL OUTER COWL TOP PANEL SUB-ASSEMBLY (for RHD)
55815E
6.INSTALL FRONT NO. 1 VENTILATOR SEAL (for LHD)
55815E
7.INSTALL FRONT NO. 1 VENTILATOR SEAL (for RHD)
55735B
8.INSTALL FRONT AIR SHUTTER SEAL (for LHD)
55735B
9.INSTALL FRONT AIR SHUTTER SEAL (for RHD)
55722C
10.INSTALL INNER COWL TOP TO COWL BRACE (for LHD)
55722C
11.INSTALL INNER COWL TOP TO COWL BRACE (for RHD)
12.INSTALL WINDSHIELD WIPER MOTOR AND LINK ASSEMBLY
13.CHARGE AIR CONDITIONING SYSTEM WITH REFRIGERANT
14.WARM UP COMPRESSOR
15.INSPECT FOR REFRIGERANT LEAK