WINDOW / GLASS POWER WINDOW CONTROL SYSTEM Driver Side Power Window Auto Up / Down Function does not Operate with Power Window Master Switch
DESCRIPTION
If the manual up and down functions operate normally but the auto up and down functions do not, then fail-safe mode may be functioning.
If power window initialization has not been performed, the auto up and down functions will not operate.
Click hereVehicle Exterior>WINDOW / GLASS>POWER WINDOW CONTROL SYSTEM>INITIALIZATION
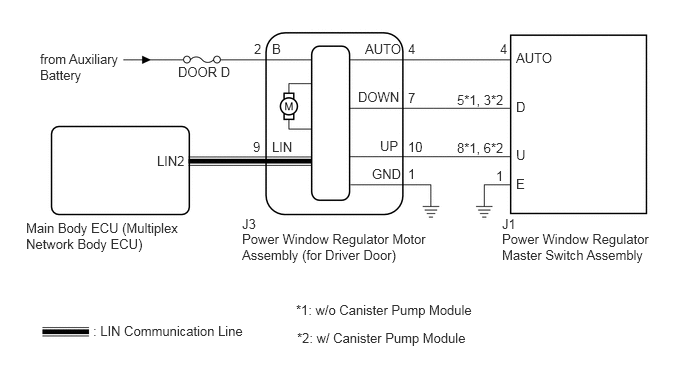
WIRING DIAGRAM
for LHD
for RHD
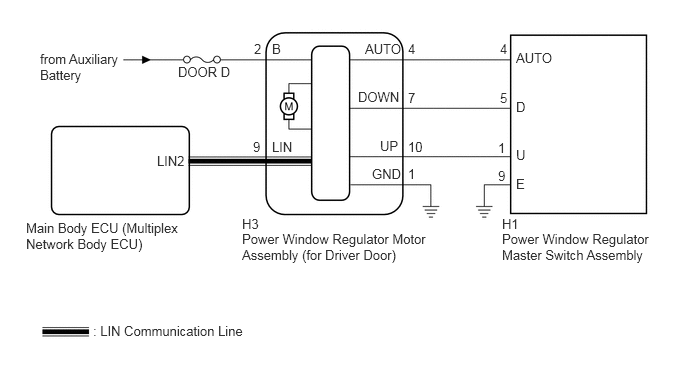
CAUTION / NOTICE / HINT
- NOTICE:
- ·
Inspect the fuses for circuits related to this system before performing the following procedure.
·The power window control system uses a LIN communication system. Inspect the communication function by following How to Proceed with Troubleshooting. Troubleshoot the power window control system after confirming that the communication system is functioning properly.
Click hereVehicle Exterior>WINDOW / GLASS>POWER WINDOW CONTROL SYSTEM>HOW TO PROCEED WITH TROUBLESHOOTING
·If a power window regulator motor assembly has been replaced with a new one, initialize the power window control system.
Click hereVehicle Exterior>WINDOW / GLASS>POWER WINDOW CONTROL SYSTEM>INITIALIZATION
·Check that power window system customize setting "D Window Auto Up" and "D Window Auto Down" are set to "ON" before performing the following procedure.
Click hereVehicle Exterior>WINDOW / GLASS>POWER WINDOW CONTROL SYSTEM>CUSTOMIZE PARAMETERS
·After the catch protection function has operated, the auto up function will not operate the first time the power window auto up switch is operated. The auto up function will operate normally after the first power window switch operation.
·When the ECU determines that the power window regulator motor assembly (for driver door) has a malfunction, DTC B2311 is stored.
- HINT:
-
If the pulse sensor built into the power window regulator motor assembly (for driver door) is malfunctioning, the power window control system will enter fail-safe mode. The remote up and down and auto up and down functions cannot be operated during fail-safe mode. However, the power window can be closed by holding the multiplex network master switch assembly at the auto up position, and opened manually by pushing down the multiplex network master switch assembly.
-
Click hereVehicle Exterior>WINDOW / GLASS>POWER WINDOW CONTROL SYSTEM>FAIL-SAFE CHART
PROCEDURE
Connect the GTS to the DLC3.
Turn the power switch to on (IG).
Turn the GTS on.
Enter the following menus: Body Electrical / D-Door Motor / Data List.
Read the Data List according to the display on the GTS.
| Tester Display | Measurement Item | Range | Normal Condition | Diagnostic Note |
|---|---|---|---|---|
| D Door P/W Auto SW | Driver door power window auto switch signal | OFF or ON | OFF: Driver door power window auto switch not operated
ON: Driver door power window auto switch operated |
- |
- OK:
On the GTS screen, ON or OFF is displayed accordingly.
OK
NG
Initialize the power window regulator motor assembly (for driver door).
Click hereVehicle Exterior>WINDOW / GLASS>POWER WINDOW CONTROL SYSTEM>INITIALIZATION
NEXT
Check that the driver door power window moves when the auto up and down functions of the power window regulator master switch assembly are operated.
Click hereVehicle Exterior>WINDOW / GLASS>POWER WINDOW CONTROL SYSTEM>OPERATION CHECK
- OK:
Driver door auto up and down functions are normal.
OK
NG
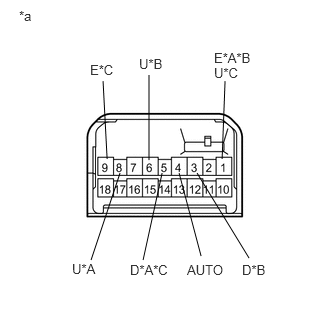
| *A | for LHD and w/o Canister Pump Module |
| *B | for LHD and w/ Canister Pump Module |
| *C | for RHD |
| *a | Component without harness connected
(Power Window Regulator Master Switch Assembly) |
Remove the power window regulator master switch assembly.
Click hereVehicle Exterior>WINDOW / GLASS>POWER WINDOW MASTER SWITCH>REMOVAL
Measure the resistance according to the value(s) in the table below.
for LHD
- Standard Resistance:
Tester Connection Switch Condition Specified Condition 8 (U) - 1 (E)*1
6 (U) - 1 (E)*2Auto UP Below 1 Ω 4 (AUTO) - 1 (E) Auto UP Below 1 Ω 5 (D) - 1 (E)*1
3 (D) - 1 (E)*2Auto DOWN Below 1 Ω 4 (AUTO) - 1 (E) Auto DOWN Below 1 Ω
*1: w/o Canister Pump Module
*2: w/ Canister Pump Module
for RHD
- Standard Resistance:
Tester Connection Switch Condition Specified Condition 1 (U) - 9 (E) Auto UP Below 1 Ω 4 (AUTO) - 9 (E) Auto UP Below 1 Ω 5 (D) - 9 (E) Auto DOWN Below 1 Ω 4 (AUTO) - 9 (E) Auto DOWN Below 1 Ω
OK
NG
Disconnect the power window regulator motor assembly (for driver door) connector.
Measure the resistance according to the value(s) in the table below.
for LHD
- Standard Resistance:
Tester Connection Condition Specified Condition J1-4 (AUTO) - J3-4 (AUTO) Always Below 1 Ω J1-4 (AUTO) - Body ground Always 10 kΩ or higher
for RHD
- Standard Resistance:
Tester Connection Condition Specified Condition H1-4 (AUTO) - H3-4 (AUTO) Always Below 1 Ω H1-4 (AUTO) - Body ground Always 10 kΩ or higher
OK
NG