FRONT SUSPENSION FRONT SHOCK ABSORBER INSTALLATION
CAUTION / NOTICE / HINT
- HINT:
- ·
Use the same procedure for the RH side and LH side.
·The procedure listed below is for the LH side.
PROCEDURE

 1.INSTALL FRONT LOWER COIL SPRING INSULATOR
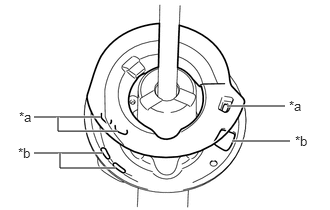
| *a | Positioning Pin |
| *b | Hole |
Install the front lower coil spring insulator to the front shock absorber assembly.
- NOTICE:
-
Make sure that each positioning pin of the front lower coil spring insulator is inserted into the hole in the front shock absorber.
48132
2.INSTALL FRONT COIL SPRING
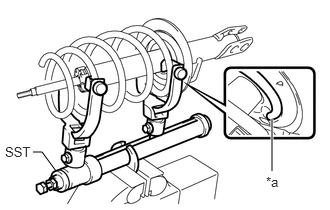
| *a | Lower End |
Using SST, compress the front coil spring.
- SST
- 09727-30021 (09727-00010, 09727-00021, 09727-00031)
for Separated Cover Type engine under cover:
- NOTICE:
-
Do not use an impact wrench. It will damage SST.
for Integrated Cover Type engine under cover:
- NOTICE:
- ·
When replacing the front coil spring with a new one, make sure to check the part number and install it to the correct position.
·Do not use an impact wrench. It will damage SST.
Install the front coil spring onto the front shock absorber assembly.
- NOTICE:
-
Make sure to fit the end of the spring that has the larger diameter into the front shock absorber lower seat.
- HINT:
-
Fit the lower end of the front coil spring into the gap of the front shock absorber lower seat.
48157C
3.INSTALL FRONT UPPER COIL SPRING INSULATOR
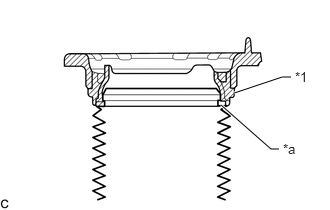
| *1 | Front Upper Coil Spring Insulator |
| *a | Top End of the Insulator (Shock Absorber Dust Cover) |
Install the front upper coil spring insulator to the front shock absorber assembly.
- NOTICE:
-
Make sure that the top end of the insulator (shock absorber dust cover) and the front upper coil spring insulator are securely attached.
48304
4.INSTALL FRONT NO. 1 SPRING BUMPER SUB-ASSEMBLY
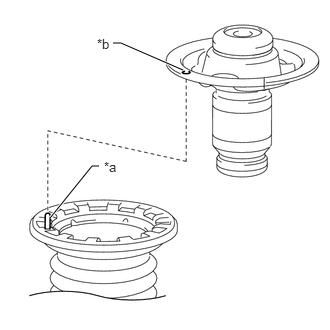
| *a | Protrusion |
| *b | Hole |
Install the front No. 1 spring bumper sub-assembly to the front shock absorber assembly.
- NOTICE:
-
When installing the front No. 1 spring bumper sub-assembly, first align the hole in the front No. 1 spring bumper sub-assembly with the protrusion of the front upper coil spring insulator.
- HINT:
-
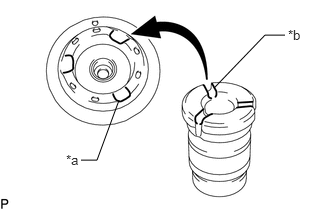 0.844,1.667 1.01,1.667 1.01,1.667 1.24,1.042 false 2.229,0.917 2.76,0.365 2.76,0.365 2.969,0.365 false 0.688,1.583 0.979,1.76 0.292,0.177 10 false *a 3,0.281 3.313,0.438 0.313,0.156 10 false *b
*a Rib Portion *b Air Discharge Groove
-
Visually check that the air discharge grooves of the front No. 1 spring bumper sub-assembly are aligned with the rib portions of the front spring seat.
48609E
5.INSTALL FRONT SUPPORT TO FRONT SHOCK ABSORBER NUT
Temporarily tighten a new front support to front shock absorber nut.
Remove SST from the front coil spring.
- NOTICE:
-
Do not use an impact wrench. It will damage SST.
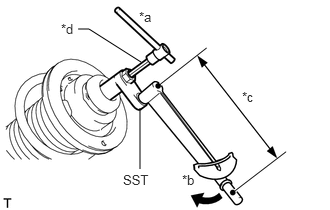
| *a | Hold |
| *b | Turn |
| *c | Torque Wrench Fulcrum Length |
| *d | Long Hexagon Socket Wrench |
Using SST and long hexagon socket wrench, hold the shock absorber rod and tighten the front support to front shock absorber nut.
- SST
- 09729-97202
- Torque:
- Specified tightening torque : 33 N*m (340 kgf*cm, 25 ft.*lbf)
- HINT:
- ·
Calculate the torque wrench reading when changing the fulcrum length of the torque wrench.
Click hereGeneral>INTRODUCTION>REPAIR INSTRUCTION>PRECAUTION
·When using SST (fulcrum length of 40 mm (1.57 in.)) + torque wrench (fulcrum length of 300 mm (11.8 in.)):
Torque: 29 N*m (300 kgf*cm, 22 ft.*lbf)
48609
6.INSTALL FRONT SUSPENSION SUPPORT SUB-ASSEMBLY
48157C
7.CONNECT FRONT UPPER COIL SPRING INSULATOR
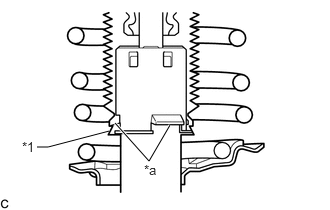
| *1 | Front Upper Coil Spring Insulator |
| *a | Claw |
Connect the end of the insulator of the front upper coil spring insulator with the claws of the front shock absorber assembly.
- NOTICE:
- ·
Make sure that the end of the insulator is securely attached to the claws of the front shock absorber assembly.
·Make sure there is no excessive damage to the bellows of the insulator.
·Do not allow oil, grease, etc. to contact the insulator.
·If there is oil or grease on the insulator, wipe clean with a cloth. Do not use an alcohol based cleaner.
8.TEMPORARILY TIGHTEN FRONT SHOCK ABSORBER WITH COIL SPRING
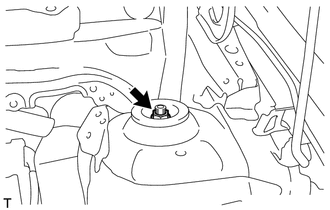
Temporarily tighten a new nut through the front No. 2 suspension support.
Install the front shock absorber with coil spring to the steering knuckle and insert the 2 bolts and 2 nuts.
- Torque:
- 164 N*m (1672 kgf*cm, 121 ft.*lbf)
- NOTICE:
-
When installing the nuts, keep the bolts from rotating.
- HINT:
-
The bolt can be inserted in either direction, however, make sure that they are installed in the same direction.
47313A
9.INSTALL FRONT FLEXIBLE HOSE
Install the front flexible hose and front speed sensor with the bolt.
- Torque:
- 29 N*m (300 kgf*cm, 22 ft.*lbf)
- NOTICE:
-
Do not twist the front flexible hose and front speed sensor when installing it.
48810
10.INSTALL FRONT STABILIZER LINK ASSEMBLY
Install the front stabilizer link assembly to the front shock absorber assembly with the nut.
- Torque:
- 74 N*m (755 kgf*cm, 55 ft.*lbf)
- HINT:
-
Use a hexagon socket wrench to hold the stud.
11.INSTALL FRONT WHEEL
- Torque:
- 103 N*m (1050 kgf*cm, 76 ft.*lbf)
12.FULLY TIGHTEN FRONT SHOCK ABSORBER WITH COIL SPRING
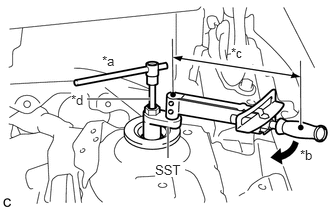
| *a | Hold |
| *b | Turn |
| *c | Torque Wrench Fulcrum Length |
| *d | Long Hexagon Socket Wrench |
Using SST and long hexagon socket wrench, hold the front shock absorber rod and tighten the nut.
- SST
- 09729-97202
- Torque:
- Specified tightening torque : 55 N*m (561 kgf*cm, 41 ft.*lbf)
- HINT:
- ·
Calculate the torque wrench reading when changing the fulcrum length of the torque wrench.
Click hereGeneral>INTRODUCTION>REPAIR INSTRUCTION>PRECAUTION
·When using SST (fulcrum length of 40 mm (1.57 in.)) + torque wrench (fulcrum length of 345 mm (1.13 ft.)):
Torque: 49 N*m (503 kgf*cm, 36 ft.*lbf)
48684B
13.INSTALL FRONT SUSPENSION SUPPORT DUST COVER
55701J
14.INSTALL OUTER COWL TOP PANEL SUB-ASSEMBLY (for LHD)
55701J
15.INSTALL OUTER COWL TOP PANEL SUB-ASSEMBLY (for RHD)
55815E
16.INSTALL FRONT NO. 1 VENTILATOR SEAL (for LHD)
55815E
17.INSTALL FRONT NO. 1 VENTILATOR SEAL (for RHD)
55735B
18.INSTALL FRONT AIR SHUTTER SEAL (for LHD)
55735B
19.INSTALL FRONT AIR SHUTTER SEAL (for RHD)
55722C
20.INSTALL INNER COWL TOP TO COWL BRACE (for LHD)
55722C
21.INSTALL INNER COWL TOP TO COWL BRACE (for RHD)
22.INSTALL WINDSHIELD WIPER MOTOR AND LINK ASSEMBLY
23.STABILIZE SUSPENSION
24.INSPECT AND ADJUST FRONT WHEEL ALIGNMENT