STEERING GEAR / LINKAGE STEERING GEAR INSTALLATION
PROCEDURE

 45047
1.INSTALL TIE ROD END SUB-ASSEMBLY LH
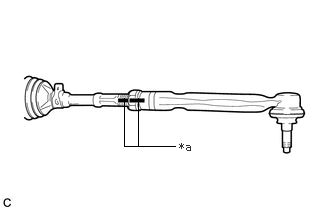
| *a | Matchmark |
Install the lock nut and tie rod end sub-assembly LH to the steering gear assembly until the matchmarks are aligned.
- HINT:
-
After adjusting the toe-in, tighten the lock nut.
45046
2.INSTALL TIE ROD END SUB-ASSEMBLY RH
- HINT:
-
Perform the same procedure as for the LH side.
3.INSTALL STEERING LINK ASSEMBLY
Install the steering link assembly to the front suspension crossmember sub-assembly with the 2 bolts and 2 new nuts.
- Torque:
- 133 N*m (1356 kgf*cm, 98 ft.*lbf)
- NOTICE:
- ·
Because the nut has its own stopper, do not turn the nut. Tighten the bolt with the nut secured.
·Make sure to tighten the bolts starting from the left side of the vehicle.
45025D
4.INSTALL NO. 1 STEERING COLUMN HOLE COVER SUB-ASSEMBLY
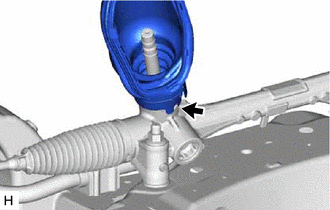
Align the protrusion of the steering link assembly with the hole of the No. 1 steering column hole cover sub-assembly, and install the No. 1 steering column hole cover sub-assembly to the steering link assembly.
- HINT:
-
Check that the No. 1 steering column hole cover sub-assembly is securely installed.
51201
5.INSTALL FRONT SUSPENSION CROSSMEMBER SUB-ASSEMBLY
51108A
6.INSTALL REAR SIDE RAIL REINFORCEMENT SUB-ASSEMBLY LH
51107A
7.INSTALL REAR SIDE RAIL REINFORCEMENT SUB-ASSEMBLY RH
- HINT:
-
Perform the same procedure as for the LH side.
48069
8.CONNECT FRONT LOWER NO. 1 SUSPENSION ARM SUB-ASSEMBLY LH
48068
9.CONNECT FRONT LOWER NO. 1 SUSPENSION ARM SUB-ASSEMBLY RH
- HINT:
-
Perform the same procedure as for the LH side.
45047
10.CONNECT TIE ROD END SUB-ASSEMBLY LH
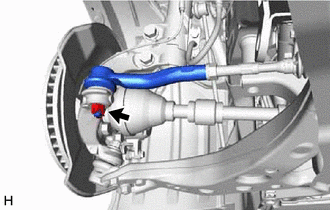
Connect the tie rod end sub-assembly LH to the steering knuckle LH with the nut.
- Torque:
- 49 N*m (500 kgf*cm, 36 ft.*lbf)
- NOTICE:
- ·
Do not damage the ball joint dust cover.
·Further tighten the nut up to 60° if the holes for the cotter pin are not aligned.
Install a new cotter pin.
45046
11.CONNECT TIE ROD END SUB-ASSEMBLY RH
- HINT:
-
Perform the same procedure as for the LH side.
48810
12.CONNECT FRONT STABILIZER LINK ASSEMBLY LH
48820B
13.CONNECT FRONT STABILIZER LINK ASSEMBLY RH
- HINT:
-
Perform the same procedure as for the LH side.
45025D
14.CONNECT NO. 1 STEERING COLUMN HOLE COVER SUB-ASSEMBLY
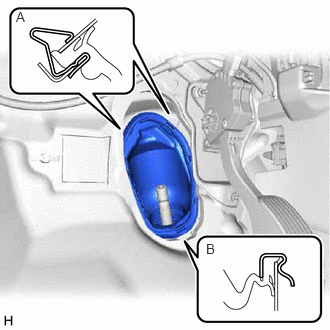
Engage the clip (B) to the vehicle body.
Engage the clip (A) to install the No. 1 steering column hole cover sub-assembly to the vehicle body.
- NOTICE:
-
Be careful not to damage the lip of the No. 1 steering column hole cover sub-assembly.
45260
15.CONNECT NO. 2 STEERING INTERMEDIATE SHAFT ASSEMBLY
45259A
16.INSTALL COLUMN HOLE COVER SILENCER SHEET
17.INSTALL FRONT WHEELS
18. STABILIZE SUSPENSION
51442
19.INSTALL NO. 2 ENGINE UNDER COVER
51444C
20.INSTALL REAR MOTOR UNDER COVER LH
51443E
21.INSTALL REAR MOTOR UNDER COVER RH
51441
22.INSTALL NO. 1 ENGINE UNDER COVER
23.INSPECT AND ADJUST FRONT WHEEL ALIGNMENT
24.PERFORM INITIALIZATION
·
Intelligent clearance sonar system ·
Simple intelligent parking assist system |
( ) |
| Parking assist monitor system | ()
|
| Automatic headlight beam level control system | ()
|