FRONT SUSPENSION FRONT SUSPENSION MEMBER INSTALLATION
PROCEDURE

 1.INSTALL HOLE PLUG
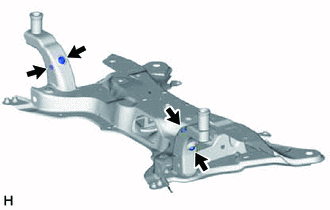
Install the 4 hole plugs to the front suspension crossmember sub-assembly.
- HINT:
-
There are 2 different shapes of hole plug.
51228
2.INSTALL SUSPENSION MEMBER SET PLATE
Install the 2 suspension member set plates to the front suspension crossmember sub-assembly.
12363A
3.INSTALL ENGINE MOVING CONTROL ROD
Install the engine moving control rod to the front suspension crossmember sub-assembly with the bolt.
- Torque:
- 200 N*m (2039 kgf*cm, 148 ft.*lbf)
48069
4.TEMPORARILY INSTALL FRONT LOWER NO. 1 SUSPENSION ARM SUB-ASSEMBLY LH
Temporarily install the front lower No. 1 suspension arm sub-assembly LH to the front suspension crossmember sub-assembly with the 2 bolts and nut.
48068
5.TEMPORARILY INSTALL FRONT LOWER NO. 1 SUSPENSION ARM SUB-ASSEMBLY RH
- HINT:
-
Perform the same procedure as for the LH side.
48811
6.INSTALL FRONT STABILIZER BAR
48829A
7.INSTALL FRONT NO. 1 STABILIZER BRACKET LH
48824A
8.INSTALL FRONT NO. 1 STABILIZER BRACKET RH
- HINT:
-
Perform the same procedure as for the LH side.
9.INSTALL STEERING LINK ASSEMBLY
51201
10.INSTALL FRONT SUSPENSION CROSSMEMBER SUB-ASSEMBLY
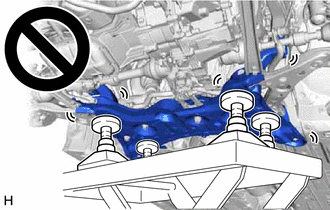
Slowly jack up the front suspension crossmember sub-assembly with an engine lifter using 4 attachments or equivalent tools.
- CAUTION:
-
- ·
The front suspension crossmember sub-assembly is a very heavy component. Make sure that it is supported securely.
·If the front suspension crossmember sub-assembly is not securely supported, it may drop, resulting in serious injury.
- NOTICE:
-
Use attachments to keep the front suspension crossmember sub-assembly level.
Install the front suspension crossmember sub-assembly to the vehicle body with the 4 bolts.
- Torque:
- 141 N*m (1438 kgf*cm, 104 ft.*lbf)
Lower the engine lifter.
Install the engine moving control rod with the bolt.
- Torque:
- 170 N*m (1734 kgf*cm, 125 ft.*lbf)
Install the 2 wire harness clamp brackets to the front suspension crossmember sub-assembly with the 2 bolts.
- Torque:
- 12 N*m (122 kgf*cm, 9 ft.*lbf)
48069
11.CONNECT FRONT LOWER NO. 1 SUSPENSION ARM SUB-ASSEMBLY LH
48068
12.CONNECT FRONT LOWER NO. 1 SUSPENSION ARM SUB-ASSEMBLY RH
- HINT:
-
Perform the same procedure as for the LH side.
45047
13.CONNECT TIE ROD END SUB-ASSEMBLY LH
45046
14.CONNECT TIE ROD END SUB-ASSEMBLY RH
- HINT:
-
Perform the same procedure as for the LH side.
48810
15.CONNECT FRONT STABILIZER LINK ASSEMBLY LH
Connect the front stabilizer link assembly LH to the front stabilizer bar with the nut.
- Torque:
- 74 N*m (755 kgf*cm, 55 ft.*lbf)
- NOTICE:
-
Do not damage the boot of the ball joint.
- HINT:
-
If the ball joint turns together with the nut, use a 6 mm hexagon socket wrench to hold the stud bolt.
48820B
16.CONNECT FRONT STABILIZER LINK ASSEMBLY RH
- HINT:
-
Perform the same procedure as for the LH side.
51108A
17.INSTALL REAR SIDE RAIL REINFORCEMENT SUB-ASSEMBLY LH
except Rough Road Area Specification Vehicles:
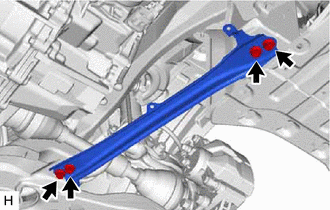
Install the rear side rail reinforcement sub-assembly LH to the front suspension crossmember sub-assembly and vehicle body with the 4 bolts.
- Torque:
- 70 N*m (714 kgf*cm, 52 ft.*lbf)
for Rough Road Area Specification Vehicles:
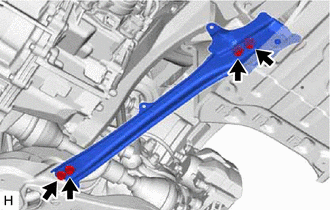
Install the rear side rail reinforcement sub-assembly LH to the front suspension crossmember sub-assembly and vehicle body with the 4 bolts.
- Torque:
- 70 N*m (714 kgf*cm, 52 ft.*lbf)
51107A
18.INSTALL REAR SIDE RAIL REINFORCEMENT SUB-ASSEMBLY RH
- HINT:
-
Perform the same procedure as for the LH side.
45025D
19.CONNECT NO. 1 STEERING COLUMN HOLE COVER SUB-ASSEMBLY
45260
20.CONNECT NO. 2 STEERING INTERMEDIATE SHAFT ASSEMBLY
45259A
21.INSTALL COLUMN HOLE COVER SILENCER SHEET
22.INSTALL FRONT WHEELS
23.STABILIZE SUSPENSION
48069
24.FULLY TIGHTEN FRONT LOWER NO. 1 SUSPENSION ARM SUB-ASSEMBLY LH
48068
25.FULLY TIGHTEN FRONT LOWER NO. 1 SUSPENSION ARM SUB-ASSEMBLY RH
51442
26.INSTALL NO. 2 ENGINE UNDER COVER
51444C
27.INSTALL REAR MOTOR UNDER COVER LH
51443E
28.INSTALL REAR MOTOR UNDER COVER RH
51441
29.INSTALL NO. 1 ENGINE UNDER COVER
30.INSPECT AND ADJUST FRONT WHEEL ALIGNMENT
31.PERFORM INITIALIZATION
| Intelligent clearance sonar system
Simple intelligent parking assist system |
( ) |
| Parking assist monitor system | ()
|
| Automatic headlight beam level control system | ()
|