2005-2008 RAV4 · Service Manual ENGINE

INSTALLATION

Removal / installation · Vehicles built Jan 2007 – Jul 2007

Versions by build date: Nov 2005 – Dec 2006 Jan 2007 – Jul 2007 from Aug 2007


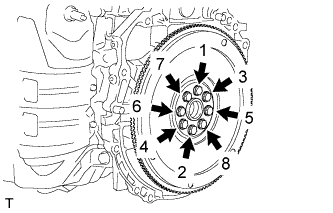
1. INSTALL FLYWHEEL SUB-ASSEMBLY (for Manual Transaxle)
  1. Clean the 8 bolts and 8 bolt holes.

  1. Apply adhesive to 2 or 3 threads of the 8 bolts.

    Adhesive:
    Part No. 08833-00070, THREE BOND or equivalent

  1. A126932E01
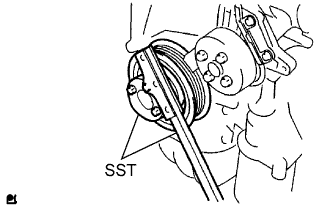
    Using SST, hold the crankshaft.
    SST
    09213-54015   (91651-60855)
    09330-00021  

  1. A112225E01
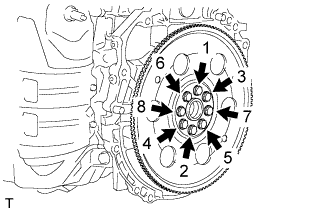
    Using several steps, uniformly install and tighten the 8 bolts in the sequence shown in the illustration.

    Torque:
    130 N*m{ 1,326 kgf*cm , 96 ft.*lbf }


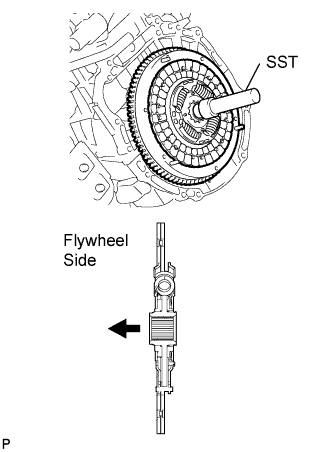
2. INSTALL CLUTCH DISC ASSEMBLY (for Manual Transaxle)

C127508E01
  1. Insert SST in the disc, then insert them in the flywheel.

    SST
    09301-00210  

    NOTICE:
    Take care not to insert the clutch disc in the wrong direction.


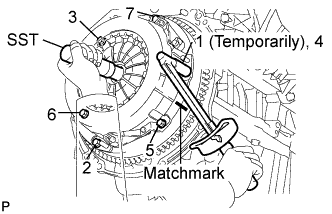
3. INSTALL CLUTCH COVER ASSEMBLY (for Manual Transaxle)

C127509E01
  1. Align the matchmarks on the cover and flywheel.

  1. Following the procedures shown in the illustration, tighten the 6 bolts in order, starting with the bolt located near the knock pin on the top.

    Torque:
    19 N*m{ 195 kgf*cm , 14 ft.*lbf }

    HINT:
    1. Following the order in the illustration, tighten the bolts one at a time, evenly.
    2. Move SST up and down, and right and left lightly after checking that the disc is in the center to tighten the bolts.

    SST
    09301-00210  


4. INSTALL MANUAL TRANSAXLE ASSEMBLY (for Manual Transaxle)
  1. Install the manual transaxle for E352 (2WD) (Click here).

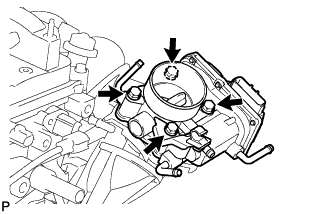
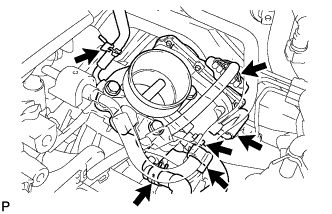
  1. Install the manual transaxle for E359F (4WD) (Click here).


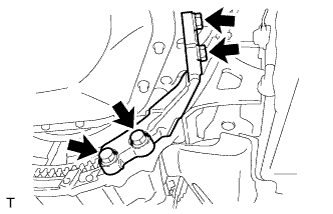
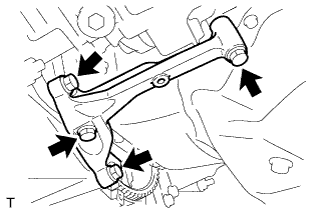
5. INSTALL STIFFENER PLATE RH (for Manual Transaxle)

C127241
  1. Install the stiffener plate with the 4 bolts.

    Torque:
    46 N*m{ 469 kgf*cm , 34 ft.*lbf }


6. INSTALL STIFFENER PLATE LH (for Manual Transaxle)

C127240
  1. Install the stiffener plate with the 4 bolts.

    Torque:
    46 N*m{ 469 kgf*cm , 34 ft.*lbf }


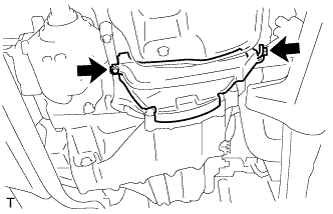
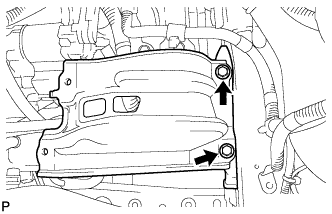
7. INSTALL FLYWHEEL HOUSING UNDER COVER (for Manual Transaxle)

C127239
  1. Install the insulator with the 2 bolts.

    Torque:
    9.0 N*m{ 92 kgf*cm , 80 in.*lbf }


8. INSTALL DRIVE PLATE SUB-ASSEMBLY (for Automatic Transaxle)
  1. Clean the 8 bolts and 8 bolt holes.

  1. Apply adhesive to 2 or 3 threads of the 8 bolts.

    Adhesive:
    Part No. 08833-00070, THREE BOND or equivalent

  1. A126932E01
    Using SST, hold the crankshaft.
    SST
    09213-54015   (91651-60855)
    09330-00021  

  1. A114342
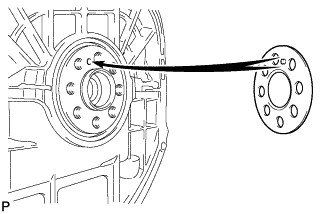
    Install the front spacer.

    HINT:
    Align the pin of the front spacer with the pin hole of the crankshaft.

  1. A129332E01
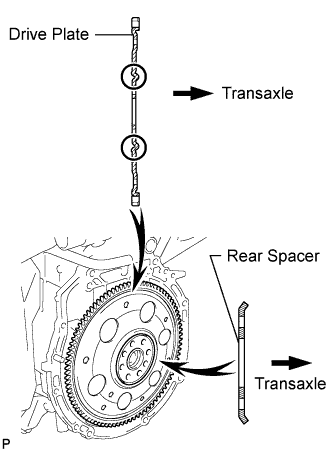
    Install the drive plate and rear spacer onto the crankshaft.

  1. A112224E01
    Using several steps, uniformly install and tighten the 8 bolts in the sequence shown in the illustration.

    Torque:
    98 N*m{ 1,000 kgf*cm , 72 ft.*lbf }


9. INSTALL TORQUE CONVERTER CLUTCH ASSEMBLY (for Automatic Transaxle)
  1. Install the torque converter clutch for U241E (2WD) (Click here).

  1. Install the torque converter clutch for U140F (4WD) (Click here).


10. INSTALL AUTOMATIC TRANSAXLE ASSEMBLY
  1. Install the automatic transaxle for U241E (2WD) (Click here).

  1. Install the automatic transaxle for U140F (4WD) (Click here).


11. INSTALL STARTER ASSEMBLY
  1. Install the starter for 1.6 kW Type (Click here).

  1. Install the starter for 1.7 kW Type (Click here).


12. INSTALL TRANSFER ASSEMBLY (for 4WD)

C126622
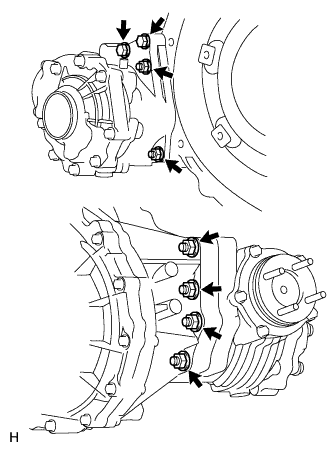
  1. Install the transfer to the transaxle with the 6 nuts and 2 bolts.

    Torque:
    69 N*m{ 700 kgf*cm , 51 ft.*lbf }


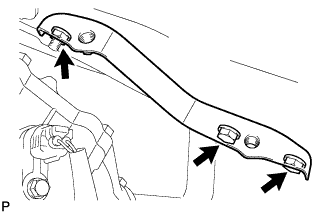
13. INSTALL DRIVE SHAFT BEARING BRACKET (for 2WD)

  1. A098759E01
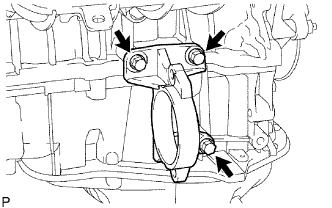
    Install the bracket with the 3 bolts.

    Torque:
    64 N*m{ 653 kgf*cm , 47 ft.*lbf }


14. INSTALL DRIVE SHAFT BEARING BRACKET (for 4WD)

  1. A114345
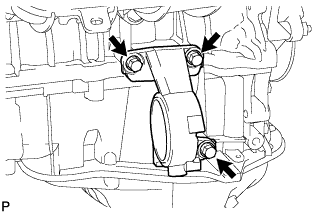
    Install the bracket with the 3 bolts.

    Torque:
    64 N*m{ 653 kgf*cm , 47 ft.*lbf }


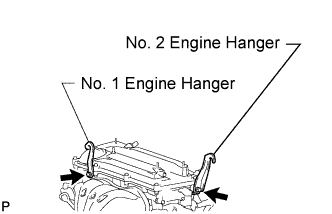
15. INSTALL ENGINE HANGER

  1. A114375E02
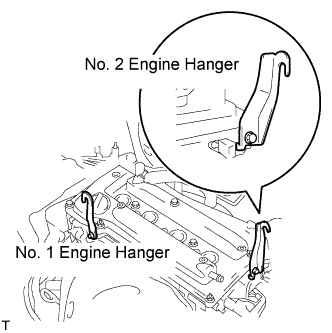
    Install the No. 1 and No. 2 engine hangers.

    Torque:
    38 N*m{ 387 kgf*cm , 28 ft.*lbf }

    Part No. :
    Item
    Part No.
    No. 1 engine hanger
    12281-28010
    No. 2engine hanger
    12282-28010
    Bolt
    91512-61020

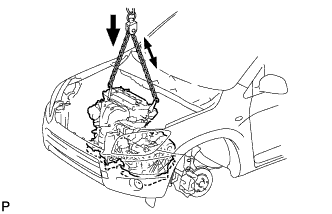
  1. Attach the sling device and the engine with the chain block.


16. INSTALL ENGINE ASSEMBLY WITH TRANSAXLE
  1. Set the engine assembly with transaxle on the engine lifter.

  1. A114337
    Slowly lower the engine assembly into the engine compartment.

    NOTICE:
    Make sure the engine is clear of all wiring, hoses and cables.


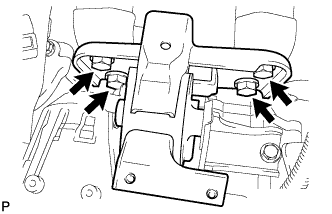
17. INSTALL ENGINE MOUNTING INSULATOR LH

  1. A124845
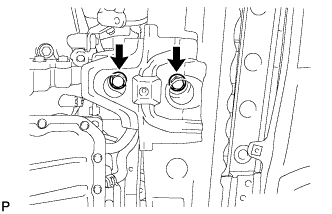
    Install the engine mounting insulator LH with the 4 bolts.

    Torque:
    95 N*m{ 969 kgf*cm , 70 ft.*lbf }

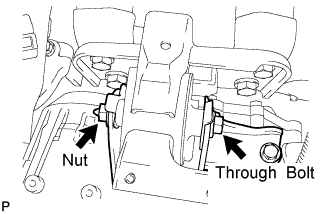
  1. A124844E01
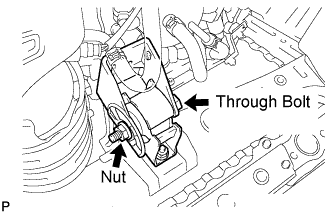
    Install the engine mounting insulator LH with the through bolt and nut.

    HINT:
    Install the through bolt by tightening the nut.

    Torque:
    56 N*m{ 571 kgf*cm , 41 ft.*lbf }


18. INSTALL ENGINE MOUNTING INSULATOR RH

  1. A124843E01
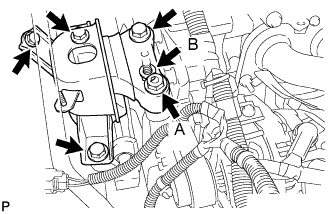
    Install the engine mounting insulator RH with the 2 bolts and 2 nuts.

    Torque:
    95 N*m{ 969 kgf*cm , 70 ft.*lbf } for bolt
    95 N*m{ 969 kgf*cm , 70 ft.*lbf } for nut A
    52 N*m{ 530 kgf*cm , 38 ft.*lbf } for nut B


19. REMOVE ENGINE HANGER

  1. A112213E01
    Remove the No. 1 and No. 2 engine hangers.


20. INSTALL ENGINE MOUNTING INSULATOR RR

  1. A124842
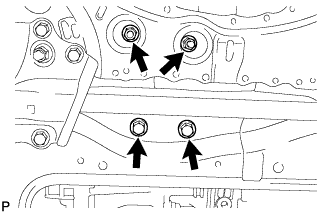
    Install the engine mounting insulator RR with the 2 nuts and 2 bolts.

    Torque:
    95 N*m{ 969 kgf*cm , 70 ft.*lbf }

  1. A124841
    Install the through bolt which is used to secure the rear engine mounting insulator, into the rear engine mounting bracket RR.

    Torque:
    95 N*m{ 969 kgf*cm , 70 ft.*lbf }


21. INSTALL ENGINE MOUNTING INSULATOR FR

  1. A124840
    Install the engine mounting insulator FR with the 2 bolts.

    Torque:
    95 N*m{ 969 kgf*cm , 70 ft.*lbf }

  1. A124839E02
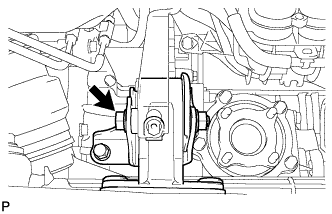
    Install the through bolt and nut.

    Torque:
    145 N*m{ 1,479 kgf*cm , 107 ft.*lbf }

    HINT:
    Install the through bolt by tightening the nut.

    HINT:
    Install the bolt which is used to secure the front engine mounting bracket FR.


22. INSTALL PROPELLER SHAFT ASSEMBLY (for 4WD)
  1. Install the propeller shaft (Click here).


23. INSTALL FRONT DRIVE SHAFT ASSEMBLY
  1. Install the front drive shaft (2WD) (Click here).

  1. Install the front drive shaft (4WD) (Click here).


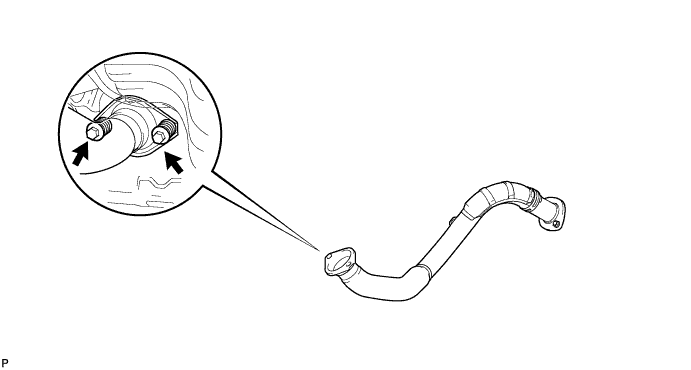
24. INSTALL FRONT EXHAUST PIPE ASSEMBLY

  1. A077857E03
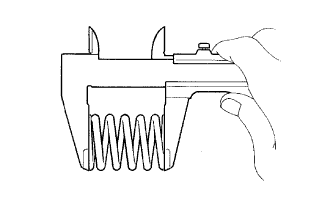
    Using a vernier caliper, measure the free length of the compression spring.

    Minimum length:
    41.5 mm (1.634 in.)

    If the length is less than the minimum, replace the compression spring.

  1. A133205E01
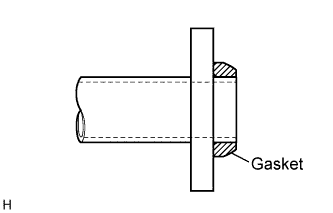
    Install a new gasket by hand so that its surface is flush with the exhaust manifold.

    NOTICE:
    1. Make sure the gasket is facing the correct direction.
    2. Do not reuse the removed gasket.
    3. Do not push in the gasket while installing the front exhaust pipe.

  1. Install the front exhaust pipe with the 2 compression springs and 2 bolts.

    Torque:
    43 N*m{ 438 kgf*cm , 32 ft.*lbf }


    A126831


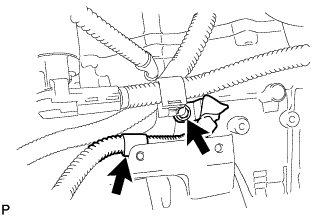
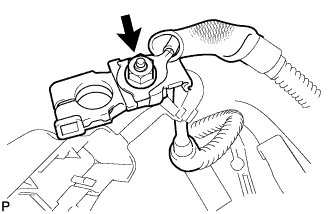
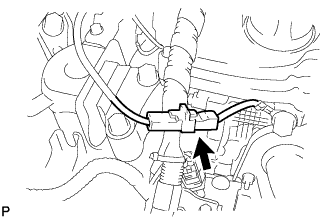
25. CONNECT ENGINE WIRE

  1. A124837
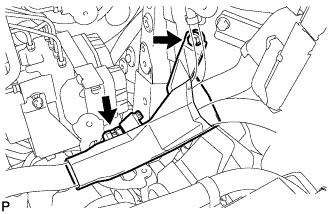
    Install the ground cable with the bolt located near the starter.

    Torque:
    13 N*m{ 133 kgf*cm , 10 ft.*lbf }

  1. Connect the ground cable clamp located near the starter.

  1. A124836
    Connect the engine wire to the battery positive (+) terminal with the nut.

    Torque:
    13 N*m{ 133 kgf*cm , 10 ft.*lbf }

  1. A124835
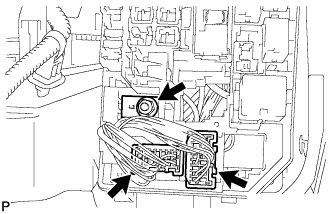
    Connect the ground cable connector.

  1. A124834
    Connect the 2 engine wire connectors and install the nut.

  1. Install the engine room relay block cover.

  1. A124847
    Attach the clamp of the engine wire cover.

  1. Install the engine wire cable with the bolt.


26. INSTALL ECM
  1. Install the ECM (Click here).


27. INSTALL COOLER COMPRESSOR ASSEMBLY

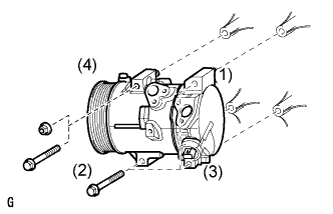
  1. E126973E01
    w/o Stud Bolt:
    Install the cooler compressor with the 4 bolts.

    Torque:
    24.5 N*m{ 250 kgf*cm , 18 ft.*lbf }

    NOTICE:
    Tighten the bolts in the order shown in the illustration to install the cooler compressor.

  1. w/ Stud Bolt:
    Install the cooler compressor with the 3 bolts and nut.

    Torque:
    24.5 N*m{ 250 kgf*cm , 18 ft.*lbf }

    NOTICE:
    Tighten the bolts in the order shown in the illustration to install the cooler compressor.

  1. Connect the connector.


28. INSTALL GENERATOR ASSEMBLY

  1. A097394E02
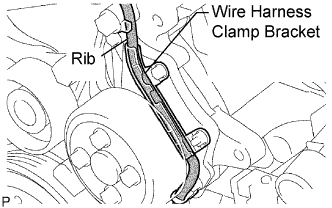
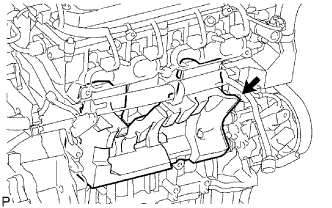
    Confirm that the wire harness of the crankshaft position sensor is secured to the wire harness clamp bracket through the back of the rib of the timing chain cover.

  1. A122810E01
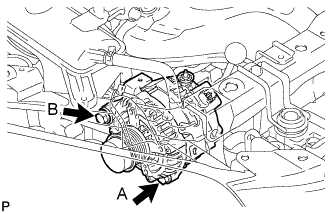
    Install the generator with the 2 bolts.

    Torque:
    21 N*m{ 215 kgf*cm , 16 ft.*lbf } for bolt A
    52 N*m{ 530 kgf*cm , 38 ft.*lbf } for bolt B

  1. A122809
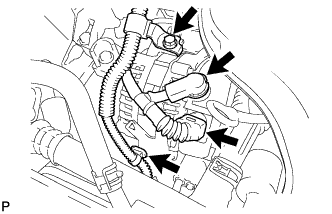
    Install the wire harness clamp.

  1. Install the wire harness clamp bracket with the bolt.

    Torque:
    8.4 N*m{ 85 kgf*cm , 74 in.*lbf }

  1. Connect the generator wire with the nut.

    Torque:
    9.8 N*m{ 100 kgf*cm , 7 ft.*lbf }

  1. Install the terminal cap.

  1. Connect the generator connector.


29. INSTALL FAN AND GENERATOR V BELT

  1. A114351E01
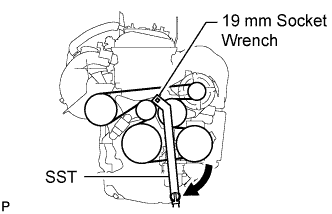
    Using SST and 19 mm socket wrench, loosen the V-ribbed belt tensioner arm clockwise, then install the fan and generator V belt.
    SST
    09216-42010  

    NOTICE:
    1. Be sure to connect SST and the tools so that they are in line during use.
    2. When retracting the tensioner, turn it clockwise slowly for 3 seconds or more. Do not apply force rapidly.
    3. After the tensioner is fully retracted, do not apply force any more than necessary.


30. INSTALL FRONT SUSPENSION MEMBER REINFORCEMENT RH
  1. Install the reinforcement RH with the 4 bolts.

    Torque:
    96 N*m{ 979 kgf*cm , 71 ft.*lbf }


31. INSTALL CLUTCH RELEASE CYLINDER ASSEMBLY (for Manual Transaxle)
  1. Install the clutch release cylinder for E352 (2WD) (Click here).

  1. Install the clutch release cylinder for E359F (4WD) (Click here).


32. INSTALL TRANSAXLE CONTROL CABLE ASSEMBLY (for Manual Transaxle)
  1. Install the transaxle control cable for E352 (2WD) (Click here).

  1. Install the transaxle control cable for E359F (4WD) (Click here).


33. INSTALL TRANSAXLE CONTROL CABLE ASSEMBLY (for Automatic Transaxle)
  1. Install the transaxle control cable for U241E (2WD) (Click here).

  1. Install the transaxle control cable for U140F (4WD) (Click here).


34. INSTALL INTAKE MANIFOLD INSULATOR

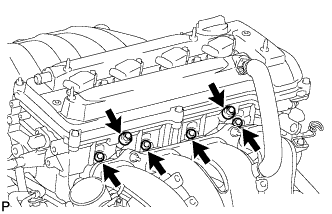
  1. A095425E02
    Install the intake manifold insulator onto the cylinder block.


35. INSTALL INTAKE MANIFOLD

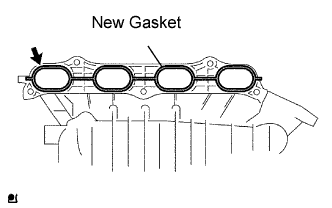
  1. A090130E02
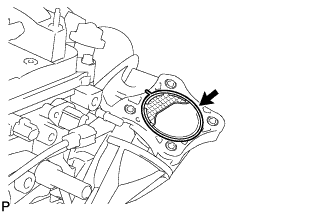
    Install a new gasket into the intake manifold.

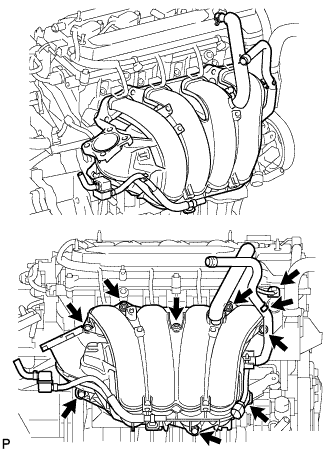
  1. A125028
    Install the intake manifold with the 5 bolts and 2 nuts.

    Torque:
    30 N*m{ 305 kgf*cm , 22 ft.*lbf }

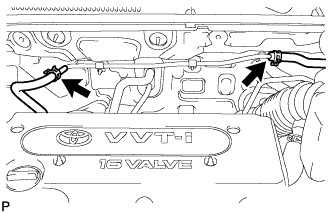
  1. Fit the union to check valve hose into the vacuum hose clamp.

  1. Install the wire harness clamp.

  1. Connect the camshaft timing oil control valve connector.

  1. Connect the union to check valve hose to the brake booster.


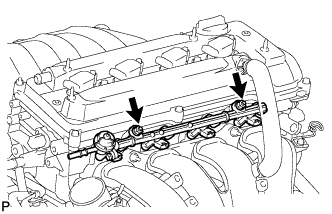
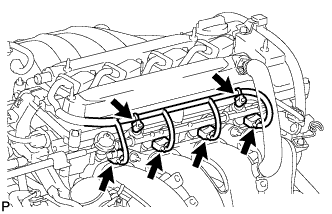
36. INSTALL FUEL DELIVERY PIPE SUB-ASSEMBLY

  1. A125335
    Install 4 new insulators into the cylinder head.

  1. Install the 2 delivery pipe spacers onto the cylinder head.

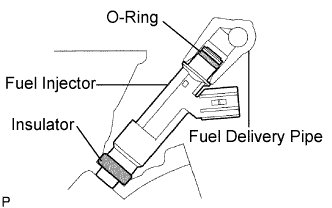
  1. A097444E02
    Install the fuel delivery pipe together with the 4 fuel injectors, then temporarily tighten the 2 bolts.

    NOTICE:
    Be careful not to drop the fuel injectors when installing the fuel delivery pipe.

  1. Check that the fuel injector rotates smoothly.
    If the fuel injector does not rotate, replace the O-ring.

  1. A125334
    Tighten the 2 bolts to the specified torque.

    Torque:
    20 N*m{ 205 kgf*cm , 15 ft.*lbf }

  1. A125333
    Connect the 4 fuel injector connectors.

  1. Install the 2 wire harness clamps.


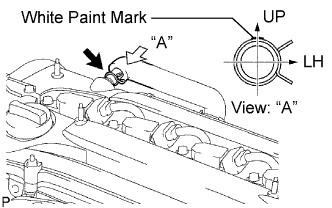
37. CONNECT NO. 2 VENTILATION HOSE

  1. A095428E02
    Connect the ventilation hose to the ventilation valve.

    NOTICE:
    Make sure that the paint mark and hose clamp are at the correct angle when installing the hose.


38. INSTALL THROTTLE BODY

  1. A124566
    Install a new gasket onto the intake manifold.

  1. A124565
    Install the throttle body and fuel pipe clamp with the 4 bolts.

    Torque:
    30 N*m{ 305 kgf*cm , 22 ft.*lbf }

  1. A124564
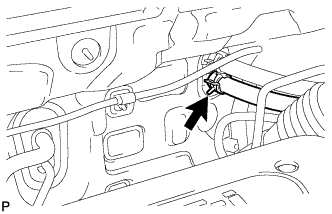
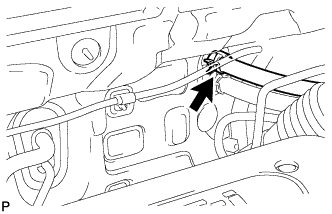
    Connect the fuel tube into the clamp.

  1. Connect the wire harness clamp.

  1. Connect the throttle position sensor and control motor connector.

  1. Connect the No. 1 throttle body hose to the throttle body.

  1. Connect the No. 2 water by-pass hose to the throttle body.

  1. Connect the water by-pass hose to the throttle body.

  1. Connect the purge line hose to the throttle body.


39. CONNECT FUEL TUBE
  1. Connect the fuel main tube.

  1. Push the fuel tube connector until it makes a "click" sound.

  1. Install the fuel pipe clamp.

  1. Install the fuel tube to the fuel hose clamp.


40. CONNECT HEATER WATER OUTLET HOSE

  1. A124831
    Connect the heater outlet hose to the heater unit.


41. CONNECT HEATER WATER INLET HOSE

  1. A124832
    Connect the heater inlet hose to the heater unit.


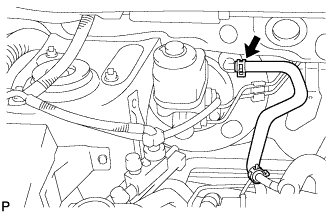
42. CONNECT UNION TO CONNECTOR TUBE HOSE (for LHD)

  1. A124830
    Connect the 2 union to connector tube hoses to the booster vacuum tube.


43. CONNECT UNION TO CONNECTOR TUBE HOSE (for RHD)

  1. A126899
    Connect the union to connector tube hose to the booster vacuum tube.


44. INSTALL BATTERY CARRIER BRACKET

  1. A124829
    Install the battery carrier bracket with the nut and 2 bolts.

    Torque:
    20 N*m{ 204 kgf*cm , 15 ft.*lbf }


45. INSTALL BATTERY BRACKET REINFORCEMENT

  1. A124828
    Install the battery bracket reinforcement with the 2 bolts.

    Torque:
    20 N*m{ 204 kgf*cm , 15 ft.*lbf }


46. INSTALL FRONT BATTERY CARRIER

  1. A124827
    Install the front battery carrier with the 4 bolts.

    Torque:
    20 N*m{ 204 kgf*cm , 15 ft.*lbf }

  1. Connect the 2 clamps of the engine wire.


47. INSTALL AIR CLEANER CASE SUB-ASSEMBLY
  1. Connect the air cleaner case to the No. 1 air cleaner inlet.

  1. A112221
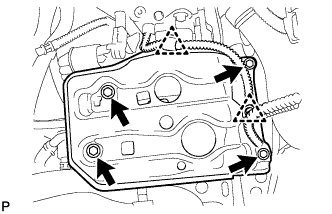
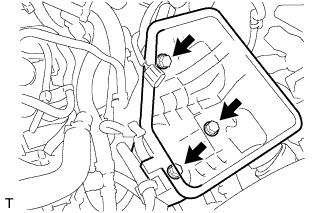
    Install the case with the 3 bolts.

    Torque:
    5.0 N*m{ 51 kgf*cm , 44 in.*lbf }


48. INSTALL AIR CLEANER FILTER ELEMENT SUB-ASSEMBLY

49. INSTALL AIR CLEANER CAP
  1. Install the air cleaner filter element onto the air cleaner case.

  1. A124568E01
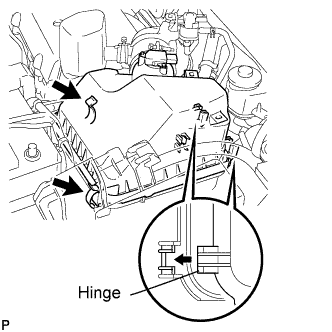
    Insert the hinge part of the air cleaner cap into the air cleaner case, then hang the 2 hook clamps.

  1. A124569E01
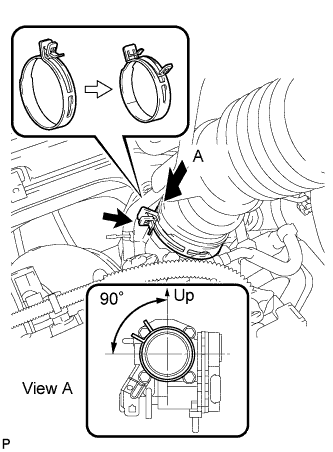
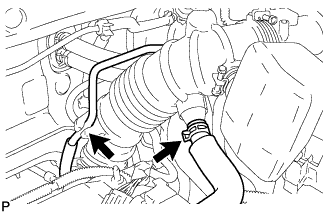
    Align the matchmarks of the No. 1 air cleaner hose and throttle body, and then connect the air cleaner hose No. 1 to the throttle body and unfasten the No. 1 air cleaner hose clamp.

    NOTICE:
    Make sure that the hose clamp is at the correct angle.

  1. A124560
    Connect the purge line hose to the clamp.

  1. Connect the No. 2 ventilation hose to the air cleaner hose.

  1. A124559
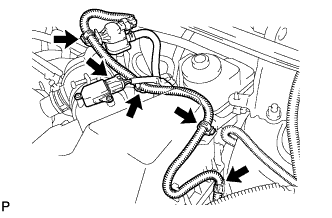
    Install the 4 wire harness clamps.

  1. Connect the mass air flow meter connector.


50. INSTALL PURGE VSV

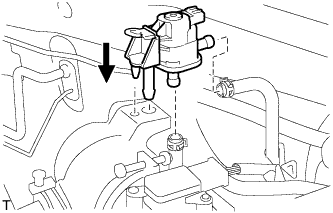
  1. A124794
    Install the purge VSV onto the air cleaner hose.

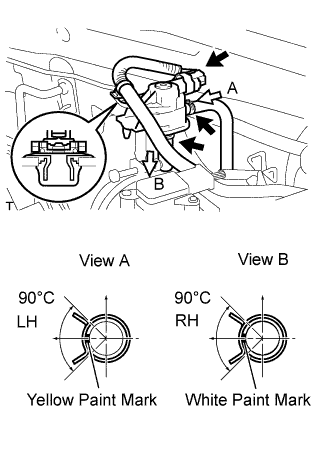
  1. A126926E01
    Connect the 2 purge line hoses to the purge VSV.

  1. Connect the wire harness clamp.

  1. Connect the purge VSV connector.


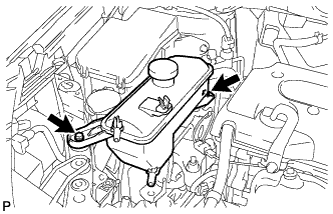
51. INSTALL RADIATOR RESERVOIR

  1. A124838
    Install the reservoir with the 2 bolts.

    Torque:
    5.0 N*m{ 51 kgf*cm , 44 in.*lbf }


52. INSTALL RADIATOR ASSEMBLY
  1. Install the radiator (Click here).


53. INSTALL BATTERY TRAY

54. INSTALL BATTERY
  1. Install the battery.

  1. Install the battery clamp with the bolt and nut.

    Torque:
    8.5 N*m{ 87 kgf*cm , 75 in.*lbf } for bolt
    5.0 N*m{ 51 kgf*cm , 44 in.*lbf } for nut


55. CONNECT CABLE TO NEGATIVE BATTERY TERMINAL

56. ADD MANUAL TRANSAXLE OIL
  1. Add manual transaxle oil for E352 (2WD) (Click here).

  1. Add manual transaxle oil for E359F (4WD) (Click here).


57. ADD AUTOMATIC TRANSAXLE FLUID
  1. Add automatic transaxle fluid for U241E (2WD) (Click here).

  1. Add automatic transaxle fluid for U140F (4WD) (Click here ).


58. CHECK FOR FUEL LEAKS

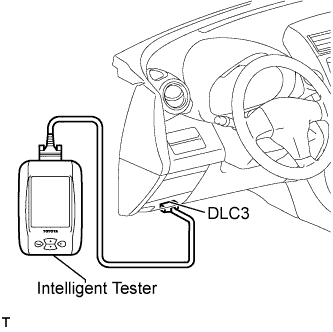
  1. B127990E01
    Make sure that there are no fuel leaks after performing maintenance on the fuel system.

    1. Connect the intelligent tester to the DLC3.

    2. Turn the ignition switch on (IG), and push the intelligent tester main switch ON.

      NOTICE:
      Do not start the engine.

    3. Select the Active Test mode on the intelligent tester.

      HINT:
      Refer to the intelligent tester operator's manual for further details.

    4. Check that there are no leaks from the fuel system.

    5. Turn the ignition switch off.

    6. Disconnect the intelligent tester from the DLC3.


59. ADD ENGINE COOLANT
  1. Tighten the radiator drain cock plug by hand.

  1. Tighten the cylinder block drain cock plug.

    Torque:
    12.7 N*m{ 130 kgf*cm , 10 ft.*lbf }

  1. Add TOYOTA Super Long Life Coolant (SLLC) to the radiator reservoir filler opening.

  1. A112307E01
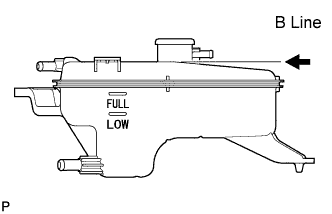
    Continue adding TOYOTA SLLC until it is filled to the B line at the base of the reservoir's filler neck.

    HINT:
    The B line is the lower edge of the inner wall of the filler neck.

    Standard capacity:
    Item
    Specified Condition
    A/T
    6.5 liters (6.9 US qts, 5.7 Imp. qts)
    M/T
    6.6 liters (7.0 US qts, 5.9 Imp. qts)

    HINT:
    TOYOTA vehicles are filled with TOYOTA SLLC at the factory. In order to avoid damage to the engine cooling system and other technical problems, only use TOYOTA SLLC or similar high quality ethylene glycol based non-silicate, non-amine, non-nitrite, non-borate coolant with long-life hybrid organic acid technology (coolant with long-life hybrid organic acid technology consists of a combination of low phosphates and organic acids).

    NOTICE:
    Never use water as a substitute for engine coolant.

  1. Press the No. 1 and No. 2 radiator hoses several times by hand, and then check the level of the coolant. If the coolant level drops below the B line, add TOYOTA SLLC to the B line.

  1. Install the radiator reservoir cap.

  1. Start the engine and warm it up until the cooling fan operates.

    1. Set the air conditioning as follows while warming up the engine.

      Item
      Specified Condition
      Manual Air Conditioning System
      Fan speed: Any setting except OFF
      Temperature: Toward WARM
      Air conditioning switch: OFF
      Automatic Air Conditioning System
      Temperature: Toward MAX
      Air conditioning switch: OFF

    2. Maintain the engine speed at 2,000 to 2,500 rpm and warm up the engine until the cooling fan operates.

      NOTICE:
      1. Make sure that the radiator reservoir still has some coolant in it.
      2. Pay attention to the needle of the water temperature meter. Make sure that the needle does not show an abnormally high temperature.
      3. If there is not enough coolant, the engine may burn out or overheat.
      4. Immediately after starting the engine, if the radiator reservoir does not have any coolant, perform the following: 1) stop the engine, 2) wait until the coolant has cooled down, and 3) add coolant until the coolant is filled to the B line.
      5. Run the engine at 2,000 rpm until the coolant level has stabilized.

  1. Press the No. 1 and No. 2 radiator hoses several times by hand to bleed air.

    CAUTION:
    When pressing the radiator hoses:
    1. Wear protective gloves.
    2. Be careful as the radiator hoses are hot.
    3. Keep your hands away from the radiator fan.

  1. Stop the engine and wait until the coolant cools down to ambient temperature.

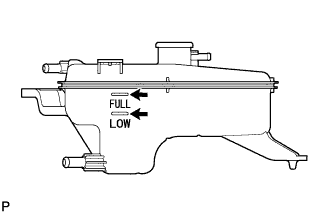
  1. A112306
    Check that the coolant level is between the FULL and LOW line.
    If the coolant level is below the LOW line, repeat all of the procedures above.
    If the coolant level is above the FULL line, drain coolant so that the coolant level is between the FULL and LOW line.


60. CHECK FOR ENGINE COOLANT LEAKS
  1. Check for engine coolant leaks (Click here).


61. CHECK FOR MANUAL TRANSAXLE OIL LEAKS

62. CHECK FOR AUTOMATIC TRANSAXLE FLUID LEAKS

63. INSPECT SHIFT LEVER POSITION
  1. When shifting the lever from P to the R position with the ignition switch on (IG) and the brake pedal depressed, make sure that the shift lever moves smoothly and moves correctly into position.

  1. Start the engine and make sure that the vehicle moves forward when shifting the lever from N to the D position and moves rearward when shifting the lever to the R position.
    If the operation cannot be performed as specified, inspect the park/neutral position switch and check the shift lever installation condition.


64. ADJUST SHIFT LEVER POSITION
  1. Shift the shift lever to the N position.

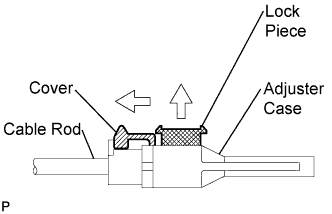
  1. C117121E01
    Slide the adjuster case cover in the direction shown in the illustration and pull out the lock piece.

  1. Gently pull the cable rod toward the rear of the vehicle by hand to pull the cable taut.

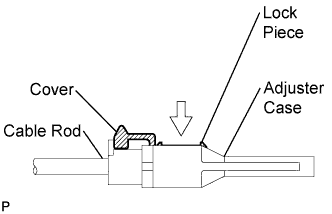
  1. C117120E01
    Press the lock piece into the adjuster case and lock it.

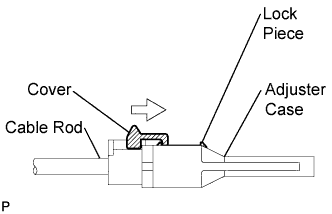
  1. C117119E01
    Slide the cover in the direction shown in the illustration.

    NOTICE:
    Slide the cover past the protrusion of the lock piece.

  1. Inspect the operation after the adjustment.


65. INSTALL NO. 1 ENGINE COVER

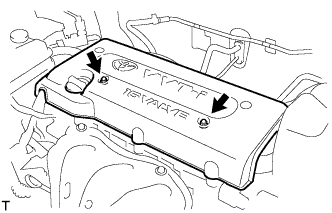
  1. A112206
    Install the engine cover with the 2 nuts.

    Torque:
    7.0 N*m{ 71 kgf*cm , 62 in.*lbf }


66. INSTALL FRONT FENDER APRON RH

67. INSTALL NO. 2 ENGINE UNDER COVER

68. INSTALL NO. 1 ENGINE UNDER COVER

69. INSTALL FRONT WHEEL

70. INSTALL RADIATOR SUPPORT OPENING COVER

71. INSTALL HOOD SUB-ASSEMBLY
  1. Install the hood (Click here).

  1. Adjust the hood (Click here).


72. INSPECT AND ADJUST FRONT WHEEL ALIGNMENT
  1. Inspect and adjust the front wheel alignment (Click here).


73. RESET MEMORY (for Automatic Transaxle)
  1. When replacing the engine assembly, perform the RESET MEMORY procedure (A/T initialization ) for U241E (2WD) (Click here) and for U140F (4WD) (Click here).

← INSTALLATION (Nov 2005 – Dec 2006)INSTALLATION (from Aug 2007) →