REMOVAL
Removal / installation · Vehicles built from Aug 2007
Versions by build date: Nov 2005 – Dec 2006 Jan 2007 – Jul 2007 from Aug 2007
- HINT:
- Use the same procedures for the RH side and LH side.
- The procedures listed below are for the LH side.
- Use the same procedures for the RH side and LH side.
| 1. DISCONNECT CABLE FROM NEGATIVE BATTERY TERMINAL |

- CAUTION:
- Wait at least 90 seconds after disconnecting the cable from the negative (-) battery terminal to prevent airbag and seat belt pretensioner activation.
| 2. DRAIN DIFFERENTIAL OIL |
Using a 10 mm socket hexagon wrench, remove the rear differential drain plug and gasket, and drain the oil.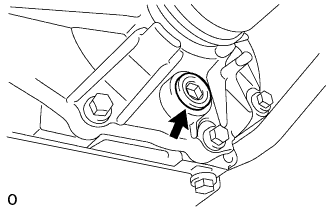

Install a new gasket to the rear differential drain plug.
Using a 10 mm socket hexagon wrench, install the rear differential drain plug and gasket.
| 3. REMOVE REAR WHEEL |
| 4. REMOVE TAILPIPE ASSEMBLY |
Remove the tailpipe for 1AZ-FE (Click here).
Remove the tailpipe for 2AD-FTV (Click here for CCo, Click here for DPF).
Remove the tailpipe for 2AD-FHV (Click here).
Remove the tailpipe for 2AZ-FE (Click here).
Remove the tailpipe for 2GR-FE (Click here).
| 5. REMOVE EXHAUST CENTER PIPE ASSEMBLY |
Remove the center pipe for 1AZ-FE (Click here).
Remove the center pipe for 2AZ-FE (Click here).
| 6. REMOVE FRONT EXHAUST PIPE ASSEMBLY |
Remove the front pipe for 2AD-FTV (Click here for CCo, Click here for DPF).
Remove the front pipe for 2AD-FHV (Click here).
| 7. REMOVE NO. 2 EXHAUST PIPE SUB-ASSEMBLY |
Remove the No. 2 exhaust pipe sub-assembly for 2GR-FE (Click here).
| 8. REMOVE PROPELLER WITH CENTER BEARING SHAFT ASSEMBLY |
Remove the 2 bolts and 2 adjusting washers, and disconnect the propeller with center bearing shaft.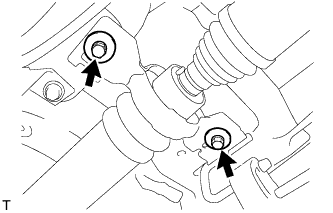
- NOTICE:
- During the removal, do not exert excessive force on the universal joint.
- When removing, transporting or storing the propeller with center bearing shaft assembly, do not allow the No. 2 joint angle to exceed 20°.
- During the removal, do not exert excessive force on the universal joint.
Place matchmarks on the differential carrier and propeller shaft.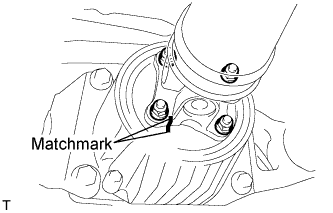
Remove the 4 nuts and 4 washers, and disconnect the propeller shaft and differential carrier.
Place matchmarks on the transfer and propeller shaft.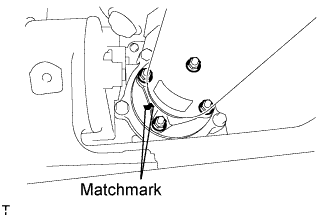
Remove the 4 nuts and 4 washers, and disconnect the propeller shaft from the transfer.
| 9. REMOVE REAR AXLE SHAFT NUT |
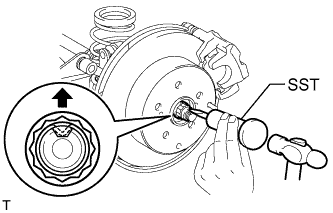 |
Using SST and hammer, unstake the staked part of the nut.
- SST
- 09930-00010
- NOTICE:
- Loosen the staked part of the nut completely, otherwise the screw of the drive shaft may be damaged.
While applying the brake, remove the lock axle hub nut.
| 10. DISCONNECT DIFFERENTIAL CARRIER ASSEMBLY |
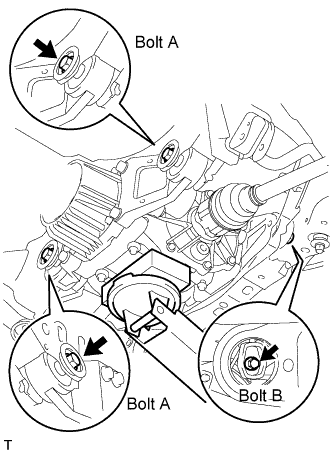 |
Support the rear differential carrier with a transmission jack or equivalent.
Fix the nuts in place and remove bolt A, bolt B and bolt C.
- NOTICE:
- Do not loosen the nuts. Loosen the bolts.
Slowly lower the jack and then tilt the rear differential carrier as shown in the illustration.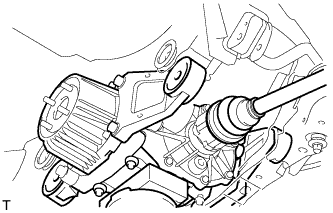
Set the tip of the tire lever to the position on the rear drive shaft inboard joint shown in the illustration. Then, using the ribbed part of the rear differential carrier as a fulcrum, disconnect the left and right rear drive shafts.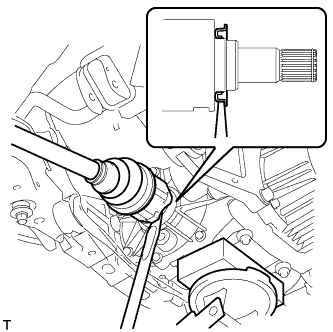
- NOTICE:
- Do not scratch the rear drive shaft dust cover.
| 11. DISCONNECT REAR SPEED SENSOR LH |
Disconnect the speed sensor (Click here).
| 12. REMOVE REAR DRIVE SHAFT ASSEMBLY LH |
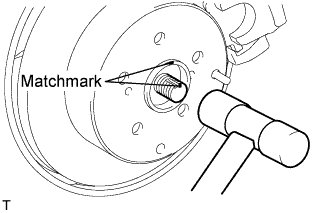 |
Put matchmarks on the drive shaft and the axle hub.
- NOTICE:
- Do not punch the marks.
Using a plastic-faced hammer, separate the drive shaft from the axle hub.
- NOTICE:
- Be careful not to damage the boot and speed sensor rotor. Do not excessively push out the drive shaft from the axle.
| 13. FIX FRONT AXLE ASSEMBLY |
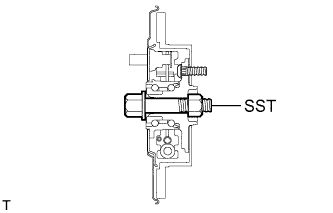 |
- NOTICE:
- The hub bearing could be damaged if it is subjected to the vehicle weight, such as when moving the vehicle with the drive shaft removed. Therefore, if it is absolutely necessary to place the vehicle weight on the hub bearing, first support it with SST.
- SST
- 09608-16042
(09608-02021, 09608-02041)