Home › ENGINE ยท 2AD-FTV › ENGINE CONTROL SYSTEM › ECD SYSTEM (for DPF)

DTC    P2002    Particulate Trap Efficiency Below Threshold (Bank1)

for Preparation Click here


DESCRIPTION


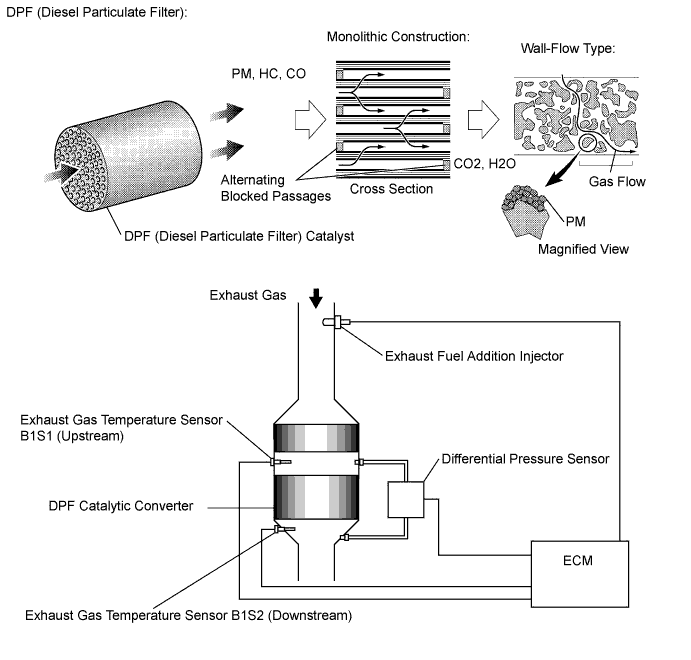
A192815E04

HINT:
  1. For more information on the Diesel Particulate Filter (DPF) catalytic converter, refer to the following procedures (Click here).
  2. If P2002 is present, refer to the DTC table for Diesel Particulate Filter System (Click here).

HINT:
The DPF catalyst has an ability to reduce particulate matter (PM), hydrocarbons (HC) and carbon monoxides (CO). The DPF catalyst is a monolithic type catalyst. Alternating passages in the catalyst have either their inlet or outlet blocked. This forces the exhaust gasses to flow through the walls of the passages (see illustration above). Due to the flow of the exhaust gasses through micro-cavities in the passage walls, it is called a "wall flow" type converter.


P2002 
DTC Detection Drive Pattern
DTC Detection Condition
Trouble Area
-
Condition (a), (b) or (c) is met (1 trip detection logic):
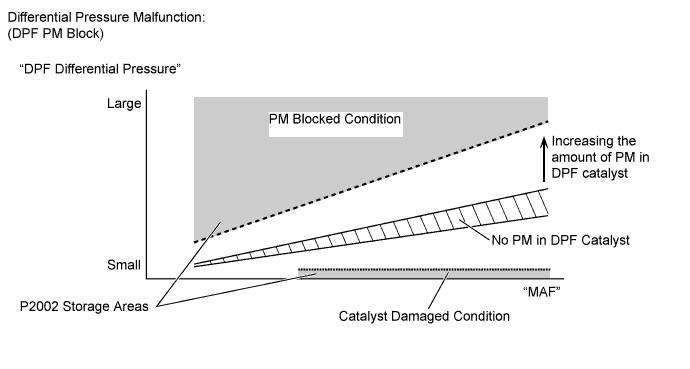
(a) Differential pressure between DPF catalyst exceeds a standard level for more than 10 seconds (Differential pressure malfunction).
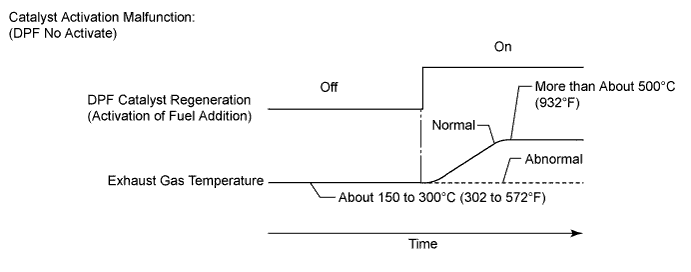
(b) Exhaust gas temperature does not rise during DPF catalyst regeneration (Catalyst activation malfunction).
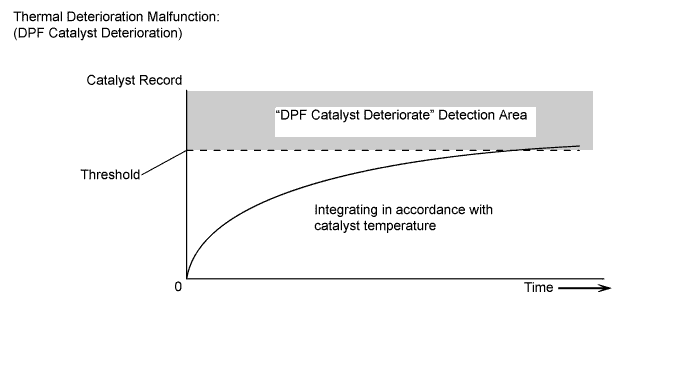
(c) The Catalyst Record exceeds the threshold (Thermal deterioration malfunction).
  1. DPF catalytic converter (Exhaust manifold converter sub-assembly)
  2. Blockage in vacuum transmitting pipe sub-assembly for differential pressure sensor
  3. Blockage in differential pressure sensor vacuum hose
  4. Blockage in EGR passage
  5. Exhaust fuel addition injector
  6. Differential pressure sensor
  7. Fuel injector assembly
  8. Exhaust gas leaks in DPF catalytic converter
  9. Mass air flow meter
  10. Turbocharger sub-assembly
  11. ECM

HINT:
Due to fail-safe operation when other DTCs (that involve the engine power limit) are stored, PM regeneration may be prohibited.
This DTC / These DTCs or P1386 may be stored due to the fact that PM forced regeneration control is prohibited due to the fail-safe operation of other DTCs.


Related Data List 
DTC No.
Data List
P2002
  1. MAF
  2. MAP
  3. Target Booster Pressure
  4. Intake Air Temp (Turbo)
  5. Atmosphere Pressure
  6. Coolant Temp
  7. Engine Speed
  8. AFS Voltage B1S1
  9. AF Lambda B1S1
  10. DPF PM Block
  11. DPF No Activate
  12. DPF Thermal Deteriorate
  13. DPF Over temperature
  14. Catalyst Differential Press
  15. Exhaust Fuel Addition FB
  16. Exhaust Temperature B1S1
  17. Exhaust Temperature B1S2
  18. DPF Differential Pressure
  19. Diff. Press. Sensor Corr.
  20. Injection Feedback Val #1 to #4
  21. Inj. FB Vol. for Idle
  22. Injection Volume

MONITOR DESCRIPTION

In order to detect abnormality in the DPF catalytic converter, the ECM monitors the exhaust gas temperature as well as differential pressure in front of and behind the DPF catalyst.
Differential pressure malfunction
  1. For monitoring the differential pressure, the ECM compares the up and downstream pressures of the DPF catalytic converter. If the difference between the pressures is large, the ECM determines that the DPF has become contaminated or is deteriorated, and illuminates the MIL.

A193876E05

Catalyst activation malfunction
  1. The ECM monitors an increase in the exhaust gas temperature while the exhaust fuel addition injector adds fuel under DPF catalyst regeneration. The exhaust gas temperature during the DPF catalyst regeneration normally rises from about 300°C (572°F) to about 500°C (932°F) or higher. If the temperature does not rise even if a certain period of time has elapsed, the ECM interprets this as a malfunction in the DPF and illuminates the MIL.

A208470E03

Thermal deterioration malfunction
  1. Furthermore, the ECM calculates and integrates the Catalyst Record of catalyst thermal deterioration data with the catalyst temperature. If Catalyst Record exceeds the threshold, the ECM interprets this as a malfunction in the DPF catalyst and illuminates the MIL.

A193875E02

Outline of Inspection Procedure:
  1. First: Check the factor which caused P2002 at first.
    1. Check the vacuum hoses and transmitting pipes for the differential pressure sensor
    2. Check the DPF catalyst
      1. The vacuum hoses for the differential pressure sensor should be replaced at this step, if damaged.
      2. The DPF catalyst and transmitting pipes should not be replaced until after the second step, even if damaged. Replacement takes many hours and much effort, so if there are other parts to be replaced at the second step, it is better to replace those at the same time.
  2. Second: Check the engine condition after conducting the inspection above.
    1. If the exhaust fuel addition injector or DPF catalyst is damaged, the engine itself may be the root cause. Check the areas related to the DPF system.
  3. Finally: Perform final confirmation of the DPF control system capability with the catalyst regeneration.

HINT:
  1. DPF catalyst diagnosis:
    The value of "Catalyst Differential Press" in the Data List is high when the catalyst is clogged. If this value exceeds approximately 0.4, DTC P2002 is stored.
    If the "Catalyst Differential Press" become near about 0.4, the catalyst is probably clogged with PM even if DTC P2002 is not present.
    Check the Catalyst differential press when the engine is running at 3000 rpm with no load. Enter the following menus: Powertrain / Engine and ECT / Data List / Catalyst differential press.
    If the value of MAF in the Data List is less than 25 g/s, a correct value for Catalyst Differential Press is not output due to exhaust gas pulsation.
  2. If the difference in pressure (DPF Differential Pressure) is very small even if the engine speed is increased, the DPF catalytic converter may be malfunctioning.
  3. If a large amount of carbon deposits exists in the DPF catalyst (when DTC P2002 is output and "DPF PM Block" of Data List displays "Blocked"), the following parts probably also have deposits inside: exhaust fuel addition injector, EGR valve assembly, intake manifold, No. 1 EGR pipe, No. 2 EGR pipe, EGR cooler assembly, and other parts related to the exhaust gas.
  4. Exhaust fuel addition injector diagnosis:
    When the fuel volume injected by the exhaust fuel addition injector decreases, the value of "Exhaust Fuel Addition FB" in the Data List increases. Exhaust Fuel Addition FB in the Data List is a correction value to increase the fuel volume injected from the exhaust fuel addition injector when the catalyst temperature does not rise to the target during catalyst regeneration. Under normal conditions, the value is between 0.9 and 1.45.
    Check the value by entering the following menus on an intelligent tester: Powertrain / Engine and ECT / Data List / Exhaust Fuel Addition FB. Under normal conditions, the exhaust gas temperature becomes 150 to 350°C (302 to 662°F) when the vehicle is driven in 3rd gear at a constant vehicle speed of about 50 km/h (31 mph). While driving under these conditions, the exhaust gas temperature rises to 500 to 700°C (932 to 1292°F) when the catalyst regeneration function in the Active Test (Activate the DPF Rejuvenate (PM)) is performed. If the temperature does not rise sufficiently, the exhaust fuel addition injector or the DPF catalyst may be damaged.
  5. By removing the EGR valve from the intake manifold, the carbon deposit condition between the EGR valve and intake manifold can be checked visually.
  6. The Freeze Frame Data may assist in identifying of the cause of the malfunction, and in judging whether it was temporary or not. Thus, record the Freeze Frame Data before starting the inspection.


INSPECTION PROCEDURE

NOTICE:
After replacing the DPF catalyst, clear the thermal deterioration data stored in the ECM.

1.CHECK OTHER OUTPUT DTC (IN ADDITION TO DTC P2002)
  1. Connect the intelligent tester to the DLC3.

  1. Turn the ignition switch to ON and turn the tester on.

  1. Enter the following menus: Powertrain / Engine and ECT / DTC.

  1. Read Current DTCs.
    Result 
    Result
    Proceed to
    P2002
    A
    P2002 and other Current DTCs output
    B

    HINT:
    1. If codes other than P2002 are output, perform troubleshooting for those DTCs first.
    2. When checking DTCs using the tester, ignore any Pending and History DTCs.


B
GO TO DTC CHART (Click here)
A


2.CHECK FREEZE FRAME DATA
  1. Connect the intelligent tester to the DLC3.

  1. Turn the ignition switch to ON and turn the tester on.

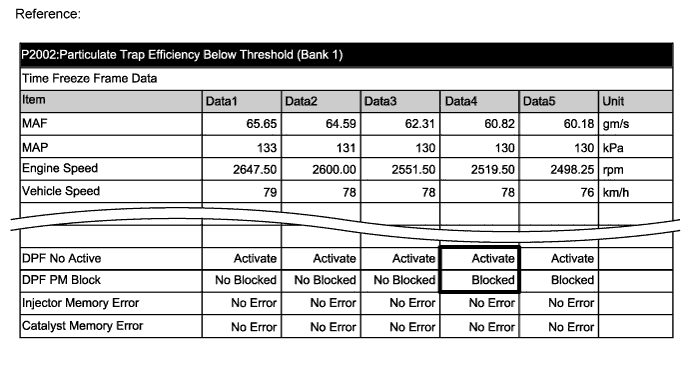
  1. Enter the following menus: Powertrain / Engine and ECT / DTC / Freeze Frame Data.


  1. Read the value of the following Data List items indicated in the 4th data frame.

    A207641E01

    Result 
    Tester Display
    Result
    Proceed to
    DPF PM Block
    Blocked
    A
    DPF No Activate
    No Activate
    B
    DPF Thermal Deteriorate
    Deteriorated
    C


B
Go to step 10

C
Go to step 36
A


3.CHECK BLOCKAGE OF VACUUM HOSES AND TRANSMITTING PIPES (DIFFERENTIAL PRESSURE SENSOR)

CAUTION:
Be careful of being burned by exhaust gases during the following inspection.

NOTICE:
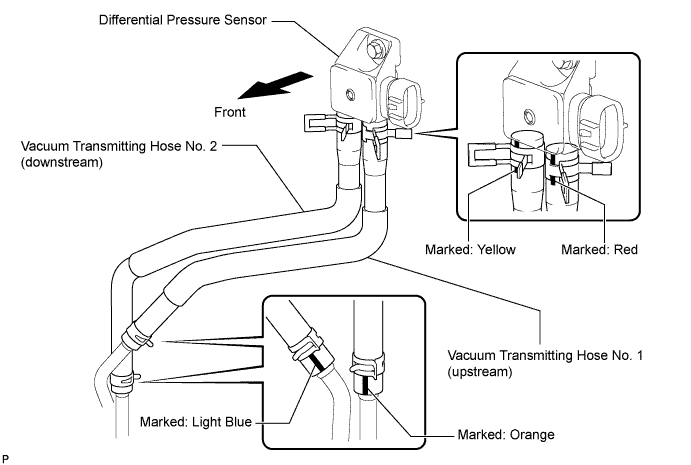
  1. Confirm the paint marks on the vacuum hoses before disconnecting them.
  2. Check that the vacuum hose connections are on the correct side of the DPF catalytic converter.


  1. Disconnect the vacuum hoses (both upstream and downstream) from the differential pressure sensor.

    A204084E01

  1. Start the engine.

  1. Check if there is exhaust gas pulsation from both vacuum hoses while the engine is idling.
    Result 
    Result
    Proceed to
    No exhaust gas pulsation
    A
    Exhaust gas pulsation exists
    B


B
Go to step 5
A


4.DIFFERENTIAL PRESSURE PIPE CLOGGED CONFIRMED (PROCEDURE 4)

HINT:
At this point, it is clear that the transmitting pipe for the differential pressure sensor must be repaired or replaced, but do not replace it at this time. Continue and complete the inspection, and then perform any other necessary repairs at the same time as the transmitting pipe replacement.


NEXT


5.CHECK FOR EXHAUST GAS LEAK
  1. Check if there is an exhaust gas leak in the exhaust system components.
    Result 
    Result
    Proceed to
    Leaks and/or blockages exist in the exhaust system
    A
    No leaks and/or blockages in the exhaust system
    B


B
Go to step 7
A


6.REPAIR OR REPLACE EXHAUST GAS LEAK POINT
  1. Repair or replace the exhaust gas leak point.


NEXT


7.READ VALUE USING INTELLIGENT TESTER (PROCEDURE 7) (CATALYST DIFFERENTIAL PRESS)
  1. Connect the intelligent tester to the DLC3.

  1. Turn the ignition switch to ON and turn the tester on.

  1. Start the engine and run the engine until the engine coolant temperature reaches 60°C (140°F) or higher.

  1. Enter the following menus: Powertrain / Engine and ECT / Data List / Catalyst Differential Press.

  1. Check the differential pressure at an engine speed of 3000 rpm with no load.

    Standard:
    Catalyst Differential Press is less than 0.25

    HINT:
    Catalyst Differential Press is the DPF Differential Pressure corrected in response to the MAF and other values.

  1. With the vehicle stopped, fully depress the accelerator pedal for 5 seconds and then release it.*A

  1. Repeat the above procedure *A 10 times.*B

  1. Check for black smoke emission during the above procedures *A and *B.

    Standard:
    Black smoke is emitted less than 5 times.

    HINT:
    Even if the black smoke is very thin, count the black smoke emission if there is any visible smoke.


    Result 
    Differential Pressure (kPa)
    Proceed to
    Note
    Catalyst Differential Press 0.25 or more at 3000 rpm (No engine load)
    A
    An extremely large amount of PM (Particulate Matter) has accumulated in the DPF catalyst.
    If DPF catalyst regeneration is performed in this condition, the heat generated will be excessive, possibly causing another malfunction. Therefore, replace the DPF catalyst.
    Black smoke is emitted 5 times or more
    A
    The DPF catalyst cannot trap PM because it is melted or cracked, and therefore must be replaced.
    Also, if a piece of the catalyst breaks off, due to melting or another condition, and enters the exhaust pipe downstream, the exhaust pipe could be blocked, possibly causing a different malfunction.
    Therefore, when replacing the DPF catalyst, visually inspect the rear surface of the DPF filter substrate to determine if replacement of the exhaust pipe is necessary.
    Except above
    B
    -

    HINT:
    1. If the "Catalyst Differential Press" is more than about 0.4, DTC P2002 (Particulate Trap Efficiency Below Threshold [Bank 1]) will be stored.
    2. The standard for the differential pressure sensor output is as follows:
      Reference 
      Condition
      Differential Pressure Output
      Ignition switch ON
      Approximately 0 kPa
    3. If the differential pressure sensor output is always 3 kPa, an open or short may exist in the differential pressure sensor circuit.
    4. If the differential pressure sensor outputs a negative value when the engine is maintained at an engine speed of 3000 rpm with no load, the hose and pipe connections may be incorrect.


A
Go to step 9

B
Go to step 8

8.PERFORM ACTIVE TEST USING INTELLIGENT TESTER (ACTIVATE THE DPF REJUVENATE PM)
  1. Clear the DTC and Exhaust Fuel Addition FB value by disconnecting the cable from the negative battery terminal or removing the EFI (EFI MAIN) fuse for 1 minute or more.

  1. Connect the intelligent tester to the DLC3.

  1. Start the engine and drive the vehicle until the engine coolant temperature reaches 60°C (140°F) or higher.

  1. Turn the tester on.

  1. Enter the following menus: Powertrain / Engine and ECT / Active Test / Activate the DPF Rejuvenate (PM).

  1. Perform the Active Test while the vehicle is driven at a constant vehicle speed within 50 to 100 km/h (31 to 62 mph) (transmission in 3rd gear) for more than 15 minutes.

    HINT:
    While the "Activate the DPF Rejuvenate (PM)" Active Test is being performed, the accelerator opening angle should be kept as constant as possible.

    DPNR/DPF Status Reju(PM) (Reference) 
    Tester Display
    Status
    Standby
    Before entering the "Activate the DPF Rejuvenate (PM)"
    Ready
    Enabling condition for "Activate the DPF Rejuvenate (PM)" is not sufficient
    Operate
    1. PM regeneration is performing.
    2. If "Activate the DPF Rejuvenate (PM)" is not finished completely, the status turns to "Ready". For example, the vehicle is idling for more than 3 minutes during the PM regeneration is performing, the exhaust gas temperature falls to outside of enabling condition and PM regeneration is stopped.
    3. If "Activate the DPF Rejuvenate (PM)" is finished completely, the status turns to "Compl".
    Compl
    PM regeneration is completed

  1. Enter the following menus: Powertrain / Engine and ECT / Data List / Catalyst Differential Press.

  1. With the vehicle stopped, check the differential pressure at an engine speed of 3000 rpm.

    Standard:
    Catalyst Differential Press is less than 0.10

    NOTICE:
    If DPF Differential Pressure is high, repeat DPF catalyst regeneration and check again. If DPF Differential Pressure is still high, then it can be assumed that ash has accumulated in the DPF catalytic converter, so replace the DPF catalytic converter.

    HINT:
    1. If non-standard oil is used or the rate of oil consumption is high, the Catalyst Differential Press may increase, due to increased accumulation of ash.
    2. If the engine oil consumption is high, inspect and repair the cause of high engine oil consumption.
    3. Toyota recommends the use of approved "Toyota genuine motor oil". Another oil of matching quality can also be used.
      Oil grade:
      ACEA C2 (If ACEA C2 cannot be obtained, you may also use ACEA B1.)
    4. Using engine oil other than ACEA C2 (or B1) may damage the catalytic converter.
    5. ACEA C2 is best choice for preventing an increase in the DPF differential pressure.


OK
Go to step 10

NG
Go to step 9

9.CATALYTIC CONVERTER DAMAGE CONFIRMED (PROCEDURE 9)

HINT:
At this point, it is clear that the DPF catalytic converter must be replaced, but do not replace it at this time. Continue and complete the inspection, and then perform any other necessary repairs at the same time as the DPF catalytic converter replacement.


NEXT


10.INSPECT EGR VALVE ASSEMBLY
  1. Remove the EGR valve assembly.

  1. Visually check the electric EGR control valve for deposits.
    If there are deposits, clean the electric EGR control valve.
    NOTICE:
    1. When cleaning the electric EGR control valve, make sure the valve is completely closed.
    2. Do not forcibly open the valve, as it may be damaged or deformed.
    3. When cleaning the electric EGR control valve, use a piece of cloth soaked with cleaning solvent. Spraying the solvent directly onto these parts or soaking the parts in the solvent may damage the parts.


    A201816E01
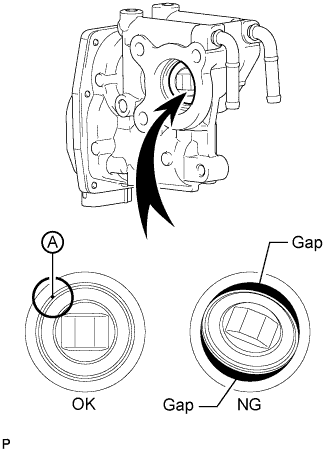
  1. Hold the electric EGR control valve up to a light, and then from the side indicated by the arrow in the illustration, visually check that there is no gap between the valve and body.

    OK:
    No light passes through (there is no gap between the valve and body).

    If light passes through (there is a gap between the valve and body), replace the electric EGR control valve assembly.

    HINT:
    Light passes through part A shown in the illustration even if the valve is completely closed, this is not a problem.


B
Go to step 12
A


11.REPLACE EGR VALVE ASSEMBLY
  1. Replace the EGR valve assembly (Click here).


NEXT


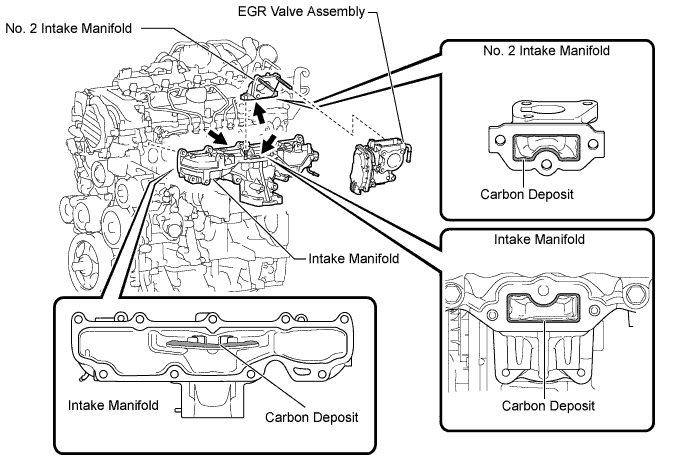
12.REMOVE DEPOSIT (CLEAN EGR PASSAGE)
  1. Remove the EGR valve assembly, No. 2 intake manifold and intake manifold.


  1. Remove the deposits from those parts and clean the parts.

    A206051E01

    NOTICE:
    1. When cleaning the EGR valve and diesel throttle body, use a piece of cloth soaked with cleaning solvent. Spraying the solvent directly onto these parts or soaking the parts in solvent may damage the parts.
    2. Extreme care must be taken to prevent the removed deposits from falling into the engine unit during cleaning.

    HINT:
    Remove the intake manifold from the cylinder head when it has to be cleaned.

  1. Reinstall the EGR valve assembly, No. 2 intake manifold and intake manifold.


NEXT


13.READ VALUE USING INTELLIGENT TESTER (MAP AND ATMOSPHERIC PRESSURE)
  1. Connect the intelligent tester to the DLC3.

  1. Turn the ignition switch to ON and turn the tester on.

  1. Enter the following menus: Powertrain / Engine and ECT / Data List / MAP and Atmospheric Pressure.

  1. Compare the values with the ignition switch ON.

    Standard:
    Difference between MAP and Atmosphere Pressure is less than 8 kPa.

    HINT:
    1. If MAP and Atmosphere Pressure have the same value, both are normal. If there is a difference of 8 kPa or more, compare the values to the atmospheric pressure for that day. The sensor whose deviation is the greatest is malfunctioning.
    2. Standard atmospheric pressure is 101 kPa. For every 100 m increase in altitude, pressure drops by 1 kPa. Varies by weather.

    Result 
    Result
    Proceed to
    MAP and Atmosphere Pressure have the same value
    A
    MAP is different from actual atmospheric pressure
    B
    Atmosphere Pressure is different from actual atmospheric pressure
    C


A
Go to step 16

B
Go to step 14

C
Go to step 15

14.REPLACE MANIFOLD ABSOLUTE PRESSURE SENSOR
  1. Replace the manifold absolute pressure sensor.


NEXT
Go to step 16

15.REPLACE ECM

HINT:
The atmosphere pressure sensor is built into the ECM.

  1. Replace the ECM (Click here).


NEXT
Go to step 16

16.READ VALUE USING INTELLIGENT TESTER (MAP AND TARGET BOOSTER PRESSURE)
  1. Connect the intelligent tester to the DLC3.

  1. Start the engine and turn the tester on.

  1. Enter the following menus: Powertrain / Engine and ECT / Data List / MAP and Target Booster Pressure.

  1. Take a snapshot when the engine speed is maintained at 4500 rpm with no load.

  1. Check the condition of the vehicle using the snapshot.
    Result 
    Result
    Proceed to
    Difference between MAP and Target Booster Pressure is +/-15 kPa or more
    A
    Except above
    B


B
Go to step 21
A


17.CHECK INTAKE SYSTEM
  1. Check for air leaks and blockages between the air cleaner case and turbocharger, and between the turbocharger and intake manifold.
    Result 
    Result
    Proceed
    Leaks and/or blockages exist in the intake system
    A
    No leaks and/or blockages in the intake system
    B

    HINT:
    1. Inspect the air intake system, especially hoses and pipes between the air cleaner and turbocharger.
    2. Check for abnormal disconnection, pipe and hose squashing, and any damage in the intake system.
    3. Using your hand, check whether the pipes and hoses in the intake system are securely connected.
    4. By applying soapy water and revving up the engine, air leaks from the intake system can be checked by checking for bubbles.
    5. Check for any modifications in the intake system made by the user.


B
Go to step 20
A


18.REPAIR OR REPLACE INTAKE SYSTEM
  1. Repair or replace the malfunctioning parts of the intake system.


NEXT


19.READ VALUE USING INTELLIGENT TESTER (MAP AND TARGET BOOSTER PRESSURE)
  1. Connect the intelligent tester to the DLC3.

  1. Start the engine and turn the tester on.

  1. Enter the following menus: Powertrain / Engine and ECT / Data List / MAP and Target Booster Pressure.

  1. Take a snapshot when the engine speed is maintained at 4500 rpm with no load.

  1. Check the condition of the vehicle using the snapshot.

    Result 
    Result
    Proceed to
    Difference between MAP and Target Booster Pressure is +/-15 kPa or more
    A
    Except above
    B


B
Go to step 21
A


20.CHECK AND REPLACE TURBOCHARGER SUB-ASSEMBLY
  1. Check and replace the turbocharger sub-assembly (Click here).


NEXT


21.READ VALUE USING INTELLIGENT TESTER (MAF)
  1. Connect the intelligent tester to the DLC3.

  1. Start the engine and run the engine until the engine coolant temperature reaches 60°C (140°F) or higher.

  1. Turn the tester on.

  1. Enter the following menus: Powertrain / Engine and ECT / Data List / Engine Speed, MAF, MAP and Intake Air Temp (Turbo).

  1. Maintain the engine at an engine speed of 4500 rpm with no load and take a note of the following values.

    HINT:
    The shift lever should be in neutral and the A/C switch and all accessory switches should be off.

    Tester Display
    Unit
    Engine Speed
    rpm
    MAF
    g/sec
    MAP
    kPa
    Intake Air Temp (Turbo)
    °C


  1. Calculate the MAF value corrected to 4500 rpm by using the following formula.

    Calculation Formula:
    MAF corrected [g/sec] = MAF measured [g/sec] x {4500 x 155 x (35 + 273)}/ {Engine Speed [rpm] x MAP [kPa] x (Intake Air Temp (Turbo) + 273)}

    Standard:
    Tester Display
    Specified Condition*
    MAF corrected
    90 to 135 g/sec.

    HINT:
    1. Example calculation
      1. Sample values
        1. Engine speed: 4435 rpm
        2. MAP: 154 kPa
        3. MAF: 119.2
        4. Intake Air Temp (Turbo): 46°C
      1. Correction Calculation of MAF
        1. 119.2 x {4500 x 155 x (35 + 273)} / {4435 x 154 x (46 + 273)} = 117.53
      1. Judgment
        1. The calculated value 117.53 is within standard range of 90 to 135 g/sec.: OK
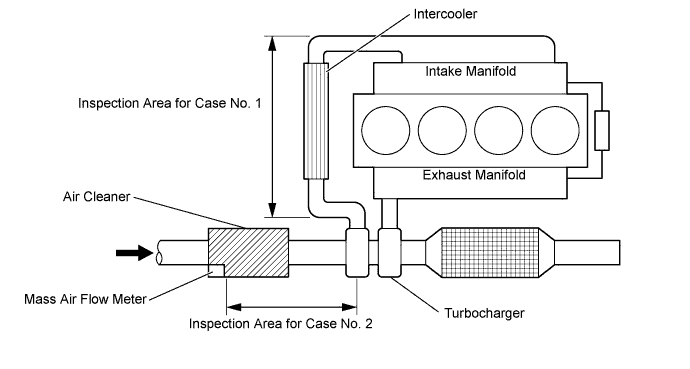
    2. If the value calculated by applying the above formula is higher than the standard, leaks may exist between the turbocharger outlet and intake manifold (Case No. 1).
    3. If the value calculated by applying the above formula is lower than the standard, leaks may exist between the air cleaner and turbocharger inlet (Case No. 2).


    A185053E01

    Result 
    Result
    Proceed to
    Outside standard range
    A
    Within standard range
    B


B
Go to step 26
A


22.CHECK INTAKE SYSTEM
  1. Check for air leaks and blockages between the air cleaner case and turbocharger, and between the turbocharger and intake manifold.
    Result 
    Result
    Proceed
    Leaks and/or blockages exist in the intake system
    A
    No leaks and/or blockages in the intake system
    B

    HINT:
    1. Inspect the air intake system, especially hoses and pipes between the air cleaner and turbocharger.
    2. Check for abnormal disconnection, pipe and hose squashing, and any damage in the intake system.
    3. Using your hand, check whether the pipes and hoses in the intake system are securely connected.
    4. By applying soapy water and revving up the engine, air leaks from the intake system can be checked by checking for bubbles.
    5. Check for any modifications in the intake system made by the user.


B
Go to step 25
A


23.REPAIR OR REPLACE INTAKE SYSTEM
  1. Repair or replace the malfunctioning parts of the intake system.


NEXT


24.READ VALUE USING INTELLIGENT TESTER (MAF)
  1. Connect the intelligent tester to the DLC3.

  1. Start the engine and drive the vehicle until the engine coolant temperature reaches 60°C (140°F) or higher.

  1. Turn the tester on.

  1. Enter the following menus: Powertrain / Engine and ECT / Data List / Engine Speed, MAF, MAP and Intake Air Temp (Turbo).

  1. Maintain the engine at an engine speed of 4500 rpm with no load and take a note of the following values.
    Tester Display
    Unit
    Engine Speed
    rpm
    MAF
    g/sec
    MAP
    kPa
    Intake Air Temp (Turbo)
    °C


  1. Calculate the MAF value corrected to 4500 rpm by using the following formula.

    Calculation Formula:
    MAF corrected [g/sec] = MAF measured [g/sec] x {4500 x 155 x (35 + 273)}/ {Engine Speed [rpm] x MAP [kPa] x (Intake Air Temp (Turbo) + 273)}

    Standard:
    Tester Display
    Specified Condition*
    MAF corrected
    90 to 135 g/sec.

    HINT:
    1. Example calculation
      1. Sample values
        1. Engine speed: 4435 rpm
        2. MAP: 154 kPa
        3. MAF: 119.2
        4. Intake Air Temp (Turbo): 46°C
      1. Correction Calculation of MAF
        1. 119.2 x {4500 x 155 x (35 + 273)} / {4435 x 154 x (46 + 273)} = 117.53
      1. Judgment
        1. The calculated value 117.53 is within standard range of 90 to 135 g/sec.: OK
    2. If the value calculated by applying the above formula is higher than the standard, leaks may exist between the turbocharger outlet and intake manifold (Case No. 1).
    3. If the value calculated by applying the above formula is lower than the standard, leaks may exist between the air cleaner and turbocharger inlet (Case No. 2).


    A185053E01

    Result 
    Result
    Proceed to
    Outside standard range
    A
    Within standard range
    B


B
Go to step 26
A


25.REPLACE MASS AIR FLOW METER
  1. Replace the mass air flow meter (Click here).


NEXT


26.READ VALUE USING INTELLIGENT TESTER (INJECTION FEEDBACK VAL #1 TO #4 AND INJECTION VOLUME)
  1. Start the engine and drive the vehicle until the engine coolant temperature reaches 60°C (140°F) or higher.

  1. Allow the engine to idle for 1 minute or more.

    HINT:
    The shift lever should be in neutral and the A/C switch and all accessory switches should be off.

  1. Connect the intelligent tester to the DLC3.

  1. Turn the tester on.

  1. Enter the following menus: Powertrain / Engine and ECT / Data List / Injection Volume and Injection Feedback Val. #1 to #4.

  1. Read the values when the engine is idling, and write them down.

    Standard:

    Tester Display
    Engine Condition
    Specified Condition
    Injection Volume
    Idling
    Less than 10 mm3/st
    Injection Feedback Val. #1
    Injection Feedback Val. #2
    Injection Feedback Val. #3
    Injection Feedback Val. #4
    Idling
    Between -3.0 mm3/st and 3.0 mm3/st

    Result 
    Result
    Proceed to
    Outside standard range
    A
    Within standard range
    B


B
Go to step 31
A


27.PERFORM ACTIVE TEST USING INTELLIGENT TESTER (CONTROL THE CYLINDER #1 TO #4 FUEL CUT)

HINT:
Use this Active Test to determine the malfunctioning cylinder.

  1. Connect the intelligent tester to the DLC3.

  1. Start the engine and turn the tester on.

  1. Enter the following menus: Powertrain / Engine and ECT / Active Test / Control the Cylinder #1 to #4 Fuel Cut.

    HINT:
    1. If the engine idle speed does not change when a fuel injector is disabled, the cylinder being tested is malfunctioning.
    2. If the cylinder being tested is normal, there will be a significant change in idle speed when the fuel injection is stopped for that cylinder.


NEXT


28.REPLACE FUEL INJECTOR ASSEMBLY
  1. Refer to the step above and identify the malfunctioning cylinder.

    Malfunctioning Cylinder:
    The cylinder for which the value of Injector Feedback Val. is outside the range of -3.0 to 3.0 mm3/st.

  1. Replace the fuel injector of the malfunctioning cylinder (Click here).

  1. If the value of Injection Volume is 10 mm3/st or more and the value of all of the Injector Feedback Val. #1 to #4 is within -3.0 to 3.0 mm3/st, replace the fuel injectors for all cylinders.


NEXT


29.REGISTER INJECTOR COMPENSATION CODE AND PERFORM PILOT QUANTITY LEARNING

NOTICE:
Injector compensation codes are unique, 30-digit, alphanumeric values printed on the head portion of each injector. If an incorrect injector compensation code is input into the ECM, the engine may rattle or engine idling may become rough. In addition, engine failure may occur and the life of the engine may be shortened.

  1. Register the injector compensation code .

  1. Perform the fuel injector pilot quantity learning .


NEXT


30.BLEED AIR FROM FUEL SYSTEM
  1. Bleed the air from the fuel system .


NEXT


31.REPLACE TRANSMITTING PIPE AND/OR CATALYTIC CONVERTER

HINT:
If damage to the vacuum hoses or transmitting pipes for the differential pressure sensor and/or catalytic converter has already been confirmed, replace the corresponding parts after referring to the following table.


Procedure
Condition
Corresponding Part
4
No exhaust gas pulsation
Replace vacuum hoses or transmitting pipes for differential pressure sensor
9
Smoke emitted when racing without load
Replace DPF catalytic converter
(manifold converter sub-assembly)
  1. Replace the DPF catalytic converter (manifold converter sub-assembly) (Click here) or the vacuum hoses or transmitting pipes for the differential pressure sensor.

    NOTICE:
    When replacing or cleaning the transmitting pipe, also clean the installation section of the pipe on the DPF catalytic converter.

  1. Check the filter substrate from the downstream side for melting, cracks or breaks when replacing the DPF catalytic converter.
    Result 
    Result
    Proceed to
    Filter substrate has melting, cracks or breaks
    A
    Filter substrate has no melting, cracks or breaks
    B

  1. When the DPF catalytic converter is replaced, the catalyst record of DPF thermal deterioration stored in the ECM must be cleared.

    1. Connect the intelligent tester to the DLC3.

    2. Turn the ignition switch to ON and turn the tester on.

    3. Enter the following menus: Powertrain / Engine and ECT / Utility / Catalyst Record Clear.


B
Go to step 33
A


32.REPLACE EXHAUST PIPE
  1. Replace the exhaust pipe (Click here).


NEXT


33.PERFORM ACTIVE TEST USING INTELLIGENT TESTER (ACTIVATE THE DPF REJUVENATE PM)
  1. Clear the DTC and Exhaust Fuel Addition FB value by disconnecting the cable from the negative battery terminal or removing the EFI (EFI MAIN) fuse for 1 minute or more.

  1. Connect the intelligent tester to the DLC3.

  1. Start the engine and drive the vehicle until the engine coolant temperature reaches 60°C (140°F) or higher.

  1. Turn the tester on.

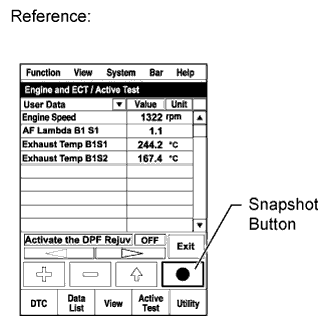
  1. Enter the following menus: Powertrain / Engine and ECT / Active Test / Activate the DPF Rejuvenate (PM) / Data List / Exhaust Temperature B1S1 and Exhaust Temperature B1S2.

  1. Perform the Active Test while the vehicle is driven at a constant vehicle speed within 50 to 100 km/h (31 to 62 mph) (transmission in 3rd gear) for more than 15 minutes.
    HINT:
    While the "Activate the DPF Rejuvenate (PM)" Active Test is being performed, the accelerator opening angle should be kept as constant as possible.


    A194530E01
  1. Take a snapshot with the intelligent tester when Exhaust Temperature B1S2 rises and becomes stable during driving.

    HINT:
    Detailed graphs can be displayed by transferring the stored snapshot from the tester to a PC (personal computer) with Intelligent Viewer installed.

    DPNR/DPF Status Reju(PM) (Reference) 
    Tester Display
    Status
    Standby
    Before entering the "Activate the DPF Rejuvenate (PM)"
    Ready
    Enabling condition for "Activate the DPF Rejuvenate (PM)" is not sufficient
    Operate
    1. PM regeneration is performing.
    2. If "Activate the DPF Rejuvenate (PM)" is not finished completely, the status turns to "Ready". For example, the vehicle is idling for more than 3 minutes during the PM regeneration is performing, the exhaust gas temperature falls to outside of enabling condition and PM regeneration is stopped.
    3. If "Activate the DPF Rejuvenate (PM)" is finished completely, the status turns to "Compl".
    Compl
    PM regeneration is completed

  1. Read the values of "Exhaust Temperature B1S1" and "Exhaust Temperature B1S2" in the Data List using the snapshot review function.

    OK:
    The values of Exhaust Temperature B1S1 and Exhaust Temperature B1S2 are both more than about 500°C (932°F), and the catalyst regeneration performed by the tester completes without the MIL lighting up.

    HINT:
    Under normal engine operation before catalyst regeneration, the value of Exhaust Temperature B1S1 is between 150°C and 300°C (302°F and 572°F).


NG
Go to step 34
OK

END 

34.REPLACE EXHAUST FUEL ADDITION INJECTOR (PROCEDURE 33)
  1. Replace the exhaust fuel addition injector assembly (Click here).


NEXT


35.PERFORM ACTIVE TEST USING INTELLIGENT TESTER (ACTIVATE THE DPF REJUVENATE PM)
  1. Clear the DTC and Exhaust Fuel Addition FB value by disconnecting the cable from the negative battery terminal or removing the EFI (EFI MAIN) fuse for 1 minute or more.

  1. Connect the intelligent tester to the DLC3.

  1. Start the engine and drive the vehicle until the engine coolant temperature reaches 60°C (140°F) or higher.

  1. Turn the tester on.

  1. Enter the following menus: Powertrain / Engine and ECT / Active Test / Activate the DPF Rejuvenate (PM) / Data List / Exhaust Temperature B1S1 and Exhaust Temperature B1S2.

  1. Perform the Active Test while the vehicle is driven at a constant vehicle speed within 50 to 100 km/h (31 to 62 mph) (transmission in 3rd gear) for more than 15 minutes.

    HINT:
    While the "Activate the DPF Rejuvenate (PM)" Active Test is being performed, the accelerator opening angle should be kept as constant as possible.

    DPNR/DPF Status Reju(PM) (Reference) 
    Tester Display
    Status
    Standby
    Before entering the "Activate the DPF Rejuvenate (PM)"
    Ready
    Enabling condition for "Activate the DPF Rejuvenate (PM)" is not sufficient
    Operate
    1. PM regeneration is performing.
    2. If "Activate the DPF Rejuvenate (PM)" is not finished completely, the status turns to "Ready". For example, the vehicle is idling for more than 3 minutes during the PM regeneration is performing, the exhaust gas temperature falls to outside of enabling condition and PM regeneration is stopped.
    3. If "Activate the DPF Rejuvenate (PM)" is finished completely, the status turns to "Compl".
    Compl
    PM regeneration is completed

  1. Enter the following menus: Powertrain / Engine and ECT / DTC.

  1. Confirm that the DTC is not output again.


NEXT

END 

36.REPLACE EXHAUST MANIFOLD CONVERTER SUB-ASSEMBLY

HINT:
When the DPF catalytic converter is replaced, the catalyst record of DPF thermal deterioration stored in the ECM must be cleared.

  1. Replace the exhaust manifold converter sub-assembly (Click here).

  1. Connect the intelligent tester to the DLC3.

  1. Turn the ignition switch to ON and turn the tester on.

  1. Enter the menu options in this order: Powertrain / Engine and ECT / Utility / Catalyst Record Clear.


NEXT

END