2AD-FTV LUBRICATION OIL PUMP REMOVAL
CAUTION / NOTICE / HINT
- NOTICE:
- ·
When replacing the injectors (including shuffling the injectors between the cylinders), common rail, intake manifold or cylinder head, it is necessary to replace the injection pipes with new ones.
·When replacing the fuel supply pump, common rail, intake manifold or cylinder head, it is necessary to replace the fuel inlet pipe with a new one.
PROCEDURE

 1.REMOVE ENGINE ASSEMBLY
2.DISCONNECT ENGINE WIRE
Disconnect the connectors and detach the clamps securing the engine wire to the engine, remove the bracket bolts and disconnect the engine wire from the engine.
27020
3.REMOVE GENERATOR ASSEMBLY
29300
4.REMOVE VACUUM PUMP ASSEMBLY
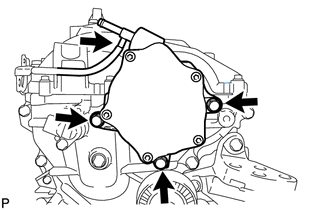
Disconnect the vacuum hose.
Remove the 3 bolts and vacuum pump assembly.
Remove the 2 O-rings from the vacuum pump assembly.
16649B
5.REMOVE IDLER PULLEY COVER PLATE
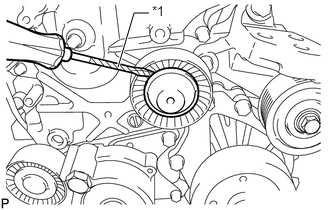
| *1 | Protective Tape |
Using a screwdriver, remove the idler pulley cover plate.
- HINT:
-
Tape the screwdriver tip before use.
16603
6.REMOVE NO. 1 IDLER PULLEY SUB-ASSEMBLY
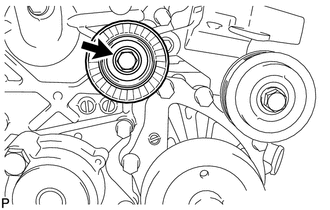
Remove the bolt and No. 1 idler pulley sub-assembly.
16604
7.REMOVE NO. 2 IDLER PULLEY SUB-ASSEMBLY
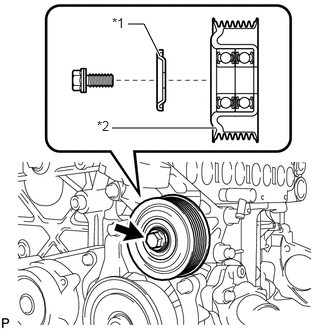
| *1 | No. 2 Idler Pulley Cover Plate |
| *2 | No. 2 Idler Pulley Sub-assembly |
Remove the bolt, No. 2 idler pulley cover plate and No. 2 idler pulley sub-assembly.
16288
8.REMOVE NO. 4 WATER BY-PASS PIPE
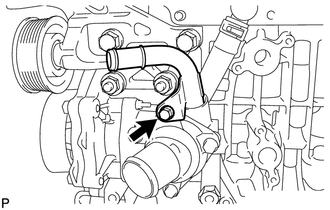
Remove the bolt and No. 4 water by-pass pipe from the water inlet housing.
Remove the O-ring from the No. 4 water by-pass pipe.
12315A
9.REMOVE ENGINE MOUNTING BRACKET
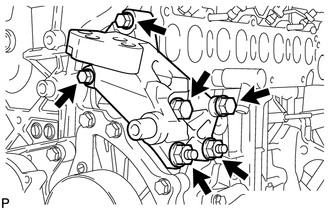
Remove the 4 bolts, 2 nuts and engine mounting bracket.
16620
10.REMOVE V-RIBBED BELT TENSIONER ASSEMBLY
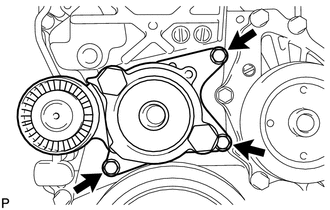
Remove the 3 bolts and V-ribbed belt tensioner assembly.
- NOTICE:
-
As the heads of the bolts are not as thick as those of typical bolts, be careful not to damage them during removal.
26100
11.REMOVE DIESEL THROTTLE BODY ASSEMBLY
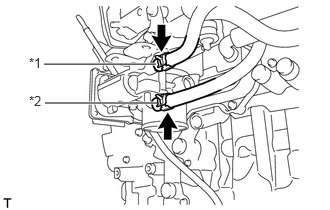
| *1 | No. 6 Water By-pass Hose |
| *2 | No. 7 Water By-pass Hose |
Slide the 2 clamps and disconnect the No. 6 water by-pass hose and No. 7 water by-pass hose from the diesel throttle body assembly.
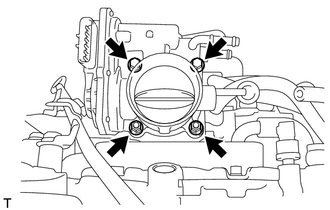
Remove the 2 bolts, 2 nuts, diesel throttle body assembly and gasket.
16295
12.REMOVE NO. 7 WATER BY-PASS HOSE
16296
13.DISCONNECT NO. 8 WATER BY-PASS HOSE
25625
14.REMOVE EGR VALVE BRACKET
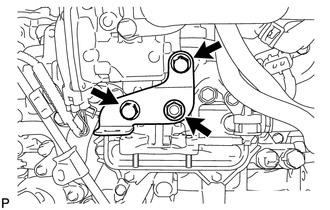
Remove the 3 bolts and EGR valve bracket.
25602
15.REMOVE NO. 2 EGR PIPE SUB-ASSEMBLY
25800
16.REMOVE ELECTRIC EGR CONTROL VALVE ASSEMBLY
11452
17.REMOVE ENGINE OIL LEVEL DIPSTICK GUIDE
Remove the engine oil level dipstick.
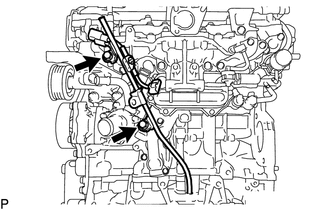
Remove the 2 bolts and engine oil level dipstick guide.
Remove the O-ring from the engine oil level dipstick guide.
23804C
18.REMOVE FUEL INLET PIPE SUB-ASSEMBLY
23701
19.REMOVE INJECTION PIPE SUB-ASSEMBLY
23282D
20.REMOVE NO. 4 FUEL HOSE
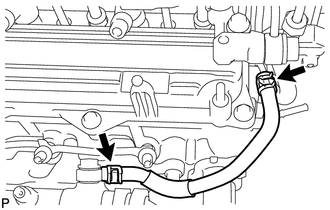
Slide the 2 clamps and remove the No. 4 fuel hose from the No. 2 nozzle leakage pipe and common rail assembly.
23810A
21.REMOVE COMMON RAIL ASSEMBLY
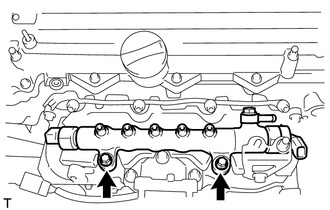
Remove the 2 bolts and common rail assembly.
17853B
22.REMOVE INTAKE MANIFOLD INSULATOR
89421C
23.REMOVE DIESEL TURBO PRESSURE SENSOR
23265
24.REMOVE NO. 1 GAS FILTER
17696
25.REMOVE GAS FILTER BRACKET
12631A
26.REMOVE ENGINE COVER BRACKET
17112
27.REMOVE NO. 2 INTAKE MANIFOLD
17111
28.REMOVE INTAKE MANIFOLD
16261
29.REMOVE WATER BY-PASS HOSE
15710
30.REMOVE OIL COOLER ASSEMBLY
16283
31.REMOVE NO. 6 WATER BY-PASS HOSE
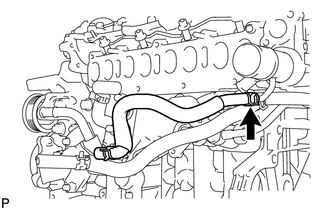
Slide the clamp and remove the No. 6 water by-pass hose from the water outlet.
16296
32.REMOVE NO. 8 WATER BY-PASS HOSE
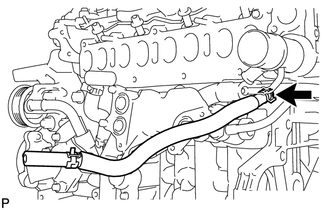
Slide the clamp and remove the No. 8 water by-pass hose from the No. 3 water by-pass pipe.
16279
33.REMOVE NO. 3 WATER BY-PASS PIPE
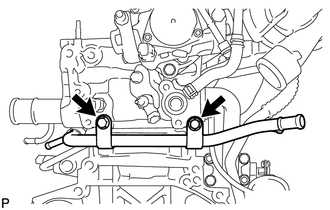
Remove the 2 bolts and No. 3 water by-pass pipe.
Remove the O-ring from the No. 3 water by-pass pipe.
15481
34.REMOVE NO. 1 TURBO OIL PIPE
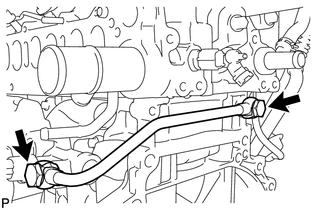
Remove the 2 union bolts, 2 gaskets and No. 1 turbo oil pipe.
15781
35.REMOVE NO. 1 OIL COOLER BRACKET
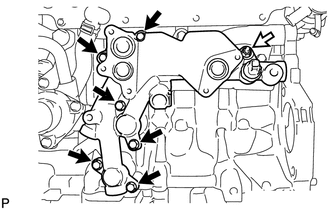

|
Nut |
Remove the 6 bolts, nut and No. 1 oil cooler bracket.
Remove the 3 O-rings from the No. 1 oil cooler bracket.
12581A
36.REMOVE NO. 1 CYLINDER BLOCK INSULATOR
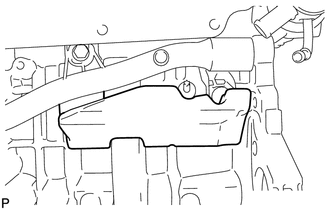
Remove the No. 1 cylinder block insulator from the cylinder block sub-assembly.
16278
37.REMOVE NO. 2 WATER BY-PASS PIPE
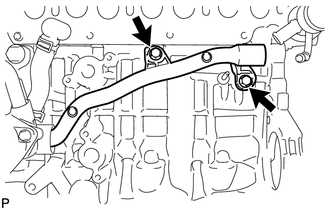
Remove the 2 bolts and No. 2 water by-pass pipe from the water inlet housing.
Remove the O-ring from the No. 2 water by-pass pipe.
16281
38.REMOVE NO. 4 WATER BY-PASS HOSE
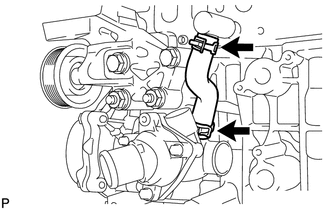
Slide the 2 clamps and disconnect the No. 4 water by-pass hose from the elbow and water inlet housing.
16323
39.REMOVE WATER INLET HOUSING
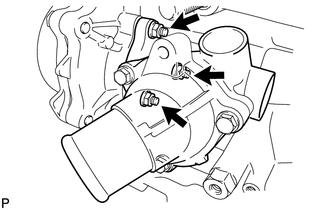
Remove the 3 nuts and water inlet housing.
Remove the gasket from the water inlet housing.
23812D
40.REMOVE NO. 2 FUEL PIPE (for CCo)
23292D
41.REMOVE FUEL HOSE PROTECTOR (for DPF)
23901E
42.REMOVE FUEL TUBE SUB-ASSEMBLY (for DPF)
23274D
43.REMOVE NO. 3 FUEL HOSE
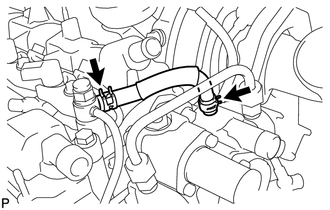
Slide the 2 clamps and remove the No. 3 fuel hose from the No. 2 nozzle leakage pipe and fuel supply pump assembly.
23762
44.REMOVE NO. 2 NOZZLE LEAKAGE PIPE
|
|
Check Valve |
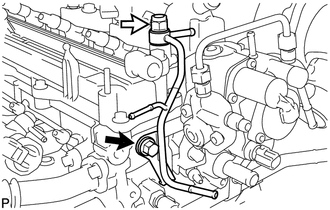
Remove the check valve and gasket.
Remove the bolt and No. 2 nozzle leakage pipe.
23761A
45.REMOVE NO. 1 NOZZLE LEAKAGE PIPE
23695
46.REMOVE NO. 1 NOZZLE HOLDER CLAMP
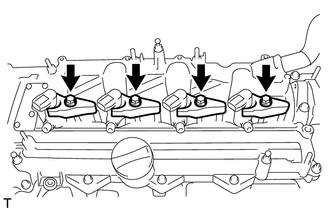
Remove the 4 bolts, 4 washers and 4 No. 1 nozzle holder clamps.
47.REMOVE INJECTOR ASSEMBLY
25860
48.REMOVE NO. 1 VACUUM SWITCHING VALVE ASSEMBLY
25819
49.REMOVE VACUUM REGULATING VALVE ASSEMBLY
25760A
50.REMOVE VACUUM TRANSMITTING HOSE ASSEMBLY
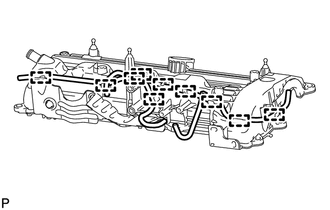
Detach the 10 clamps and remove the 2 vacuum transmitting hoses.
12261
51.REMOVE PCV HOSE
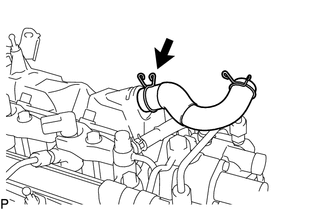
Slide the clamp and remove the PCV hose from the cylinder head cover sub-assembly.
12108
52.REMOVE OIL FILLER CAP SUB-ASSEMBLY
11201
53.REMOVE CYLINDER HEAD COVER SUB-ASSEMBLY

|
Bolt |
|
|
Nozzle Holder Clamp Seat |

|
Nut |
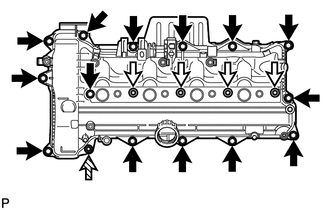
Remove the 4 nozzle holder clamp seats, 14 bolts, nut and cylinder head cover sub-assembly.
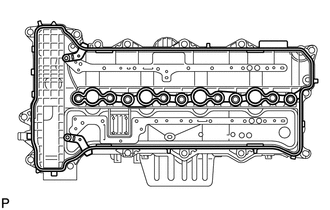
Remove the cylinder head cover gasket from the cylinder head cover sub-assembly.
12102A
54.REMOVE NO. 2 OIL PAN SUB-ASSEMBLY
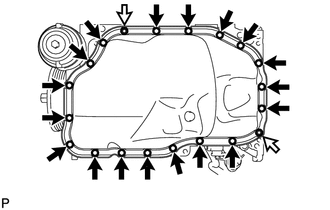
|
|
Nut |
Remove the 18 bolts and 2 nuts.
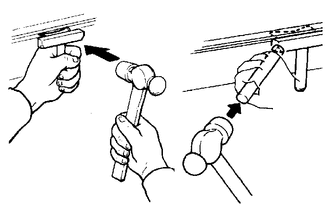
Insert the blade of an oil pan seal cutter between the No. 2 oil pan sub-assembly and cylinder block sub-assembly, cut through the applied sealer and remove the No. 2 oil pan sub-assembly.
- NOTICE:
- ·
Do not use the oil pan seal cutter for the area between the No. 2 oil pan sub-assembly and timing chain cover sub-assembly.
·Be careful not to damage the contact surfaces of the No. 2 oil pan sub-assembly.
55.REMOVE OIL FILTER ELEMENT
15677
56.REMOVE OIL FILTER BRACKET
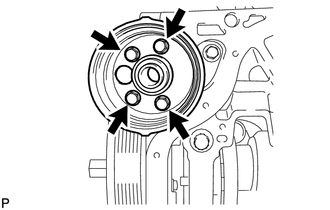
Remove the 4 bolts and oil filter bracket.
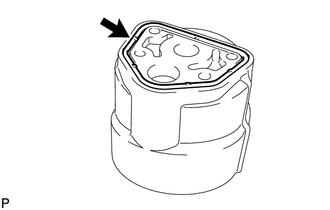
Remove the gasket from the oil filter bracket.
15104
57.REMOVE OIL STRAINER SUB-ASSEMBLY
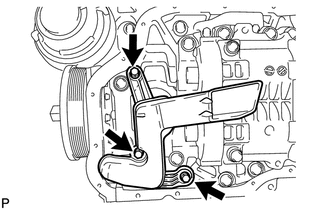
Remove the 3 bolts and oil strainer sub-assembly.
Remove the O-ring from the oil strainer sub-assembly.
11301K
58.REMOVE CAMSHAFT POSITION SENSOR
11401G
59.DISCONNECT CRANKSHAFT POSITION SENSOR WIRE HARNESS
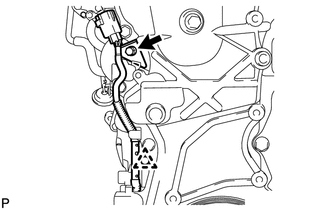
Using a clip remover, remove the clip.
Remove the bolt and disconnect the crankshaft position sensor wire harness.
60.REMOVE ENGINE WATER PUMP ASSEMBLY
61.SET NO. 1 PISTON TO TDC / COMPRESSION
13471
62.REMOVE CRANKSHAFT PULLEY
11302
63.REMOVE TIMING CHAIN COVER SUB-ASSEMBLY
|
|
Bolt and Seal Washer |
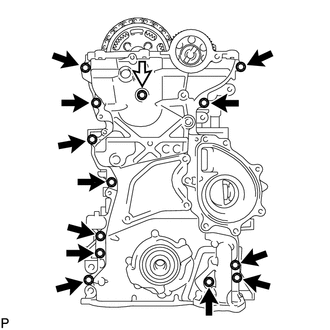
Remove the 13 bolts and seal washer.
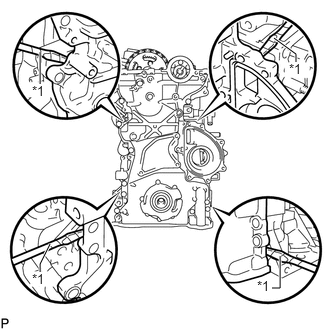
| *1 | Protective Tape |
Remove the timing chain cover sub-assembly by prying between the timing chain cover sub-assembly and cylinder head sub-assembly, cylinder block sub-assembly and stiffening crankcase with a screwdriver as shown in the illustration.
- NOTICE:
-
Be careful not to damage the contact surfaces of the cylinder head sub-assembly, cylinder block sub-assembly, stiffening crankcase and timing chain cover sub-assembly.
- HINT:
-
Tape the screwdriver tip before use.
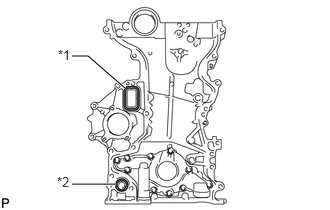
| *1 | Gasket |
| *2 | O-Ring |
Remove the gasket and O-ring from the timing chain cover sub-assembly.
64.REMOVE STRAIGHT SCREW PLUG
- HINT:
-
It is not necessary to replace the straight screw plug if there is no damage to the straight screw plug and no sign of oil leaks.
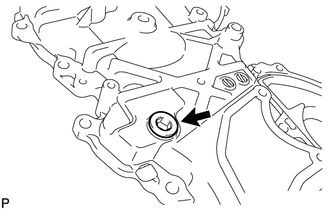
Using a 10 mm socket hexagon wrench, remove the straight screw plug and gasket.
11301C
65.REMOVE FRONT CRANKSHAFT OIL SEAL
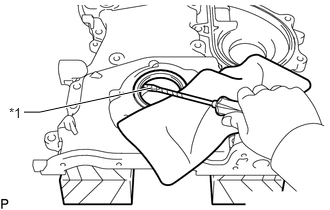
| *1 | Protective Tape |
Place the timing chain cover sub-assembly on wooden blocks.
Using a screwdriver, pry out the front crankshaft oil seal.
- NOTICE:
-
Do not damage the surface of the front crankshaft oil seal press fit hole.
- HINT:
-
Tape the screwdriver tip before use.
66.REMOVE STUD BOLT
- HINT:
-
If a stud bolt is deformed or its threads are damaged, replace it.