2AD-FHV COOLING RADIATOR INSTALLATION
PROCEDURE

 16711
1.INSTALL FAN SHROUD
Install the fan shroud with the 3 bolts.
- Torque:
- 5.5 N*m (56 kgf*cm, 49 in.*lbf)
17940D
2.INSTALL INTERCOOLER ASSEMBLY
16535
3.INSTALL LOWER RADIATOR SUPPORT
32906
4.INSTALL OIL COOLER TUBE SUB-ASSEMBLY
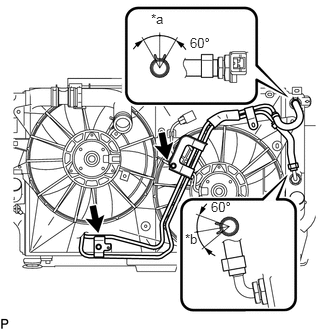
| *a | Top |
| *b | RH Side |
Connect the 2 hoses of the oil cooler tube sub-assembly to the radiator assembly, and slide the 2 clips to secure the hose.
- HINT:
-
Position the clips as illustrated.
Install the oil cooler tube sub-assembly with the 2 bolt.
- Torque:
- 5.5 N*m (56 kgf*cm, 49 in.*lbf)
16572D
5.INSTALL NO. 2 RADIATOR HOSE
Install the No. 2 radiator hose to the radiator assembly, and slide the clamp to secure the hose.
- HINT:
-
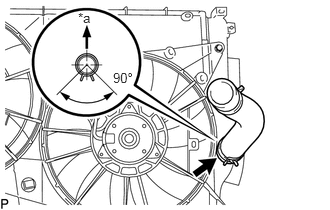 0.813,0.104 1.125,0.26 0.313,0.156 10 false *a 1.177,0.729 1.49,0.885 0.313,0.156 10 false 90°
*a Top
-
Position the clamp as illustrated.
16057
6.INSTALL RADIATOR HOSE SUB-ASSEMBLY
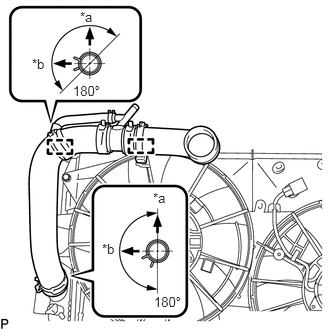
| *a | Top |
| *b | LH Side |
Install the radiator hose sub-assembly to the radiator assembly, and slide the 2 clamps to secure the hose.
- HINT:
-
Position the clamps as illustrated.
Attach the 2 clamps to the fan shroud.
17362B
7.INSTALL NO. 2 AIR TUBE
Install the No. 2 air tube to the intercooler assembly with the bolt.
- NOTICE:
-
Before installation, remove any oil residue from the inside of the No. 2 air tube and intercooler assembly.
- Torque:
- 31 N*m (316 kgf*cm, 23 ft.*lbf)
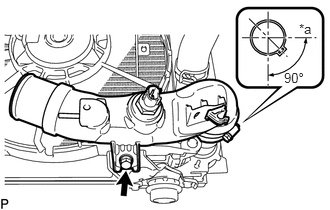
| *a | LH Side |
Tighten the hose clamp.
- Torque:
- 6.5 N*m (66 kgf*cm, 58 in.*lbf)
- HINT:
-
Position the clamp as illustrated.
25770A
8.INSTALL NO. 2 VACUUM TRANSMITTING HOSE ASSEMBLY
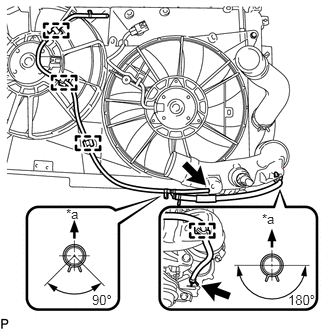
| *a | Top |
Attach the 4 clamps to the fan shroud and No. 2 air tube.
Install the No. 2 vacuum transmitting hose assembly to the intercooler assembly and No. 2 air hose and 2 clips to secure the hose.
- HINT:
-
Position the clips as illustrated.
88460
9.INSTALL COOLER CONDENSER ASSEMBLY
Install the cooler condenser assembly.
16533
10.INSTALL NO. 2 RADIATOR SUPPORT
Install the 2 No. 2 radiator supports with the 4 bolts.
- Torque:
- 5.5 N*m (56 kgf*cm, 49 in.*lbf)
16400
11.INSTALL RADIATOR ASSEMBLY
Install the 2 cushions.
Insert the radiator assembly.
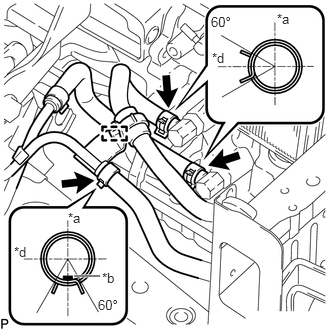
| *a | Top |
| *b | Paint Mark |
| *c | Front Side of Vehicle |
Connect the 3 oil cooler hoses to the automatic transaxle, and slide the 3 clips to secure the hose.
- HINT:
-
Position the clips as illustrated.
Attach the clamp to the oil cooler tube sub-assembly.
17343D
12.INSTALL NO. 3 AIR HOSE
17342F
13.INSTALL INTERCOOLER AIR HOSE
- NOTICE:
-
Before installation, remove any oil residue from the inside of the intercooler air hose.
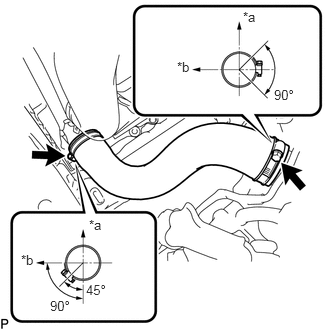
| *a | Top |
| *b | LH Side |
Install the intercooler air hose to the No. 1 air tube and intercooler assembly and tighten the 2 hose clamps.
- Torque:
- 6.5 N*m (66 kgf*cm, 58 in.*lbf)
- HINT:
-
Position the hose clamps as illustrated.
16572D
14.CONNECT NO. 2 RADIATOR HOSE
16057
15.CONNECT RADIATOR HOSE SUB-ASSEMBLY
53216A
16.INSTALL UPPER RADIATOR SUPPORT
Install the upper radiator support with the 4 bolts.
- Torque:
- 31 N*m (316 kgf*cm, 23 ft.*lbf)
53510
17.INSTALL HOOD LOCK ASSEMBLY
18.CONNECT WIRE HARNESS
Connect the 4 connectors to the fan motors, hood courtesy switch and intake air temperature sensor.
Attach the 13 clamps to the fan shroud.
16261G
19.CONNECT NO. 1 WATER BY-PASS HOSE
Connect the No. 1 water by-pass hose clamp bracket to the upper radiator support with the 2 bolts.
- Torque:
- 5.0 N*m (51 kgf*cm, 44 in.*lbf)
Attach the hose clamp to the upper radiator support.
Connect the No. 1 water by-pass hose to the radiator reservoir assembly and radiator hose sub-assembly, and slide the 2 clamps to secure the hose.
16533B
20.INSTALL NO. 1 RADIATOR SUPPORT
Install the 2 radiator support cushions.
Install the 2 No. 1 radiator supports with the 2 bolts.
- Torque:
- 19 N*m (194 kgf*cm, 14 ft.*lbf)
25770
21.CONNECT NO. 2 VACUUM TRANSMITTING HOSE ASSEMBLY
Connect the No. 2 vacuum transmitting hose assembly, and slide the clip secure the hose.
16697A
22.INSTALL REAR RADIATOR SIDE AIR GUIDE PLATE LH
Install the rear radiator side air guide plate LH with the 2 clips.
16695A
23.INSTALL FRONT RADIATOR SIDE AIR GUIDE PLATE LH
Install the front radiator side air guide plate LH and attach the 3 claws.
16693A
24.INSTALL REAR RADIATOR SIDE AIR GUIDE PLATE RH
Install the rear radiator side air guide plate RH with the 2 clips.
16691A
25.INSTALL FRONT RADIATOR SIDE AIR GUIDE PLATE RH
Install the front radiator side air guide plate RH and attach the 3 claws.
88706
26.CONNECT LIQUID TUBE SUB-ASSEMBLY
Remove the attached vinyl tape from the liquid tube sub-assembly and connecting part of the cooler condenser assembly.
Sufficiently apply compressor oil to a new O-ring and the fitting surface of the tube joint.
- Compressor Oil:
ND-OIL 8 or equivalent
Connect the liquid tube sub-assembly to the cooler condenser assembly with the bolt.
- Torque:
- 5.4 N*m (55 kgf*cm, 48 in.*lbf)
88703
27.CONNECT DISCHARGE HOSE SUB-ASSEMBLY
Remove the attached vinyl tape from the discharge hose sub-assembly and connecting part of the cooler condenser assembly.
Sufficiently apply compressor oil to a new O-ring and the fitting surface of the hose joint.
- Compressor Oil:
ND-OIL 8 or equivalent
Connect the discharge hose sub-assembly to the cooler condenser assembly with the bolt.
- Torque:
- 5.4 N*m (55 kgf*cm, 48 in.*lbf)
52131A
28.INSTALL FRONT BUMPER REINFORCEMENT
88625P
29.CONNECT AMBIENT TEMPERATURE SENSOR ASSEMBLY
Attach the clamp to connect the ambient thermistor assembly.
16683A
30.INSTALL LOWER RADIATOR AIR GUIDE PLATE
Install the lower radiator guide plate and attach the 3 claws.
16681A
31.INSTALL UPPER RADIATOR AIR GUIDE PLATE
Install the upper radiator air guide plate with 6 clips.
52029
32.INSTALL FRONT BUMPER UPPER REINFORCEMENT SUB-ASSEMBLY
Install the front bumper upper reinforcement sub-assembly with the 2 bolts.
- HINT:
-
A bolt without a torque specification is shown in the standard bolt chart.
-
Click hereGeneral>SPECIFICATIONS>STANDARD BOLT>SPECIFIED TORQUE FOR STANDARD BOLTS
52085
33.INSTALL FRONT BUMPER CENTER STAY SUB-ASSEMBLY
Install the front bumper center stay sub-assembly with the 2 bolts and clip.
- HINT:
-
A bolt without a torque specification is shown in the standard bolt chart.
-
Click hereGeneral>SPECIFICATIONS>STANDARD BOLT>SPECIFIED TORQUE FOR STANDARD BOLTS
86520
34.INSTALL LOW PITCHED HORN ASSEMBLY
Click hereVehicle Exterior>HORN>HORN>INSTALLATION
86510
35.INSTALL HIGH PITCHED HORN ASSEMBLY
Click hereVehicle Exterior>HORN>HORN>INSTALLATION
74414B
36.INSTALL BATTERY BRACKET REINFORCEMENT
74411B
37.INSTALL FRONT BATTERY BRACKET
74431
38.INSTALL BATTERY TRAY
28800
39.INSTALL BATTERY
28899
40.INSTALL BATTERY INSULATOR
74404A
41.INSTALL BATTERY CLAMP SUB-ASSEMBLY
52618
42.INSTALL FRONT LOWER BUMPER ABSORBER
Install the front lower bumper absorber with the 4 screws.
43.INSTALL HEADLIGHT ASSEMBLY
for Halogen Headlight
Click hereVehicle Exterior>LIGHTING (EXT)>HEADLIGHT ASSEMBLY(for Halogen Headlight)>INSTALLATION
for HID Headlight
Click hereVehicle Exterior>LIGHTING (EXT)>HEADLIGHT ASSEMBLY(for HID Headlight)>INSTALLATION
52119A
44.INSTALL FRONT BUMPER COVER
45.CONNECT CABLE TO POSITIVE BATTERY TERMINAL
46.CONNECT CABLE TO NEGATIVE BATTERY TERMINAL
- NOTICE:
-
When disconnecting the cable, some systems need to be initialized after the cable is reconnected.
-
Click hereGeneral>INTRODUCTION>REPAIR INSTRUCTION>INITIALIZATION
47.ADD ENGINE COOLANT
48.CHARGE REFRIGERANT
49.WARM UP ENGINE
50.INSPECT FOR REFRIGERANT LEAK
51.ADJUSTMENT AUTOMATIC TRANSAXLE FLUID
52.INSPECT FOR COOLANT LEAK
12611
53.INSTALL NO. 1 ENGINE COVER
51441
54.INSTALL NO. 1 ENGINE UNDER COVER