2WW ENGINE MECHANICAL CYLINDER HEAD GASKET REMOVAL
PROCEDURE

 1. PRECAUTION
- NOTICE:
- ·
After the engine has stopped, wait at least 1 minute before releasing the high pressure lines.
·When working on the fuel circuit, protect the generator assembly against contamination. Cover the generator assembly with suitable materials. Failure to comply with this procedure may result in a generator assembly malfunction.
·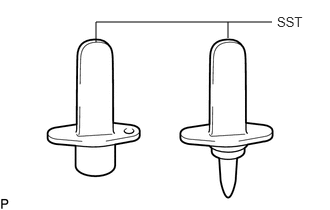 1,0.229 2.833,0.229 false 1,0.438 1,0.229 false 2.375,0.396 2.375,0.229 false 2.885,0.146 3.344,0.344 0.458,0.198 10 false SST
After disconnecting the pressure line, it is absolutely essential to seal the injector assemblies and the common rail assembly with SST.
- SST:
PZ4TB-04941-79
·After turning the ignition switch off, waiting time may be required before disconnecting the cable from the battery terminal. Therefore, make sure to read the disconnecting the cable from the battery terminal notice before proceeding with work.
Click hereGeneral>INTRODUCTION>REPAIR INSTRUCTION>PRECAUTION
2.DISCONNECT CABLE FROM NEGATIVE BATTERY TERMINAL
- NOTICE:
-
When disconnecting the cable, some systems need to be initialized after the cable is reconnected.
-
Click hereGeneral>INTRODUCTION>REPAIR INSTRUCTION>INITIALIZATION
13511
3.REMOVE CAMSHAFT AND NO. 2 CAMSHAFT
17141
4.REMOVE EXHAUST MANIFOLD
5.REMOVE EGR VALVE BRACKET
17271
6.REMOVE NO. 2 TURBO INSULATOR
16482
7.DISCONNECT RADIATOR RESERVOIR ASSEMBLY
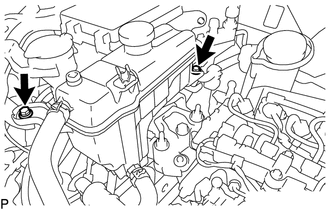
Remove the 2 bolts and disconnect the radiator reservoir assembly.
Remove the bolt and radiator reserve tank bracket from the engine mounting insulator sub-assembly RH.
12305
8.REMOVE ENGINE MOUNTING INSULATOR SUB-ASSEMBLY RH
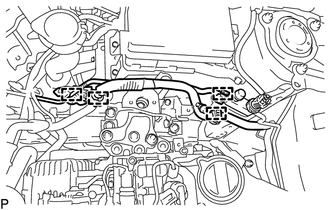
Detach the 2 clamps to disconnect the air conditioner tube and accessory assembly.
Detach the 2 clamps to disconnect the suction pipe sub-assembly.
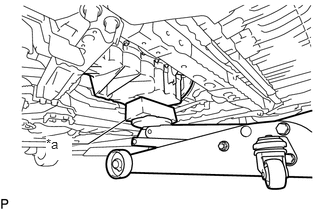
| *a | Wooden Block |
Place a wooden block between a jack and the oil pan sub-assembly.
Support the engine slightly.
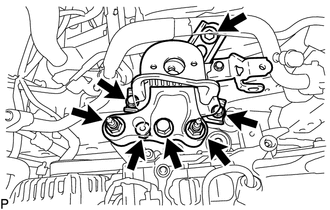
Remove the 4 bolts, 3 nuts and engine mounting insulator sub-assembly RH.
- HINT:
-
Supporting the engine slightly makes the engine mounting insulator sub-assembly RH easier to remove.
19850
9.REMOVE GLOW PLUG ASSEMBLY
11101
10.REMOVE CYLINDER HEAD SUB-ASSEMBLY
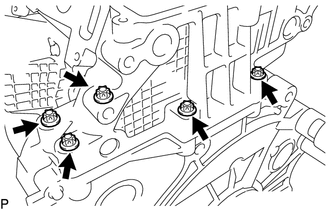
Using an E10 "TORX" socket wrench, remove the 5 bolts.
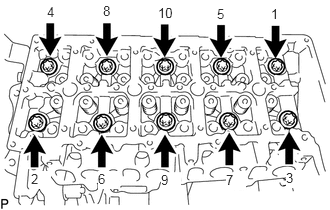
Using an E18 "TORX" socket wrench, uniformly loosen the 10 cylinder head bolts in several steps in the sequence shown in the illustration.
- NOTICE:
-
Do not reuse the cylinder head bolts.
Remove the 10 cylinder head bolts and cylinder head sub-assembly.
11115
11.REMOVE CYLINDER HEAD GASKET
Remove the cylinder head gasket from the cylinder block sub-assembly.