2WW ENGINE MECHANICAL CAMSHAFT REMOVAL
PROCEDURE

 1. PRECAUTION
- NOTICE:
- ·
After the engine has stopped, wait at least 1 minute before releasing the high pressure lines.
·When working on the fuel circuit, protect the generator assembly against contamination. Cover the generator assembly with suitable materials. Failure to comply with this procedure may result in a generator assembly malfunction.
·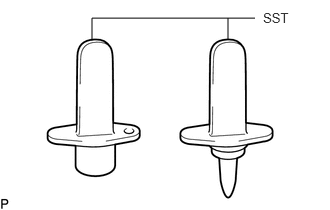 2.656,0.188 0.958,0.188 0.958,0.188 0.958,0.417 false 2.375,0.406 2.375,0.188 false 2.74,0.104 3.198,0.302 0.458,0.198 10 false SST
After disconnecting the pressure line, it is absolutely essential to seal the injector assemblies and the common rail assembly with SST.
- SST:
PZ4TB-04941-79
·After turning the ignition switch off, waiting time may be required before disconnecting the cable from the battery terminal. Therefore, make sure to read the disconnecting the cable from the battery terminal notice before proceeding with work.
Click hereGeneral>INTRODUCTION>REPAIR INSTRUCTION>PRECAUTION
2.DISCONNECT CABLE FROM NEGATIVE BATTERY TERMINAL
- NOTICE:
-
When disconnecting the cable, some systems need to be initialized after the cable is reconnected.
-
Click hereGeneral>INTRODUCTION>REPAIR INSTRUCTION>INITIALIZATION
16400
3.REMOVE RADIATOR ASSEMBLY
22030
4.REMOVE DIESEL THROTTLE BODY ASSEMBLY
5.REMOVE ENGINE COVER
6.REMOVE AIR CLEANER CAP SUB-ASSEMBLY WITH AIR CLEANER HOSE ASSEMBLY
7.REMOVE AIR CLEANER CASE SUB-ASSEMBLY
8.DISCONNECT ENGINE WIRE
11409
9.REMOVE ENGINE OIL LEVEL DIPSTICK GUIDE
10.DISCONNECT NO. 2 VACUUM HOSE ASSEMBLY
25733A
11.REMOVE NO. 1 VACUUM PIPE
17111
12.REMOVE INTAKE MANIFOLD
13.REMOVE FUEL INLET PIPE SUB-ASSEMBLY
23701
14.REMOVE INJECTION PIPE SUB-ASSEMBLY
23810A
15.REMOVE COMMON RAIL ASSEMBLY
19300D
16.REMOVE CAMSHAFT POSITION SENSOR
23760
17.REMOVE NOZZLE LEAKAGE PIPE ASSEMBLY
23670
18.REMOVE INJECTOR ASSEMBLY
19.SET NO. 1 CYLINDER TO TDC/COMPRESSION
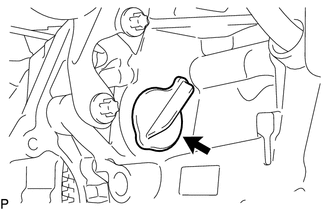
Remove the plug from the cylinder block.
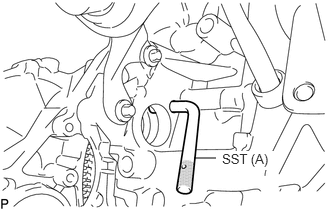
Set SST (A) to the plug hole of the cylinder block.
- SST (A):
PZ4TB-04951-26
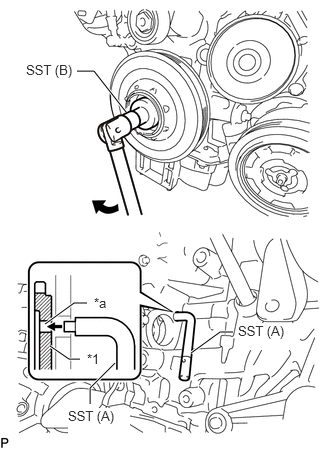
| *1 | Flywheel with Damper Assembly |
| *a | Groove |
Using SST (B), turn the crankshaft pulley clockwise until SST (A) fits into the groove of the flywheel with damper assembly.
- SST (B):
PZ4TB-04933-80
Using SST (A), hold the flywheel with damper assembly.
- SST (A):
PZ4TB-04951-26
Remove SST.
Install the plug to the cylinder block.
12108
20.REMOVE OIL FILLER CAP SUB-ASSEMBLY
21.REMOVE VACUUM CONTROL VALVE BRACKET
11201
22.REMOVE CYLINDER HEAD COVER SUB-ASSEMBLY
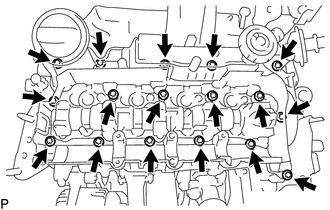
Using an E10 "TORX" socket wrench, loosen the 17 bolts and remove the cylinder head cover sub-assembly.
- HINT:
-
The bolts cannot be removed from the cylinder head cover sub-assembly.
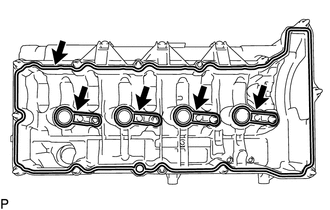
Remove the 5 gaskets from the cylinder head cover sub-assembly.
23.SECURE CAMSHAFT AND NO. 2 CAMSHAFT
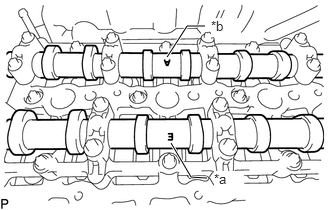
| *a | Mark (E) (Intake Side) |
| *b | Mark (A) (Exhaust Side) |
Check that the mark (E) and mark (A) of the camshaft and No. 2 camshaft are facing upward.
- NOTICE:
-
If the marks of the camshaft and No. 2 camshaft are not aligned as shown in the illustration, set No. 1 cylinder to TDC again.
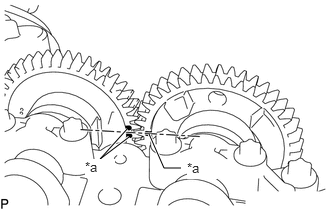
| *a | Timing Mark |
Check the camshaft and No. 2 camshaft timing marks.
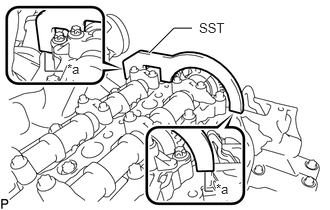
| *a | No Clearance |
Set SST to secure the camshaft and No. 2 camshaft.
- SST:
PZ4TB-04961-12
- NOTICE:
-
Make sure there is no clearance between SST and the camshaft housing sub-assembly.
17271
24.REMOVE NO. 1 TURBO INSULATOR
17167
25.REMOVE NO. 1 EXHAUST MANIFOLD HEAT INSULATOR
13550
26.REMOVE NO. 2 CHAIN TENSIONER ASSEMBLY
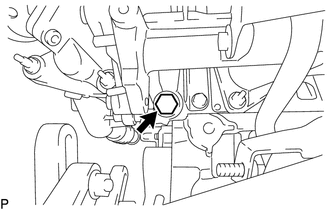
Using a 24 mm socket wrench, remove the No. 2 chain tensioner assembly.
12282D
27.REMOVE NO. 2 ENGINE HANGER
13567A
28.REMOVE NO. 2 TIMING CHAIN GUIDE
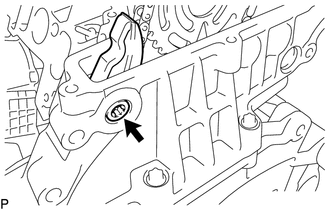
Using a T45 "TORX" socket wrench, remove the bolt and No. 2 timing chain guide.
29.REMOVE CAMSHAFT AND NO. 2 CAMSHAFT
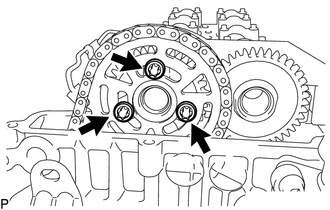
Using an E10 "TORX" socket wrench, remove the 3 bolts and the camshaft timing sprocket.
- NOTICE:
-
Do not drop the No. 2 chain sub-assembly into the gap between the cylinder block and timing chain cover plate.
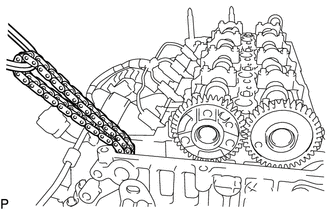
Suspend the No. 2 chain sub-assembly with a string or equivalent.
Remove SST from the camshaft and No. 2 camshaft.
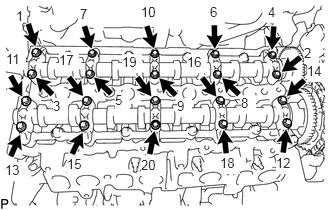
Using an E8 "TORX" socket wrench, uniformly loosen the 20 bolts 180° in several steps in the sequence shown in the illustration.
Uniformly loosen the 20 bolts further in several steps in the sequence shown in the illustration and remove the bolts.
Remove the 5 intake camshaft bearing caps and 5 exhaust camshaft bearing caps.
- HINT:
-
Arrange the removed parts in the correct order.
Remove the camshaft and No. 2 camshaft.
11103
30.REMOVE CAMSHAFT HOUSING SUB-ASSEMBLY
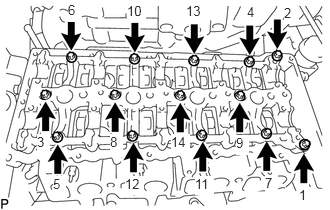
Using an E10 "TORX" socket wrench, remove the 14 bolts and camshaft housing sub-assembly.
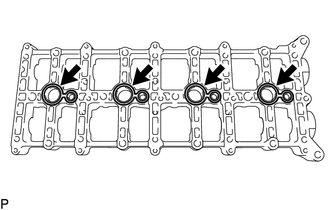
Remove the 4 gaskets.
13801
31.REMOVE NO. 1 VALVE ROCKER ARM SUB-ASSEMBLY
Remove the 16 No. 1 valve rocker arm sub-assemblies.
- HINT:
-
Arrange the removed parts in the correct order.
13750
32.REMOVE VALVE LASH ADJUSTER ASSEMBLY
Remove the 16 valve lash adjuster assemblies from the cylinder head sub-assembly.
- HINT:
-
Arrange the removed parts in the correct order.