2WW ENGINE MECHANICAL CYLINDER HEAD GASKET INSTALLATION
CAUTION / NOTICE / HINT
- NOTICE:
- ·
Always be sure to check the tightening torque.
·If the pressure lines are leaking after installation, they must be replaced.
·Do not overtighten the pressure lines.
PROCEDURE

 11115
1.SELECT CYLINDER HEAD GASKET
Check the piston protrusions for each cylinder.
Clean the cylinder block with solvent.
Set the piston of the cylinder to be measured to slightly before TDC.
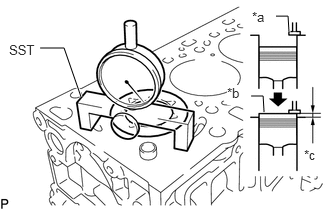
| *a | Measuring Tip |
| *b | Measuring Point |
| *c | Protrusion |
Using SST, place a dial indicator on the cylinder block and set the measuring tip as shown in the illustration.
- SST:
PZ4TB-04901-85
Set the dial indicator at 0 mm (0 in.).
- HINT:
-
Make sure that the measuring tip is perpendicular to the cylinder head gasket surface and piston head when taking the measurements.
Find where the piston head protrudes most by slowly turning the crankshaft clockwise and counterclockwise.
Measure each cylinder at 2 places for a total of 8 measurements.
For the piston protrusion value of each cylinder, use the average of the 2 measurements of each cylinder.
- Standard piston protrusion:
0.920 to 1.180 mm (0.0362 to 0.0465 in.)
If the protrusion is not as specified, remove the piston sub-assembly and connecting rod sub-assembly and reinstall them.
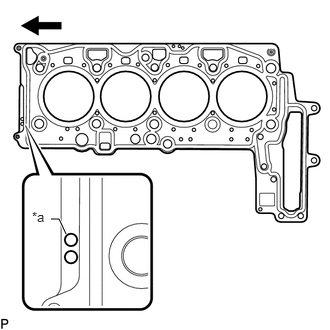
| *a | Cylinder Head Gasket Hole |

|
Front |
Select the largest piston protrusion value from the measurements and then select a new appropriate gasket according to the table below.
- Cylinder Head Gasket Size:
Item Specified Condition Piston Protrusion 0.92 mm (0.0362 in.) or less 0.92 to 1.03 mm (0.0362 to 0.0406 in.) 1.03 to 1.18 mm (0.0406 to 0.0465 in.) Cylinder Head Gasket Holes 1 Hole 2 Holes 3 Holes
- HINT:
-
Cylinder head gaskets have 1, 2 or 3 holes.
11115
2.INSTALL CYLINDER HEAD GASKET
Place a new cylinder head gasket in position on the cylinder block.
11101
3.INSTALL CYLINDER HEAD SUB-ASSEMBLY
- NOTICE:
- ·
Do not reuse the cylinder head bolts.
·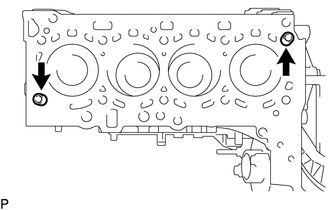
Make sure the ring pins shown in the illustration are not loose, deformed or otherwise damaged.
Place the cylinder head sub-assembly on the cylinder head gasket.
- NOTICE:
-
Be careful of the installation direction.
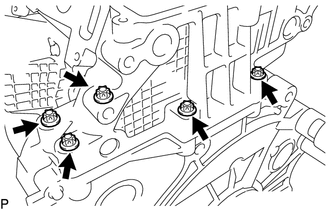
Using an E10 "TORX" socket wrench, temporarily install the 5 bolts.
Apply a light coat of engine oil to under the heads of new cylinder head bolts.
- NOTICE:
-
Do not reuse the cylinder head bolts.
Temporarily install the cylinder head bolts.
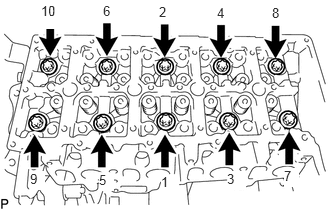
Step 1:
Using an E18 "TORX" socket wrench, uniformly tighten the 10 cylinder head bolts in several steps in the sequence shown in the illustration.
- Torque:
- : 70 N*m (714 kgf*cm, 52 ft.*lbf)
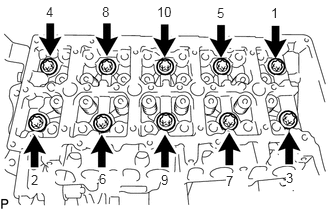
Loosen the cylinder head bolts by 180° in the sequence shown in the illustration.
Mark the front of each cylinder head bolt head with paint.
Step 2:
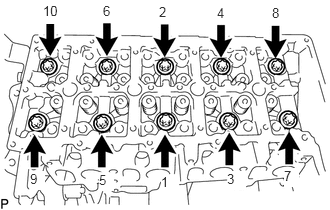
Tighten the 10 cylinder head bolts in several steps in the sequence shown in the illustration.
- Torque:
- : 50 N*m (510 kgf*cm, 37 ft.*lbf)
Retighten the cylinder head bolts by 120°.
Step 3:
Tighten the cylinder head bolts 120° further.
Check that the paint marks are now at a 240° angle to the RH.
Using an E10 "TORX" socket wrench, tighten the 5 bolts.
- Torque:
- : 10 N*m (102 kgf*cm, 7 ft.*lbf)
19850
4.INSTALL GLOW PLUG ASSEMBLY
12305
5.INSTALL ENGINE MOUNTING INSULATOR SUB-ASSEMBLY RH
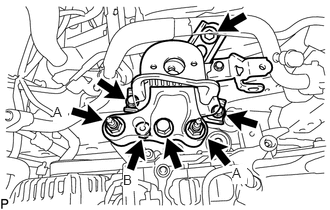
Install the engine mounting insulator sub-assembly RH with the 4 bolts and 3 nuts.
- Torque:
- Bolt and nut (A) : 95 N*m (969 kgf*cm, 70 ft.*lbf)
- Nut (B) : 52 N*m (530 kgf*cm, 38 ft.*lbf)
Attach the 2 clamps to connect the air conditioner tube and accessory assembly.
Attach the 2 clamps to connect the suction pipe sub-assembly.
Remove the jack.
16482
6.CONNECT RADIATOR RESERVOIR ASSEMBLY
Install the radiator reserve tank bracket with the bolt to the engine mounting insulator sub-assembly RH.
- Torque:
- 5.0 N*m (51 kgf*cm, 44 in.*lbf)
Connect the radiator reservoir assembly with the 2 bolts.
- Torque:
- 5.0 N*m (51 kgf*cm, 44 in.*lbf)
17271
7.INSTALL NO. 2 TURBO INSULATOR
8.INSTALL EGR VALVE BRACKET
17141
9.INSTALL EXHAUST MANIFOLD
13511
10.INSTALL CAMSHAFT AND NO. 2 CAMSHAFT
11.CONNECT CABLE TO NEGATIVE BATTERY TERMINAL
- NOTICE:
-
When disconnecting the cable, some systems need to be initialized after the cable is reconnected.
-
Click hereGeneral>INTRODUCTION>REPAIR INSTRUCTION>INITIALIZATION