2WW ENGINE MECHANICAL CAMSHAFT INSTALLATION
CAUTION / NOTICE / HINT
- NOTICE:
- ·
Always be sure to check the tightening torque.
·If the pressure lines are leaking after installation, they must be replaced.
·Do not overtighten the pressure lines.
PROCEDURE

 13750
1.INSPECT VALVE LASH ADJUSTER ASSEMBLY
13750
2.INSTALL VALVE LASH ADJUSTER ASSEMBLY
Install the 16 valve lash adjuster assemblies to the cylinder head sub-assembly.
- NOTICE:
-
Install the valve lash adjuster assemblies to their original positions.
13801
3.INSTALL NO. 1 VALVE ROCKER ARM SUB-ASSEMBLY
Install the 16 No. 1 valve rocker arm sub-assemblies.
11103
4.INSTALL CAMSHAFT HOUSING SUB-ASSEMBLY
Install 4 new gaskets.
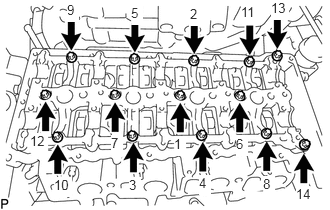
Uniformly tighten the 14 bolts in several steps in the sequence shown in the illustration.
Using an E10 "TORX" socket wrench, install the camshaft housing sub-assembly with the 14 bolts.
- Torque:
- 13 N*m (133 kgf*cm, 10 ft.*lbf)
5.SET NO. 1 CYLINDER TO TDC/COMPRESSION
6.INSTALL CAMSHAFT AND NO. 2 CAMSHAFT
Apply clean engine oil to the cam lobe of each camshaft, journals of the camshaft housing sub-assembly and No. 1 valve rocker arm sub-assemblies.
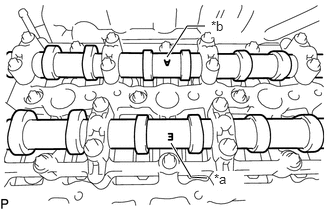
| *a | Mark (E) (Intake Side) |
| *b | Mark (A) (Exhaust Side) |
Place the camshaft and No. 2 camshaft on the camshaft housing sub-assembly as shown in the illustration so that mark (E) and mark (A) face upward.
- NOTICE:
-
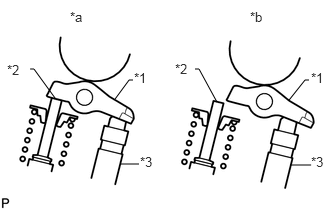 3.01,1.042 3.177,0.833 3.177,0.833 3.219,0.833 false 1.198,1.031 1.344,0.833 1.344,0.833 1.385,0.833 false 2.26,1.063 2.073,0.719 2.073,0.719 2.031,0.719 false 0.573,1.021 0.354,0.719 0.354,0.719 0.313,0.719 false 1.25,1.708 1.448,1.708 false 3.021,1.719 3.24,1.719 false 1.396,0.729 1.563,0.906 0.167,0.177 10 *1 1.823,0.635 1.99,0.813 0.167,0.177 10 *2 3.24,1.604 3.406,1.781 0.167,0.177 10 *3 1.458,1.604 1.625,1.781 0.167,0.177 10 *3 0.729,0.094 0.917,0.25 0.188,0.156 10 *a 2.604,0.094 2.781,0.26 0.177,0.167 10 *b 3.24,0.729 3.406,0.906 0.167,0.177 10 *1 0.073,0.646 0.24,0.823 0.167,0.177 10 *2
*1 No. 1 Valve Rocker Arm Sub-assembly *2 Valve Stem *3 Valve Lash Adjuster Assembly *a Correct *b Incorrect
-
Before and after setting the camshaft and No. 2 camshaft on the camshaft housing sub-assembly, check that the No. 1 valve rocker arm sub-assembly is correctly installed to the valve lash adjuster assembly.
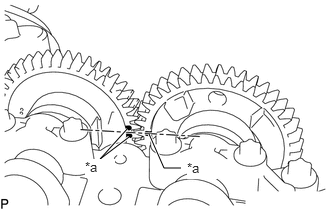
| *a | Timing Mark |
Align the camshaft and No. 2 camshaft timing marks.
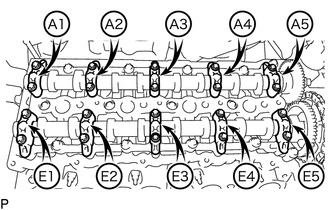
Set the 5 intake camshaft bearing caps and 5 exhaust camshaft bearing caps on the camshaft and No. 2 camshaft as shown in the illustration.
Using an E8 "TORX" socket wrench, temporarily install the 20 bolts.
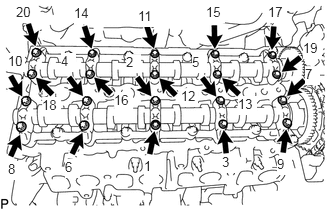
Uniformly tighten the 20 bolts in several steps in the sequence shown in the illustration.
- Torque:
- 10 N*m (102 kgf*cm, 7 ft.*lbf)
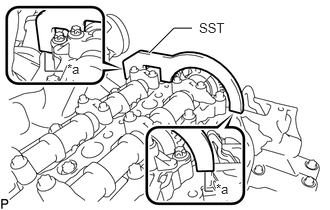
| *a | No clearance |
Using SST, hold the camshaft and No. 2 camshaft.
- SST:
PZ4TB-04961-12
- NOTICE:
-
Make sure there is no clearance between SST and the camshaft housing sub-assembly.
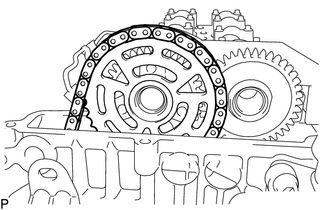
Using an E10 "TORX" socket wrench, temporarily install the camshaft timing sprocket with No. 2 chain sub-assembly to the camshaft with the 3 bolts.
Step 1:
Tighten the 3 bolts.
- Torque:
- 10 N*m (102 kgf*cm, 7 ft.*lbf)
Step 2:
Loosen the 3 bolts 90°.
Using a T45 "TORX" socket wrench, install the No. 2 timing chain guide with the bolt.
- Torque:
- 20 N*m (204 kgf*cm, 15 ft.*lbf)
Using a 24 mm socket wrench, install the No. 2 chain tensioner assembly.
- Torque:
- 70 N*m (714 kgf*cm, 52 ft.*lbf)
Using an E10 "TORX" socket wrench, install the camshaft timing sprocket with the 3 bolts.
- Torque:
- 14 N*m (143 kgf*cm, 10 ft.*lbf)
Remove SST from the camshaft.
12282D
7.INSTALL NO. 2 ENGINE HANGER
17167
8.INSTALL NO. 1 EXHAUST MANIFOLD HEAT INSULATOR
17271
9.INSTALL NO. 1 TURBO INSULATOR
11201
10.INSTALL CYLINDER HEAD COVER SUB-ASSEMBLY
Install 5 new gaskets to the cylinder head cover sub-assembly.
Install the cylinder head cover sub-assembly and tighten the 17 bolts.
- HINT:
-
Refer to "SPECIFICATIONS - STANDARD BOLT" for the tightening torque.
12108
11.INSTALL OIL FILLER CAP SUB-ASSEMBLY
12.INSTALL VACUUM CONTROL VALVE BRACKET
23670
13.INSTALL INJECTOR ASSEMBLY
23760
14.INSTALL NOZZLE LEAKAGE PIPE ASSEMBLY
19300D
15.INSTALL CAMSHAFT POSITION SENSOR
23810A
16.INSTALL COMMON RAIL ASSEMBLY
23701
17.INSTALL INJECTION PIPE SUB-ASSEMBLY
18.INSTALL FUEL INLET PIPE SUB-ASSEMBLY
17111
19.INSTALL INTAKE MANIFOLD
25733A
20.INSTALL NO. 1 VACUUM PIPE
21.CONNECT NO. 2 VACUUM HOSE ASSEMBLY
11409
22.INSTALL ENGINE OIL LEVEL DIPSTICK GUIDE
82121
23.CONNECT ENGINE WIRE
24.INSTALL AIR CLEANER CASE SUB-ASSEMBLY
25.INSTALL AIR CLEANER CAP SUB-ASSEMBLY WITH AIR CLEANER HOSE ASSEMBLY
26.INSTALL ENGINE COVER
22030
27.INSTALL DIESEL THROTTLE BODY ASSEMBLY
16400
28.INSTALL RADIATOR ASSEMBLY
29.CONNECT CABLE TO NEGATIVE BATTERY TERMINAL
- NOTICE:
-
When disconnecting the cable, some systems need to be initialized after the cable is reconnected.
-
Click hereGeneral>INTRODUCTION>REPAIR INSTRUCTION>INITIALIZATION
30.INSPECT FOR FUEL LEAK
31.INSPECT FOR ENGINE OIL LEAK