BRAKE CONTROL / DYNAMIC CONTROL SYSTEMS VEHICLE STABILITY CONTROL SYSTEM TC and CG Terminal Circuit
DESCRIPTION
Connecting terminals TC and CG of the DLC3 causes the ECU to display the DTC by blinking the ABS warning light and slip indicator light.
WIRING DIAGRAM
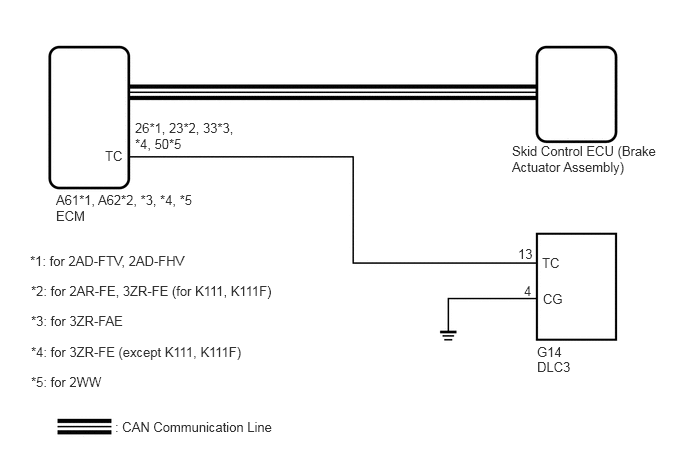
CAUTION / NOTICE / HINT
- NOTICE:
-
When replacing the skid control ECU (brake actuator assembly), perform zero point calibration.
-
Click hereBrake>BRAKE CONTROL / DYNAMIC CONTROL SYSTEMS>VEHICLE STABILITY CONTROL SYSTEM>CALIBRATION
PROCEDURE
Check if CAN communication system DTCs are output.
for LHD with Central Gateway ECU: Click herePower Source / Network>NETWORKING>CAN COMMUNICATION SYSTEM(for LHD with Central Gateway ECU)>DIAGNOSIS SYSTEM
for RHD with Central Gateway ECU: Click herePower Source / Network>NETWORKING>CAN COMMUNICATION SYSTEM(for RHD with Central Gateway ECU)>DIAGNOSIS SYSTEM
for LHD without Central Gateway ECU: Click herePower Source / Network>NETWORKING>CAN COMMUNICATION SYSTEM(for LHD without Central Gateway ECU)>DIAGNOSIS SYSTEM
for RHD without Central Gateway ECU: Click herePower Source / Network>NETWORKING>CAN COMMUNICATION SYSTEM(for RHD without Central Gateway ECU)>DIAGNOSIS SYSTEM
- Result:
Proceed to DTC is not output DTC is output (for LHD with Central Gateway ECU) DTC is output (for RHD with Central Gateway ECU) DTC is output (for LHD without Central Gateway ECU) DTC is output (for RHD without Central Gateway ECU)
DTC is not output
DTC is output (for LHD with Central Gateway ECU)
DTC is output (for RHD with Central Gateway ECU)
DTC is output (for LHD without Central Gateway ECU)
DTC is output (for RHD without Central Gateway ECU)
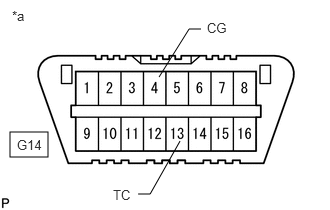
| *a | DLC3 |
Turn the ignition switch to ON.
Measure the voltage according to the value(s) in the table below.
- Standard Voltage:
Tester Connection Switch Condition Specified Condition G14-13 (TC) - G14-4 (CG) Ignition switch ON 11 to 14 V
- Result:
Proceed to OK NG
OK
NG
Turn the ignition switch off.
for 2AD-FTV, 2AD-FHV:
Disconnect the A61 ECM connector.
for 2AR-FE, 3ZR-FE, 3ZR-FAE, 2WW:
Disconnect the A62 ECM connector.
Measure the resistance according to the value(s) in the table below.
- Standard Resistance:
for 2AD-FTV, 2AD-FHV: Tester Connection Condition Specified Condition G14-13 (TC) - A61-26 (TC) Always Below 1 Ω G14-13 (TC) - Body ground Always 10 kΩ or higher
- Standard Resistance:
for 2AR-FE, 3ZR-FE (for K111, K111F): Tester Connection Condition Specified Condition G14-13 (TC) - A62-23 (TC) Always Below 1 Ω G14-13 (TC) - Body ground Always 10 kΩ or higher
- Standard Resistance:
for 3ZR-FAE, 3ZR-FE (except K111, K111F): Tester Connection Condition Specified Condition G14-13 (TC) - A62-33 (TC) Always Below 1 Ω G14-13 (TC) - Body ground Always 10 kΩ or higher
- Standard Resistance:
for 2WW: Tester Connection Condition Specified Condition G14-13 (TC) - A62-50 (TC) Always Below 1 Ω G14-13 (TC) - Body ground Always 10 kΩ or higher
- Result:
Proceed to OK NG
OK
NG
for 2AD-FTV, 2AD-FHV:
Reconnect the A61 ECM connector.
for 2AR-FE, 3ZR-FE, 3ZR-FAE, 2WW:
Reconnect the A62 ECM connector.
Measure the resistance according to the value(s) in the table below.
- Standard Resistance:
Tester Connection Condition Specified Condition G14-4 (CG) - Body ground Always Below 1 Ω
- Result:
Proceed to OK NG
OK
NG
| *a | DLC3 |
Turn the ignition switch off.
Using SST, connect terminals 13 (TC) and 4 (CG) of the DLC3.
- SST
- 09843-18040
Turn the ignition switch to ON.
Check that the malfunction indicator lamp is blinking.
- Result:
Proceed to Malfunction indicator lamp is blinking (for 2WW) Malfunction indicator lamp is blinking (for 2AD-FHV) Malfunction indicator lamp is blinking (for 2AD-FTV) Malfunction indicator lamp is blinking (for 2AR-FE) Malfunction indicator lamp is blinking (for 3ZR-FAE) Malfunction indicator lamp is blinking (for 3ZR-FE) Malfunction indicator lamp is not blinking
Malfunction indicator lamp is blinking (for 2WW)
Malfunction indicator lamp is blinking (for 2AD-FHV)
Malfunction indicator lamp is blinking (for 2AD-FTV)
Malfunction indicator lamp is blinking (for 2AR-FE)
Malfunction indicator lamp is blinking (for 3ZR-FAE)
Malfunction indicator lamp is blinking (for 3ZR-FE)
Malfunction indicator lamp is not blinking