HEATING / AIR CONDITIONING AIR CONDITIONING UNIT INSTALLATION
CAUTION / NOTICE / HINT
- HINT:
- ·
Use the same procedure for RHD and LHD vehicles.
·The procedure listed below is for LHD vehicles.
·A bolt without a torque specification is shown in the standard bolt chart.
Click hereGeneral>SPECIFICATIONS>STANDARD BOLT>SPECIFIED TORQUE FOR STANDARD BOLTS
PROCEDURE

 82210K
1.INSTALL AIR CONDITIONING HARNESS ASSEMBLY (for Automatic Air Conditioning System)
Route the air conditioning harness assembly as shown in the illustration.
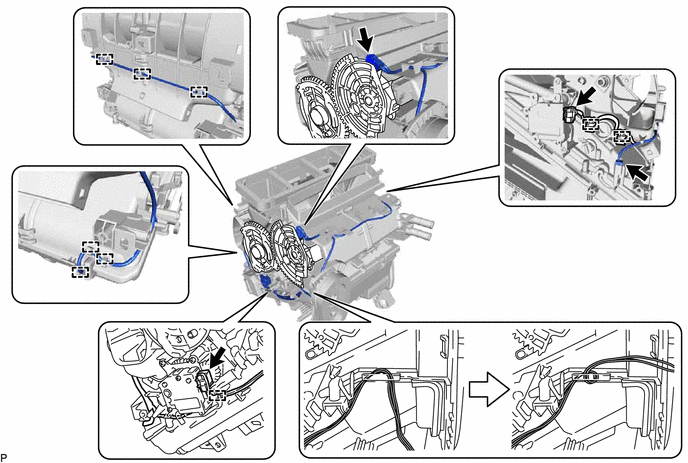
Connect each connector.
Engage each clamp to install the air conditioning harness assembly.
88539J
2.INSTALL DRAIN COOLER HOSE
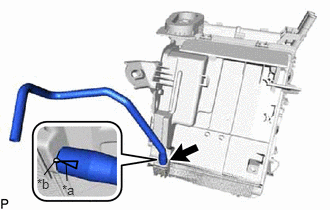
| *a | Hose Notch |
| *b | Rib |
Align the hose notch and rib as shown in the illustration and install the drain cooler hose.
88650N
3.INSTALL AIR CONDITIONING AMPLIFIER ASSEMBLY
55388A
4.INSTALL CONSOLE MOUNTING BRACKET RH
Attach the 2 claws to install the console mounting bracket RH.
55389
5.INSTALL CONSOLE MOUNTING BRACKET LH
Install the console mounting bracket LH with the screw.
88505
6.INSTALL AIR CONDITIONING DUCT SUB-ASSEMBLY (for Automatic Air Conditioning System)
Engage the 2 claws to install the air conditioning duct sub-assembly.
86652B
7.INSTALL SKID CONTROL BUZZER ASSEMBLY (for RHD)
87130D
8.INSTALL BLOWER ASSEMBLY
9.TEMPORARILY INSTALL AIR CONDITIONER UNIT ASSEMBLY
Temporarily install the air conditioner unit assembly with the bolt and nut.
- NOTICE:
-
To prevent damage to the installation bracket for the air conditioner unit assembly, be sure to support the air conditioner unit assembly in place.
Connect the drain cooler hose.
55331
10.INSTALL INSTRUMENT PANEL REINFORCEMENT ASSEMBLY
Install the instrument panel reinforcement assembly with the 6 bolts <A>.
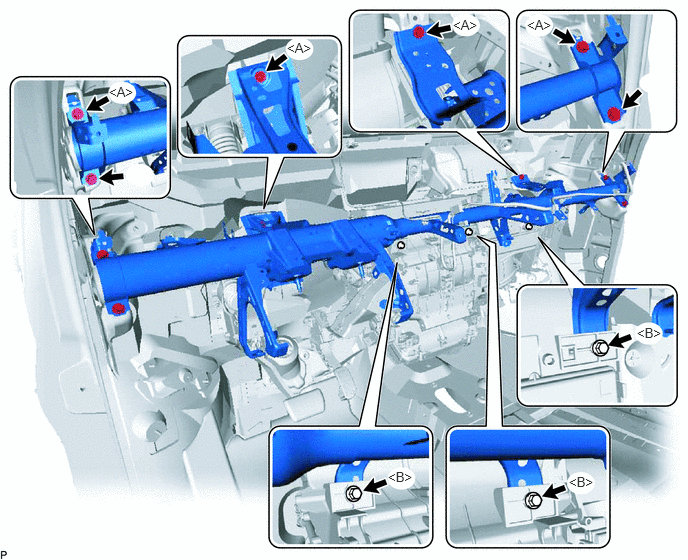
Temporarily install the 3 bolts <B>.
55307C
11.INSTALL NO. 2 INSTRUMENT PANEL BRACE SUB-ASSEMBLY
Install the No. 2 instrument panel brace sub-assembly with the bolt, screw and nut.
- HINT:
-
Do not fully tighten the screw.
Install the front floor carpet assembly to the original position and install the clip.
55306A
12.INSTALL NO. 1 INSTRUMENT PANEL BRACE SUB-ASSEMBLY
Install the No. 1 instrument panel brace sub-assembly with the bolt, screw and nut.
- HINT:
-
Do not fully tighten the screw.
Install the front floor carpet assembly to the original position and install the clip.
82141
13.INSTALL INSTRUMENT PANEL WIRE (for LHD)
Attach each clamp.
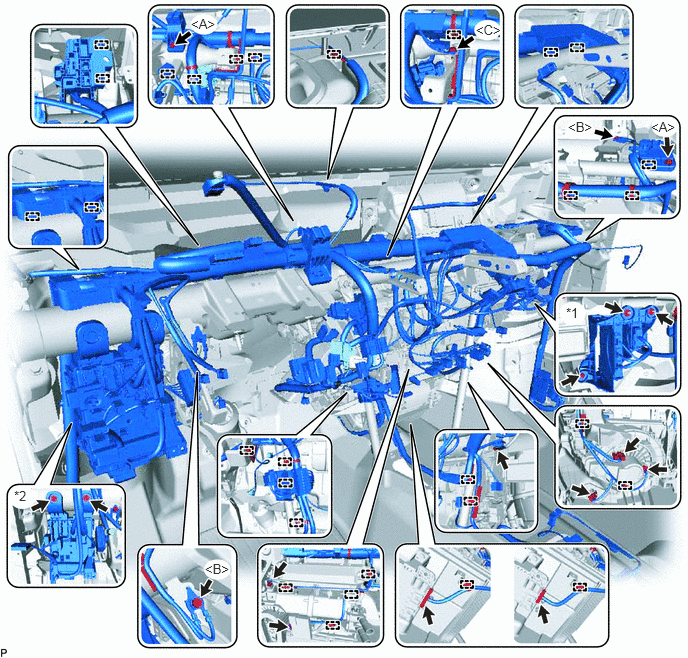
| *1 | ECU Integration Box RH | *2 | Instrument Panel Junction Block Assembly |
Connect each connector.
Connect the ECU integration box RH with the 2 nuts and bolt.
- Torque:
- for Nut : 5.5 N*m (56 kgf*cm, 49 in.*lbf)
- for Bolt : 12 N*m (122 kgf*cm, 9 ft.*lbf)
Connect the instrument panel junction block assembly with the 2 bolts.
- Torque:
- 3.2 N*m (33 kgf*cm, 28 in.*lbf)
Connect the instrument panel wire with the 2 bolts <A>.
- Torque:
- 8.4 N*m (86 kgf*cm, 74 in.*lbf)
Connect the ground wire with the 3 bolts.
- Torque:
- for Bolt <B> : 8.4 N*m (86 kgf*cm, 74 in.*lbf)
- for Bolt <C> : 8.5 N*m (87 kgf*cm, 75 in.*lbf)
w/ PTC Heater:
Connect the 2 or 3 connectors.
82141
14.INSTALL INSTRUMENT PANEL WIRE (for RHD)
Attach each clamp.
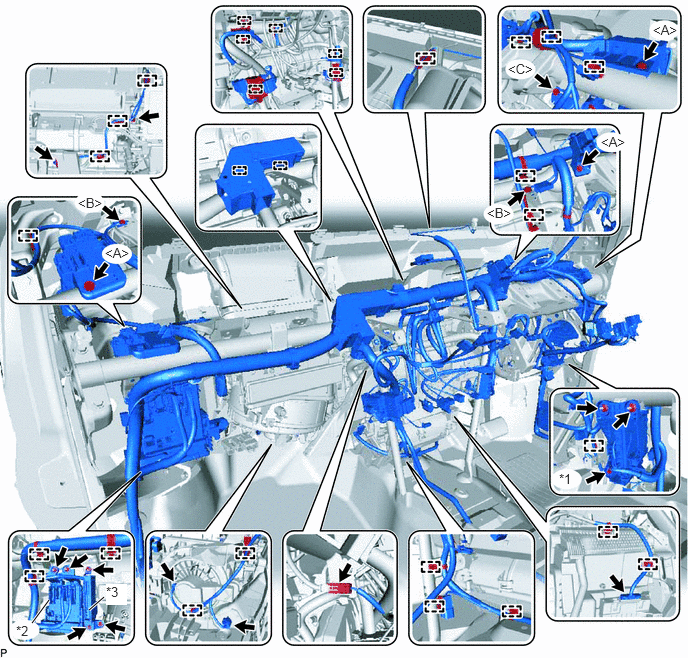
| *1 | ECU Integration Box RH | *2 | Instrument Panel Junction Block Assembly |
| *3 | Engeine Stop and Start ECU | - | - |
Connect each connector.
Connect the ECU integration box RH with the 3 bolts.
- Torque:
- for Nut : 5.5 N*m (56 kgf*cm, 49 in.*lbf)
- for Bolt : 12 N*m (122 kgf*cm, 9 ft.*lbf)
Connect the instrument panel junction block assembly with the 2 nuts and bolt.
- Torque:
- for Nut : 8.4 N*m (86 kgf*cm, 74 in.*lbf)
- for Bolt : 8.4 N*m (86 kgf*cm, 74 in.*lbf)
Install the engine stop and start ECU with the bolt and nut.
- Torque:
- 8.0 N*m (82 kgf*cm, 71 in.*lbf)
Connect the instrument panel wire with the 3 bolts <A>.
- Torque:
- 8.4 N*m (86 kgf*cm, 74 in.*lbf)
Connect the ground wire with the 3 bolts.
- Torque:
- for Bolt <B> : 8.4 N*m (86 kgf*cm, 74 in.*lbf)
- for Bolt <C> : 8.5 N*m (87 kgf*cm, 75 in.*lbf)
w/ PTC Heater:
Connect the 2 or 3 connectors.
15.INSTALL AIR CONDITIONER UNIT ASSEMBLY
for LHD:
Tighten the 4 bolts, 2 screws and nut.
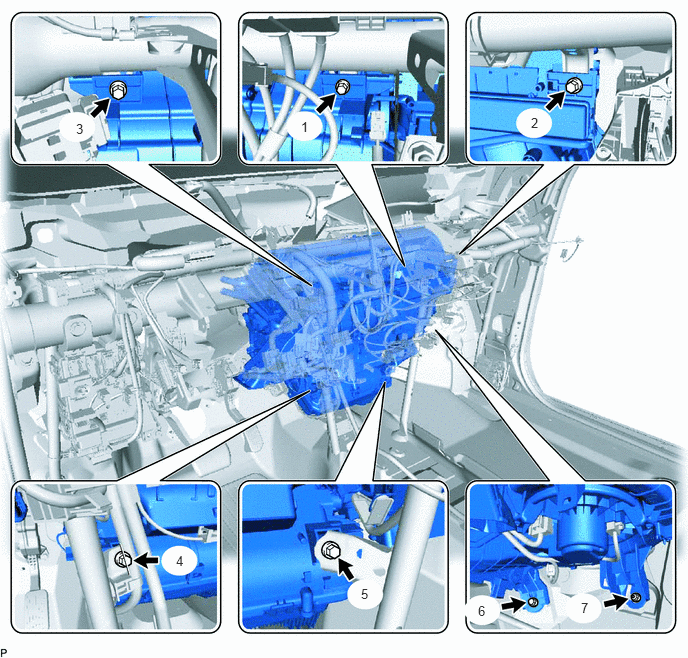
- Torque:
- for Bolt : 9.8 N*m (100 kgf*cm, 7 ft.*lbf)
- NOTICE:
-
Tighten the bolts, screws and nut in the order shown in the illustration to install the air conditioner unit assembly.
for RHD:
Tighten the 4 bolts, 2 screws and nut.
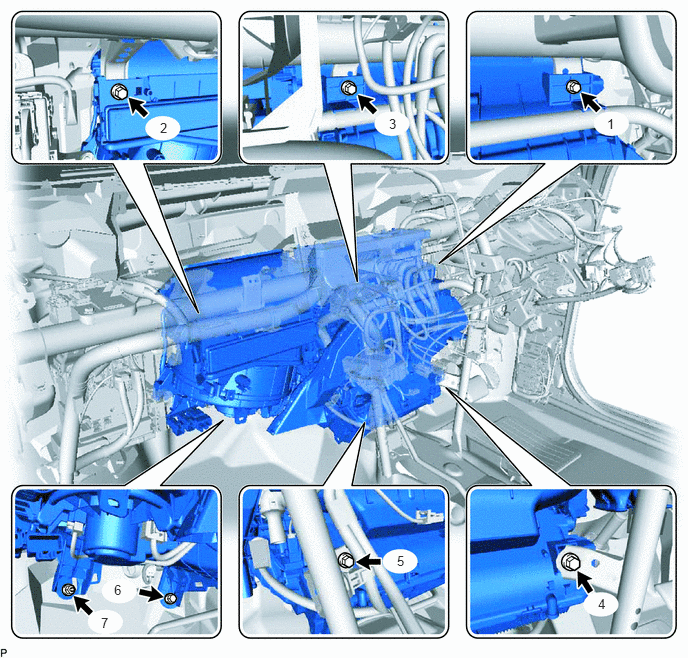
- Torque:
- for Bolt : 9.8 N*m (100 kgf*cm, 7 ft.*lbf)
- NOTICE:
-
Tighten the bolts, screws and nut in the order shown in the illustration to install the air conditioner unit assembly.
87201
16.INSTALL NO. 3 AIR DUCT SUB-ASSEMBLY
Attach the 2 claws to install the No. 3 air duct sub-assembly.
- NOTICE:
-
If any of the claws of the No. 3 air duct sub-assembly are cracked or deformed, make sure to replace the air duct with a new one. Failure to do so may cause the No. 3 air duct sub-assembly to fall off or noise to occur.
87201B
17.INSTALL NO. 2 AIR DUCT SUB-ASSEMBLY
Attach the 2 claws to install the No. 2 air duct sub-assembly.
- NOTICE:
-
If any of the claws of the No. 2 air duct sub-assembly are cracked or deformed, make sure to replace the air duct with a new one. Failure to do so may cause the No. 2 air duct sub-assembly to fall off or noise to occur.
55950G
18.INSTALL DEFROSTER NOZZLE ASSEMBLY
Attach the 3 hooks to install the defroster nozzle assembly.
Connect the automatic light control sensor (solar sensor) connector and attach the 2 harness clamps.
87220
19.INSTALL AIR DUCT ASSEMBLY
Install the air duct assembly with the 2 nuts.
- Torque:
- 9.8 N*m (100 kgf*cm, 87 in.*lbf)
87212
20.INSTALL REAR NO. 1 AIR DUCT
Attach the 8 claws to install the rear No. 1 air duct.
21.INSTALL STEERING COLUMN ASSEMBLY
55312
22.INSTALL LOWER INSTRUMENT PANEL SUB-ASSEMBLY
87245A
23.CONNECT HEATER WATER HOSE
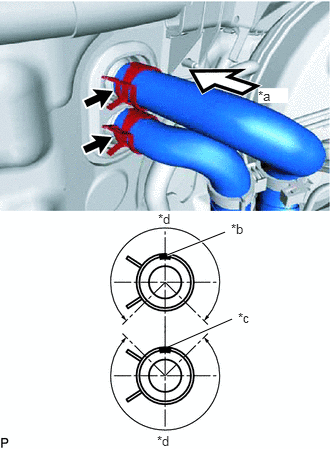
| *a | View A |
| *b | Heater Water Outlet Hose Paint Mark |
| *c | Heater Water Inlet Hose Paint Mark |
| *d | Clip installation angle (270°) |
Connect the heater water outlet hose A and heater water inlet hose A with the paint mark facing up and attach the clip within the area shown in the illustration.
- Paint Mark Color:
Engine Transmission Hose Color 2AR All Outlet Purple Inlet Purple 3ZR Manual Transmission Outlet Pink Inlet Pink CVT Outlet Blue Inlet Blue 2AD w/o Fuel Heater Outlet Blue Inlet Blue w/ Fuel Heater Outlet Green Inlet Green 2WW w/o Fuel Heater Outlet Orange Inlet Orange w/ Fuel Heater Outlet Orange Inlet White
- NOTICE:
-
Do not apply excessive force to the heater water outlet hose A and heater water inlet hose A.
88707
24.CONNECT AIR CONDITIONING TUBE (except Sub-cool Accelerator)
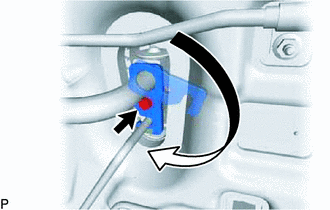
Remove the vinyl tape from the suction tube sub-assembly and liquid tube sub-assembly.
Sufficiently apply compressor oil to 2 new O-rings and fitting surface of the suction tube sub-assembly and liquid tube sub-assembly.
| Refrigerant | Compressor Oil |
|---|---|
| HFC-134a (R134a) | ND-OIL 8 or equivalent |
Install the 2 O-rings to the suction tube sub-assembly liquid tube sub-assembly.
Connect the liquid tube sub-assembly and suction tube sub-assembly.
Rotate the hook connector in the direction indicated by the arrow in the illustration and install the bolt.
- Torque:
- 9.8 N*m (100 kgf*cm, 87 in.*lbf)
88707
25.CONNECT SUCTION PIPE SUB-ASSEMBLY (for Sub-cool Accelerator)
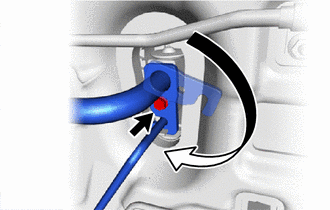
Remove the vinyl tape from the suction pipe sub-assembly and liquid tube sub-assembly.
Sufficiently apply compressor oil to 2 new O-rings and fitting surface of the suction pipe sub-assembly and liquid tube sub-assembly.
| Refrigerant | Compressor Oil |
|---|---|
| HFC-134a (R134a) | ND-OIL 8 or equivalent |
| HFO-1234yf (R1234yf) | ND-OIL 12 or equivalent |
Install the 2 O-rings to the suction pipe sub-assembly liquid tube sub-assembly.
Connect the suction pipe sub-assembly.
Rotate the hook connector in the direction indicated by the arrow in the illustration and install the bolt.
- Torque:
- 9.8 N*m (100 kgf*cm, 87 in.*lbf)
26.CONNECT CABLE TO NEGATIVE BATTERY TERMINAL
- NOTICE:
-
When disconnecting the cable, some systems need to be initialized after the cable is reconnected.
-
Click hereGeneral>INTRODUCTION>REPAIR INSTRUCTION>INITIALIZATION
55789D
27.INSTALL NO. 3 COWL TOP PANEL INSULATOR (for 2WW)
12611
28.INSTALL NO. 1 ENGINE COVER (for 2WW)
29.ADD ENGINE COOLANT
for 2AD-FHV: Click hereEngine / Hybrid System>2AD-FHV COOLING>COOLANT>REPLACEMENT
for 2AD-FTV: Click hereEngine / Hybrid System>2AD-FTV COOLING>COOLANT>REPLACEMENT
for 2AR-FE: Click hereEngine / Hybrid System>2AR-FE COOLING>COOLANT>REPLACEMENT
for 3ZR-FAE: Click hereEngine / Hybrid System>3ZR-FAE COOLING>COOLANT>REPLACEMENT
for 3ZR-FE: Click hereEngine / Hybrid System>3ZR-FE COOLING>COOLANT>REPLACEMENT
for 2WW: Click hereEngine / Hybrid System>2WW COOLING>COOLANT>REPLACEMENT
30.CHARGE AIR CONDITIONING SYSTEM WITH REFRIGERANT
for HFC-134a (R134a):
Click hereVehicle Interior>HEATING / AIR CONDITIONING>REFRIGERANT(for HFC-134a(R134a))>REPLACEMENT
for HFO-1234yf (R1234yf):
Click hereVehicle Interior>HEATING / AIR CONDITIONING>REFRIGERANT(for HFO-1234yf(R1234yf))>REPLACEMENT
31.WARM UP ENGINE
for HFC-134a (R134a):
Click hereVehicle Interior>HEATING / AIR CONDITIONING>REFRIGERANT(for HFC-134a(R134a))>REPLACEMENT
for HFO-1234yf (R1234yf):
Click hereVehicle Interior>HEATING / AIR CONDITIONING>REFRIGERANT(for HFO-1234yf(R1234yf))>REPLACEMENT
32.INSPECT FOR COOLANT LEAK
for 2AD-FHV: Click hereEngine / Hybrid System>2AD-FHV COOLING>COOLING SYSTEM>ON-VEHICLE INSPECTION
for 2AD-FTV: Click hereEngine / Hybrid System>2AD-FTV COOLING>COOLING SYSTEM>ON-VEHICLE INSPECTION
for 2AR-FE: Click hereEngine / Hybrid System>2AR-FE COOLING>COOLING SYSTEM>ON-VEHICLE INSPECTION
for 3ZR-FAE: Click hereEngine / Hybrid System>3ZR-FAE COOLING>COOLING SYSTEM>ON-VEHICLE INSPECTION
for 3ZR-FE: Click hereEngine / Hybrid System>3ZR-FE COOLING>COOLING SYSTEM>ON-VEHICLE INSPECTION
for 2WW: Click hereEngine / Hybrid System>2WW COOLING>COOLING SYSTEM>ON-VEHICLE INSPECTION
33.INSPECT FOR REFRIGERANT LEAK
for HFC-134a (R134a):
Click hereVehicle Interior>HEATING / AIR CONDITIONING>REFRIGERANT(for HFC-134a(R134a))>REPLACEMENT
for HFO-1234yf (R1234yf):
Click hereVehicle Interior>HEATING / AIR CONDITIONING>REFRIGERANT(for HFO-1234yf(R1234yf))>REPLACEMENT
34.INITIALIZATION SERVO MOTOR (for Automatic Air Conditioning System)