PARK ASSIST / MONITORING TELEVISION CAMERA(for Front) REMOVAL
CAUTION / NOTICE / HINT
The necessary procedures (adjustment, calibration, initialization or registration) that must be performed after parts are removed and installed, or replaced during front television camera assembly removal/installation are shown below.
| Replaced Part or Performed Procedure | Necessary Procedure | Effect/Inoperative Function when Necessary Procedure not Performed | Link |
|---|---|---|---|
| Front bumper assembly (Including removal and installation) | ·
Ultrasonic sensor detection angle ·
Ultrasonic sensor detection angle registration |
Parking support brake system (for Gasoline model) | ( ) |
| Front television camera assembly (Including removal and installation) | Front television camera view adjustment | Panoramic view monitor system (for Gasoline model) | ()
|
| Replaced Part or Performed Procedure | Necessary Procedure | Effect/Inoperative Function when Necessary Procedure not Performed | Link |
|---|---|---|---|
| Front bumper assembly (Including removal and installation) | ·
Ultrasonic sensor detection angle ·
Ultrasonic sensor detection angle registration |
Parking support brake system (for HV model) | ()
|
| Front television camera assembly (Including removal and installation) | Front television camera view adjustment | Panoramic view monitor system (for HV model) | ()
|
PROCEDURE

 1.REMOVE FRONT BUMPER ASSEMBLY (w/ NO. 1 RADIATOR TO SUPPORT SEAL)
- HINT:
-
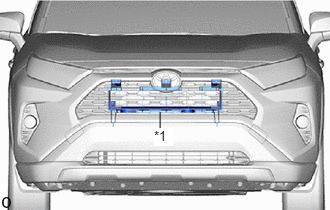 1.667,1.333 1.667,1.167 false 1.604,1.333 1.802,1.521 0.198,0.188 10 true *1
*1 No. 1 Radiator To Support Seal
-
For vehicles with the No. 1 radiator to support seal installed, remove the front bumper assembly.
except Off Road Package:
Click hereVehicle Exterior>EXTERIOR PANELS / TRIM>FRONT BUMPER (except Off Road Package)>REMOVAL
for Off Road Package:
Click hereVehicle Exterior>EXTERIOR PANELS / TRIM>FRONT BUMPER (for Off Road Package)>REMOVAL
17750A
2.REMOVE INLET AIR CLEANER ASSEMBLY (for Gasoline Model, w/o NO. 1 RADIATOR TO SUPPORT SEAL)
for A25A-FKS:
Click hereEngine / Hybrid System>A25A-FKS (ENGINE CONTROL)>THROTTLE BODY>REMOVAL
for M20A-FKS:
Click hereEngine / Hybrid System>M20A-FKS (ENGINE CONTROL)>THROTTLE BODY>REMOVAL
53510
3.REMOVE HOOD LOCK ASSEMBLY (w/o NO. 1 RADIATOR TO SUPPORT SEAL)
16681A
4.REMOVE RADIATOR UPPER AIR GUIDE PLATE (w/o NO. 1 RADIATOR TO SUPPORT SEAL)
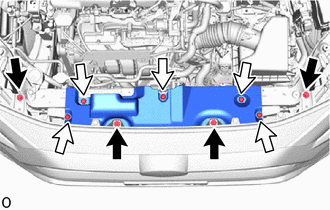

|
Bolt |

|
Clip |
Remove the 4 bolts.
Remove the 5 clips.
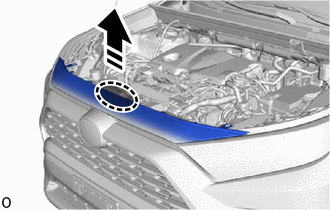

|
Place Hands Here |

|
Pull in this Direction |
Place both hands at the position shown in the illustration and pull in the direction.
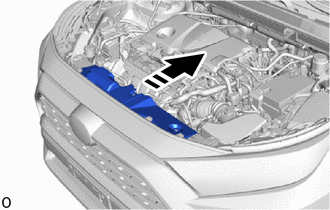
|
|
Remove in this Direction |
Pull in the direction and remove the radiator upper air guide plate.
86790B
5.REMOVE FRONT TELEVISION CAMERA ASSEMBLY
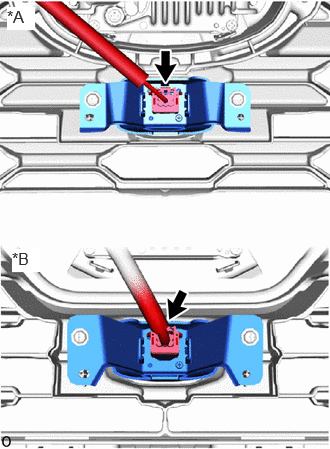
| *A | except Off Road Pacakge |
| *B | for Off Road Pacakge |
Disconnect the connector.
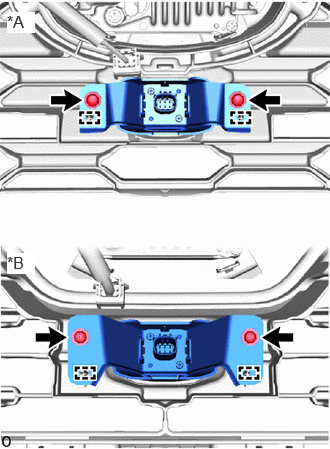
| *A | except Off Road Pacakge |
| *B | for Off Road Pacakge |
Remove the 2 screws.
Detach the guide and remove the front television camera assembly.