SUPPLEMENTAL RESTRAINT SYSTEMS SPIRAL CABLE INSTALLATION
CAUTION / NOTICE / HINT
- HINT:
- ·
Use the same procedure for RHD and LHD vehicles.
·The procedure listed below is for LHD vehicles.
PROCEDURE

 89245B
1.INSTALL STEERING SENSOR
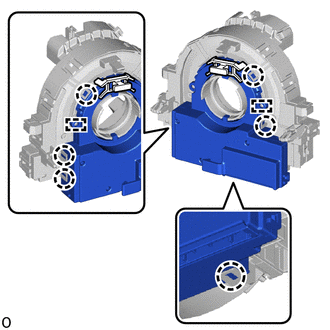
Align the pin and attach the claw to install the steering sensor to the spiral cable sub-assembly.
- NOTICE:
- ·
Do not remove the lock pin before the spiral cable sub-assembly is installed to the steering sensor.
·Do not damage the pins of the spiral cable sub-assembly or guides of the steering sensor.
·The spiral cable sub-assembly can be rotated up to 30° even when the interlock is engaged. Therefore, make sure that both guides are aligned properly when installing the spiral cable sub-assembly to the steering sensor.
Remove the lock pin from the steering sensor.
2.INSPECT SPIRAL WITH SENSOR CABLE SUB-ASSEMBLY
Check that the spiral with sensor cable sub-assembly is center position.
- OK:
The connector is at the top.
The matchmarks are aligned.
The top of the flat cable U-turn can be checked from the check window.
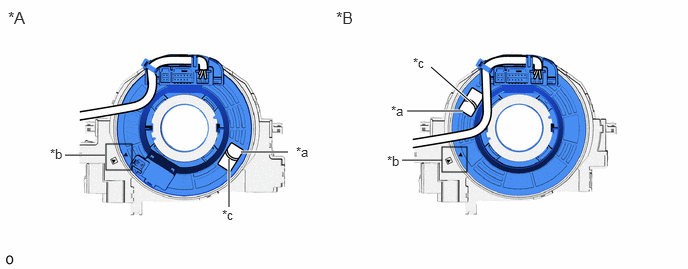
| *A | Type A | *B | Type B |
| *a | Check Window | *b | Matchmark |
| *c | Top of Flat Cable U-turn | - | - |
If the spiral with sensor cable sub-assembly is not centered, center it.
- NOTICE:
-
Failure to observe the following precautions may result in damage to the spiral with sensor cable sub-assembly.
- ·
When rotating the spiral with sensor cable sub-assembly, make sure to push on the interlock to release the interlock.
·Do not turn the spiral with sensor cable sub-assembly using the airbag wire harness.
·Do not forcibly rotate the part.
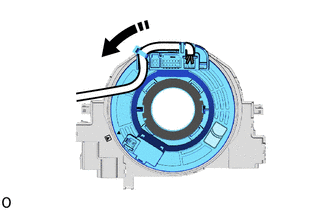

|
Interlock |

|
Rotation Direction |
While pushing on the interlock indicated in the illustration. Make sure to rotate the spiral with sensor cable sub-assembly counterclockwise slowly by hand until it stops.
- NOTICE:
-
Make sure to rotate the spiral with sensor cable sub-assembly counterclockwise. If rotated clockwise, it may be damaged or centering may no longer be possible.
- HINT:
-
The interlock operates at the top and bottom of the connector.
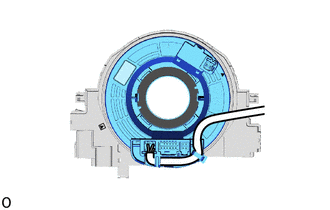
If the spiral with sensor cable sub-assembly stops rotating and the connector has moved past the bottom, return the connector to the bottom as shown in the illustration.
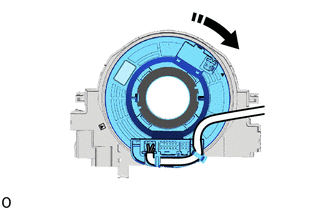
|
|
Interlock |
|
|
Rotation Direction |
While pushing on the interlock, rotate the spiral with sensor cable sub-assembly clockwise approximately 2.5 times to move the connector from the bottom to the top.
- NOTICE:
-
If the connector is rotated clockwise from the bottom 5 times or more, the spiral with sensor cable sub-assembly may be damaged.
- HINT:
-
The interlock operates at the top and bottom of the connector.
Check that the spiral with sensor cable sub-assembly is center position.
- OK:
The connector is at the top.
The matchmarks are aligned.
The top of the flat cable U-turn can be checked from the check window.
| *A | Type A | *B | Type B |
| *a | Check Window | *b | Matchmark |
| *c | Top of Flat Cable U-turn | - | - |
- NOTICE:
-
If the spiral with sensor cable sub-assembly cannot be centered, it is possible that the spiral cable sub-assembly is broken. Replace the spiral cable sub-assembly with a new one.
3.PLACE FRONT WHEELS FACING STRAIGHT AHEAD
4.INSTALL SPIRAL WITH SENSOR CABLE SUB-ASSEMBLY
- NOTICE:
- ·
Do not replace the spiral with sensor cable sub-assembly with the auxiliary battery connected and the ignition switch on (IG).
·Do not rotate the spiral with sensor cable sub-assembly with the auxiliary battery connected and the ignition switch on (IG).
·When rotating the spiral with sensor cable sub-assembly to check the operation of the spiral with sensor cable sub-assembly (checking for abnormal noise, checking the DTC, Data List, etc.) make sure to perform the inspection with the steering wheel assembly installed.
Check that the ignition switch is off.
Check that the cable is disconnected from the negative (-) auxiliary battery terminal.
- CAUTION:
-
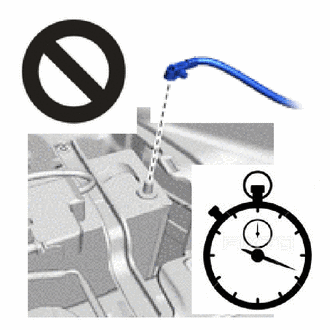
- ·
Wait at least 90 seconds after disconnecting the cable from the negative (-) auxiliary battery terminal to disable the SRS system.
·If the airbag deploys for any reason, it may cause a serious accident.
Check that the front wheels are facing straight ahead.
Set the turn signal switch to the neutral position.
- NOTICE:
-
If it is not in the neutral position, the turn signal switch cancel ratchet may snap.
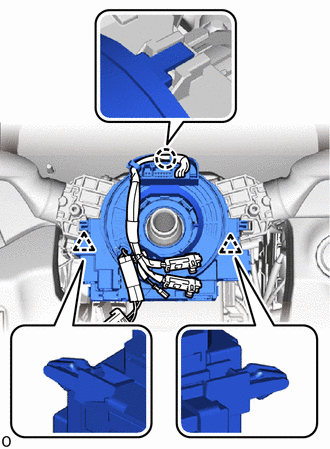
Attach the claw and clip to install the spiral with sensor cable sub-assembly.
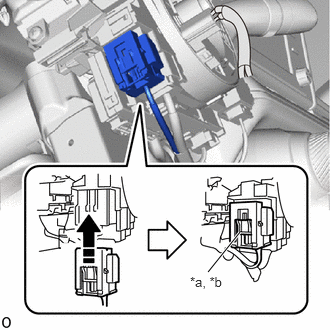
| *a | Slider |
| *b | Lock Position |
|
|
Connect in this Direction |
Connect the airbag connector and check that the slider is in the lock position.
- NOTICE:
-
When connecting any airbag connector, take care not to damage the airbag wire harness.
- HINT:
-
If the slider is not in the lock position, the airbag connector is not completely connected. Disconnect the airbag connector, check the airbag connector and spiral with sensor cable sub-assembly terminals and connector housings for deformation or foreign matter, and then reconnect the airbag connector.
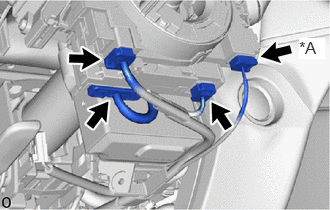
| *A | w/ Steering Heater |
w/ Steering Heater:
Connect the 4 connectors.
w/o Steering Heater:
Connect the 3 connectors.
45286B
5.INSTALL UPPER STEERING COLUMN COVER
45287
6.INSTALL LOWER STEERING COLUMN COVER
7.ADJUST SPIRAL WITH SENSOR CABLE SUB-ASSEMBLY
Check that the ignition switch is off.
Check that the cable is disconnected from the negative (-) auxiliary battery terminal.
- CAUTION:
-
- ·
Wait at least 90 seconds after disconnecting the cable from the negative (-) auxiliary battery terminal to disable the SRS system.
·If the airbag deploys for any reason, it may cause a serious accident.
Check that the spiral with sensor cable sub-assembly is center position.
- OK:
The connector is at the top.
The top of the flat cable U-turn can be checked from the check window.
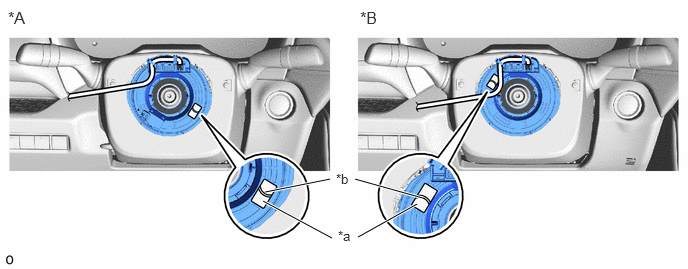
| *A | Type A | *B | Type B |
| *a | Check Window | *b | Top of Flat Cable U-turn |
If the spiral with sensor cable sub-assembly is not centered, center it.
- NOTICE:
-
Failure to observe the following precautions may result in damage to the spiral with sensor cable sub-assembly.
- ·
When rotating the spiral with sensor cable sub-assembly, make sure to push on the interlock to release the interlock.
·Do not turn the spiral with sensor cable sub-assembly using the airbag wire harness.
·Do not forcibly rotate the part.
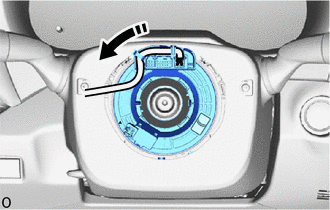
|
|
Interlock |
|
|
Rotation Direction |
While pushing on the interlock indicated in the illustration. Make sure to rotate the spiral with sensor cable sub-assembly counterclockwise slowly by hand until it stops.
- NOTICE:
-
If the connector is rotated clockwise from the bottom 5 times or more, the spiral with sensor cable sub-assembly may be damaged.
- HINT:
-
The interlock operates at the top and bottom of the connector.
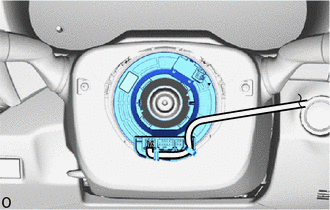
If the spiral with sensor cable sub-assembly stops rotating and the connector has moved past the bottom, return the connector to the bottom as shown in the illustration.
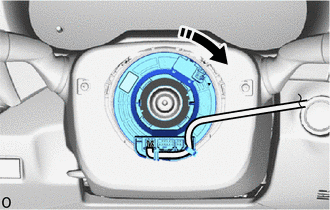
|
|
Interlock |
|
|
Rotation Direction |
While pushing on the interlock, rotate the spiral with sensor cable sub-assembly clockwise approximately 2.5 times to move the connector from the bottom to the top.
- NOTICE:
-
If the connector is rotated clockwise from the bottom 5 times or more, the spiral with sensor cable sub-assembly may be damaged.
- HINT:
-
The interlock operates at the top and bottom of the connector.
Check that the spiral with sensor cable sub-assembly is center position.
- OK:
The connector is at the top.
The top of the flat cable U-turn can be checked from the check window.
| *A | Type A | *B | Type B |
| *a | Check Window | *b | Top of Flat Cable U-turn |
- NOTICE:
-
If the spiral cable sub-assembly cannot be centered, it is possible that the spiral cable sub-assembly is broken. Replace the spiral cable sub-assembly with a new one.
45100
8.INSTALL STEERING WHEEL ASSEMBLY
9.CONNECT CABLE TO NEGATIVE AUXILIARY BATTERY TERMINAL
for A25A-FKS:
for M20A-FKS:
for A25A-FXS:
Click hereGeneral>MAINTENANCE>A25A-FXS AUXILIARY BATTERY>INSTALLATION
- NOTICE:
-
When disconnecting the cable, some systems need to be initialized after the cable is reconnected.
-
Click hereGeneral>INTRODUCTION>REPAIR INSTRUCTION>INITIALIZATION
65351A
10.INSTALL BATTERY HOLE COVER (for HV Model)
58416K
11.INSTALL REAR NO. 2 FLOOR BOARD (for HV Model)
58410B
12.INSTALL DECK BOARD ASSEMBLY (for HV Model)
13. PERFORM DIAGNOSTIC SYSTEM CHECK
w/o Occupant Classification System:
for Gasoline Model with Occupant Classification System:
for HV Model with Occupant Classification System:
14.CHECK SRS WARNING LIGHT
w/o Occupant Classification System:
for Gasoline Model with Occupant Classification System:
for HV Model with Occupant Classification System:
15.PERFORM SYSTEM CALIBRATION (When Removing or Replacing the steering sensor)