HYBRID / BATTERY CONTROL FRAME WIRE REMOVAL
CAUTION / NOTICE / HINT
The necessary procedures (adjustment, calibration, initialization, or registration) that must be performed after parts are removed and installed, or replaced during HV floor under wire removal/installation are shown below.
| Replaced Part or Performed Procedure | Necessary Procedures | Effect/Inoperative Function when Necessary Procedure not Performed | Link |
|---|---|---|---|
|
*: When performing learning using the GTS. Click here( |
|||
| Auxiliary battery terminal is disconnected/reconnected | Perform steering sensor zero point calibration | Lane control system | ( ) |
| Parking support brake system* | |||
| Pre-collision system | |||
| Memorize steering angle neutral point | Parking assist monitor system | ()
|
|
| Panoramic view monitor system | ()
|
||
| Reset back door close position | Power back door system | ()
|
|
| Power back door initialization | Power door lock control system | ()
|
|
·
Replacement of air fuel ratio sensor ·
Gas leak from exhaust system is repaired |
Inspection After Repair | ·
Poor idle, etc. ·
Engine start function, etc. |
w/ Canister Pump Module:()
w/o Canister Pump Module:( )
|
- CAUTION:
- ·
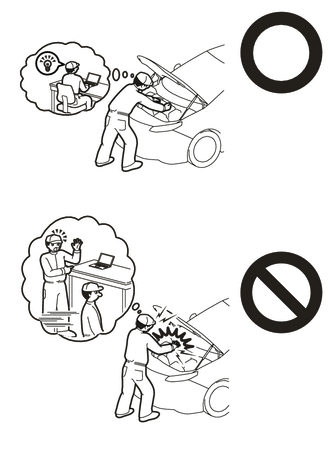
Orange wire harnesses and connectors indicate high-voltage circuits. To prevent electric shock, always follow the procedure described in the repair manual.
·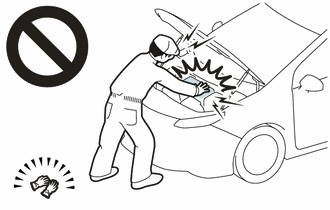
To prevent electric shock, wear insulated gloves when working on wire harnesses and components of the high voltage system.
- NOTICE:
-
After the power switch is turned off, the navigation system requires approximately a minute to record various types of memory and settings. As a result, after turning the power switch off, wait a minute or more before disconnecting the cable from the negative (-) auxiliary battery terminal.
PROCEDURE

 1. PRECAUTION
- NOTICE:
-
After turning the power switch off, waiting time may be required before disconnecting the cable from the negative (-) auxiliary battery terminal. Therefore, make sure to read the disconnecting the cable from the negative (-) auxiliary battery terminal notices before proceeding with work.
G3834
2.REMOVE SERVICE PLUG GRIP
82111
3.DISCONNECT ENGINE ROOM MAIN WIRE
- CAUTION:
-
Be sure to wear insulated gloves.
- NOTICE:
-
Do not allow any foreign matter or water to enter the inverter with converter assembly.
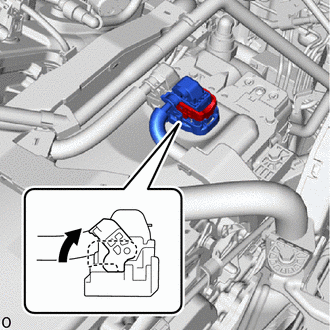
Move the lock lever while pushing the lock on the connector, and disconnect the inverter with converter assembly connector.
- NOTICE:
- ·
Do not damage the terminals, connector housing or inverter with converter assembly during disconnection.
·Cover the hole where the cable was connected with tape (non-residue type) or equivalent to prevent entry of foreign matter.
·Insulate the disconnected terminals with insulating tape.
·Do not touch the waterproof seal or terminals of the connector.
4.REMOVE CONNECTOR COVER ASSEMBLY
5.CHECK TERMINAL VOLTAGE
6.TEMPORARILY INSTALL CONNECTOR COVER ASSEMBLY
821H1
7.DISCONNECT HV FLOOR UNDER WIRE
8.REMOVE BENCH TYPE REAR SEAT CUSHION ASSEMBLY
72693
9.REMOVE REAR SEAT CUSHION LOCK HOOK
67918E
10.REMOVE REAR DOOR SCUFF PLATE LH
58467H
11.REMOVE NO. 3 BATTERY SERVICE COVER BOARD
67917C
12.REMOVE REAR DOOR SCUFF PLATE RH
- HINT:
-
Use the same procedure as for the LH side.
58466J
13.REMOVE NO. 2 BATTERY SERVICE COVER BOARD
58464D
14.REMOVE BATTERY SERVICE COVER BOARD
71033
15.REMOVE REAR SEAT CUSHION LEG SUB-ASSEMBLY
G92N4A
16.REMOVE NO. 1 HV BATTERY COVER PANEL RH
821H1
17.DISCONNECT HV FLOOR UNDER WIRE
- CAUTION:
-
Be sure to wear insulated gloves.
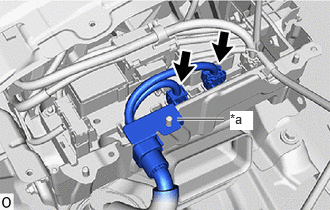
| *a | Shield Ground |
Disconnect the 2 HV battery junction block assembly connectors.
- NOTICE:
-
Insulate each disconnected high-voltage connector with insulating tape. Wrap the connector from the wire harness side to the end of the connector.
Disconnect the shield ground from the HV battery.
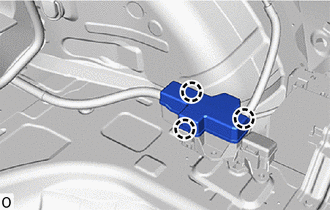
Disengage the 3 claws to remove the No. 4 relay block cover.
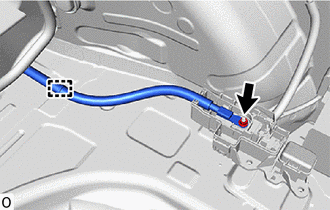
Remove the nut.
Disengage the clamp.
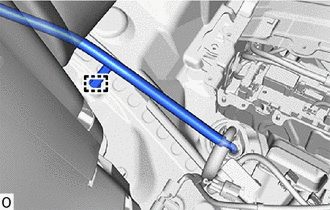
Disengage the clamp and disconnect HV floor under wire.
53896B
18.REMOVE FRONT FENDER FRONT SPLASH SHIELD LH
53895B
19.REMOVE FRONT FENDER FRONT SPLASH SHIELD RH
51441
20.REMOVE NO. 1 ENGINE UNDER COVER
51420
21.REMOVE NO. 2 ENGINE UNDER COVER ASSEMBLY
51468B
22.REMOVE ENGINE UNDER COVER HEAT INSULATOR
58166A
23.REMOVE FRONT FLOOR COVER LH
58165C
24.REMOVE FRONT FLOOR COVER RH
58167A
25.REMOVE FRONT CENTER FLOOR COVER
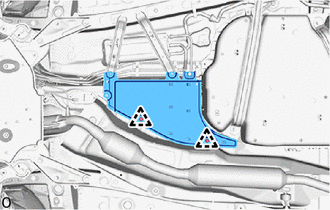
Remove the 2 clips and front center floor cover.
58153E
26.REMOVE FRONT NO. 2 FLOOR HEAT INSULATOR
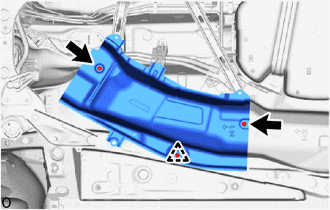
Remove the 2 nuts, clip and front No. 2 floor heat insulator.
58152A
27.REMOVE FRONT LOWER NO. 1 FLOOR HEAT INSULATOR
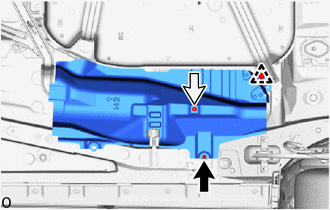
Remove the nut, bolt, clip and front lower No. 1 floor heat insulator.
58151
28.REMOVE FRONT NO. 1 FLOOR HEAT INSULATOR
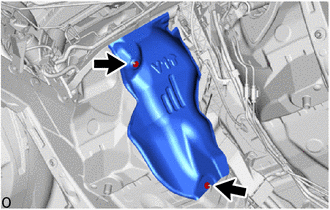
Remove the 2 nuts and front No. 1 floor heat insulator.
58724F
29.REMOVE NO. 2 ENGINE SERVICE COVER CUSHION
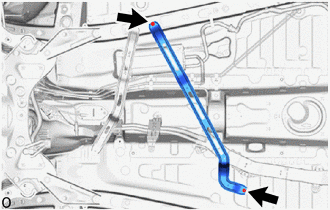
Remove the 2 nuts and No. 2 engine service cover cushion.
58723E
30.REMOVE ENGINE SERVICE COVER CUSHION
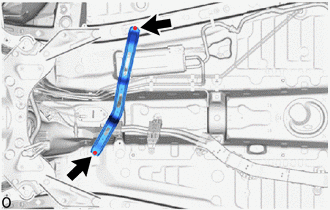
Remove the 2 nuts and engine service cover cushion.
33820B
31.DISCONNECT TRANSMISSION CONTROL CABLE ASSEMBLY
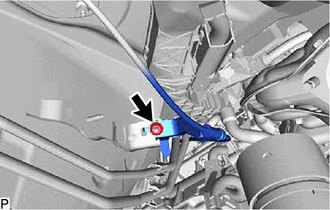
Remove the nut and disconnect the transmission control cable assembly.
17410
32.REMOVE FRONT EXHAUST PIPE ASSEMBLY
17141
33.REMOVE EXHAUST MANIFOLD
77100
34.REMOVE FUEL TANK ASSEMBLY
w/ Canister Pump Module:
Click hereEngine / Hybrid System>A25A-FXS (FUEL)>FUEL TANK (w/ Canister Pump Module)>REMOVAL
w/o Canister Pump Module:
Click hereEngine / Hybrid System>A25A-FXS (FUEL)>FUEL TANK (w/o Canister Pump Module)>REMOVAL
821H1
35.REMOVE HV FLOOR UNDER WIRE
- CAUTION:
-
Be sure to wear insulated gloves.
- NOTICE:
-
Insulate the disconnected connectors with insulating tape.
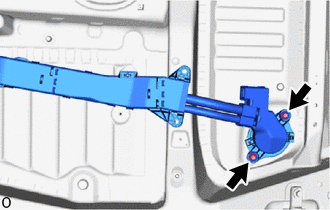
Remove the 2 nuts.
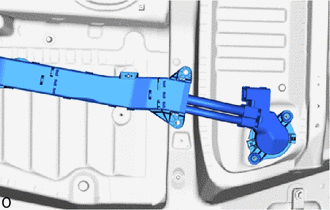
Disengage the grommet and pull out the HV floor under wire from the floor panel hole.
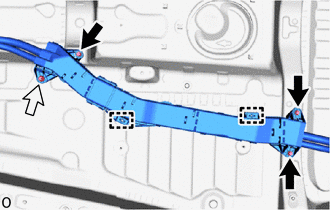
Remove the 3 bolts and nut.
Remove the 2 stud clamps.
- NOTICE:
-
If the stud clamps are removed forcibly, the stud bolts may be damaged.
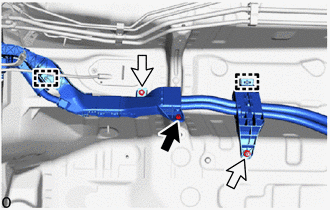
Remove the 2 nuts, bolt and 2 stud clamps.
- NOTICE:
-
If the stud clamps is removed forcibly, the stud bolt may be damaged.
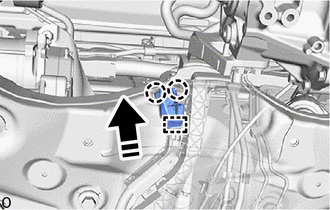

|
Remove in this Direction |
Disengage the 2 claws.
Disengage the guide and disconnect the No. 1 terminal cap.
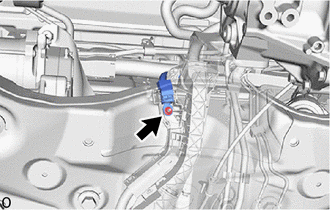
Remove the nut and disconnect the engine room main wire.
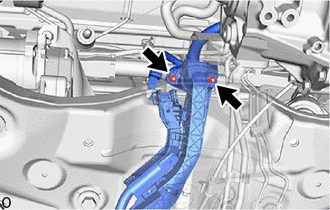
Remove the 2 nuts and HV floor under wire.