DOOR / HATCH POWER BACK DOOR SYSTEM(for HV Model) Power Back Door cannot be Operated Using Any Switch
DESCRIPTION
The power back door controls the multiplex network door ECU and operates the power back door unit assembly and back door lock assembly.
If the power back door does not operate using any of the operations, a malfunction related to the power back door operation conditions or multiplex network door ECU are possible causes.
WIRING DIAGRAM
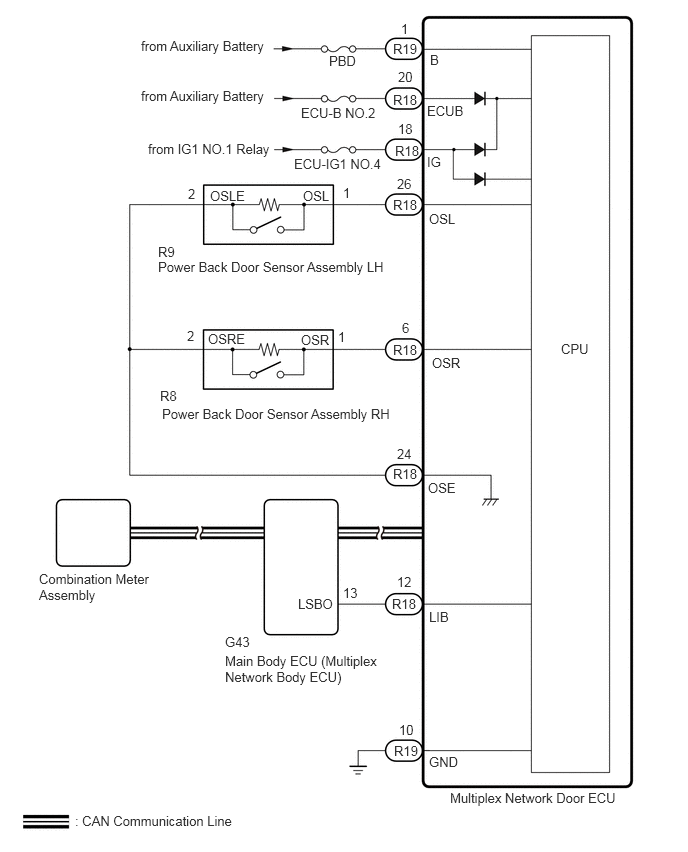
CAUTION / NOTICE / HINT
- NOTICE:
- ·
First perform the communication function inspections in How to Proceed with Troubleshooting to confirm that there are no CAN communication malfunctions before troubleshooting this problem.
·Inspect fuses for circuits related to this system before performing the following inspection procedure.
·This check is possible only when the "System Settings" customization setting using the multi-information display in the combination meter assembly is set to "On" (The default setting is "On").
Click hereVehicle Exterior>DOOR / HATCH>POWER BACK DOOR SYSTEM (for HV Model)>CUSTOMIZE PARAMETERS
·If the replacement, removal and installation of the multiplex network door ECU or disconnection of the connectors of the multiplex network door ECU has been performed, initialize the power back door system.
Click hereVehicle Exterior>DOOR / HATCH>POWER BACK DOOR SYSTEM (for HV Model)>INITIALIZATION
PROCEDURE
With the vehicle stopped and hybrid control system started, check the shift position indicator operation and that the speedometer indicates 0 km/h (0 mph).
- OK:
Combination meter operates normally.
- Result:
Proceed to OK NG
OK
NG
Click hereVehicle Interior>METER / GAUGE / DISPLAY>METER / GAUGE SYSTEM>HOW TO PROCEED WITH TROUBLESHOOTING
Clear the DTCs.
Click hereVehicle Exterior>DOOR / HATCH>POWER BACK DOOR SYSTEM (for HV Model)>DTC CHECK / CLEAR
- Body Electrical > Back Door > Clear DTCs
- 50002 159
Check for DTCs.
Click hereVehicle Exterior>DOOR / HATCH>POWER BACK DOOR SYSTEM (for HV Model)>DTC CHECK / CLEAR
- Body Electrical > Back Door > Trouble Codes
- 50001 159
- OK:
DTC is not output.
- Result:
Proceed to OK NG
OK
NG
Click hereVehicle Exterior>DOOR / HATCH>POWER BACK DOOR SYSTEM (for HV Model)>DIAGNOSTIC TROUBLE CODE CHART
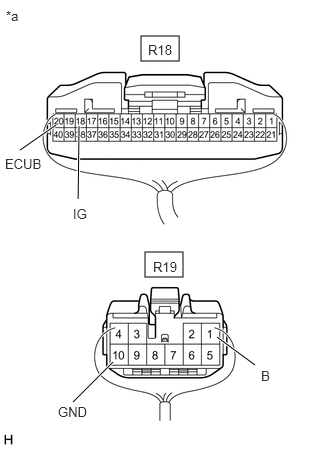
| *a | Rear view of wire harness connector
(to Multiplex Network Door ECU) |
Disconnect the multiplex network door ECU connectors.
Measure the resistance according to the value(s) in the table below.
- Standard Resistance:
Tester Connection Condition Specified Condition R19-10 (GND) - Body ground Always Below 1 Ω
Measure the voltage according to the value(s) in the table below.
- Standard Voltage:
Tester Connection Switch Condition Specified Condition R18-20 (ECUB) - Body ground Power switch off 11 to 14 V R19-1 (B) - Body ground Power switch off 11 to 14 V R18-18 (IG) - Body ground Power switch on (IG) 11 to 14 V Power switch off Below 1 V
- Result:
Proceed to OK NG
OK
NG
Read the Data List according to the display on the GTS.
Click hereVehicle Exterior>DOOR / HATCH>POWER BACK DOOR SYSTEM (for HV Model)>DATA LIST / ACTIVE TEST
- Body Electrical > Back Door > Data List
-
Tester Display Measurement Item Range Normal Condition Diagnostic Note PBD Main SW Power back door ON/OFF signal ON or OFF Current customize setting displayed - Door Lock Signal Back door condition signal Lock or Unlock Lock: Back door locked
Unlock: Back door unlocked-
- Body Electrical > Back Door > Data List
-
Tester Display PBD Main SW Door Lock Signal - 50003 159 7,84
- Result:
Result Proceed to Either item is normal A "PBD Main SW" item does not switch to "ON" or "OFF" according to main switch operation B "Door Lock Signal" item does not switch to "Lock" or "Unlock" according to operation to lock or unlock all doors C
A
B
Click hereVehicle Interior>METER / GAUGE / DISPLAY>METER / GAUGE SYSTEM>HOW TO PROCEED WITH TROUBLESHOOTING
C
Read the Data List according to the display on the GTS.
Click hereVehicle Exterior>DOOR / HATCH>POWER BACK DOOR SYSTEM (for HV Model)>DATA LIST / ACTIVE TEST
- Body Electrical > Back Door > Data List
-
Tester Display Measurement Item Range Normal Condition Diagnostic Note PBD Touch Sensor (Right) Power back door sensor assembly RH signal ON, OFF or Open ON: Power back door sensor assembly RH pressed
OFF: Power back door sensor assembly RH not pressed
Open: Power back door sensor assembly RH circuit open- PBD Touch Sensor (Left) Power back door sensor assembly LH signal ON, OFF or Open ON: Power back door sensor assembly LH pressed
OFF: Power back door sensor assembly LH not pressed
Open: Power back door sensor assembly LH circuit open-
- Body Electrical > Back Door > Data List
-
Tester Display PBD Touch Sensor (Right) PBD Touch Sensor (Left) - 50003 159 5,6
- Result:
Result Proceed to On the GTS screen, ON or OFF is displayed accordingly A On the GTS screen, ON or OFF is not displayed accordingly or Open is displayed for power back door sensor assembly RH B On the GTS screen, ON or OFF is not displayed accordingly or Open is displayed for power back door sensor assembly LH C
A
B
C
Remove the power back door sensor assembly RH.
Click hereVehicle Exterior>DOOR / HATCH>POWER BACK DOOR TOUCH SENSOR>REMOVAL
Inspect the power back door sensor assembly RH.
Click hereVehicle Exterior>DOOR / HATCH>POWER BACK DOOR TOUCH SENSOR>INSPECTION
- Result:
Proceed to OK NG
OK
NG
Disconnect the R8 power back door sensor assembly RH connector.
Disconnect the R18 multiplex network door ECU connector.
Measure the resistance according to the value(s) in the table below.
- Standard Resistance:
Tester Connection Condition Specified Condition R8-1 (OSR) - R18-6 (OSR) Always Below 1 Ω R8-2 (OSRE) - R18-24 (OSE) Always Below 1 Ω R8-1 (OSR) or R18-6 (OSR) - Body ground Always 10 kΩ or higher R8-2 (OSRE) or R18-24 (OSE) - Body ground Always 10 kΩ or higher
- Result:
Proceed to OK NG
OK
NG
Disconnect the G43 main body ECU (multiplex network body ECU) connector.
Disconnect the R18 multiplex network door ECU connector.
Measure the resistance according to the value(s) in the table below.
- Standard Resistance:
Tester Connection Condition Specified Condition G43-13 (LSBO) - R18-12 (LIB) Always Below 1 Ω G43-13 (LSBO) or R18-12 (LIB) - Body ground Always 10 kΩ or higher
- Result:
Proceed to OK NG
OK
NG
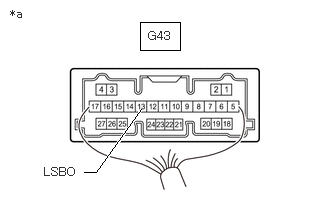
| *a | Component with harness connected
(Main Body ECU [Multiplex Network Body ECU]) |
Remove the main body ECU (multiplex network body ECU) with the connector(s) still connected.
for LHD:
Click herePower Source / Network>POWER DISTRIBUTION>MAIN BODY ECU (for LHD)>REMOVAL
for RHD:
Click herePower Source / Network>POWER DISTRIBUTION>MAIN BODY ECU (for RHD)>REMOVAL
Measure the voltage according to the value(s) in the table below.
- Standard Voltage:
Tester Connection Condition Specified Condition G43-13 (LSBO) - Body ground Always 11 to 14 V
- Result:
Result Proceed to OK A NG (for LHD) B NG (for RHD) C
A
B
C
Remove the power back door sensor assembly LH.
Click hereVehicle Exterior>DOOR / HATCH>POWER BACK DOOR TOUCH SENSOR>REMOVAL
Inspect the power back door sensor assembly LH.
Click hereVehicle Exterior>DOOR / HATCH>POWER BACK DOOR TOUCH SENSOR>INSPECTION
- Result:
Proceed to OK NG
OK
NG
Disconnect the R9 power back door sensor assembly LH connector.
Disconnect the R18 multiplex network door ECU connector.
Measure the resistance according to the value(s) in the table below.
- Standard Resistance:
Tester Connection Condition Specified Condition R9-1 (OSL) - R18-26 (OSL) Always Below 1 Ω R9-2 (OSLE) - R18-24 (OSE) Always Below 1 Ω R9-1 (OSL) or R18-26 (OSL) - Body ground Always 10 kΩ or higher R9-2 (OSLE) or R18-24 (OSE) - Body ground Always 10 kΩ or higher
- Result:
Proceed to OK NG
OK
NG