WINDOW / GLASS WINDSHIELD DEICER SYSTEM Windshield Deicer does not Operate
DESCRIPTION
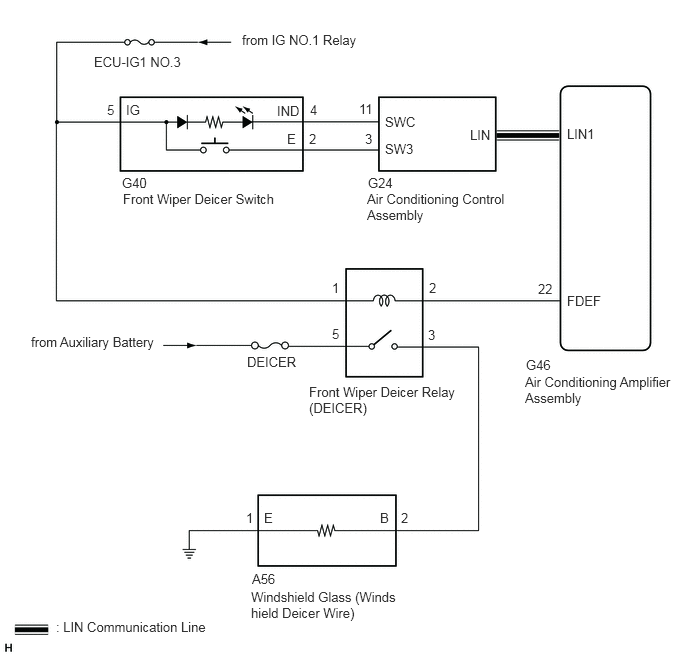
When the front wiper deicer switch is operated, an activation request signal is sent to the air conditioning control assembly through the direct line. The air conditioning control assembly sends an operation request signal to the air conditioning amplifier assembly via LIN communication, and when the air conditioning amplifier assembly receives the operation request signal, the system turns on the front wiper deicer relay (DEICER) and operates the windshield deicer system.
WIRING DIAGRAM
CAUTION / NOTICE / HINT
- NOTICE:
- ·
Inspect the fuses and relay for circuits related to this system before performing the following procedure.
·If the auxiliary battery voltage becomes low, windshield deicer operation is canceled to prioritize supplying power to the power steering system.
Click hereSteering>POWER ASSIST SYSTEMS>POWER STEERING SYSTEM>DATA LIST / ACTIVE TEST
PROCEDURE
Check air conditioning system.
- HINT:
-
Both the windshield deicer system operation signal and air conditioning system operation signal are transmitted to the air conditioning amplifier assembly via the same communication line.
- OK:
The windshield deicer system operates normally.
- Result:
Result Proceed to OK A NG (for HV Model) B NG (for Gasoline Model) C
A
B
C
Using the GTS, perform the Active Test.
Click hereVehicle Exterior>WINDOW / GLASS>WINDSHIELD DEICER SYSTEM>DATA LIST / ACTIVE TEST
- Body Electrical > Air Conditioner > Active Test
-
Tester Display Measurement Item Control Range Diagnostic Note Deicer Relay (Front) Windshield glass (windshield deicer) OFF or ON -
- Body Electrical > Air Conditioner > Active Test
-
Tester Display Deicer Relay (Front) - 50004 121 38
- OK:
The windshield deicer system operates normally.
- Result:
Proceed to OK NG
OK
NG
Remove the front wiper deicer switch.
Click hereVehicle Exterior>WINDOW / GLASS>WINDSHIELD DEICER SWITCH>REMOVAL
Inspect the front wiper deicer switch.
Click hereVehicle Exterior>WINDOW / GLASS>WINDSHIELD DEICER SWITCH>INSPECTION
- Result:
Proceed to OK NG
OK
NG
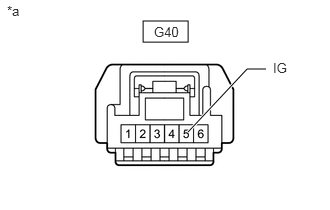
| *a | Front view of wire harness connector
(to Front Wiper Deicer Switch) |
Disconnect the front wiper deicer switch connector.
Measure the voltage according to the value(s) in the table below.
- Standard Voltage:
Tester Connection Switch Condition Specified Condition G40-5 (IG) - Body ground Ignition switch off Below 1 V Ignition switch ON 11 to 14 V
- Result:
Proceed to OK NG
OK
NG
Disconnect the G40 front wiper deicer switch connector.
Disconnect the G24 air conditioning control assembly connector.
Measure the resistance according to the value(s) in the table below.
- Standard Resistance:
Tester Connection Condition Specified Condition G40-2 (E) - G24-3 (SW3) Always Below 1 Ω G40-4 (IND) - G24-11 (SWC) Always Below 1 Ω G40-2 (E) or G24-3 (SW3) - Body ground Always 10 kΩ or higher G40-4 (IND) or G24-11 (SWC) - Body ground Always 10 kΩ or higher
- Result:
Proceed to OK NG
OK
NG
Replace the air conditioning control assembly with a new or known good one.
Click hereVehicle Interior>HEATING / AIR CONDITIONING>AIR CONDITIONING PANEL>REMOVAL
Check that the windshield deicer system operates normally.
- OK:
The windshield deicer system operates normally.
- Result:
Proceed to OK NG
OK
NG
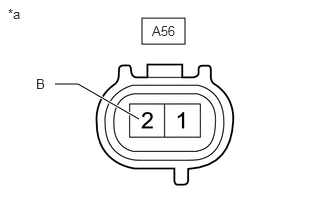
| *a | Front view of wire harness connector
(to Windshield Glass [Windshield Deicer Wire]) |
Disconnect the windshield glass (windshield deicer wire) connector.
Measure the voltage according to the value(s) in the table below.
- Standard Voltage:
Tester Connection Switch Condition Specified Condition A56-2 (B) - Body ground Ignition switch ON, front wiper deicer switch off Below 1 V Ignition switch ON, front wiper deicer switch on 11 to 14 V
- Result:
Proceed to OK NG
OK
NG
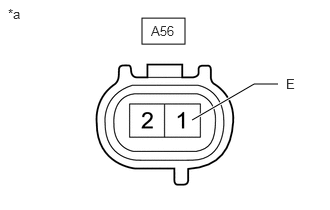
| *a | Front view of wire harness connector
(to Windshield Glass [Windshield Deicer Wire]) |
Disconnect the windshield glass (windshield deicer wire) connector.
Measure the resistance according to the value(s) in the table below.
- Standard Resistance:
Tester Connection Condition Specified Condition A56-1 (E) - Body ground Always Below 1 Ω
- Result:
Proceed to OK NG
OK
NG
Remove the front wiper deicer relay (DEICER) from the No. 2 engine room relay block.
Inspect the front wiper deicer relay (DEICER).
Click hereVehicle Exterior>WINDOW / GLASS>RELAY>ON-VEHICLE INSPECTION
- Result:
Proceed to OK NG
OK
NG
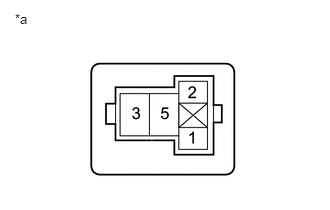
| *a | Front view of wire harness connector
(to Front Wiper Deicer Relay [DEICER]) |
Remove the front wiper deicer relay (DEICER) from the No. 2 engine room relay block.
Measure the voltage according to the value(s) in the table below.
- Standard Voltage:
Tester Connection Condition Specified Condition Front wiper deicer relay (DEICER) terminal 5 - Body ground Always 11 to 14 V Front wiper deicer relay (DEICER) terminal 1 - Body ground Ignition switch ON 11 to 14 V
- Result:
Proceed to OK NG
OK
NG
Remove the front wiper deicer relay (DEICER) from the No. 2 engine room relay block.
Disconnect the A56 windshield glass (windshield deicer wire) connector.
Disconnect the G46 air conditioning amplifier assembly connector.
Measure the resistance according to the value(s) in the table below.
- Standard Resistance:
Tester Connection Condition Specified Condition Front wiper deicer relay (DEICER) terminal 3 - A56-2 (B) Always Below 1 Ω Front wiper deicer relay (DEICER) terminal 2 - G46-22 (FDEF) Always Below 1 Ω Front wiper deicer relay (DEICER) terminal 3 or A56-2 (B) - Body ground Always 10 kΩ or higher Front wiper deicer relay (DEICER) terminal 2 or G46-22 (FDEF) - Body ground Always 10 kΩ or higher
- Result:
Proceed to OK NG
OK
NG