AXLE AND DIFFERENTIAL REAR DIFFERENTIAL CARRIER ASSEMBLY(for Torque Vectoring Differential) INSTALLATION
PROCEDURE

 52391A
1.INSTALL REAR DIFFERENTIAL SUPPORT
Install the rear differential support to the torque vectoring differential carrier assembly with 3 new bolts.
- Torque:
- 120 N*m (1224 kgf*cm, 89 ft.*lbf)
12351F
2.INSTALL REAR DIFFERENTIAL DAMPER
Install the rear differential damper to the rear No. 2 differential support with the bolt.
- Torque:
- 20 N*m (204 kgf*cm, 15 ft.*lbf)
52380C
3.TEMPORARILY INSTALL REAR NO. 2 DIFFERENTIAL SUPPORT
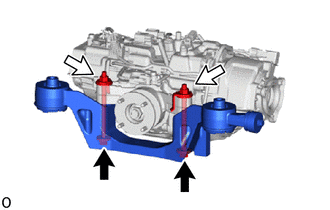
Temporarily install the rear No. 2 differential support to the torque vectoring differential carrier assembly with the 2 bolts and 2 nuts.
- NOTICE:
- ·
Reuse the removed bolt and nut.
·Be sure to install the No. 2 rear differential support facing the direction shown in the illustration.
- HINT:
-
The nuts have tabs to prevent them from rotating.
Install the 2 upper rear differential mount stoppers to the rear No. 2 differential support.
82164
4.INSTALL FRAME WIRE
Engage the clamp to install the frame wire.
Connect the 2 connectors and breather tube.
41110
5.INSTALL TORQUE VECTORING DIFFERENTIAL CARRIER ASSEMBLY
- NOTICE:
- ·
Do not damage the contact surface when installing the torque vectoring differential carrier assembly.
·Securely support the torque vectoring differential carrier assembly while performing this step to avoid excessively tilting or dropping the torque vectoring differential carrier assembly .
·Install the bolts and nuts with the torque vectoring differential carrier assembly secured.
·Be careful not to damage the frame wire.
Support the torque vectoring differential carrier assembly with a transmission jack and 2 attachments or equivalent tools as shown in the illustration.
Temporarily install the torque vectoring differential carrier assembly to the rear suspension member sub-assembly with the 2 rear lower differential mount stoppers and 3 new bolts.
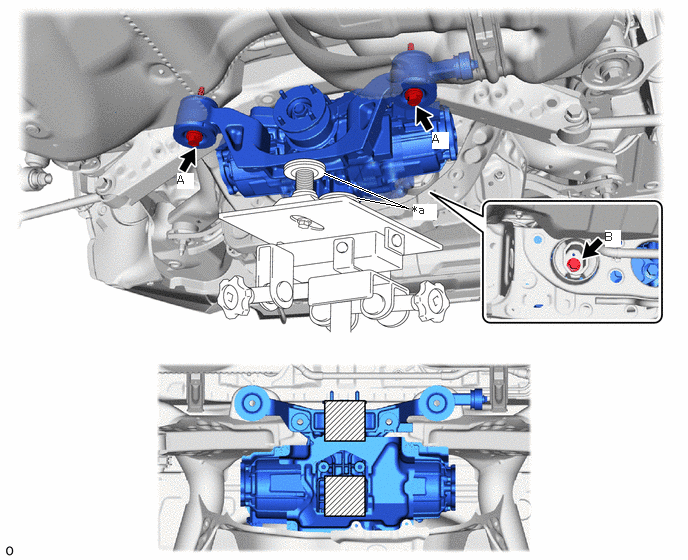
| *a | Attachment | - | - |

|
Attachment Installation Position | - | - |
Tighten the 2 bolts (A).
- Torque:
- 86 N*m (877 kgf*cm, 63 ft.*lbf)
- NOTICE:
-
Do not tighten the bolts with the inner cylinder or rear differential mount cushion tilted.
Tighten the bolt (B).
- Torque:
- 130 N*m (1326 kgf*cm, 96 ft.*lbf)
- NOTICE:
-
Do not tighten the bolts with the inner cylinder or rear differential mount cushion tilted.
Engage the 7 clamps to install the frame wire.
Pass the connector through the hole to the inside of the vehicle and install the grommet of the frame wire.
Connect the 3 connectors.
52391B
6.INSTALL DIFFERENTIAL SUPPORT
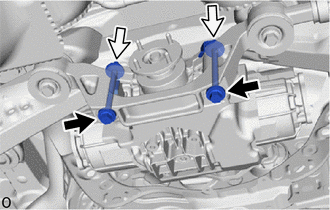
Remove the 2 bolts and 2 nuts.
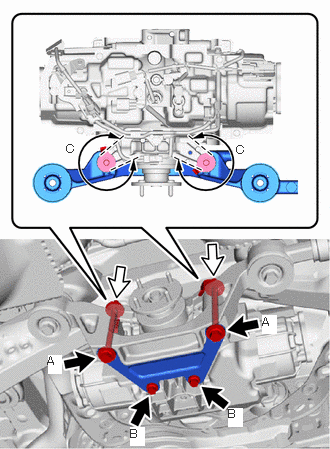
Temporarily install the differential support to the torque vectoring differential carrier assembly with 2 new bolts (A) and 2 new nuts.
- NOTICE:
-
Be sure to install the tab of each nut to the position (C) shown in the illustration.
- HINT:
-
The nuts have tabs to prevent them from rotating.
Temporarily install the 2 bolt (B).
Tighten the 4 bolts and 2 nuts.
- Torque:
- Bolt A : 82 N*m (836 kgf*cm, 60 ft.*lbf)
- Bolt B : 38.5 N*m (393 kgf*cm, 28 ft.*lbf)
42340B
7.INSTALL REAR DRIVE SHAFT ASSEMBLY LH
42330
8.INSTALL REAR DRIVE SHAFT ASSEMBLY RH
- HINT:
-
Use the same procedure described for the LH side.
77606
9.INSTALL NO. 1 FUEL TANK PROTECTOR
10.INSTALL REAR STABILIZER BAR
37110
11.INSTALL PROPELLER SHAFT ASSEMBLY
64740E
12.INSTALL DECK TRIM SIDE PANEL ASSEMBLY LH
58460D
13.INSTALL LUGGAGE HOLD BELT STRIKER ASSEMBLY
73708A
14.INSTALL TETHER ANCHOR BRACKET SET
62552F
15.INSTALL REAR SEAT SIDE GARNISH LH
62332C
16.INSTALL REAR DOOR OPENING TRIM WEATHERSTRIP LH
67918E
17.INSTALL REAR DOOR SCUFF PLATE LH
58577E
18.INSTALL REAR NO. 1 FLOOR MAT SUPPORT SIDE PLATE
58386
19.INSTALL REAR FLOOR FINISH PLATE
64993
20.INSTALL REAR DECK FLOOR BOX (w/o Spare Tire)
58417H
21.INSTALL REAR NO. 3 FLOOR BOARD
58410B
22.INSTALL DECK BOARD ASSEMBLY
64910N
23.INSTALL TONNEAU COVER ASSEMBLY (w/ Tonneau Cover)
73706
24.INSTALL CHILD RESTRAINT SEAT ANCHOR BRACKET SUB-ASSEMBLY LH
25.INSTALL REAR SEAT ASSEMBLY
26.CONNECT CABLE TO NEGATIVE BATTERY TERMINAL
for A25A-FKS: Click hereGeneral>MAINTENANCE>A25A-FKS BATTERY>INSTALLATION
for M20A-FKS: Click hereGeneral>MAINTENANCE>M20A-FKS BATTERY>INSTALLATION
- NOTICE:
-
When disconnecting the cable, some systems need to be initialized after the cable is reconnected.
-
Click hereGeneral>INTRODUCTION>REPAIR INSTRUCTION>INITIALIZATION
27.ADD DIFFERENTIAL OIL
28. DYNAMIC TORQUE VECTORING AWD SYSTEM CALIBRATION