GF1A TRANSFER / 4WD / AWD TRANSFER CASE FRONT OIL SEAL(for RH Side) REPLACEMENT
CAUTION / NOTICE / HINT
The necessary procedures (adjustment, calibration, initialization, or registration) that must be performed after parts are removed and installed, or replaced during the transfer case front oil seal removal/installation are shown below.
| Replacement Part or Procedure | Necessary Procedure | Effect/Inoperative when not Performed | Link |
|---|---|---|---|
| Front wheel alignment adjustment | ·
Perform reset memory ·
Perform acceleration sensor zero point calibration and store system information memorization. |
·
VSC is disabled or malfunctions ·
DTCs are output ·
Slip indicator light illuminates ·
ABS warning light illuminates |
( ) |
PROCEDURE

 51420
1.REMOVE NO. 2 ENGINE UNDER COVER ASSEMBLY
for A25A-FKS: Click hereEngine / Hybrid System>A25A-FKS (ENGINE MECHANICAL)>ENGINE ASSEMBLY>REMOVAL
for M20A-FKS: Click hereEngine / Hybrid System>M20A-FKS (ENGINE MECHANICAL)>ENGINE ASSEMBLY>REMOVAL
2.DRAIN TRANSFER OIL
43410
3.REMOVE FRONT DRIVE SHAFT ASSEMBLY RH
43457
4.REMOVE DRIVE SHAFT BEARING BRACKET
for A25A-FKS: Click hereEngine / Hybrid System>A25A-FKS (ENGINE MECHANICAL)>ENGINE UNIT>REMOVAL
for M20A-FKS: Click hereEngine / Hybrid System>M20A-FKS (ENGINE MECHANICAL)>ENGINE UNIT>REMOVAL
36113D
5.REMOVE TRANSFER CASE OIL SEAL RH
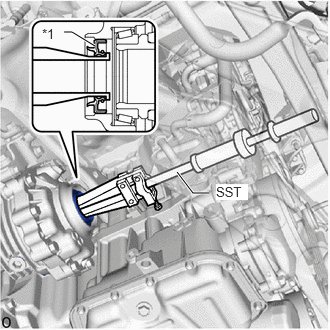
| *1 | Transfer Case Oil Seal RH |
Using SST, remove the transfer case oil seal RH from the No. 1 transfer case cover.
- SST
- 09308-00010
- NOTICE:
-
Do not scratch the press-fitting surface of the transfer case oil seal RH.
36113D
6.INSTALL TRANSFER CASE OIL SEAL RH
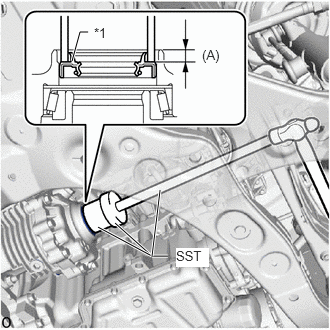
| *1 | Transfer Case Oil Seal RH |
Coat the lip of a new drive shaft oil seal RH with MP grease.
Using SST and a hammer, tap in a new transfer case oil seal RH as shown in the illustration.
- SST
- 09631-32020
09950-60021 (09951-00680)
09950-70010 (09951-07360)
- Drive in depth (A):
7.5 to 8.5 mm (0.296 to 0.334 in.)
- NOTICE:
- ·
Tap the transfer case oil seal RH uniformly so that the transfer case oil seal RH is straight.
·Do not tap the transfer case oil seal RH in too far.
43457
7.INSTALL DRIVE SHAFT BEARING BRACKET
for A25A-FKS: Click hereEngine / Hybrid System>A25A-FKS (ENGINE MECHANICAL)>ENGINE UNIT>INSTALLATION
for M20A-FKS: Click hereEngine / Hybrid System>M20A-FKS (ENGINE MECHANICAL)>ENGINE UNIT>INSTALLATION
43410
8.INSTALL FRONT DRIVE SHAFT ASSEMBLY RH
9.ADD TRANSFER OIL
10.INSPECT TRANSFER OIL LEAK
51420
11.INSTALL NO. 2 ENGINE UNDER COVER ASSEMBLY
for A25A-FKS: Click hereEngine / Hybrid System>A25A-FKS (ENGINE MECHANICAL)>ENGINE ASSEMBLY>INSTALLATION
for M20A-FKS: Click hereEngine / Hybrid System>M20A-FKS (ENGINE MECHANICAL)>ENGINE ASSEMBLY>INSTALLATION