LIGHTING (EXT) LIGHTING SYSTEM Clearance Light/Daytime Running Light Circuit
DESCRIPTION
When the main body ECU (multiplex network body ECU) receives the light control switch position signal, it sends an illumination request signal to the headlight ECU sub-assembly LH/RH and illuminates the clearance lights.
When the operation conditions of the daytime running lights are met, the main body ECU (multiplex network body ECU) sends an illumination request signal to the headlight ECU sub-assembly LH/RH and illuminates the daytime running lights.
WIRING DIAGRAM
for Triple Beam Headlight
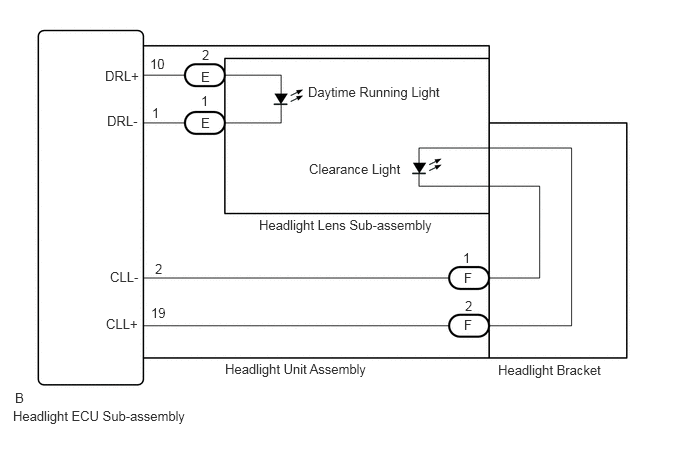
for Single Beam Headlight
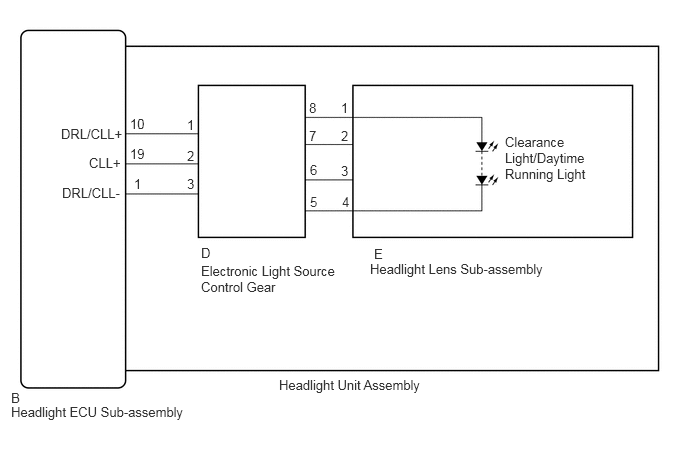
CAUTION / NOTICE / HINT
- NOTICE:
-
If the headlight ECU sub-assembly LH has been replaced, it is necessary to synchronize the vehicle information and initialize the headlight ECU sub-assembly LH.
-
Click hereVehicle Exterior>LIGHTING (EXT)>LIGHTING SYSTEM>INITIALIZATION
PROCEDURE
Choose the model to be inspected.
- Result:
Result Proceed to for Triple Beam Headlight A for Single Beam Headlight B
A
B
Check the illumination of each clearance lights and daytime running lights.
- Result:
Result Proceed to LH side daytime running light does not operate properly (clearance light operates normally) A LH side clearance light does not operate properly (daytime running light operates normally) B RH side daytime running light does not operate properly (clearance light operates normally) C RH side clearance light does not operate properly (daytime running light operates normally) D
A
B
C
D
Connect the GTS to the DLC3.
Turn the ignition switch to ON.
Turn the GTS on.
Enter the following menus: Body Electrical / HL AutoLeveling / Active Test.
Perform the Active Test according to the display on the GTS.
- Body Electrical > HL AutoLeveling > Active Test
-
Tester Display Measurement Item Control Range Diagnostic Note Daytime Running Light Daytime running lights OFF or ON -
- Body Electrical > HL AutoLeveling > Active Test
-
Tester Display Daytime Running Light - 50004 361 20
- OK:
Daytime running light illuminates.
- Result:
Proceed to OK NG
OK
NG
Interchange the headlight unit assembly LH with RH and connect the connectors.
Click hereVehicle Exterior>LIGHTING (EXT)>HEADLIGHT ASSEMBLY (for Triple Beam Headlight)>DISASSEMBLY
- Result:
Proceed to NEXT
NEXT
Check the operation of the daytime running light.
- Result:
Result Proceed to LH side daytime running light does not illuminate. A RH side daytime running light does not illuminate. B
A
B
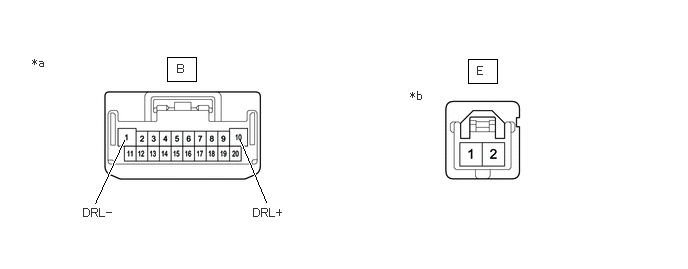
| *a | Component without harness connected
(to Headlight ECU Sub-assembly LH) |
*b | Component without harness connected
(to Headlight Lens Sub-assembly LH) |
Remove the headlight assembly LH.
Click hereVehicle Exterior>LIGHTING (EXT)>HEADLIGHT ASSEMBLY (for Triple Beam Headlight)>REMOVAL
Remove the headlight lens sub-assembly LH.
Click hereVehicle Exterior>LIGHTING (EXT)>HEADLIGHT ASSEMBLY (for Triple Beam Headlight)>DISASSEMBLY
Measure the resistance according to the value(s) in the table below.
- Standard Resistance:
Tester Connection Wiring Color Condition Specified Condition B-10 (DRL+) - E-2 R-W Always Below 1 Ω B-1 (DRL-) - E-1 G-W Always Below 1 Ω
- Result:
Proceed to OK NG
OK
Click hereVehicle Exterior>LIGHTING (EXT)>HEADLIGHT ASSEMBLY (for Triple Beam Headlight)>DISASSEMBLY
NG
Click hereVehicle Exterior>LIGHTING (EXT)>HEADLIGHT ASSEMBLY (for Triple Beam Headlight)>DISASSEMBLY
Connect the GTS to the DLC3.
Turn the ignition switch to ON.
Turn the GTS on.
Enter the following menus: Body Electrical / HL AutoLeveling / Active Test.
Perform the Active Test according to the display on the GTS.
- Body Electrical > HL AutoLeveling > Active Test
-
Tester Display Measurement Item Control Range Diagnostic Note Clearance Light Clearance lights OFF or ON -
- Body Electrical > HL AutoLeveling > Active Test
-
Tester Display Clearance Light - 50004 361 17
- OK:
Clearance light illuminates.
- Result:
Proceed to OK NG
OK
NG
Interchange the headlight bracket LH with RH and connect the connectors.
Click hereVehicle Exterior>LIGHTING (EXT)>HEADLIGHT ASSEMBLY (for Triple Beam Headlight)>DISASSEMBLY
- Result:
Proceed to NEXT
NEXT
Check the operation of the clearance light.
- Result:
Result Proceed to LH side clearance light does not illuminate. A RH side clearance light does not illuminate. B
A
B
Click hereVehicle Exterior>LIGHTING (EXT)>HEADLIGHT ASSEMBLY (for Triple Beam Headlight)>DISASSEMBLY
Interchange the headlight unit assembly LH with RH and connect the connectors.
Click hereVehicle Exterior>LIGHTING (EXT)>HEADLIGHT ASSEMBLY (for Triple Beam Headlight)>DISASSEMBLY
- Result:
Proceed to NEXT
NEXT
Check the operation of the clearance light.
- Result:
Result Proceed to LH side clearance light does not illuminate. A RH side clearance light does not illuminate. B
A
B
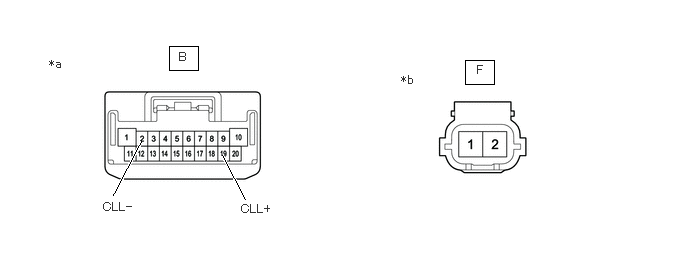
| *a | Component without harness connected
(to Headlight ECU Sub-assembly LH) |
*b | Component without harness connected
(to Headlight Bracket LH) |
Remove the headlight assembly LH.
Click hereVehicle Exterior>LIGHTING (EXT)>HEADLIGHT ASSEMBLY (for Triple Beam Headlight)>REMOVAL
Remove the headlight bracket LH.
Click hereVehicle Exterior>LIGHTING (EXT)>HEADLIGHT ASSEMBLY (for Triple Beam Headlight)>DISASSEMBLY
Measure the resistance according to the value(s) in the table below.
- Standard Resistance:
Tester Connection Wiring Color Condition Specified Condition B-19 (CLL+) - F-2 R Always Below 1 Ω B-2 (CLL-) - F-1 GR Always Below 1 Ω
- Result:
Proceed to OK NG
OK
Click hereVehicle Exterior>LIGHTING (EXT)>HEADLIGHT ASSEMBLY (for Triple Beam Headlight)>DISASSEMBLY
NG
Click hereVehicle Exterior>LIGHTING (EXT)>HEADLIGHT ASSEMBLY (for Triple Beam Headlight)>DISASSEMBLY
Connect the GTS to the DLC3.
Turn the ignition switch to ON.
Turn the GTS on.
Enter the following menus: Body Electrical / HL AutoLeveling (Sub) / Active Test.
Perform the Active Test according to the display on the GTS.
- Body Electrical > HL AutoLeveling (Sub) > Active Test
-
Tester Display Measurement Item Control Range Diagnostic Note Daytime Running Light Daytime running lights OFF or ON -
- Body Electrical > HL AutoLeveling (Sub) > Active Test
-
Tester Display Daytime Running Light - 50004 414 5
- OK:
Daytime running light illuminates.
- Result:
Proceed to OK NG
OK
NG
Interchange the headlight unit assembly RH with LH and connect the connectors.
Click hereVehicle Exterior>LIGHTING (EXT)>HEADLIGHT ASSEMBLY (for Triple Beam Headlight)>DISASSEMBLY
- Result:
Proceed to NEXT
NEXT
Check the operation of the daytime running light.
- Result:
Result Proceed to RH side daytime running light does not illuminate. A LH side daytime running light does not illuminate. B
A
B
| *a | Component without harness connected
(to Headlight ECU Sub-assembly RH) |
*b | Component without harness connected
(to Headlight Lens Sub-assembly RH) |
Remove the headlight assembly RH.
Click hereVehicle Exterior>LIGHTING (EXT)>HEADLIGHT ASSEMBLY (for Triple Beam Headlight)>REMOVAL
Remove the headlight lens sub-assembly RH.
Click hereVehicle Exterior>LIGHTING (EXT)>HEADLIGHT ASSEMBLY (for Triple Beam Headlight)>DISASSEMBLY
Measure the resistance according to the value(s) in the table below.
- Standard Resistance:
Tester Connection Wiring Color Condition Specified Condition B-10 (DRL+) - E-2 R-W Always Below 1 Ω B-1 (DRL-) - E-1 G-W Always Below 1 Ω
- Result:
Proceed to OK NG
OK
Click hereVehicle Exterior>LIGHTING (EXT)>HEADLIGHT ASSEMBLY (for Triple Beam Headlight)>DISASSEMBLY
NG
Click hereVehicle Exterior>LIGHTING (EXT)>HEADLIGHT ASSEMBLY (for Triple Beam Headlight)>DISASSEMBLY
Connect the GTS to the DLC3.
Turn the ignition switch to ON.
Turn the GTS on.
Enter the following menus: Body Electrical / HL AutoLeveling (Sub) / Active Test.
Perform the Active Test according to the display on the GTS.
- Body Electrical > HL AutoLeveling (Sub) > Active Test
-
Tester Display Measurement Item Control Range Diagnostic Note Clearance Light Clearance lights OFF or ON -
- Body Electrical > HL AutoLeveling (Sub) > Active Test
-
Tester Display Clearance Light - 50004 414 2
- OK:
Clearance light illuminates.
- Result:
Proceed to OK NG
OK
NG
Interchange the headlight bracket RH with LH and connect the connectors.
Click hereVehicle Exterior>LIGHTING (EXT)>HEADLIGHT ASSEMBLY (for Triple Beam Headlight)>DISASSEMBLY
- Result:
Proceed to NEXT
NEXT
Check the operation of the clearance light.
- Result:
Result Proceed to RH side clearance light does not illuminate. A LH side clearance light does not illuminate. B
A
B
Click hereVehicle Exterior>LIGHTING (EXT)>HEADLIGHT ASSEMBLY (for Triple Beam Headlight)>DISASSEMBLY
Interchange the headlight unit assembly RH with LH and connect the connectors.
Click hereVehicle Exterior>LIGHTING (EXT)>HEADLIGHT ASSEMBLY (for Triple Beam Headlight)>DISASSEMBLY
- Result:
Proceed to NEXT
NEXT
Check the operation of the clearance light.
- Result:
Result Proceed to RH side clearance light does not illuminate. A LH side clearance light does not illuminate. B
A
B
| *a | Component without harness connected
(to Headlight ECU Sub-assembly RH) |
*b | Component without harness connected
(to Headlight Bracket RH) |
Remove the headlight assembly RH.
Click hereVehicle Exterior>LIGHTING (EXT)>HEADLIGHT ASSEMBLY (for Triple Beam Headlight)>REMOVAL
Remove the headlight bracket RH.
Click hereVehicle Exterior>LIGHTING (EXT)>HEADLIGHT ASSEMBLY (for Triple Beam Headlight)>DISASSEMBLY
Measure the resistance according to the value(s) in the table below.
- Standard Resistance:
Tester Connection Wiring Color Condition Specified Condition B-19 (CLL+) - F-2 R Always Below 1 Ω B-2 (CLL-) - F-1 GR Always Below 1 Ω
- Result:
Proceed to OK NG
OK
Click hereVehicle Exterior>LIGHTING (EXT)>HEADLIGHT ASSEMBLY (for Triple Beam Headlight)>DISASSEMBLY
NG
Click hereVehicle Exterior>LIGHTING (EXT)>HEADLIGHT ASSEMBLY (for Triple Beam Headlight)>DISASSEMBLY
Check the illumination of each clearance lights and daytime running lights.
- Result:
Result Proceed to LH side clearance lights and daytime running lights do not illuminate A RH side clearance lights and daytime running lights do not illuminate B
A
B
Connect the GTS to the DLC3.
Turn the ignition switch to ON.
Turn the GTS on.
Enter the following menus: Body Electrical / HL AutoLeveling / Active Test.
Perform the Active Test according to the display on the GTS.
- Body Electrical > HL AutoLeveling > Active Test
-
Tester Display Measurement Item Control Range Diagnostic Note Clearance Light Clearance lights OFF or ON - Daytime Running Light Daytime running lights OFF or ON -
- Body Electrical > HL AutoLeveling > Active Test
-
Tester Display Clearance Light - 50004 361 17
- Body Electrical > HL AutoLeveling > Active Test
-
Tester Display Daytime Running Light - 50004 361 20
- OK:
Clearance lights and daytime running lights illuminate.
- Result:
Proceed to OK NG
OK
NG
Interchange the headlight unit assembly LH with RH and connect the connectors.
Click hereVehicle Exterior>LIGHTING (EXT)>HEADLIGHT ASSEMBLY(for Single Beam Headlight)>DISASSEMBLY
- Result:
Proceed to NEXT
NEXT
Check the operation of the clearance lights and daytime running lights.
- Result:
Result Proceed to LH side clearance lights and daytime running lights do not illuminate. A RH side clearance lights and daytime running lights do not illuminate. B
A
B
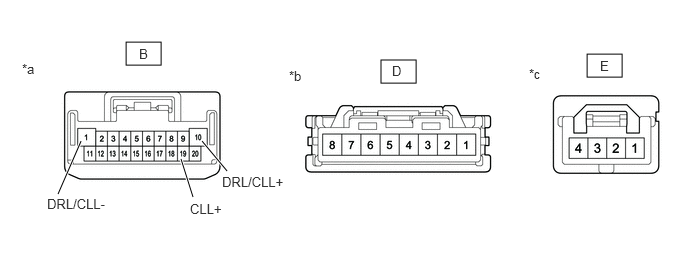
| *a | Component without harness connected
(to Headlight ECU Sub-assembly LH) |
*b | Component without harness connected
(to Electronic Light Source Control Gear LH) |
| *c | Component without harness connected
(to Headlight Lens Sub-assembly LH) |
- | - |
Remove the headlight assembly LH.
Click hereVehicle Exterior>LIGHTING (EXT)>HEADLIGHT ASSEMBLY(for Single Beam Headlight)>REMOVAL
Remove the headlight lens sub-assembly LH.
Click hereVehicle Exterior>LIGHTING (EXT)>HEADLIGHT ASSEMBLY(for Single Beam Headlight)>DISASSEMBLY
Measure the resistance according to the value(s) in the table below.
- Standard Resistance:
Tester Connection Wiring Color Condition Specified Condition B-10 (DRL/CLL+) - D-1 R Always Below 1 Ω B-19 (CLL+) - D-2 G-W Always Below 1 Ω B-1 (DRL/CLL-) - D-3 GR Always Below 1 Ω D-8 - E-1 BR Always Below 1 Ω D-7 - E-2 G Always Below 1 Ω D-6 - E-3 R-W Always Below 1 Ω D-5 - E-4 W Always Below 1 Ω
- Result:
Proceed to OK NG
OK
NG
Temporarily replace the headlight lens sub-assembly LH with a new one or normally functioning one.
Click hereVehicle Exterior>LIGHTING (EXT)>HEADLIGHT ASSEMBLY(for Single Beam Headlight)>DISASSEMBLY
Check the operation of the clearance lights.
Turn the ignition switch to ON.
Turn the light control switch to the AUTO or TAIL position.
Check the operation of the daytime running lights.
Click hereVehicle Exterior>LIGHTING (EXT)>LIGHTING SYSTEM>OPERATION CHECK
- OK:
Clearance lights and daytime running lights operate normally.
- Result:
Proceed to OK NG
OK
NG
Connect the GTS to the DLC3.
Turn the ignition switch to ON.
Turn the GTS on.
Enter the following menus: Body Electrical / HL AutoLeveling (Sub) / Active Test.
Perform the Active Test according to the display on the GTS.
- Body Electrical > HL AutoLeveling (Sub) > Active Test
-
Tester Display Measurement Item Control Range Diagnostic Note Clearance Light Clearance lights OFF or ON - Daytime Running Light Daytime running lights OFF or ON -
- Body Electrical > HL AutoLeveling (Sub) > Active Test
-
Tester Display Clearance Light - 50004 414 2
- Body Electrical > HL AutoLeveling (Sub) > Active Test
-
Tester Display Daytime Running Light - 50004 414 5
- OK:
Clearance lights and daytime running lights illuminate.
- Result:
Proceed to OK NG
OK
NG
Interchange the headlight unit assembly RH with LH and connect the connectors.
Click hereVehicle Exterior>LIGHTING (EXT)>HEADLIGHT ASSEMBLY(for Single Beam Headlight)>DISASSEMBLY
- Result:
Proceed to NEXT
NEXT
Check the operation of the clearance lights and daytime running lights.
- Result:
Result Proceed to RH side clearance lights and daytime running lights do not illuminate. A LH side clearance lights and daytime running lights do not illuminate. B
A
B
| *a | Component without harness connected
(to Headlight ECU Sub-assembly RH) |
*b | Component without harness connected
(to Electronic Light Source Control Gear RH) |
| *c | Component without harness connected
(to Headlight Lens Sub-assembly RH) |
- | - |
Remove the headlight assembly RH.
Click hereVehicle Exterior>LIGHTING (EXT)>HEADLIGHT ASSEMBLY(for Single Beam Headlight)>REMOVAL
Remove the headlight lens sub-assembly RH.
Click hereVehicle Exterior>LIGHTING (EXT)>HEADLIGHT ASSEMBLY(for Single Beam Headlight)>DISASSEMBLY
Measure the resistance according to the value(s) in the table below.
- Standard Resistance:
Tester Connection Wiring Color Condition Specified Condition B-10 (DRL/CLL+) - D-1 R Always Below 1 Ω B-19 (CLL+) - D-2 G-W Always Below 1 Ω B-1 (DRL/CLL-) - D-3 GR Always Below 1 Ω D-8 - E-1 BR Always Below 1 Ω D-7 - E-2 G Always Below 1 Ω D-6 - E-3 R-W Always Below 1 Ω D-5 - E-4 W Always Below 1 Ω
- Result:
Proceed to OK NG
OK
NG
Temporarily replace the headlight lens sub-assembly RH with a new one or normally functioning one.
Click hereVehicle Exterior>LIGHTING (EXT)>HEADLIGHT ASSEMBLY(for Single Beam Headlight)>DISASSEMBLY
Check the operation of the clearance lights.
Turn the ignition switch to ON.
Turn the light control switch to the AUTO or TAIL position.
Check the operation of the daytime running lights.
Click hereVehicle Exterior>LIGHTING (EXT)>LIGHTING SYSTEM>OPERATION CHECK
- OK:
Clearance lights and daytime running lights operate normally.
- Result:
Proceed to OK NG
OK
NG