HEATING / AIR CONDITIONING CONDENSER(for HV Model) REMOVAL
CAUTION / NOTICE / HINT
- HINT:
- ·
Use the same procedure as for the LHD and RHD vehicles.
·The procedure listed below is for the LHD vehicles.
PROCEDURE

 1.RECOVER REFRIGERANT FROM REFRIGERATION SYSTEM
for HFC-134a (R134a):
Click hereVehicle Interior>HEATING / AIR CONDITIONING>REFRIGERANT (for HFC-134a(R134a))>REPLACEMENT
for HFO-1234yf (R1234yf):
Click hereVehicle Interior>HEATING / AIR CONDITIONING>REFRIGERANT (for HFO-1234yf(R1234yf))>REPLACEMENT
52021
2.REMOVE FRONT BUMPER REINFORCEMENT SUB-ASSEMBLY
- HINT:
-
Remove using the same procedure that is performed when replacement of the front bumper reinforcement sub-assembly is necessary.
-
Click hereVehicle Exterior>EXTERIOR PANELS / TRIM>FRONT BUMPER (except Off Road Package)>REMOVAL
53019F
3.REMOVE RADIATOR SHUTTER SUB-ASSEMBLY (w/ Grille Shutter)
86520
4.REMOVE LOW PITCHED HORN ASSEMBLY
Click hereVehicle Exterior>HORN>HORN>REMOVAL
86570
5.REMOVE VEHICLE APPROACHING SPEAKER ASSEMBLY (w/ Vehicle Proximity Notification System)
17750A
6.REMOVE INLET AIR CLEANER ASSEMBLY
53630
7.DISCONNECT HOOD LOCK CONTROL CABLE ASSEMBLY
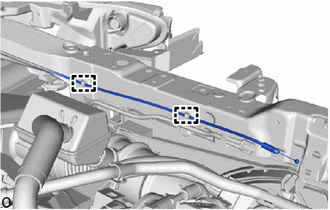
Disconnect the hood lock control cable assembly from the clamp.
53205
8.REMOVE UPPER RADIATOR SUPPORT SUB-ASSEMBLY
w/ Engine Hood Courtesy Switch
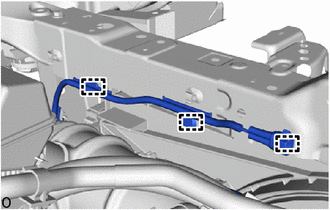
Detach the clamp.
Detach the clamp.
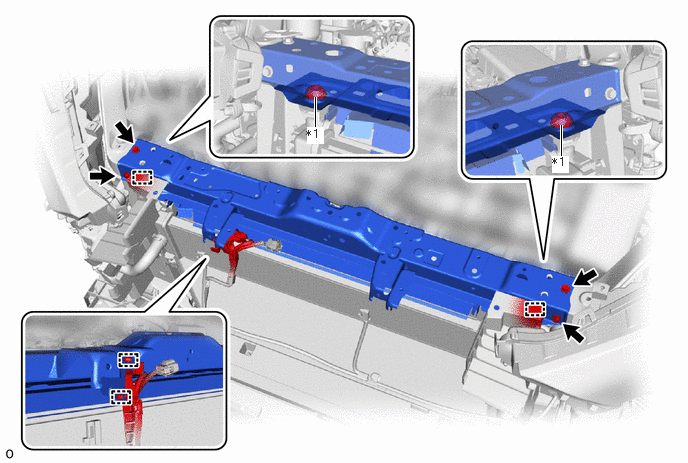
| *1 | Radiator Support Cushion | - | - |
Remove the 4 bolts.
Detach the 2 radiator support cushions and remove the upper radiator support sub-assembly.
- NOTICE:
-
Do not damage the cooler condenser assembly, radiator assembly (for inverter coolant) and radiator assembly when removing the upper radiator support sub-assembly.
88710E
9.DISCONNECT AIR CONDITIONING TUBE AND ACCESSORY ASSEMBLY
Press the air conditioning tube and accessory assembly to the cooler condenser assembly, and then release the piping clamp lock.
- NOTICE:
-
Do not apply excessive force to the air conditioning tube and accessory assembly.
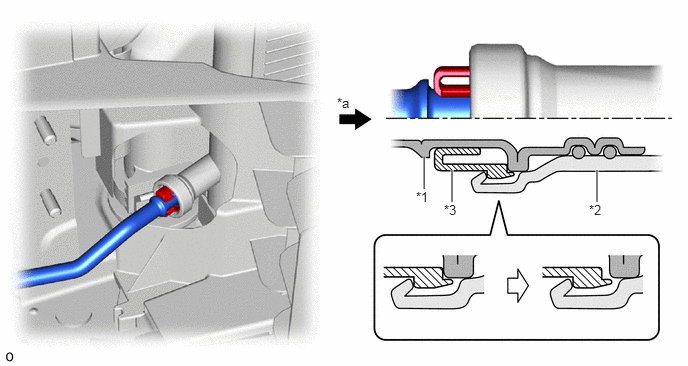
| *1 | Air Conditioning Tube and Accessory Assembly | *2 | Cooler Condenser Assembly |
| *3 | Piping Clamp | - | - |
| *a | Press In | - | - |
While releasing the piping clamp lock, use pliers or another tool to pinch near the rear end of the piping clamp, and then disconnect the air conditioning tube and accessory assembly as you buckle it.
- NOTICE:
- ·
If any foreign matter is attached to the connecting parts, brush it off or use compressed air to remove it before disconnecting the parts.
·Make sure that fragments of the piping clamp do not enter the piping.
·When the piping clamp is buckled, cracks form. Therefore, make sure to replace it with a new one.
·Remove any foreign matter from the connecting parts of the air conditioning tube and accessory assembly and cooler condenser assembly.
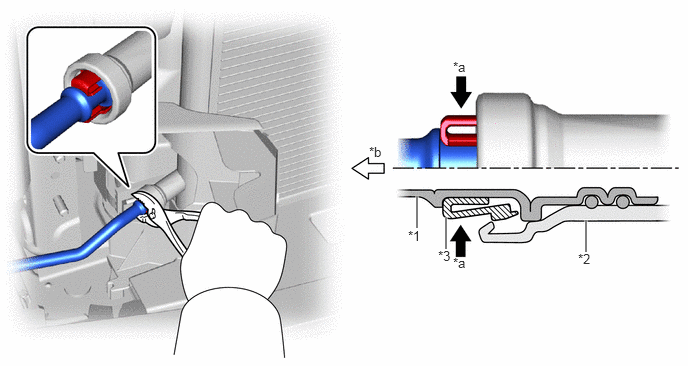
| *1 | Air Conditioning Tube and Accessory Assembly | *2 | Cooler Condenser Assembly |
| *3 | Piping Clamp | - | - |
| *a | Buckle | *b | Pull Out |
Remove the 2 O-rings from the air conditioning tube and accessory assembly.
- NOTICE:
-
Seal the openings of the disconnected parts with vinyl tape to prevent entry of moisture and foreign matter.
Remove the piping clamp.
G9010A
10.DISCONNECT RADIATOR ASSEMBLY (for Inverter Coolant)
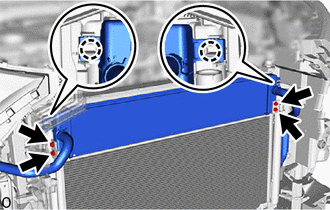
Remove the 4 bolts.
Detach the claw and disconnect the radiator assembly.
Move the radiator assembly so that the No. 3 inverter cooling hose detaches from the No. 1 radiator air guide RH as shown in the illustration.
- NOTICE:
-
Do not apply excessive force to the No. 3 inverter cooling hose and No. 4 inverter cooling hose.
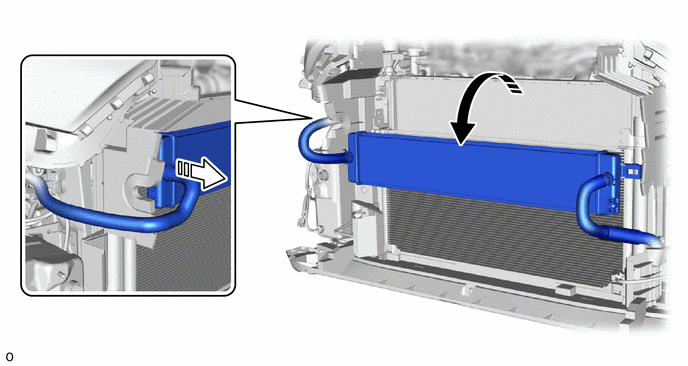

|
Disconnect in this Direction (1) | 
|
Disconnect in this Direction (2) |
16593B
11.REMOVE NO. 1 RADIATOR AIR GUIDE RH
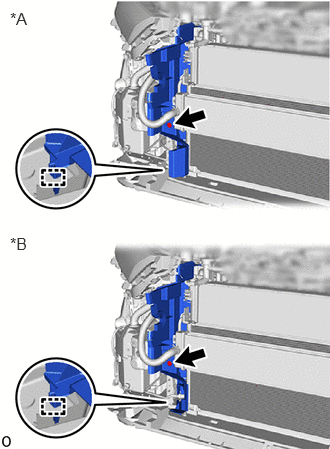
| *A | w/o Grille Shutter |
| *B | w/ Grille Shutter |
Remove the clip.
Detach the guide and remove the No. 1 radiator air guide RH.
88711
12.DISCONNECT NO. 1 COOLER REFRIGERANT DISCHARGE HOSE
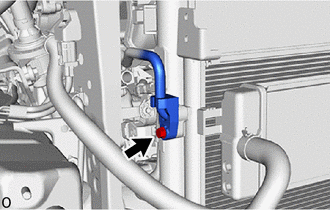
Remove the bolt and disconnect the No. 1 cooler refrigerant discharge hose.
- NOTICE:
-
Do not apply excessive force to the No. 1 cooler refrigerant discharge hose.
Remove the O-ring from the No. 1 cooler refrigerant discharge hose.
- NOTICE:
-
Seal the openings of the disconnected parts using vinyl tape to prevent entry of moisture and foreign matter.
88460
13.REMOVE COOLER CONDENSER ASSEMBLY
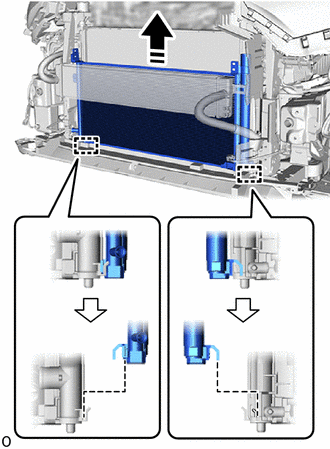
|
|
Remove in this Direction |
Detach the guide and remove the cooler condenser assembly as shown in the illustration.
- NOTICE:
-
Do not damage the cooler condenser assembly, radiator assembly (for inverter coolant) and radiator assembly when removing the cooler condenser assembly.