HYBRID / BATTERY CONTROL HYBRID CONTROL SYSTEM(for 4WD/AWD with NICKEL METAL HYDRIDE BATTERY) P0AA649 Hybrid/EV Battery Voltage System Isolation Internal Electronic Failure P1C7C49 Hybrid/EV Battery Voltage System Isolation (A/C Area) Internal Electronic Failure P1C7D49 Hybrid/EV Battery Voltage System Isolation (Hybrid/EV Battery Area) Internal Electronic Failure P1C7E49 Hybrid/EV Battery Voltage System Isolation (Transaxle Area) Internal Electronic Failure P1C7F49 Hybrid/EV Battery Voltage System Isolation (Direct Current Area) Internal Electronic Failure P1C8049 Hybrid/EV Battery Voltage System Isolation (Rear Motor Area) Internal Electronic Failure
DESCRIPTION
The hybrid vehicle control ECU assembly monitors the battery voltage sensor and detects insulation malfunctions in the high-voltage system.
| DTC No. | Detection Item | DTC Detection Condition | Trouble Area | MIL | Warning Indicate |
|---|---|---|---|---|---|
| P0AA649 | Hybrid/EV Battery Voltage System Isolation Internal Electronic Failure | Insulation resistance between the high-voltage circuit and the body has decreased.*1
(1 trip detection logic) |
·
Inverter with converter assembly ·
HV floor under wire ·
HV battery junction block assembly ·
Battery voltage sensor ·
Hybrid battery terminal block ·
HV battery ·
Hybrid vehicle transaxle assembly ·
Motor cable ·
Air conditioning system ·
Air conditioning wire ·
Rear traction motor with transaxle assembly |
Does not come on | Master Warning:
Comes on |
| P1C7C49 | Hybrid/EV Battery Voltage System Isolation (A/C Area) Internal Electronic Failure | Insulation resistance of the compressor with motor assembly or air conditioning inverter has decreased.*2
(1 trip detection logic) |
Air conditioning system | Does not come on | Master Warning:
Comes on |
| P1C7D49 | Hybrid/EV Battery Voltage System Isolation (Hybrid/EV Battery Area) Internal Electronic Failure | Insulation resistance of the HV battery, battery voltage sensor or SMR has decreased.*2
(1 trip detection logic) |
·
HV battery junction block assembly ·
Battery voltage sensor ·
Hybrid battery terminal block ·
HV battery |
Does not come on | Master Warning:
Comes on |
| P1C7E49 | Hybrid/EV Battery Voltage System Isolation (Transaxle Area) Internal Electronic Failure | Insulation resistance of the hybrid vehicle transaxle assembly or inverter for the generator (MG1) and motor (MG2) has decreased.*2
(1 trip detection logic) |
·
Hybrid vehicle transaxle assembly ·
Motor cable ·
Inverter with converter assembly |
Does not come on | Master Warning:
Comes on |
| P1C7F49 | Hybrid/EV Battery Voltage System Isolation (Direct Current Area) Internal Electronic Failure | Insulation resistance of the inverter for the generator (MG1), motor (MG2) and rear motor (MGR), A/C inverter, SMR or HV floor under wire has decreased.*2
(1 trip detection logic) |
·
Inverter with converter assembly ·
HV floor under wire ·
HV battery junction block assembly ·
Air conditioning system ·
Air conditioning wire |
Does not come on | Master Warning:
Comes on |
| P1C8049 | Hybrid/EV Battery Voltage System Isolation (Rear Motor Area) Internal Electronic Failure | Insulation resistance of the rear motor area has decreased.*2
(1 trip detection logic) |
·
Inverter with converter assembly ·
Rear traction motor with transaxle assembly ·
HV floor under wire (rear traction motor cable) |
Does not come on | Master Warning:
Comes on |
- HINT:
- ·
*1: The insulation malfunction detection circuit in the battery voltage sensor monitors the insulation resistance between the high voltage circuits and body. If the insulation resistance decreases, the hybrid vehicle control ECU assembly stores DTC P0AA649 and illuminates the master warning first regardless of malfunction area.
Depending on the vehicle condition, the high voltage circuit insulation resistance may return to normal. So if DTC P0AA649 is output, complete the following steps as soon as possible.
·*2: If the following operations are performed within the same trip after DTC P0AA649 is stored, just one of the related DTCs (P1C7C49, P1C7D49, P1C7E49, P1C7F49 or P1C8049) will be stored.
(a)Apply the parking brake firmly.
- NOTICE:
-
Perform this test with the AUTO function (shift-linked function) of the electric parking brake system off.
- HINT:
-
When the parking brake indicator (red) is illuminated after the electric parking brake switch assembly has been pulled to the lock side, the maximum amount of braking force is applied if the electric parking brake switch assembly is pulled to the lock side one more time.
(b)Wait for 1 minute or more with the vehicle stopped, the brake pedal firmly depressed, the power switch on (READY), shift lever in D and the air conditioning system on (Lo/MAX COOL, blower speed HI).
(c)Turn the power switch off and wait for 2 minutes or more.
- HINT:
- ·
DTCs and freeze frame data are useful information in determining the malfunctioning part. Before performing diagnosis, make sure to check and make a note of all output DTCs and freeze frame data. (Even if a high-voltage insulation malfunction cannot be reproduced, once stored, insulation malfunction DTCs will not be cleared unless the clear operation is performed.)
·When the insulation resistance of the HV battery area decreases and the power switch is turned on (IG), DTC P1C7D49 is stored within 2 minutes.
·When measuring insulation resistance using a megohmmeter, measure the resistance while jiggling the high voltage wire harness.
| DTC No. | Data List |
|---|---|
| P0AA649 | ·
Short Wave Highest Value Level ·
Hybrid Battery Voltage ·
VL-Voltage before Boosting ·
VL-Voltage before Boosting for Rear Motor ·
VH-Voltage after Boosting ·
Boost Ratio ·
A/C Consumption Power ·
SMRP Status ·
SMRB Status ·
SMRG Status ·
Generator Inverter Shutdown Status ·
Motor Inverter Shutdown Status ·
Rear Motor Inverter Shutdown Status ·
Insulation Resistance Division Check Completion using MG Inv ·
Insulation Resistance Division Check Completion using A/C Inv ·
Insulation Resistance Division Check Completion using SMR ·
Insulation Resistance Division Check Completion using Rear Motor Inv ·
Short Wave Highest Value Availability just after MG Inv On/Off ·
Short Wave Highest Value Availability just after A/C Inv On/Off ·
Short Wave Highest Value Availability just after SMR On/Off ·
Short Wave Highest Value Availability just after Rear Motor Inv On/Off |
| P1C7C49 | |
| P1C7D49 | |
| P1C7E49 | |
| P1C7F49 | |
| P1C8049 |
Use the following items as a reference when duplicating the vehicle conditions at the time when the malfunction occurred.
Vehicle Speed
Engine Run Time
Auxiliary Battery Voltage
Distance from DTC Cleared
Ready Signal
Hybrid Battery SOC
CONFIRMATION DRIVING PATTERN
CONFIRMATION AFTER REPLACING PARTS
- HINT:
-
After repair has been completed, clear the DTC and then check that the vehicle has returned to normal by performing the following All Readiness check procedure. (Do not turn the power switch off (READY off) during this inspection.)
Connect the GTS to the DLC3.
Turn the power switch on (IG) and turn the GTS on.
Clear the DTCs (even if no DTCs are stored, perform the clear DTC procedure).
Turn the power switch off and wait for 2 minutes or more.
Apply the parking brake and secure the wheels using chocks.
- NOTICE:
-
Perform this test with the AUTO function (shift-linked function) of the electric parking brake system off.
- HINT:
-
When the parking brake indicator (red) is illuminated after the electric parking brake switch assembly has been pulled to the lock side, the maximum amount of braking force is applied if the electric parking brake switch assembly is pulled to the lock side one more time.
When the vehicle is stationary, turn the power switch on (READY) with shift lever in P and wait for 1 minute or more.
Turn the air conditioning system on (MAX COLD, blower speed HI).
While depressing the brake pedal without depressing the accelerator pedal, move the shift lever to D and wait for 5 minutes.
- If step A is performed within the same trip after DTC P0AA649 is stored, the parts with insufficient insulation resistance will be determined and a DTC (P1C7C49, P1C7D49, P1C7E49, P1C7F49 or P1C8049) will be stored.
- If no DTCs are output, proceed to the next step.
Drive the vehicle for approximately 5 minutes referring to the following freeze frame data items: "Vehicle Speed", "Shift Position", "Accelerator Position", "Engine Speed", "Coolant Temperature", "Master Cylinder Control Torque", "Inverter Coolant Water Temperature", "Generator Inverter Calculated Temperature" and "Motor Inverter Temperature"
(If the freeze frame data item "Vehicle Speed" is 10 km/h (6 mph) or less, drive the vehicle at 10 km/h (6 mph) or more.)
- If step A is performed within the same trip after DTC P0AA649 is stored, the parts with insufficient insulation resistance will be determined and a DTC (P1C7C49, P1C7D49, P1C7E49, P1C7F49 or P1C8049) will be stored.
- If DTC P0AA649 is output, complete Step A immediately as quickly as possible.
Wait for 1 minute or more with the vehicle stopped, the power switch on (READY), shift lever in P and the air conditioning system on (Lo/COOL MAX, blower speed HI), then turn the power switch off and wait for 2 minutes or more. (Step A)
Turn the power switch on (IG) and turn the GTS on.
Enter the following menus: Powertrain / Hybrid Control / Utility / All Readiness.
Check the DTC judgment result.
- HINT:
- ·
If the judgment result shows NORMAL, the system is normal.
·If the judgment result shows ABNORMAL, the system has a malfunction.
·If the judgment result shows INCOMPLETE, perform driving pattern again.
WIRING DIAGRAM
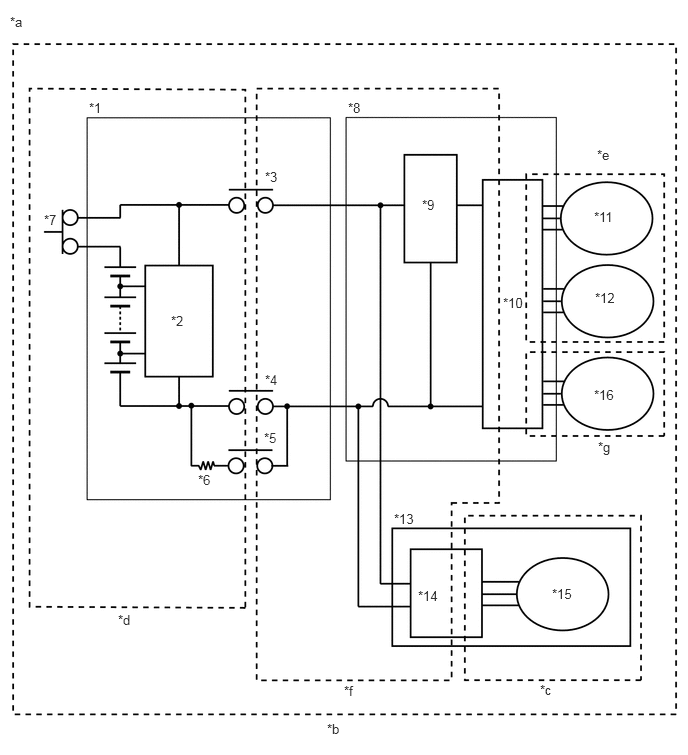
| *1 | HV Battery | *2 | Battery Voltage Sensor |
| *3 | SMRB | *4 | SMRG |
| *5 | SMRP | *6 | System Main Resistor |
| *7 | Service Plug Grip | *8 | Inverter with Converter Assembly |
| *9 | Boost Converter | *10 | Inverter |
| *11 | Generator (MG1) | *12 | Motor (MG2) |
| *13 | Compressor with Motor Assembly | *14 | A/C Inverter |
| *15 | A/C Motor | *16 | Rear Motor (MGR) |
| *a | High-voltage Areas | *b | DTC P0AA649 Vehicle Insulation Resistance Reduction Area |
| *c | DTC P1C7C49 Air Conditioning System Area | *d | DTC P1C7D49 HV Battery Area |
| *e | DTC P1C7E49 Hybrid Vehicle Transaxle Assembly Area or Inverter with Converter Assembly AC (Alternation Current) Section Area | *f | DTC P1C7F49 High Voltage Direct Current Area |
| *g | DTC P1C8049 Rear Motor Area | - | - |
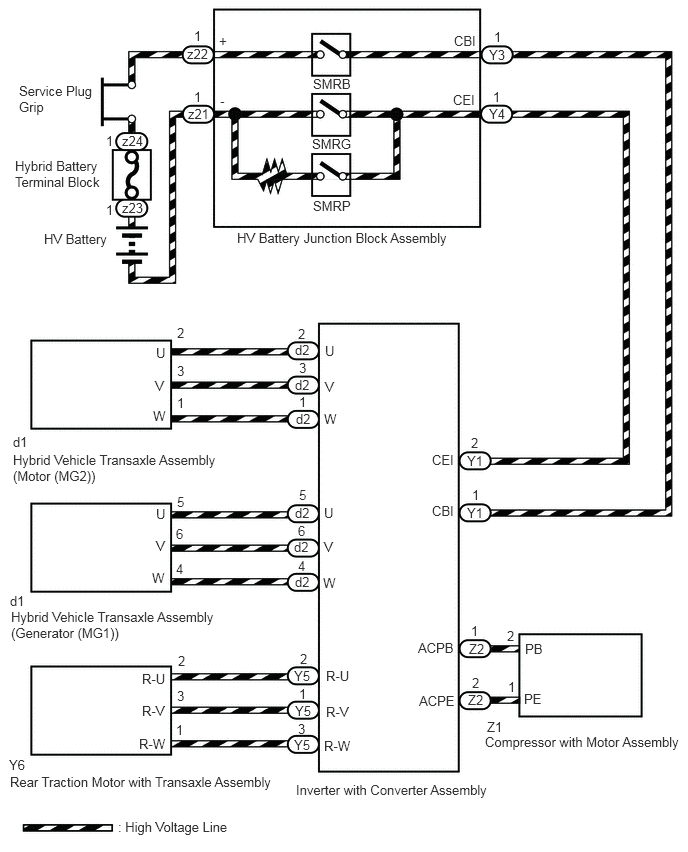
SYSTEM DESCRIPTION
- HINT:
-
If a decrease in insulation resistance cannot be confirmed using a megohmmeter, check "Short Wave Highest Value Level" in the Data List.
SHORT WAVE HIGHEST VALUE LEVEL
"Short Wave Highest Value Level" shows a decrease in insulation resistance. When insulation resistance decreases, "Insulation Lower" will be displayed. However, even though the insulation resistance of the vehicle is normal, "Short Wave Highest Value Level" may decrease, so that "Not Judge" will be displayed for any of the following conditions.
Within approximately 1 minute since the power switch was turned on (IG).
When the system voltages ("Hybrid Battery Voltage", "VL-Voltage before Boosting", "VL-Voltage before Boosting for Rear Motor" and "VH-Voltage after Boosting") are changing.
During boosting. If the Data List item "Boost Ratio" is not 0% or within a few seconds of it becoming 0%. (The values of "Hybrid Battery Voltage", "VL-Voltage before Boosting", "VL-Voltage before Boosting for Rear Motor" and "VH-Voltage after Boosting" are about the same when not boosting.)
When "No" is displayed for any of the following Data List items:
- Short Wave Highest Value Availability just after MG Inv On/Off
- Short Wave Highest Value Availability just after A/C Inv On/Off
- Short Wave Highest Value Availability just after SMR On/Off
- Short Wave Highest Value Availability just after Rear Motor Inv On/Off
When "Short Wave Highest Value Level" shows "Insulation Lower LV3", insulation resistance will be close to 0 Ω. In this case, damage to a high-voltage cable or hybrid component (high-voltage), or a short to body ground due to intrusion of foreign matter, such as metal particles, can be suspected.
RELATED FREEZE FRAME DATA
If problem symptoms cannot be reproduced and a malfunction still exists after replacing a part as instructed, checking the following freeze frame data can help determine a trouble area.
| Freeze Frame Data | Diagnostic Note |
|---|---|
| Short Wave Highest Value Level | Indicates that the insulation resistance has decreased. |
·
VL-Voltage before Boosting ·
VL-Voltage before Boosting for Rear Motor ·
VH-Voltage after Boosting ·
Hybrid Battery Voltage ·
Boost Ratio |
During boosting (when "Boost Ratio" is not 0%), or when "VL-Voltage before Boosting", "VL-Voltage before Boosting for Rear Motor", "VH-Voltage after Boosting" or "Hybrid Battery Voltage" is varying, "Short Wave Highest Value Level" may decrease even though the insulation resistance is normal. |
·
SMRP Status ·
SMRB Status ·
SMRG Status |
When "SMRP Status", "SMRB Status" and "SMRG Status" are all OFF, the insulation malfunction detection circuit detects a decrease in insulation resistance in the HV battery area ((*d) in the wiring diagram).
Example:
When the power switch is turned on (IG) (not on (READY)), all 3 system main relays are off and it is suspected that the HV battery assembly is disconnected from the high voltage circuits. If "Short Wave Highest Value Level" decreases a few minutes after the power switch is turned on (IG) (not on (READY)), the HV battery assembly may have an insulation malfunction. |
| Motor Inverter Shutdown Status | When "Motor Inverter Shutdown Status" is ON, the insulation malfunction detection circuit cannot detect a decrease in insulation resistance in the motor system AC (alternating current) section (motor (MG2) side of (*e) in the wiring diagram).
The motor system AC (alternating current) section includes the motor (MG2) in the hybrid vehicle transaxle assembly, motor cables and the AC (alternating current) section of the motor drive circuit in the inverter with converter assembly. |
| Generator Inverter Shutdown Status | When "Generator Inverter Shutdown Status" is ON, the insulation malfunction detection circuit cannot detect a decrease in insulation resistance in the generator system AC (alternating current) section (generator (MG1) side of (*e) in the wiring diagram).
The generator system AC (alternating current) section includes the generator (MG1) in the hybrid vehicle transaxle assembly, generator cables and the AC (alternating current) section of the generator drive circuit in the inverter with converter assembly. |
| Rear Motor Inverter Shutdown Status | When "Rear Motor Inverter Shutdown Status" is ON, the insulation malfunction detection circuit cannot detect a decrease in insulation resistance in the rear motor system AC (alternating current) section ((*g) in the wiring diagram).
The rear motor system AC (alternating current) section includes the rear motor (MGR) in the rear traction motor with transaxle assembly, rear traction motor cables and the AC (alternating current) section of the rear motor drive circuit in the inverter with converter assembly. |
| A/C Consumption Power | The compressor with motor assembly AC (alternating current) section ((*c) in the wiring diagram) includes the air conditioning motor, wiring between the air conditioning motor and air conditioning inverter, and the AC (alternating current) section of the air conditioning motor drive circuit in the air conditioning inverter.
With the vehicle stopped, turn on/off the air conditioning system and observe "Short Wave Highest Value Level" to use as a diagnosis reference. |
- HINT:
- ·
Reproducing the vehicle conditions the moment a DTC was stored according to the freeze frame data and results of the customer problem analysis helps ensure that the same DTC is stored again.
Driving Status Item Diagnostic Note Vehicle Speed - Accelerator Position Sensor No.1 Voltage % - Engine Speed - Shift Position - Master Cylinder Control Torque - Coolant Temperature -
Operation Conditions Item Diagnostic Note Motor Temperature If any liquid leaks into the ATF, insulation resistance may decrease only when the temperature is high.
The motor temperature is likely to increase if the motor speed is low and output torque is high such as when cruising uphill slowly or accelerating from a low speed.Generator Temperature If any liquid leaks into the ATF, insulation resistance may decrease only when the temperature is high.
The generator temperature is likely to increase under repeat acceleration and deceleration while the vehicle is driven in the mid speed range (60 to 80 km/h (37 to 50 mph)).Rear Motor Temperature If any liquid leaks into the ATF, insulation resistance may decrease only when the temperature is high.
The rear motor temperature is likely to increase if the motor speed is low and output torque is high such as when cruising uphill slowly or accelerating from a low speed.
·Customer Problem Analysis
Ask the customer about the operating conditions and environment when the malfunction occurred.
Item Diagnostic Note Driving Condition (acceleration, deceleration, turning, etc.) Changes in the insulation of the parts with insufficient insulation due to changes in G force or vibration are suspected. Road Condition (unpaved, etc.) Weather (rain, snow, etc.) Water intrusion is suspected Washing the vehicle (Whether the malfunction occurred after washing the vehicle?)
CAUTION / NOTICE / HINT
- CAUTION:
- ·
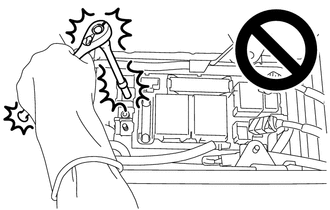
When troubleshooting DTC P0AA649, use either a tool wrapped with vinyl insulation tape or an insulated tool. (It is extremely dangerous when a high-voltage charge passes through a non-insulated tool causing a short.)
·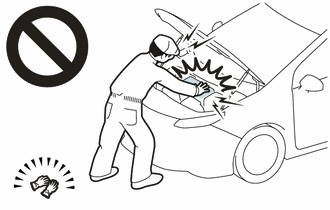
Before the following operations are conducted, take precautions to prevent electric shock by turning the power switch off, wearing insulated gloves, and removing the service plug grip from HV battery.
-Inspecting the high-voltage system
-Disconnecting the low voltage connector of the inverter with converter assembly
-Disconnecting the low voltage connector of the HV battery
·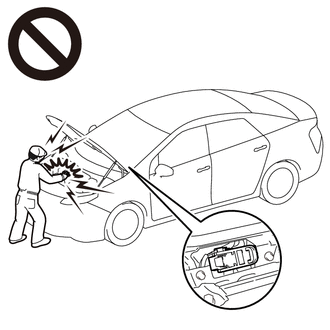
To prevent electric shock, make sure to remove the service plug grip to cut off the high voltage circuit before servicing the vehicle.
·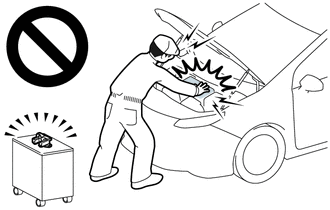
After removing the service plug grip from the HV battery, put it in your pocket to prevent other technicians from accidentally reconnecting it while you are working on the high-voltage system.
·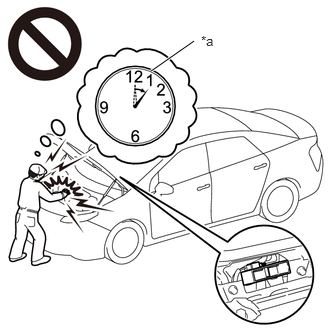 1.573,0.74 2.021,0.427 true 2.094,0.344 2.354,0.51 0.26,0.167 10 false *a
*a Without waiting for 10 minutes
After removing the service plug grip, wait for at least 10 minutes before touching any of the high-voltage connectors or terminals. After waiting for 10 minutes, check the voltage at the terminals in the inspection point in the inverter with converter assembly. The voltage should be 0 V before beginning work.
- HINT:
-
Waiting for at least 10 minutes is required to discharge the high-voltage capacitor inside the inverter with converter assembly.
·Make sure to insulate the high-voltage connectors and terminals of the HV battery with insulating tape after removing it.
If the HV battery stored without insulating the connectors and terminals, electric shock or fire may result.
·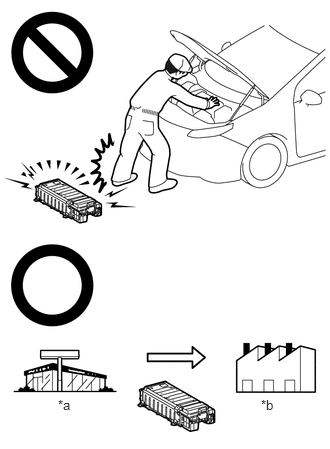 0.604,4.135 0.917,4.333 0.313,0.198 10 false *a 2.719,4.135 3.031,4.333 0.313,0.198 10 false *b
*a Dealer *b Battery Collection Agent
When disposing of an HV battery, make sure to return it through an authorized collection agent who is capable of handling it safely. If the HV battery is returned via the manufacturer specified route, it will be returned properly and in a safe manner by an authorized collection agent.
·Before returning the HV battery, make sure to perform a recovery inspection.
·Make a note of the output DTCs as some of them may be necessary for recovery inspection of the HV battery.
- NOTICE:
-
After turning the power switch off, waiting time may be required before disconnecting the cable from the negative (-) auxiliary battery terminal. Therefore, make sure to read the disconnecting the cable from the negative (-) auxiliary battery terminal notices before proceeding with work.
-
Click hereGeneral>INTRODUCTION>REPAIR INSTRUCTION>PRECAUTION
- HINT:
-
When measuring insulation resistance using a megohmmeter, set the megohmmeter to 500 V.
PROCEDURE
Connect the GTS to the DLC3.
Turn the power switch on (IG).
Enter the following menus: Powertrain / Hybrid Control / Trouble Codes.
Check for DTCs.
- Powertrain > Hybrid Control > Trouble Codes
- 50001 397
- Result:
Result Proceed to P0AA649, P1C7C49, P1C7D49, P1C7E49, P1C7F49 or P1C8049 only is output, or DTCs except the ones in the table below are also output. A Any of the following DTCs are also output. B
| Malfunction Content | Relevant DTC | |
|---|---|---|
| Microcomputer malfunction | P060647 | Hybrid/EV Powertrain Control Module Processor Watchdog / Safety MCU Failure |
| P060687 | Hybrid/EV Powertrain Control Module Processor to Monitoring Processor Missing Message | |
| P060A29 | Hybrid/EV Powertrain Control Module Monitoring Processor Signal Invalid | |
| P060A44 | Hybrid/EV Powertrain Control Module Monitoring Processor Data Memory Failure | |
| P060A45 | Hybrid/EV Powertrain Control Module Monitoring Processor Program Memory Failure | |
| P060A47 | Hybrid/EV Powertrain Control Module Monitoring Processor Watchdog / Safety MCU Failure | |
| P060A49 | Hybrid/EV Powertrain Control Module Monitoring Processor Internal Electronic Failure | |
| P060A87 | Hybrid/EV Powertrain Control Module Processor from Monitoring Processor Missing Message | |
| P060B1C | Hybrid/EV Powertrain Control Module A/D Processing Voltage Out of Range | |
| P060B49 | Hybrid/EV Powertrain Control Module A/D Processing Internal Electronic Failure | |
| P060B71 | Hybrid/EV Powertrain Control Module A/D Processing Actuator Stuck | |
| P1CE31C | Hybrid/EV Powertrain Control Module Monitoring Processor A/D Processing Voltage Out of Range | |
| P1CE349 | Hybrid/EV Powertrain Control Module Monitoring Processor A/D Processing Internal Electronic Failure | |
| P1CE371 | Hybrid/EV Powertrain Control Module Monitoring Processor A/D Processing Actuator Stuck | |
| P0AFC96 | Hybrid/EV Battery Sensor Module Component Internal Failure | |
| P0AFC00 | Hybrid/EV Battery Sensor Module | |
| P0AFC49 | Hybrid/EV Battery Sensor Module Internal Electronic Failure | |
| P0AFC62 | Hybrid/EV Battery Sensor Module Signal Compare Failure | |
| Power Source Circuit Malfunction | P06881F | ECM/PCM Power Relay Sense Circuit Intermittent |
| P0AFC16 | Hybrid/EV Battery Sensor Module Circuit Voltage Below Threshold | |
| System malfunction | P1C9E9F | Hybrid/EV System Reset Stuck Off |
- HINT:
- ·
P0AA649 may be output as a result of the malfunction indicated by the DTCs above.
(a)The chart above is listed in inspection order of priority.
(b)Check DTCs that are output at the same time by following the listed order. (The main cause of the malfunction can be determined without performing unnecessary inspections.)
Turn the power switch off.
A
B
Connect the GTS to the DLC3.
Turn the power switch on (IG).
Enter the following menus: Powertrain / Hybrid Control / Trouble Codes.
Check for DTCs.
- Powertrain > Hybrid Control > Trouble Codes
- 50001 397
- NOTICE:
- ·
DTC P1C7C49, P1C7D49, P1C7E49, P1C7F49 and P1C8049 are not stored with P0AA649 at the same time. If a drop in insulation resistance is detected and DTC P0AA649 is output, wait for 1 minute with the power switch on (READY), the shift lever in D and the air conditioning system on within the same trip, then turn the power switch off and wait for 2 minutes to determine the DTC (P1C7C49, P1C7D49, P1C7E49, P1C7F49 or P1C8049).
·If only DTC P0AA649 is output, perform the diagnostic procedure for DTC P0AA649 to inspect all of the high voltage circuits.
·When any other DTC indicating parts which the insulation resistance dropped are output, perform the diagnostic procedure for each DTC.
- Result:
Result Proceed to P0AA649 (decrease in the insulation resistance of the high-voltage circuit) only is output. A P0AA649 and P1C7C49 (decrease in the insulation resistance of the air conditioning system area) are output. B P0AA649 and P1C7D49 (decrease in the insulation resistance of the HV battery area) are output. C P0AA649 and P1C7E49 (decrease in the insulation resistance of the hybrid vehicle transaxle assembly area) are output. D P0AA649 and P1C7F49 (decrease in the insulation resistance of the high-voltage direct current area) are output. E P0AA649 and P1C8049 (decrease in the insulation resistance of the rear motor area) are output. F
Turn the power switch off.
A
B
C
D
E
F
- CAUTION:
-
Be sure to wear insulated gloves.
Check that the service plug grip is not installed.
- NOTICE:
-
After removing the service plug grip, do not turn the power switch on (READY), unless instructed by the repair manual because this may cause a malfunction.
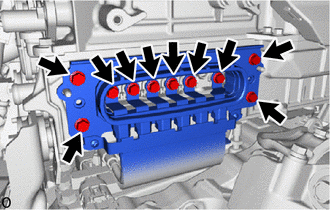
Disconnect the motor cable from the inverter with converter assembly.
- HINT:
-
Make sure that no foreign matter, coolant or water enters the inverter with converter assembly.
Connect the cable to the negative (-) auxiliary battery terminal.
Turn the power switch on (IG).
- NOTICE:
-
Turning the power switch on (IG) with the service plug grip removed causes DTCs to be stored. Clear the DTCs after performing this inspection.
Move the shift lever to N and lift the vehicle.
Turn the power switch off.
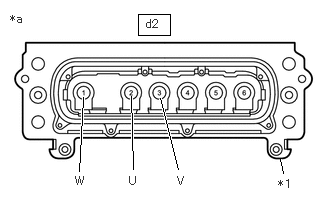
| *1 | Shield Ground |
| *a | Motor Cable (for MG2)
(Inverter with Converter Assembly Side) |
Using a megohmmeter set to 500 V, measure the resistance according to the value(s) in the table below while rotating the front wheels 2 revolutions in the same direction simultaneously.
- NOTICE:
- ·
Carefully perform this inspection as the motor (MG2) may generate current when the front wheels are rotated by hand.
·Be sure to set the megohmmeter to 500 V when performing this test. Using a setting higher than 500 V can result in damage to the component being inspected.
- HINT:
-
As the insulation resistance may vary when motor (MG2) rotates, perform this inspection while rotating the front wheels.
- Standard Resistance:
Tester Connection Condition Specified Condition d2-2 (U) - Body ground and shield ground Power switch off 100 MΩ or higher d2-3 (V) - Body ground and shield ground Power switch off 100 MΩ or higher d2-1 (W) - Body ground and shield ground Power switch off 100 MΩ or higher
Lower the vehicle and move the shift lever to P.
Disconnect the cable from the negative (-) auxiliary battery terminal.
- Result:
Proceed to OK NG
OK
NG
- CAUTION:
-
Be sure to wear insulated gloves.
Check that the service plug grip is not installed.
- NOTICE:
-
After removing the service plug grip, do not turn the power switch on (READY), unless instructed by the repair manual because this may cause a malfunction.
Connect the cable to the negative (-) auxiliary battery terminal.
Turn the power switch on (IG).
- NOTICE:
-
Turning the power switch on (IG) with the service plug grip removed causes DTCs to be stored. Clear the DTCs after performing this inspection.
Move the shift lever to N and lift the vehicle.
Turn the power switch off.
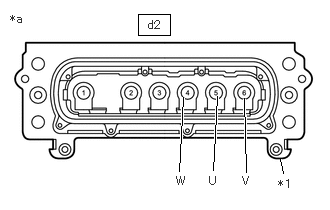
| *1 | Shield Ground |
| *a | Motor Cable (for MG1)
(Inverter with Converter Assembly Side) |
Using a megohmmeter set to 500 V, measure the resistance according to the value(s) in the table below while rotating the front wheels 2 revolutions in the same direction simultaneously.
- NOTICE:
- ·
Carefully perform this inspection as the generator (MG1) may generate current when the front wheels are rotated by hand.
·Be sure to set the megohmmeter to 500 V when performing this test. Using a setting higher than 500 V can result in damage to the component being inspected.
- HINT:
-
As the insulation resistance may vary when generator (MG1) rotates, perform this inspection while rotating the front wheels.
- Standard Resistance:
Tester Connection Condition Specified Condition d2-5 (U) - Body ground and shield ground Power switch off 100 MΩ or higher d2-6 (V) - Body ground and shield ground Power switch off 100 MΩ or higher d2-4 (W) - Body ground and shield ground Power switch off 100 MΩ or higher
Lower the vehicle and move the shift lever to P.
Disconnect the cable from the negative (-) auxiliary battery terminal.
- Result:
Proceed to OK NG
OK
NG
- CAUTION:
-
Be sure to wear insulated gloves.
Check that the service plug grip is not installed.
- NOTICE:
-
After removing the service plug grip, do not turn the power switch on (READY), unless instructed by the repair manual because this may cause a malfunction.
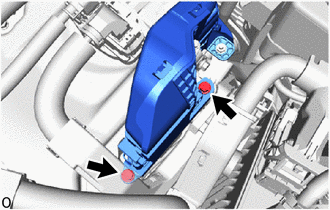
Disconnect the HV floor under wire (rear traction motor cable) from the inverter with converter assembly.
- HINT:
-
Make sure that no foreign matter, coolant or water enters the inverter with converter assembly.
Connect the cable to the negative (-) auxiliary battery terminal.
Turn the power switch on (IG).
- NOTICE:
-
Turning the power switch on (IG) with the service plug grip removed causes DTCs to be stored. Clear the DTCs after performing this inspection.
Move the shift lever to N and lift the vehicle.
Turn the power switch off.
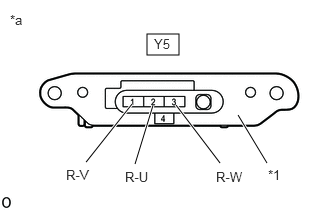
| *1 | Shield Ground |
| *a | HV Floor Under Wire (Rear Traction Motor Cable)
(Inverter with Converter Assembly Side) |
Using a megohmmeter set to 500 V, measure the resistance according to the value(s) in the table below while rotating the rear wheels 2 revolutions in the same direction simultaneously.
- NOTICE:
- ·
Carefully perform this inspection as the rear motor (MGR) may generate current when the rear wheels are rotated by hand.
·Be sure to set the megohmmeter to 500 V when performing this test. Using a setting higher than 500 V can result in damage to the component being inspected.
- HINT:
-
As the insulation resistance may vary when rear motor (MGR) rotates, perform this inspection while rotating the rear wheels.
- Standard Resistance:
Tester Connection Condition Specified Condition Y5-2 (R-U) - Body ground and shield ground Power switch off 100 MΩ or higher Y5-1 (R-V) - Body ground and shield ground Power switch off 100 MΩ or higher Y5-3 (R-W) - Body ground and shield ground Power switch off 100 MΩ or higher
Lower the vehicle and move the shift lever to P.
Disconnect the cable from the negative (-) auxiliary battery terminal.
- Result:
Proceed to OK NG
OK
NG
- CAUTION:
-
Be sure to wear insulated gloves.
Check that the service plug grip is not installed.
- NOTICE:
-
After removing the service plug grip, do not turn the power switch on (READY), unless instructed by the repair manual because this may cause a malfunction.
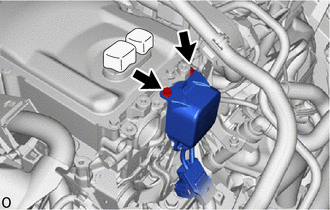
Disconnect the HV air conditioning wire connector from the inverter with converter assembly.
- HINT:
-
Make sure that no foreign matter has entered or contaminated the HV air conditioning wire.
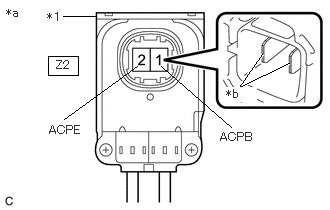
| *1 | Shield Ground |
| *a | HV Air Conditioning Wire
(Inverter with Converter Assembly Side) |
| *b | Tip of Terminal |
Using a megohmmeter set to 500 V, measure the resistance according to the value(s) in the table below.
- NOTICE:
- ·
Be sure to set the megohmmeter to 500 V when performing this test. Using a setting higher than 500 V can result in damage to the component being inspected.
·Be sure to inspect with connecting the tester probes to the tips of the terminal.
- Standard Resistance:
Tester Connection Condition Specified Condition Z2-1 (ACPB) - Body ground and shield ground Power switch off 3 MΩ or higher Z2-2 (ACPE) - Body ground and shield ground Power switch off 3 MΩ or higher
- Result:
Proceed to OK NG
OK
NG
- CAUTION:
-
Be sure to wear insulated gloves.
Check that the service plug grip is not installed.
- NOTICE:
-
After removing the service plug grip, do not turn the power switch on (READY), unless instructed by the repair manual because this may cause a malfunction.
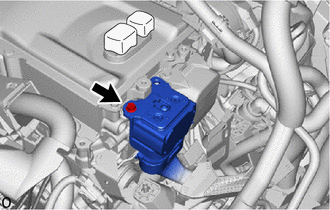
Disconnect the HV floor under wire connector from the inverter with converter assembly.
- HINT:
-
Make sure that no foreign matter has entered or contaminated the HV floor under wire.
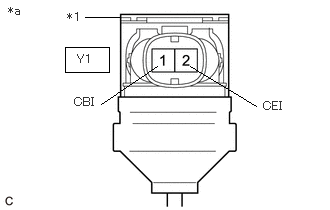
| *1 | Shield Ground |
| *a | HV Floor Under Wire
(Inverter with Converter Assembly Side) |
Using a megohmmeter set to 500 V, measure the resistance according to the value(s) in the table below.
- NOTICE:
- ·
Be sure to set the megohmmeter to 500 V when performing this test. Using a setting higher than 500 V can result in damage to the component being inspected.
·Be sure not to damage or deform the terminal being inspected.
- Standard Resistance:
Tester Connection Condition Specified Condition Y1-1 (CBI) - Body ground and shield ground Power switch off 10 MΩ or higher Y1-2 (CEI) - Body ground and shield ground Power switch off 10 MΩ or higher
- HINT:
-
Visually inspect the HV floor under wire for damage. If there is any damage, then this is the likely cause of low insulation resistance.
- Result:
Proceed to OK NG
OK
NG
- CAUTION:
-
Be sure to wear insulated gloves.
Check that the service plug grip is not installed.
- NOTICE:
-
After removing the service plug grip, do not turn the power switch on (READY), unless instructed by the repair manual because this may cause a malfunction.
Connect the HV floor under wire connector to the inverter with converter assembly.
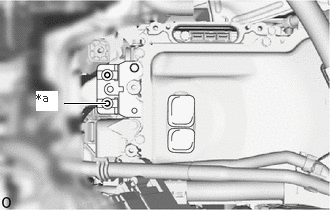
| *a | High Voltage Terminal |
Using a megohmmeter set to 500 V, measure the resistance according to the value(s) in the table below.
- NOTICE:
-
Be sure to set the megohmmeter to 500 V when performing this test. Using a setting higher than 500 V can result in damage to the component being inspected.
- Standard Resistance:
Tester Connection Condition Specified Condition High voltage terminal - Body ground Power switch off 1 MΩ or higher
- HINT:
-
Perform this inspection with the motor cable, HV floor under wire and air conditioning wire disconnected from the inverter with converter assembly.
- Result:
Proceed to OK NG
OK
NG
- CAUTION:
-
Be sure to wear insulated gloves.
- HINT:
-
Make sure that no foreign matter or water has entered the HV battery.
Check that the service plug grip is not installed.
- NOTICE:
-
After removing the service plug grip, do not turn the power switch on (READY), unless instructed by the repair manual because this may cause a malfunction.
Remove the No. 1 HV battery cover panel RH.
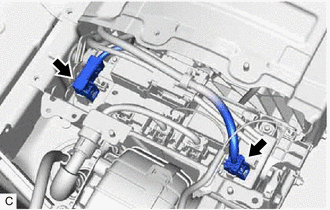
Disconnect the high voltage cable connectors of the HV battery from the HV battery junction block assembly.
- NOTICE:
-
Insulate each disconnected high-voltage connector with insulating tape. Wrap the connector from the wire harness side to the end of the connector.
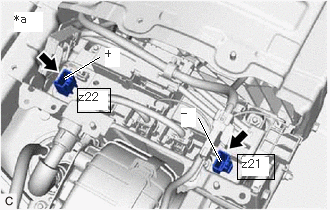
| *a | Component without harness connected
(HV Battery Junction Block Assembly) |
Using a megohmmeter set to 500 V, measure the resistance according to the value(s) in the table below.
- NOTICE:
-
Be sure to set the megohmmeter to 500 V when performing this test. Using a setting higher than 500 V can result in damage to the component being inspected.
- Standard Resistance:
Tester Connection Condition Specified Condition z22-1 (+) - Body ground Power switch off 10 MΩ or higher z21-1 (-) - Body ground Power switch off 10 MΩ or higher
- Result:
Proceed to OK NG
OK
NG
- CAUTION:
-
Be sure to wear insulated gloves.
Check that the service plug grip is not installed.
- NOTICE:
-
After removing the service plug grip, do not turn the power switch on (READY), unless instructed by the repair manual because this may cause a malfunction.
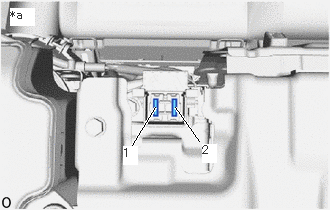
| *a | Service Plug Grip Removed
(Service Plug Grip Connecting Terminals) |
Using a megohmmeter set to 500 V, measure the resistance according to the value(s) in the table below.
- NOTICE:
-
Be sure to set the megohmmeter to 500 V when performing this test. Using a setting higher than 500 V can result in damage to the component being inspected.
- Standard Resistance:
Tester Connection Condition Specified Condition 2 - Body ground Power switch off 10 MΩ or higher
- Result:
Proceed to OK NG
OK
NG
- CAUTION:
-
Be sure to wear insulated gloves.
Check that the service plug grip is not installed.
- NOTICE:
-
After removing the service plug grip, do not turn the power switch on (READY), unless instructed by the repair manual because this may cause a malfunction.
| *a | Service Plug Grip Removed
(Service Plug Grip Connecting Terminals) |
Using a megohmmeter set to 500 V, measure the resistance according to the value(s) in the table below.
- NOTICE:
-
Be sure to set the megohmmeter to 500 V when performing this test. Using a setting higher than 500 V can result in damage to the component being inspected.
- Standard Resistance:
Tester Connection Condition Specified Condition 1 - Body ground Power switch off 10 MΩ or higher
- Result:
Proceed to OK NG
OK
NG
Click hereVehicle Interior>HEATING / AIR CONDITIONING>AIR CONDITIONING SYSTEM (for HV Model)>P1C7C49
- Result:
Proceed to NEXT
NEXT
- CAUTION:
-
Be sure to wear insulated gloves.
Check that the service plug grip is not installed.
- NOTICE:
-
After removing the service plug grip, do not turn the power switch on (READY), unless instructed by the repair manual because this may cause a malfunction.
Remove the motor cable from the hybrid vehicle transaxle assembly.
Click hereDrivetrain>P710 (HYBRID TRANSMISSION / TRANSAXLE)>MOTOR CABLE>REMOVAL
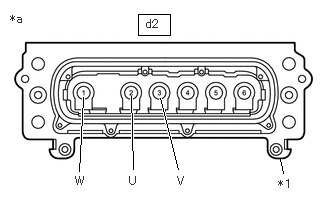
| *1 | Shield Ground |
| *a | Motor Cable (for MG2)
(Inverter with Converter Assembly Side) |
Using a megohmmeter set to 500 V, measure the resistance according to the value(s) in the table below.
- NOTICE:
-
Be sure to set the megohmmeter to 500 V when performing this test. Using a setting higher than 500 V can result in damage to the component being inspected.
- Standard Resistance:
Tester Connection Condition Specified Condition d2-2 (U) - Shield ground Power switch off 100 MΩ or higher d2-3 (V) - Shield ground Power switch off 100 MΩ or higher d2-1 (W) - Shield ground Power switch off 100 MΩ or higher
- Result:
Proceed to OK NG
OK
NG
- CAUTION:
-
Be sure to wear insulated gloves.
Check that the service plug grip is not installed.
- NOTICE:
-
After removing the service plug grip, do not turn the power switch on (READY), unless instructed by the repair manual because this may cause a malfunction.
Remove the motor cable from the hybrid vehicle transaxle assembly.
Click hereDrivetrain>P710 (HYBRID TRANSMISSION / TRANSAXLE)>MOTOR CABLE>REMOVAL
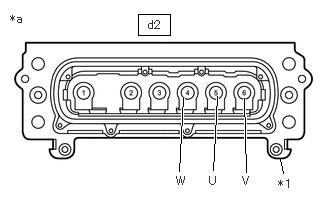
| *1 | Shield Ground |
| *a | Motor Cable (for MG1)
(Inverter with Converter Assembly Side) |
Using a megohmmeter set to 500 V, measure the resistance according to the value(s) in the table below.
- NOTICE:
-
Be sure to set the megohmmeter to 500 V when performing this test. Using a setting higher than 500 V can result in damage to the component being inspected.
- Standard Resistance:
Tester Connection Condition Specified Condition d2-5 (U) - Shield ground Power switch off 100 MΩ or higher d2-6 (V) - Shield ground Power switch off 100 MΩ or higher d2-4 (W) - Shield ground Power switch off 100 MΩ or higher
- Result:
Proceed to OK NG
OK
NG
- CAUTION:
-
Be sure to wear insulated gloves.
Check that the service plug grip is not installed.
- NOTICE:
-
After removing the service plug grip, do not turn the power switch on (READY), unless instructed by the repair manual because this may cause a malfunction.
Remove the HV floor under wire (rear traction motor cable) from the rear traction motor with transaxle assembly.
Click hereEngine / Hybrid System>HYBRID / BATTERY CONTROL>FRAME WIRE>REMOVAL
| *1 | Shield Ground |
| *a | HV Floor Under Wire (Rear Traction Motor Cable)
(Inverter with Converter Assembly Side) |
Using a megohmmeter set to 500 V, measure the resistance according to the value(s) in the table below.
- NOTICE:
-
Be sure to set the megohmmeter to 500 V when performing this test. Using a setting higher than 500 V can result in damage to the component being inspected.
- Standard Resistance:
Tester Connection Condition Specified Condition Y5-2 (R-U) - Shield ground Power switch off 100 MΩ or higher Y5-1 (R-V) - Shield ground Power switch off 100 MΩ or higher Y5-3 (R-W) - Shield ground Power switch off 100 MΩ or higher
- Result:
Proceed to OK NG
OK
NG
- CAUTION:
-
Be sure to wear insulated gloves and protective goggles.
Check that the service plug grip is not installed.
- NOTICE:
-
After removing the service plug grip, do not turn the power switch on (READY), unless instructed by the repair manual because this may cause a malfunction.
Remove the No. 1 HV battery shield panel.
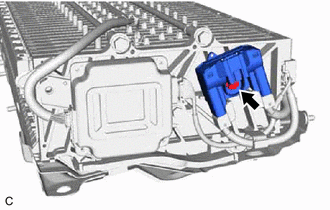
Remove the bolt from the hybrid battery terminal block.
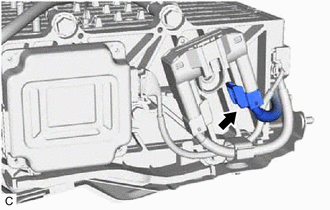
Disconnect the high voltage connector.
- NOTICE:
-
Insulate each disconnected high-voltage connector with insulating tape. Wrap the connector from the wire harness side to the end of the connector.
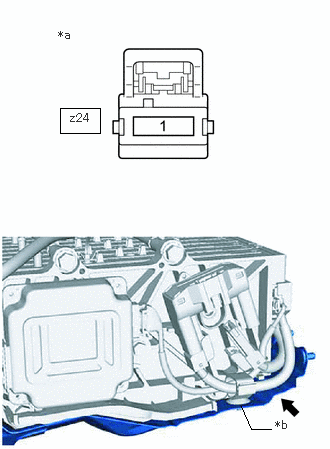
| *a | High Voltage Cable
(Hybrid Battery Terminal Block Side) |
| *b | HV Battery Carrier |
Using a megohmmeter set to 500 V, measure the resistance according to the value(s) in the table below.
- NOTICE:
-
Be sure to set the megohmmeter to 500 V when performing this test. Using a setting higher than 500 V can result in damage to the component being inspected.
- Standard Resistance:
Tester Connection Condition Specified Condition z24-1 - HV battery carrier Power switch off 10 MΩ or higher
- Result:
Proceed to OK NG
OK
NG
- CAUTION:
-
Be sure to wear insulated gloves and protective goggles.
Check that the service plug grip is not installed.
- NOTICE:
-
After removing the service plug grip, do not turn the power switch on (READY), unless instructed by the repair manual because this may cause a malfunction.
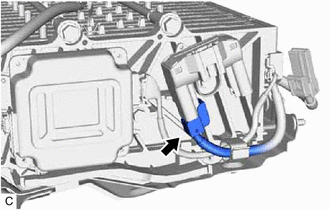
Disconnect the high voltage connector.
- NOTICE:
-
Insulate each disconnected high-voltage connector with insulating tape. Wrap the connector from the wire harness side to the end of the connector.
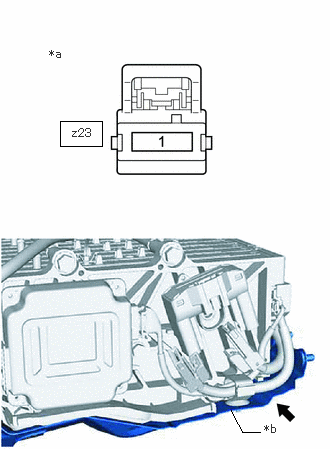
| *a | High Voltage Cable
(Hybrid Battery Terminal Block Side) |
| *b | HV Battery Carrier |
Using a megohmmeter set to 500 V, measure the resistance according to the value(s) in the table below.
- NOTICE:
-
Be sure to set the megohmmeter to 500 V when performing this test. Using a setting higher than 500 V can result in damage to the component being inspected.
- Standard Resistance:
Tester Connection Condition Specified Condition z23-1 - HV battery carrier Power switch off 10 MΩ or higher
- Result:
Proceed to OK NG
OK
NG
Click hereEngine / Hybrid System>HYBRID / BATTERY CONTROL>FUSE BOX (for NICKEL METAL HYDRIDE BATTERY)>REMOVAL
- Result:
Proceed to NEXT
NEXT
- CAUTION:
-
Be sure to wear insulated gloves and protective goggles.
Check that the service plug grip is not installed.
- NOTICE:
-
After removing the service plug grip, do not turn the power switch on (READY), unless instructed by the repair manual because this may cause a malfunction.
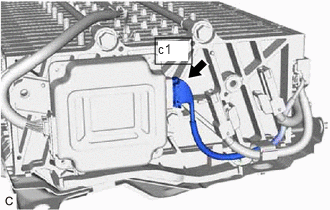
Disconnect the c1 battery voltage sensor connector.
- NOTICE:
-
Insulate each disconnected high-voltage connector with insulating tape. Wrap the connector from the wire harness side to the end of the connector.
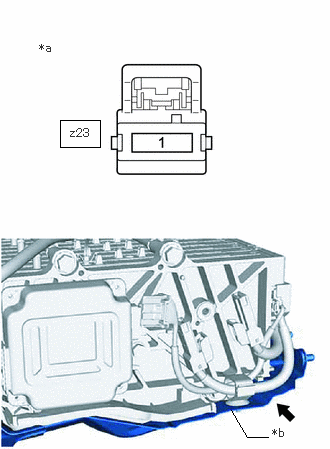
| *a | High Voltage Cable
(Hybrid Battery Terminal Block Side) |
| *b | HV Battery Carrier |
Using a megohmmeter set to 500 V, measure the resistance according to the value(s) in the table below.
- NOTICE:
-
Be sure to set the megohmmeter to 500 V when performing this test. Using a setting higher than 500 V can result in damage to the component being inspected.
- Standard Resistance:
Tester Connection Condition Specified Condition z23-1 - HV battery carrier Power switch off 10 MΩ or higher
- Result:
Proceed to OK NG
OK
NG
- Result:
Proceed to NEXT
NEXT
- CAUTION:
-
Be sure to wear insulated gloves.
Check that the service plug grip is not installed.
- NOTICE:
-
After removing the service plug grip, do not turn the power switch on (READY), unless instructed by the repair manual because this may cause a malfunction.
Disconnect the motor cable from the inverter with converter assembly.
- HINT:
-
Make sure that no foreign matter, coolant or water enters the inverter with converter assembly.
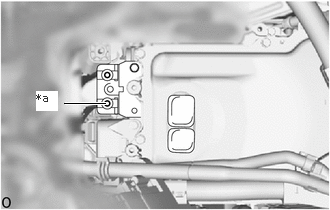
| *a | High Voltage Terminal |
Using a megohmmeter set to 500 V, measure the resistance according to the value(s) in the table below.
- NOTICE:
-
Be sure to set the megohmmeter to 500 V when performing this test. Using a setting higher than 500 V can result in damage to the component being inspected.
- Standard Resistance:
Tester Connection Condition Specified Condition High voltage terminal - Body ground Power switch off 1 MΩ or higher
- HINT:
-
Perform this inspection with the motor cable disconnected from the inverter with converter assembly.
- Result:
Proceed to OK NG
OK
NG
- CAUTION:
-
Be sure to wear insulated gloves.
Check that the service plug grip is not installed.
- NOTICE:
-
After removing the service plug grip, do not turn the power switch on (READY), unless instructed by the repair manual because this may cause a malfunction.
Remove the motor cable from the hybrid vehicle transaxle assembly.
Click hereDrivetrain>P710 (HYBRID TRANSMISSION / TRANSAXLE)>MOTOR CABLE>REMOVAL
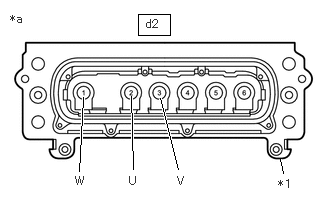
| *1 | Shield Ground |
| *a | Motor Cable (for MG2)
(Inverter with Converter Assembly Side) |
Using a megohmmeter set to 500 V, measure the resistance according to the value(s) in the table below.
- NOTICE:
-
Be sure to set the megohmmeter to 500 V when performing this test. Using a setting higher than 500 V can result in damage to the component being inspected.
- Standard Resistance:
Tester Connection Condition Specified Condition d2-2 (U) - Shield ground Power switch off 100 MΩ or higher d2-3 (V) - Shield ground Power switch off 100 MΩ or higher d2-1 (W) - Shield ground Power switch off 100 MΩ or higher
- Result:
Proceed to OK NG
OK
NG
- CAUTION:
-
Be sure to wear insulated gloves.
Check that the service plug grip is not installed.
- NOTICE:
-
After removing the service plug grip, do not turn the power switch on (READY), unless instructed by the repair manual because this may cause a malfunction.
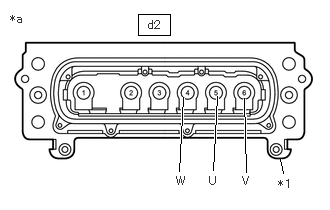
| *1 | Shield Ground |
| *a | Motor Cable (for MG1)
(Inverter with Converter Assembly Side) |
Using a megohmmeter set to 500 V, measure the resistance according to the value(s) in the table below.
- NOTICE:
-
Be sure to set the megohmmeter to 500 V when performing this test. Using a setting higher than 500 V can result in damage to the component being inspected.
- Standard Resistance:
Tester Connection Condition Specified Condition d2-5 (U) - Shield ground Power switch off 100 MΩ or higher d2-6 (V) - Shield ground Power switch off 100 MΩ or higher d2-4 (W) - Shield ground Power switch off 100 MΩ or higher
- Result:
Proceed to OK NG
OK
NG
Click hereDrivetrain>P710 (HYBRID TRANSMISSION / TRANSAXLE)>HYBRID VEHICLE TRANSAXLE>REMOVAL
- Result:
Proceed to NEXT
NEXT
- Result:
Proceed to NEXT
NEXT
Click hereDrivetrain>P710 (HYBRID TRANSMISSION / TRANSAXLE)>MOTOR CABLE>REMOVAL
- Result:
Proceed to NEXT
NEXT
Click hereDrivetrain>P710 (HYBRID TRANSMISSION / TRANSAXLE)>MOTOR CABLE>REMOVAL
- Result:
Proceed to NEXT
NEXT
- CAUTION:
-
Be sure to wear insulated gloves.
Check that the service plug grip is not installed.
- NOTICE:
-
After removing the service plug grip, do not turn the power switch on (READY), unless instructed by the repair manual because this may cause a malfunction.
Disconnect the HV floor under wire connector from the inverter with converter assembly.
- HINT:
-
Make sure that no foreign matter has entered or contaminated the HV floor under wire.
| *1 | Shield Ground |
| *a | HV Floor Under Wire
(Inverter with Converter Assembly Side) |
Using a megohmmeter set to 500 V, measure the resistance according to the value(s) in the table below.
- NOTICE:
- ·
Be sure to set the megohmmeter to 500 V when performing this test. Using a setting higher than 500 V can result in damage to the component being inspected.
·Be sure not to damage or deform the terminal being inspected.
- Standard Resistance:
Tester Connection Condition Specified Condition Y1-1 (CBI) - Body ground and shield ground Power switch off 10 MΩ or higher Y1-2 (CEI) - Body ground and shield ground Power switch off 10 MΩ or higher
- HINT:
-
Visually inspect the HV floor under wire for damage. If there is any damage, then this is the likely cause of low insulation resistance.
- Result:
Proceed to OK NG
OK
NG
- CAUTION:
-
Be sure to wear insulated gloves.
Check that the service plug grip is not installed.
- NOTICE:
-
After removing the service plug grip, do not turn the power switch on (READY), unless instructed by the repair manual because this may cause a malfunction.
Disconnect the HV air conditioning wire connector from the inverter with converter assembly.
- HINT:
-
Make sure that no foreign matter has entered or contaminated the HV air conditioning wire.
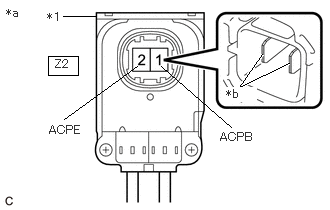
| *1 | Shield Ground |
| *a | HV Air Conditioning Wire
(Inverter with Converter Assembly Side) |
| *b | Tip of Terminal |
Using a megohmmeter set to 500 V, measure the resistance according to the value(s) in the table below.
- NOTICE:
- ·
Be sure to set the megohmmeter to 500 V when performing this test. Using a setting higher than 500 V can result in damage to the component being inspected.
·Be sure to inspect with connecting the tester probes to the tips of the terminal.
- Standard Resistance:
Tester Connection Condition Specified Condition Z2-1 (ACPB) - Body ground and shield ground Power switch off 3 MΩ or higher Z2-2 (ACPE) - Body ground and shield ground Power switch off 3 MΩ or higher
- Result:
Proceed to OK NG
OK
NG
Click hereEngine / Hybrid System>HYBRID / BATTERY CONTROL>INVERTER WITH CONVERTER (for 4WD/AWD)>REMOVAL
- Result:
Proceed to NEXT
NEXT
- CAUTION:
-
Be sure to wear insulated gloves.
Check that the service plug grip is not installed.
- NOTICE:
-
After removing the service plug grip, do not turn the power switch on (READY), unless instructed by the repair manual because this may cause a malfunction.
Remove the No. 1 HV battery cover panel RH.
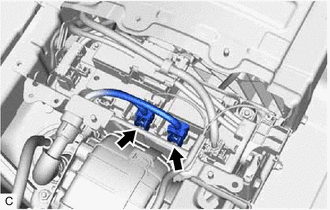
Disconnect the HV floor under wire connectors from the HV battery junction block assembly.
- HINT:
-
Make sure that no foreign matter has entered or contaminated the HV floor under wire.
| *1 | Shield Ground |
| *a | HV Floor Under Wire
(Inverter with Converter Assembly Side) |
Using a megohmmeter set to 500 V, measure the resistance according to the value(s) in the table below.
- NOTICE:
- ·
Be sure to set the megohmmeter to 500 V when performing this test. Using a setting higher than 500 V can result in damage to the component being inspected.
·Be sure not to damage or deform the terminal being inspected.
- Standard Resistance:
Tester Connection Condition Specified Condition Y1-1 (CBI) - Body ground and shield ground Power switch off 10 MΩ or higher Y1-2 (CEI) - Body ground and shield ground Power switch off 10 MΩ or higher
- HINT:
-
Visually inspect the HV floor under wire for damage. If there is any damage, then this is the likely cause of low insulation resistance.
- Result:
Proceed to OK NG
OK
NG
- Result:
Proceed to NEXT
NEXT
- CAUTION:
-
Be sure to wear insulated gloves.
Check that the service plug grip is not installed.
- NOTICE:
-
After removing the service plug grip, do not turn the power switch on (READY), unless instructed by the repair manual because this may cause a malfunction.
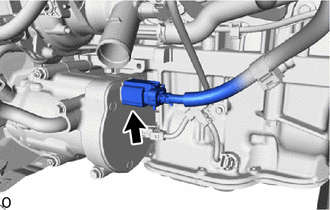
Disconnect the HV air conditioning wire from the compressor with motor assembly.
for A25A-FXS:
Click hereVehicle Interior>HEATING / AIR CONDITIONING>COMPRESSOR (for A25A-FXS)>REMOVAL
for A25B-FXS:
Click hereVehicle Interior>HEATING / AIR CONDITIONING>COMPRESSOR (for A25B-FXS)>REMOVAL
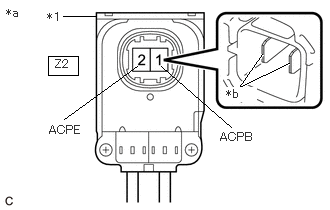
| *1 | Shield Ground |
| *a | HV Air Conditioning Wire
(Inverter with Converter Assembly Side) |
| *b | Tip of Terminal |
Using a megohmmeter set to 500 V, measure the resistance according to the value(s) in the table below.
- NOTICE:
- ·
Be sure to set the megohmmeter to 500 V when performing this test. Using a setting higher than 500 V can result in damage to the component being inspected.
·Be sure to inspect with connecting the tester probes to the tips of the terminal.
- Standard Resistance:
Tester Connection Condition Specified Condition Z2-1 (ACPB) - Body ground and shield ground Power switch off 10 MΩ or higher Z2-2 (ACPE) - Body ground and shield ground Power switch off 10 MΩ or higher
- Result:
Proceed to OK NG
OK
NG
Click hereVehicle Interior>HEATING / AIR CONDITIONING>AIR CONDITIONING SYSTEM (for HV Model)>P1C7C49
- Result:
Proceed to NEXT
NEXT
Click hereEngine / Hybrid System>HYBRID / BATTERY CONTROL>FRAME WIRE>REMOVAL
- Result:
Proceed to NEXT
NEXT
- Result:
Proceed to NEXT
NEXT
- CAUTION:
-
Be sure to wear insulated gloves.
Check that the service plug grip is not installed.
- NOTICE:
-
After removing the service plug grip, do not turn the power switch on (READY), unless instructed by the repair manual because this may cause a malfunction.
Disconnect the HV floor under wire (rear traction motor cable) from the inverter with converter assembly.
- HINT:
-
Make sure that no foreign matter, coolant or water enters the inverter with converter assembly.
| *a | High Voltage Terminal |
Using a megohmmeter set to 500 V, measure the resistance according to the value(s) in the table below.
- NOTICE:
-
Be sure to set the megohmmeter to 500 V when performing this test. Using a setting higher than 500 V can result in damage to the component being inspected.
- Standard Resistance:
Tester Connection Condition Specified Condition High voltage terminal - Body ground Power switch off 1 MΩ or higher
- HINT:
-
Perform this inspection with the HV floor under wire (rear traction motor cable) disconnected from the inverter with converter assembly.
- Result:
Proceed to OK NG
OK
NG
- CAUTION:
-
Be sure to wear insulated gloves.
Check that the service plug grip is not installed.
- NOTICE:
-
After removing the service plug grip, do not turn the power switch on (READY), unless instructed by the repair manual because this may cause a malfunction.
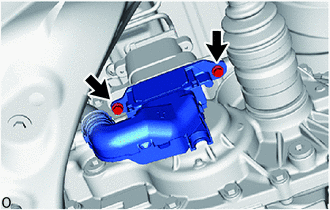
Remove the HV floor under wire (rear traction motor cable) from the rear traction motor with transaxle assembly.
Click hereEngine / Hybrid System>HYBRID / BATTERY CONTROL>FRAME WIRE>REMOVAL
| *1 | Shield Ground |
| *a | HV Floor Under Wire (Rear Traction Motor Cable)
(Inverter with Converter Assembly Side) |
Using a megohmmeter set to 500 V, measure the resistance according to the value(s) in the table below.
- NOTICE:
-
Be sure to set the megohmmeter to 500 V when performing this test. Using a setting higher than 500 V can result in damage to the component being inspected.
- Standard Resistance:
Tester Connection Condition Specified Condition Y5-2 (R-U) - Shield ground Power switch off 100 MΩ or higher Y5-1 (R-V) - Shield ground Power switch off 100 MΩ or higher Y5-3 (R-W) - Shield ground Power switch off 100 MΩ or higher
- Result:
Proceed to OK NG
OK
NG
Click hereDrivetrain>Q610 (HYBRID TRANSMISSION / TRANSAXLE)>REAR TRACTION MOTOR>REMOVAL
- Result:
Proceed to NEXT
NEXT
Click hereEngine / Hybrid System>HYBRID / BATTERY CONTROL>FRAME WIRE>REMOVAL
- Result:
Proceed to NEXT
NEXT