AXLE AND DIFFERENTIAL FRONT AXLE HUB ON-VEHICLE INSPECTION
CAUTION / NOTICE / HINT
- HINT:
- ·
Use the same procedure for the RH and LH sides.
·The following procedure is for the LH side.
PROCEDURE

 1.DISABLE BRAKE CONTROL (w/o Vacuum Brake Booster)
Click hereBrake>BRAKE (REAR)>REAR BRAKE>REMOVAL
2.REMOVE FRONT WHEEL
47313J
3.DISCONNECT FRONT FLEXIBLE HOSE
4.DISCONNECT FRONT DISC BRAKE CALIPER ASSEMBLY LH
43512
5.REMOVE FRONT DISC
for 2-Pot Caliper: Click hereBrake>BRAKE (FRONT)>FRONT BRAKE (for 2-Pot Caliper)>REMOVAL
except 2-Pot Caliper: Click hereBrake>BRAKE (FRONT)>FRONT BRAKE (except 2-Pot Caliper)>REMOVAL
6.INSPECT FRONT AXLE HUB BEARING LOOSENESS
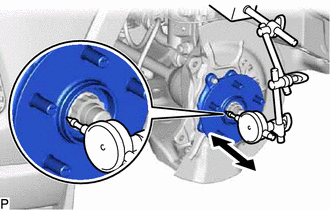
Using a dial indicator with magnetic base, check for looseness near the center of the front axle hub sub-assembly.
- Maximum looseness:
0.05 mm (0.00197 in.)
- NOTICE:
- ·
Ensure that the dial indicator is set perpendicular to the measurement surface.
·Keep the magnet of the dial indicator away from the front axle hub sub-assembly and front speed sensor.
- HINT:
-
If the looseness exceeds the maximum, replace the front axle hub sub-assembly.
7.INSPECT FRONT AXLE HUB RUNOUT
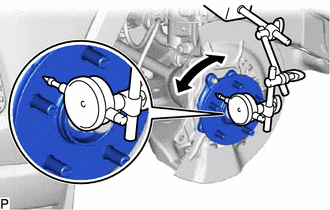
Using a dial indicator with magnetic base, check for runout on the surface of the front axle hub sub-assembly outside the front axle hub bolts.
- Maximum runout:
0.05 mm (0.00197 in.)
- NOTICE:
- ·
Ensure that the dial indicator is set perpendicular to the measurement surface.
·Make sure to set the tip of the dial indicator towards the outside of the front axle hub bolts.
·Keep the magnet of the dial indicator away from the front axle hub sub-assembly and front speed sensor.
- HINT:
-
If the runout exceeds the maximum, replace the front axle hub sub-assembly.
43512
8.INSTALL FRONT DISC
for 2-Pot Caliper: Click hereBrake>BRAKE (FRONT)>FRONT BRAKE (for 2-Pot Caliper)>INSTALLATION
except 2-Pot Caliper: Click hereBrake>BRAKE (FRONT)>FRONT BRAKE (except 2-Pot Caliper)>INSTALLATION
9.INSTALL FRONT DISC BRAKE CALIPER ASSEMBLY LH
47313J
10.INSTALL FRONT FLEXIBLE HOSE
11.INSTALL FRONT WHEEL
12.CONNECT CABLE TO NEGATIVE AUXILIARY BATTERY TERMINAL (w/o Vacuum Brake Booster)
Connect the reservoir level switch connector.
Connect the cable to the negative (-) auxiliary battery terminal.
for A25A-FXS: Click hereGeneral>MAINTENANCE>A25A-FXS AUXILIARY BATTERY>INSTALLATION
for A25B-FXS: Click hereGeneral>MAINTENANCE>A25B-FXS AUXILIARY BATTERY>INSTALLATION
Perform the following procedure if air bleeding is not necessary:
Turn the power switch on (READY).
Depress the brake pedal and release it.