 |
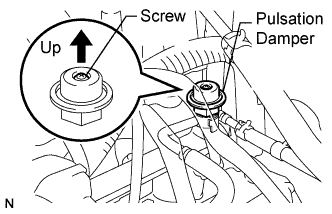
Check that the pulsation damper screw rises up when the fuel pump operates.
If the operation is not as specified, check the following parts:
- Fusible link
- Fuses
- Circuit opening relay
- Fuel pump
- ECM
- Wiring connections
VALVE CLEARANCE > ADJUSTMENT |
| 1. DISCHARGE FUEL SYSTEM PRESSURE |
Connect the Techstream to the DLC3.
Turn the ignition switch to ON and turn the Techstream ON.
Techstream:
Enter the following menus: Powertrain / Engine and ECT / Active Test / Control the Fuel Pump / Speed.
Check that there are no fuel leaks after doing maintenance anywhere on the fuel system.
|
Check that the pulsation damper screw rises up when the fuel pump operates.
If the operation is not as specified, check the following parts:
Turn the ignition switch off.
Disconnect the Techstream from the DLC3.
| 2. REMOVE THROTTLE BODY COVER SUB-ASSEMBLY |
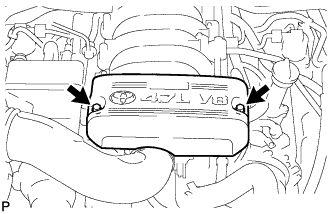 |
Remove the 2 nuts and throttle body cover sub-assembly.
| 3. REMOVE AIR CLEANER HOSE ASSEMBLY |
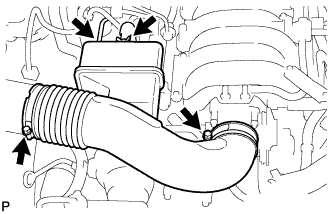 |
Disconnect the vacuum hose and No. 2 ventilation hose.
Loosen the 2 hose clamps and remove the air cleaner hose assembly.
| 4. REMOVE AIR SWITCHING VALVE ASSEMBLY |
Remove the air switching valve assembly (Click here).
| 5. REMOVE IGNITION COIL ASSEMBLY |
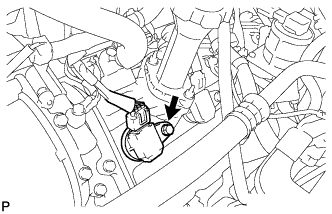 |
Disconnect the 8 ignition coil assembly connectors.
Remove the 8 bolts and pull out the 8 ignition coil assemblies.
| 6. REMOVE FAN AND GENERATOR V BELT |
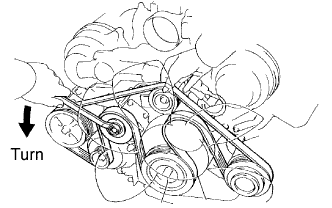 |
Loosen the belt tension by turning the belt tensioner counterclockwise, and then remove the fan and generator V belt.
| 7. REMOVE NO. 3 TIMING BELT COVER SUB-ASSEMBLY LH |
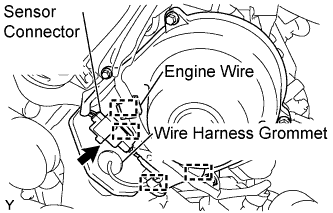 |
Separate the engine wire from the 4 wire clamps.
Disconnect the camshaft position sensor connector.
Disconnect the camshaft position sensor wire from the wire clamp on the timing belt cover.
Remove the wire harness grommet from the timing belt cover.
Remove the 4 bolts.
Pull the cover outward, pull the camshaft position sensor wire out of the cover, and remove the cover.
| 8. REMOVE NO. 3 TIMING BELT COVER SUB-ASSEMBLY RH |
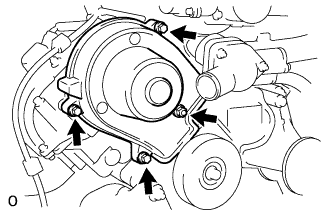 |
Remove the 3 bolts, nut and timing belt cover.
| 9. REMOVE CYLINDER HEAD COVER SUB-ASSEMBLY |
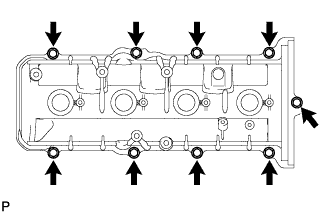 |
Remove the 9 bolts, cylinder head cover and gasket.
| 10. REMOVE CYLINDER HEAD COVER SUB-ASSEMBLY LH |
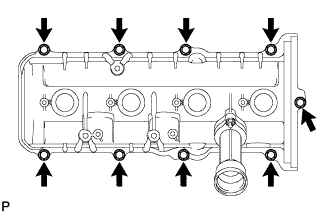 |
Remove the 9 bolts, cylinder head cover and gasket.
| 11. SET NO. 1 CYLINDER TO TDC/COMPRESSION |
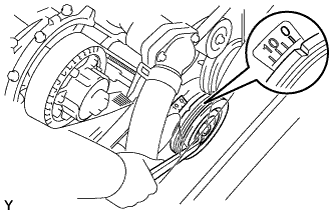 |
Turn the crankshaft pulley to align its notch with timing mark "0" of the No. 1 timing belt cover.
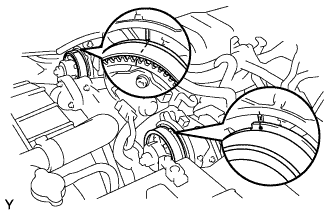 |
Check that the timing marks of the camshaft timing pulleys and timing belt rear plates are aligned.
If not, turn the crankshaft 1 complete revolution (360°) and align the marks as above.
| 12. INSPECT VALVE CLEARANCE |
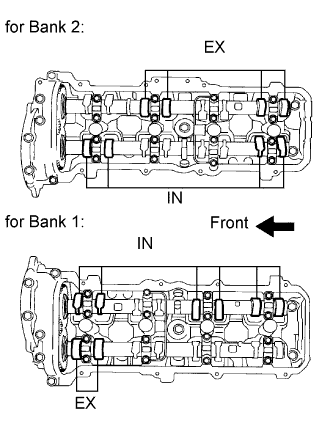 |
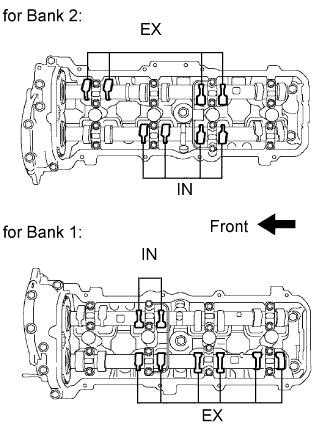
Check only the valves indicated.
Using a feeler gauge, measure the clearance between the valve lifter and camshaft.
| Item | Specified Condition |
| Intake | 0.15 to 0.25 mm (0.00591 to 0.00984 in.) |
| Exhaust | 0.25 to 0.35 mm (0.00984 to 0.0138 in.) |
Record the out-of-specification valve clearance measurements. They will be used later to determine the required replacement adjusting shim.
 |
Turn the crankshaft 1 complete revolution (360°) and align the camshaft timing marks.
Check only the valves indicated in the illustration.
Using a feeler gauge, measure the clearance between the valve lifter and camshaft.
| Item | Specified Condition |
| Intake | 0.15 to 0.25 mm (0.00591 to 0.00984 in) |
| Exhaust | 0.25 to 0.35 mm (0.00984 to 0.0138 in.) |
Record the out-of-specification valve clearance measurements. They will be used later to determine the required replacement adjusting shim.
| 13. ADJUST VALVE CLEARANCE |
Remove the timing belt (Click here).
Remove the camshaft (Click here).
Remove the valve lifter and adjusting shim.
 |
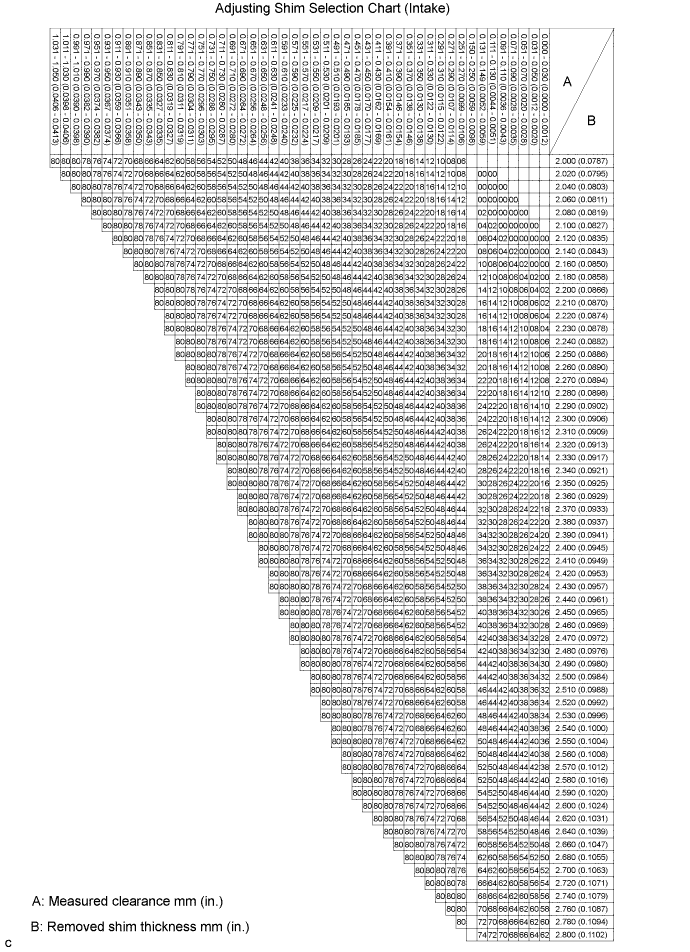
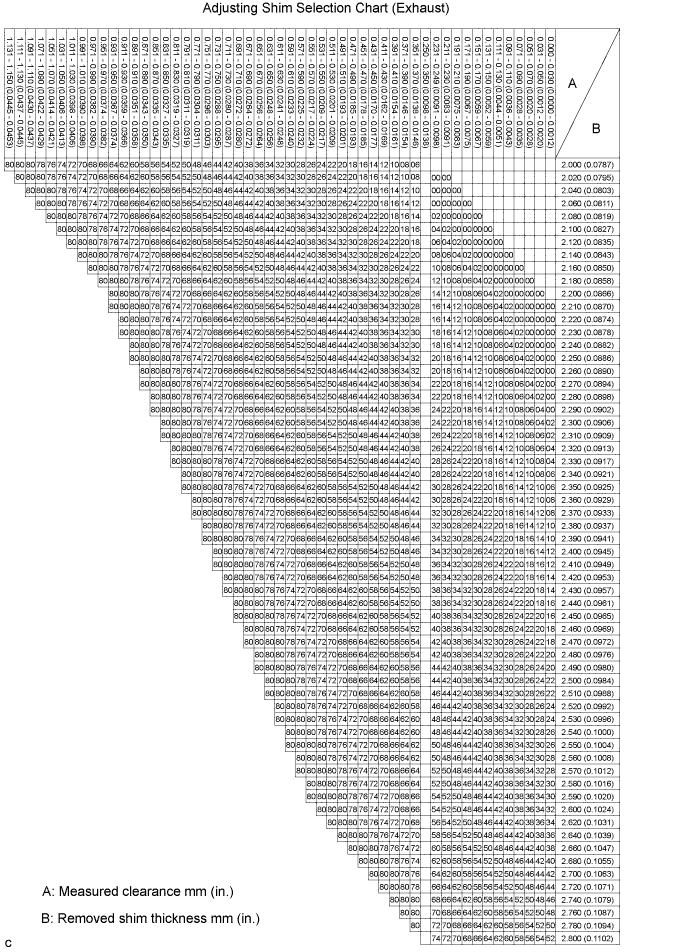
Determine the replacement adjusting shim size according to the formula or charts below.
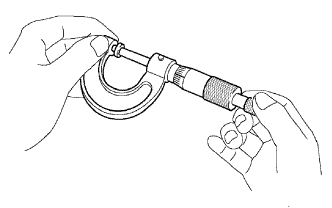
Using a micrometer, measure the thickness of the removed shim.
Calculate the thickness of a new shim so that the valve clearance comes within the specified value.
Select a new shim with a thickness as close as possible to the calculated value.
| Shim No. | Thickness | Shim No. | Thickness | Shim No. | Thickness |
| 00 | 2.000 mm (0.0787 in.) | 28 | 2.280 mm (0.0898 in.) | 56 | 2.560 mm (0.1008 in.) |
| 02 | 2.020 mm (0.0795 in.) | 30 | 2.300 mm (0.0906 in.) | 58 | 2.580 mm (0.1016 in.) |
| 04 | 2.040 mm (0.0803 in.) | 32 | 2.320 mm (0.0913 in.) | 60 | 2.600 mm (0.1024 in.) |
| 06 | 2.060 mm (0.0811 in.) | 34 | 2.340 mm (0.0921 in.) | 62 | 2.620 mm (0.1031 in.) |
| 08 | 2.080 mm (0.0819 in.) | 36 | 2.360 mm (0.0929 in.) | 64 | 2.640 mm (0.1039 in.) |
| 10 | 2.100 mm (0.0827 in.) | 38 | 2.380 mm (0.0937 in.) | 66 | 2.660 mm (0.1047 in.) |
| 12 | 2.120 mm (0.0835 in.) | 40 | 2.400 mm (0.0945 in.) | 68 | 2.680 mm (0.1055 in.) |
| 14 | 2.140 mm (0.0843 in.) | 42 | 2.420 mm (0.0953 in.) | 70 | 2.700 mm (0.1063 in.) |
| 16 | 2.160 mm (0.0850 in.) | 44 | 2.440 mm (0.0961 in.) | 72 | 2.720 mm (0.1071 in.) |
| 18 | 2.180 mm (0.0858 in.) | 46 | 2.460 mm (0.0969 in.) | 74 | 2.740 mm (0.1079 in.) |
| 20 | 2.200 mm (0.0866 in.) | 48 | 2.480 mm (0.0976 in.) | 76 | 2.760 mm (0.1087 in.) |
| 22 | 2.220 mm (0.0874 in.) | 50 | 2.500 mm (0.0984 in.) | 78 | 2.780 mm (0.1094 in.) |
| 24 | 2.240 mm (0.0882 in.) | 52 | 2.520 mm (0.0992 in.) | 80 | 2.800 mm (0.1102 in.) |
| 26 | 2.260 mm (0.0890 in.) | 54 | 2.540 mm (0.1000 in.) | - | - |
| Shim No. | Thickness | Shim No. | Thickness | Shim No. | Thickness |
| 00 | 2.000 mm (0.0787 in.) | 28 | 2.280 mm (0.0898 in.) | 56 | 2.560 mm (0.1008 in.) |
| 02 | 2.020 mm (0.0795 in.) | 30 | 2.300 mm (0.0906 in.) | 58 | 2.580 mm (0.1016 in.) |
| 04 | 2.040 mm (0.0803 in.) | 32 | 2.320 mm (0.0913 in.) | 60 | 2.600 mm (0.1024 in.) |
| 06 | 2.060 mm (0.0811 in.) | 34 | 2.340 mm (0.0921 in.) | 62 | 2.620 mm (0.1031 in.) |
| 08 | 2.080 mm (0.0819 in.) | 36 | 2.360 mm (0.0929 in.) | 64 | 2.640 mm (0.1039 in.) |
| 10 | 2.100 mm (0.0827 in.) | 38 | 2.380 mm (0.0937 in.) | 66 | 2.660 mm (0.1047 in.) |
| 12 | 2.120 mm (0.0835 in.) | 40 | 2.400 mm (0.0945 in.) | 68 | 2.680 mm (0.1055 in.) |
| 14 | 2.140 mm (0.0843 in.) | 42 | 2.420 mm (0.0953 in.) | 70 | 2.700 mm (0.1063 in.) |
| 16 | 2.160 mm (0.0850 in.) | 44 | 2.440 mm (0.0961 in.) | 72 | 2.720 mm (0.1071 in.) |
| 18 | 2.180 mm (0.0858 in.) | 46 | 2.460 mm (0.0969 in.) | 74 | 2.740 mm (0.1079 in.) |
| 20 | 2.200 mm (0.0866 in.) | 48 | 2.480 mm (0.0976 in.) | 76 | 2.760 mm (0.1087 in.) |
| 22 | 2.220 mm (0.0874 in.) | 50 | 2.500 mm (0.0984 in.) | 78 | 2.780 mm (0.1094 in.) |
| 24 | 2.240 mm (0.0882 in.) | 52 | 2.520 mm (0.0992 in.) | 80 | 2.800 mm (0.1102 in.) |
| 26 | 2.260 mm (0.0890 in.) | 54 | 2.540 mm (0.1000 in.) | - | - |
Place a new adjusting shim on the valve.
Place the valve lifter.
Install the camshaft (Click here ).
Install the timing belt (Click here).
Check the valve clearance.
If the result is not as specified, adjust the valve clearance.
| 14. INSTALL CYLINDER HEAD COVER SUB-ASSEMBLY LH |
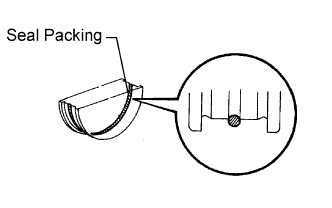 |
Apply seal packing to the semicircular plug grooves.
Install the 2 semicircular plugs to the cylinder heads.
Install the gasket to the cylinder head cover.
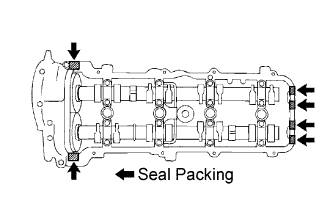 |
Apply seal packing to the cylinder head as shown in the illustration.
|
Install the cylinder head cover with the 9 bolts. Uniformly tighten the bolts in several steps.
| 15. INSTALL CYLINDER HEAD COVER SUB-ASSEMBLY |
|
Apply seal packing to the semicircular plug grooves.
Install the 2 semicircular plugs to the cylinder heads.
Install the gasket to the cylinder head cover.
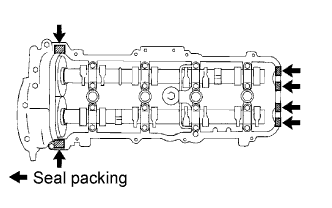 |
Apply seal packing to the cylinder head as shown in the illustration.
|
Install the cylinder head cover with the 9 bolts. Uniformly tighten the bolts in several steps.
| 16. INSTALL NO. 3 TIMING BELT COVER SUB-ASSEMBLY RH |
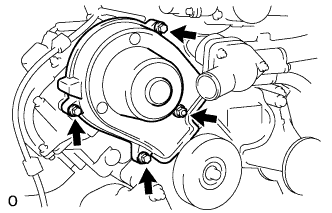 |
Install the cover with the 3 bolts and nut.
| 17. INSTALL NO. 3 TIMING BELT COVER SUB-ASSEMBLY LH |
|
Pass the camshaft position sensor wire through the cover hole.
Install the cover with the 4 bolts.
Install the wire harness grommet to the belt cover.
Connect the sensor connector.
Install the sensor wire to the wire clamps on the cover.
Connect the engine wire to the 4 wire clamps on the cover.
| 18. INSTALL IGNITION COIL ASSEMBLY |
|
Install the 8 ignition coil assemblies with the 8 bolts.
Connect the 8 ignition coil assembly connectors.
| 19. INSTALL AIR SWITCHING VALVE ASSEMBLY |
| 20. INSTALL FAN AND GENERATOR V BELT |
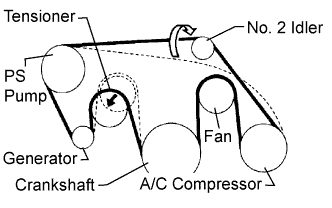 |
Set the V belt onto every part except the No. 2 idler pulley, as shown in the illustration.
Loosen the V belt by turning the belt tensioner counterclockwise.
Set the V belt to the No. 2 idler pulley.
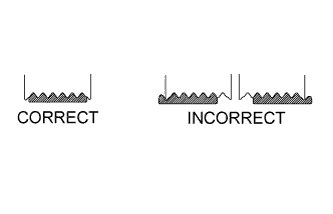 |
After installing the belt, check that it fits properly in the ribbed grooves.
Check by hand to confirm that the belt has not slipped out of the grooves on the bottom of the pulley.
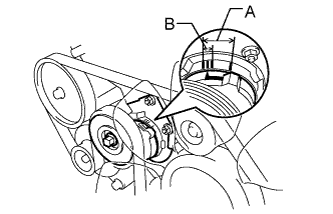 |
Check that the arrow on the belt tensioner is within area "A".
If it is outside area "A", replace the fan and generator V belt.
| 21. INSTALL AIR CLEANER HOSE ASSEMBLY |
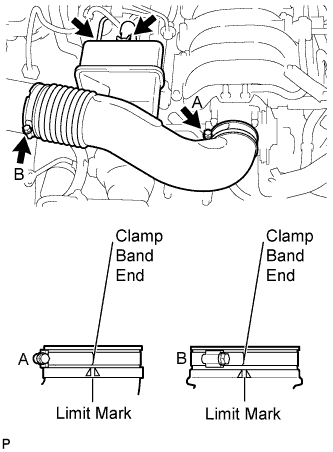 |
Install the air cleaner hose assembly with the 2 clamps.
Connect the vacuum hose and No. 2 ventilation hose.
| 22. INSTALL THROTTLE BODY COVER SUB-ASSEMBLY |
|
Install the throttle body cover sub-assembly with the 2 nuts.
| 23. INSPECT FOR OIL LEAK |
Start the engine. Make sure that there are no oil leaks from the area that was worked on.