BRAKE CONTROL / DYNAMIC CONTROL SYSTEMS VEHICLE STABILITY CONTROL SYSTEM Brake Warning Light Remains ON
DESCRIPTION
If any of the following conditions are detected, the BRAKE warning light remains on:
The ECU connector is disconnected from the skid control ECU.
The brake fluid level is insufficient.
The parking brake is applied.
The EBD system is malfunctioning.
The booster vacuum pressure is abnormal.
The pedal stroke sensor is malfunctioning.
WIRING DIAGRAM
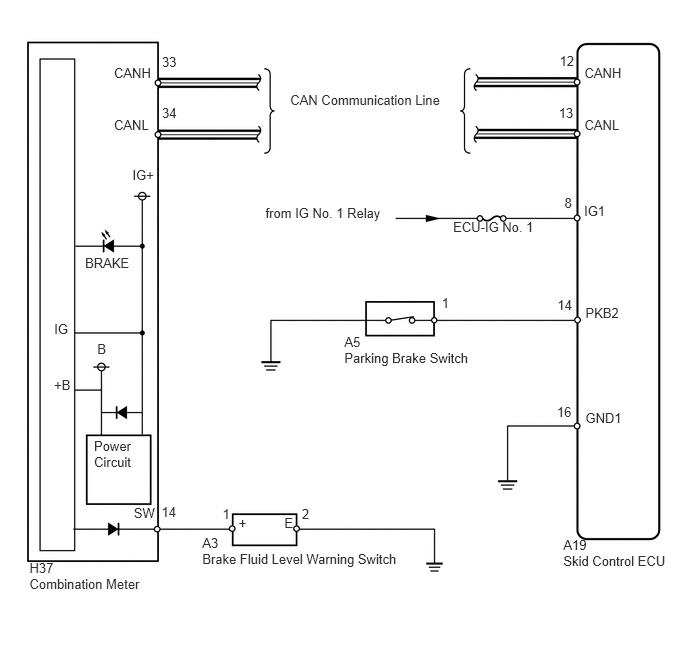
CAUTION / NOTICE / HINT
- NOTICE:
-
When replacing the VSC actuator assembly, perform zero point calibration (See page Brake>BRAKE CONTROL / DYNAMIC CONTROL SYSTEMS>VEHICLE STABILITY CONTROL SYSTEM>CALIBRATION).
PROCEDURE
Check that both of the following conditions are satisfied.
The brake fluid level in the brake master cylinder reservoir is correct.
The parking brake is released.
- HINT:
- ·
When the ABS warning light remains illuminated, repair the malfunction in the ABS system first.
·When the slip indicator light remains illuminated, repair the malfunction in the VSC system first.
NEXT
Check if any ABS DTCs are output (See page Brake>BRAKE CONTROL / DYNAMIC CONTROL SYSTEMS>VEHICLE STABILITY CONTROL SYSTEM>DTC CHECK / CLEAR).
| Result | Proceed to |
|---|---|
| DTC is not output | A |
| DTC is output | B |
A
B
Check if the CAN communication system DTC is output (See page Power Source / Network>NETWORKING>CAN COMMUNICATION SYSTEM>DIAGNOSIS SYSTEM).
| Result | Proceed to |
|---|---|
| DTC is not output | A |
| DTC is output | B |
A
B
(See pagePower Source / Network>NETWORKING>CAN COMMUNICATION SYSTEM>HOW TO PROCEED WITH TROUBLESHOOTING)
Check if the skid control ECU connector is connected securely.
- OK:
The connector is connected securely.
OK
NG
Connect the Techstream to the DLC3.
Turn the ignition switch to ON.
Turn the Techstream ON.
Select Data List mode and check the parking brake switch using the Techstream.
| Tester Display | Measurement Item/Range | Normal Condition | Diagnostic Note |
|---|---|---|---|
| Parking Brake SW | Parking brake switch / ON or OFF | ON: Parking brake applied
OFF: Parking brake released |
- |
Check that "ON" and "OFF" are properly indicated on the Techstream display when the parking brake lever is operated.
- OK:
Techstream display changes in accordance with the parking brake lever operation.
OK
NG
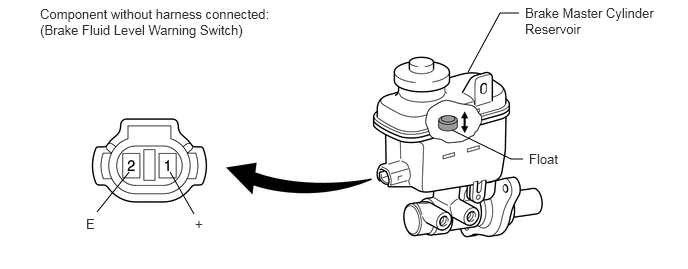
Remove the reservoir tank cap and strainer.
Disconnect the A3 switch connector.
Measure the resistance according to the value(s) in the table below.
- HINT:
-
A float is placed inside the reservoir. Its position can be changed by increasing or decreasing the brake fluid level.
- Standard Resistance:
Tester Connection Switch Condition Specified Condition 1 (+) - 2 (E) Float up (Switch OFF) 10 kΩ or higher 1 (+) - 2 (E) Float down (Switch ON) Below 1 Ω
- HINT:
-
If the result is as specified, adjust the brake fluid level to the MAX level after measuring the resistance.
OK
NG
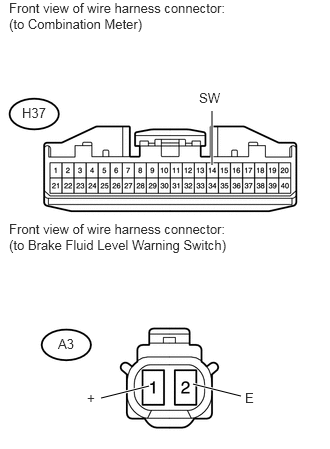
Disconnect the H37 meter connector.
Disconnect the A3 switch connector.
Measure the resistance according to the value(s) in the table below.
- Standard Resistance:
Tester Connection Condition Specified Condition H37-14 (SW) - A3-1 (+) Always Below 1 Ω H37-14 (SW) - Body ground Always 10 kΩ or higher A3-2 (E) - Body ground Always Below 1 Ω
OK
NG
Connect the Techstream to the DLC3.
Turn the ignition switch to ON.
Turn the Techstream ON.
Select Active Test mode and operate the BRAKE warning light using the Techstream.
| Tester Display | Test Part | Control Range | Diagnostic Note |
|---|---|---|---|
| Brake Warning Light | BRAKE warning light | Warning light ON/OFF | Observe combination meter |
Check that the BRAKE warning light turns on and off in the combination meter using the Techstream.
- OK:
The BRAKE warning light turns ON and OFF in accordance with the Techstream operation.
OK
NG
(See pageVehicle Interior>METER / GAUGE / DISPLAY>METER / GAUGE SYSTEM>HOW TO PROCEED WITH TROUBLESHOOTING)
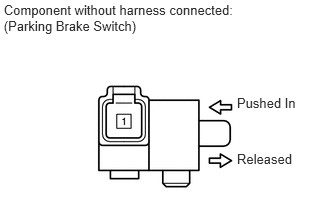
Disconnect the A5 switch connector.
Measure the resistance according to the value(s) in the table below.
- Standard Resistance:
Tester Connection Switch Condition Specified Condition 1 - Body ground Parking brake switch ON
(Switch pin released)Below 1 Ω 1 - Body ground Parking brake switch OFF
(Switch pin pushed in)10 kΩ or higher
OK
NG
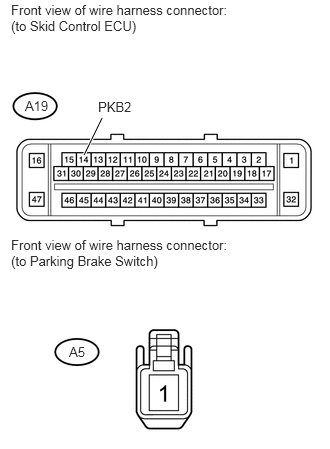
Disconnect the A19 ECU connector.
Disconnect the A5 switch connector.
Measure the resistance according to the value(s) in the table below.
- Standard Resistance:
Tester Connection Condition Specified Condition A19-14 (PKB2) - A5-1 Always Below 1 Ω A19-14 (PKB2) - Body ground Always 10 kΩ or higher
OK
NG