SUPPLEMENTAL RESTRAINT SYSTEMS REAR AIRBAG SENSOR INSTALLATION
CAUTION / NOTICE / HINT
PROCEDURE

 89833
1.INSTALL REAR AIRBAG SENSOR RH
Check that the ignition switch is off.
Check that the battery negative (-) terminal is disconnected.
- CAUTION:
-
Wait at least 90 seconds after disconnecting the cable from the negative (-) battery terminal to disable the SRS system.
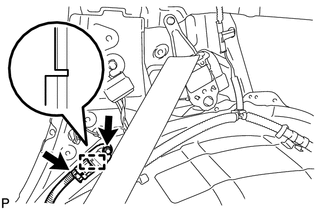
Engage the guide and Install the rear airbag sensor.
Install the bolt.
- Torque:
- 9.0 N*m (92 kgf*cm, 80 in.*lbf)
- CAUTION:
- ·
If the rear airbag sensor LH has been dropped, or there are any cracks, dents or other defects in the case, bracket or connector, replace it with a new one.
·When installing the rear airbag sensor LH, be careful that the SRS wiring does not interfere with other parts and that it is not pinched between other parts.
Check that there is no looseness in the installation parts of the rear airbag sensor.
Connect the connector to the rear airbag sensor.
89834
2.INSTALL REAR AIRBAG SENSOR LH
- HINT:
-
Use the same procedure as for the RH side.
87217E
3.INSTALL REAR SIDE NO. 3 AIR DUCT
62510P
4.INSTALL QUARTER TRIM PANEL ASSEMBLY RH (for Standard)
62520P
5.INSTALL QUARTER TRIM PANEL ASSEMBLY LH (for Standard)
62510P
6.INSTALL QUARTER TRIM PANEL ASSEMBLY RH (for Power Seat)
62520P
7.INSTALL QUARTER TRIM PANEL ASSEMBLY LH (for Power Seat)
58573A
8.INSTALL REAR FLOOR MAT SUPPORT PLATE
66310D
9.INSTALL ROPE HOOK ASSEMBLY
62331C
10.INSTALL REAR DOOR OPENING TRIM WEATHERSTRIP RH
62332C
11.INSTALL REAR DOOR OPENING TRIM WEATHERSTRIP LH
67917C
12.INSTALL REAR DOOR SCUFF PLATE RH
67918D
13.INSTALL REAR DOOR SCUFF PLATE LH
51775
14.INSTALL REAR FLOOR STEP NO. 1 COVER
51775
15.INSTALL REAR FLOOR STEP NO. 2 COVER
71693
16.INSTALL REAR SEAT CUSHION HINGE LOWER COVER RH
71694
17.INSTALL REAR SEAT CUSHION HINGE LOWER COVER LH
18.INSTALL REAR NO. 2 SEAT ASSEMBLY RH
for Manual seat:
Install the rear No. 2 seat assembly RH (See page Vehicle Interior>SEAT>REAR NO. 2 SEAT ASSEMBLY(for Manual Seat Type RH Side)>INSTALLATION )
for Power Seat:
Install the rear No. 2 seat assembly RH (See page Vehicle Interior>SEAT>REAR NO. 2 SEAT ASSEMBLY(for Power Seat Type RH Side)>INSTALLATION )
19.INSTALL REAR NO. 2 SEAT ASSEMBLY LH
for Manual seat:
Install the rear No. 2 seat assembly LH (See page Vehicle Interior>SEAT>REAR NO. 2 SEAT ASSEMBLY(for Manual Seat Type LH Side)>INSTALLATION )
for Power Seat:
Install the rear No. 2 seat assembly LH (See page Vehicle Interior>SEAT>REAR NO. 2 SEAT ASSEMBLY(for Power Seat Type LH Side)>INSTALLATION )
58417F
20.INSTALL DECK BOARD BRACKET
58403K
21.INSTALL DECK BOARD REINFORCEMENT SUB-ASSEMBLY
58401A
22.INSTALL NO. 1 DECK BOARD SUB-ASSEMBLY
66310D
23.INSTALL ROPE HOOK ASSEMBLY
64429G
24.INSTALL LUGGAGE COMPARTMENT TRIM BOX
58408D
25.INSTALL NO. 2 DECK BOARD SUB-ASSEMBLY
26.CONNECT CABLE TO NEGATIVE BATTERY TERMINAL
- NOTICE:
-
When disconnecting the cable, some systems need to be initialized after the cable is reconnected (See page General>INTRODUCTION>REPAIR INSTRUCTION>INITIALIZATION).
- Torque:
- 5.4 N*m (55 kgf*cm, 48 in.*lbf)
27.INSPECT SRS WARNING LIGHT
Inspect the SRS warning light (See page Vehicle Interior>SUPPLEMENTAL RESTRAINT SYSTEMS>AIRBAG SYSTEM>DIAGNOSIS SYSTEM).