WINDOW / GLASS WINDSHIELD GLASS INSTALLATION
PROCEDURE

 75533E
1.INSTALL WINDSHIELD OUTSIDE MOULDING
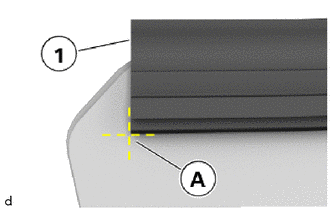
Observe marks (A) for a new windshield outside moulding (1).
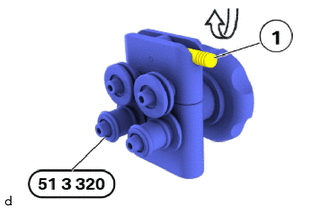
Reposition lever (1) in direction of arrow and open it using the special tool 0 496 529 (51 3 320).
- SST
- 09800-WA170
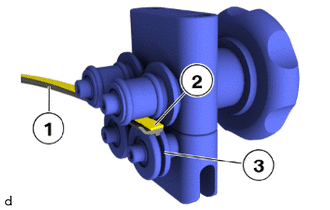
Pull off protective film (2) in stages from double-sided tape.
Insert the windshield outside moulding (1) into the special tool 0 496 529 (51 3 320) (3).
- SST
- 09800-WA170
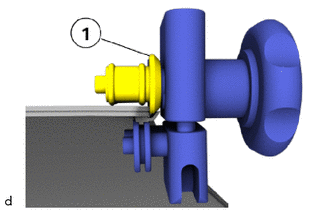
Place the special tool 0 496 529 (51 3 320) with the pressure rollers (1) up against the windshield glass edge.
- SST
- 09800-WA170
Align the cover on the outer edge of the windshield glass.
Fit the cover and visually check for perfect fit.
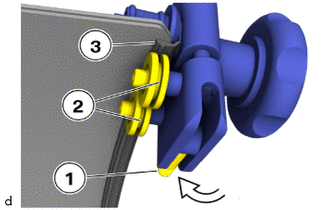
Reposition the lever (1) in the direction of arrow and close the special tool 0 496 529 (51 3 320).
- SST
- 09800-WA170
Ensure the windshield outside moulding (3) fits correctly into the guide pulleys (2).
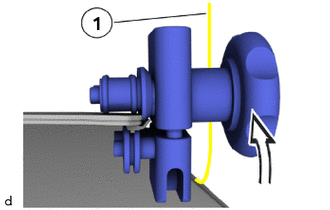
Continue to pull off protective film (1) in stages from double-sided tape.
Pull the special tool 0 496 529 (51 3 320) in the direction of arrow with the handwheel over the entire upper edge of the windshield glass.
- SST
- 09800-WA170
Install the windshield outside moulding.
56111
2.INSTALL WINDSHIELD GLASS
- HINT:
- ·
The vehicle can be towed away or driven without the windshield glass.
·When carrying out removal/installation work and during the hardening time, the vehicle must be standing on its wheels on a level surface.
·The windshield glass are bonded to the body. This bonding will increase the torsional rigidity of the vehicle. To obtain perfect bonding, comply with the installation procedure described in the following.
Clean windshield glass and body aperture with residual adhesive bead.
- Cleaner:
Cleaner R1, Cleaner R2
- HINT:
-
Protect vehicle interior against contamination.
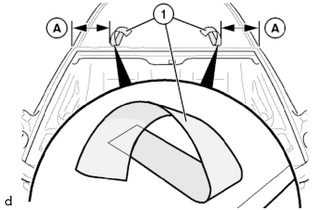
Install the 2 protective tapes (1) to the roof.
- Standard Dimension:
Area Dimension A 250 mm (9.84 in.)
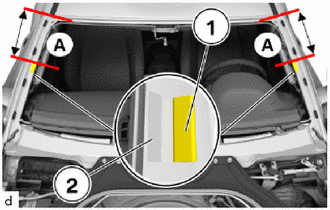
Completely remove the No. 1 windshield glass spacer (1).
Replace the No. 1 windshield glass spacer (1).
Bond the new No. 1 windshield glass spacer (1) in the center on the marks (2) embossed on the body.
- Dimensions of the No. 1 windshield glass spacer and positioning:
Area Dimension Length 20 mm (0.787 in.) Width 5.0 mm (0.197 in.) Height 5.0 mm (0.197 in.) A 300 mm (11.8 in.)
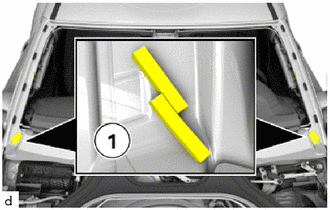
Check both cushions (1) for damage and replace if necessary.
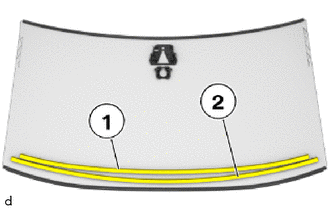
Check No. 1 instrument panel cushion (2) and No. 2 instrument panel cushion (1) for the cowl panel for damage.
- HINT:
- ·
No. 1 instrument panel cushion (2) or No. 2 instrument panel cushion (1) for the cowl panel is damaged.
-Replace No. 1 instrument panel cushion (2) or No. 2 instrument panel cushion (1) for the cowl panel.
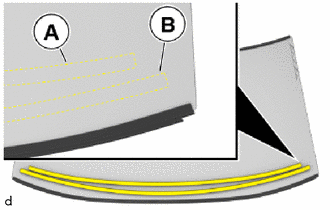
When reusing the No. 1 instrument panel cushion and No. 2 instrument panel cushion:
Observe marks (A) and (B) for the No. 1 instrument panel cushion and No. 2 instrument panel cushion on the windshield glass.
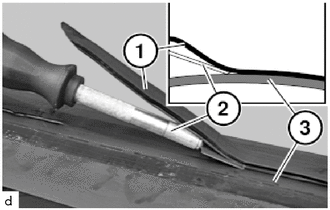
When reusing the windshield glass:
Position the scraper (2) as shown and remove the residual adhesive bead (1) up to remaining thickness.
- Standard Dimension:
Area Dimension Remaining thickness of adhesive bead 0.5 mm (0.0197 in.)
Apply glass activator to the windshield glass (3) so that a wide line of glass activator is located next to the squeezed adhesive bead.
- Glass activator:
Repair Kit, Window Glass, Cold, 1 Hour
- NOTICE:
- ·
The glass activator is used for adhesion between glass or ceramic glass and the adhesive. Therefore, a thin, homogeneous and continuous line of glass activator must be applied. If the windshield glass is to be reused with a cut-back adhesive bead, glass activator is not needed.
·The glass activator may not be applied in the field of view or the point grid. Fresh glass activator in the field of view must immediately be wiped off because hardened glass activator will leave a haze behind.
- Cleaner:
Cleaner R2
- HINT:
- ·
Protrusion of glass activator against the compressed adhesive bead: 1.0 to 2.0 mm (0.0394 to 0.0787 in.)
·Allow the glass activator to dry for 2 minutes.
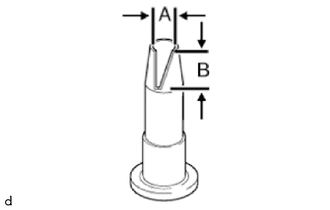
Prepare the glue cartridge with the standard nozzle C.
- Standard Nozzle C:
Repair Kit, Window Glass, Cold, 1 Hour
- Standard Dimension:
Area Dimension A 7.0 to 9.0 mm (0.276 to 0.354 in.) B 11 to 13 mm (0.433 to 0.512 in.)
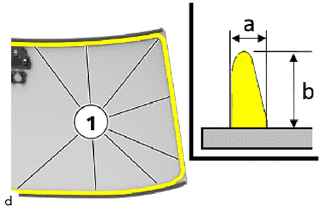
Apply adhesive bead within the marks (1) on the windshield glass.
- Adhesive:
Repair Kit, Window Glass, Cold, 1 Hour
- Standard Dimension:
Area Dimension a 7.0 to 9.0 mm (0.276 to 0.354 in.) b 11 to 13 mm (0.433 to 0.512 in.)
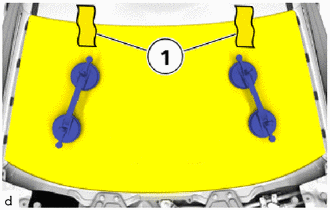
Using suction cups, carefully insert the windshield glass between the bonnet and the cowl panel.
Position the windshield glass at the top.
Evenly align the windshield glass on the left and right.
Insert and press on the windshield glass at the bottom.
Press the windshield glass towards the top until the windshield outside moulding of the windshield glass is evenly in contact with the roof.
Secure the windshield glass in this installation position using the two protective tapes (1).
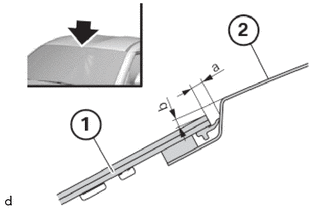
| (1) | Windshield Glass |
| (2) | Roof Outer Skin |
Using the special tools 0 496 076 (00 9 470) and 0 495 259 (51 0 010), measuring gap dimension windshield glass to roof outer skin.
- SST
- 09800-WA340 09800-WA350
- Standard Dimension:
Area Dimension a 2.6 to 5.0 mm (0.102 to 0.197 in.) b 1.1 to 3.7 mm (0.0433 to 0.146 in.)
75552E
3.INSTALL ROOF DRIP SIDE FINISH MOULDING LH
75551E
4.INSTALL ROOF DRIP SIDE FINISH MOULDING RH
- HINT:
-
Use the same procedure as for the LH side.
55781E
5.INSTALL COWL TOP VENTILATOR LOUVER SUB-ASSEMBLY
6. CHECK WIPER AND WASHER SYSTEM
Check the wiper range for streaks.
Streaks in the wiper range.
Replace the windshield wiper blade assembly.
Check the washer fluid contacts the windshield glass.
The washer fluid contacts does not exit or exits unevenly.
If applicable, replace the front washer nozzle and hose assembly.
62212
7.INSTALL FRONT PILLAR GARNISH LH
62211
8.INSTALL FRONT PILLAR GARNISH RH
- HINT:
-
Use the same procedure as for the LH side.
9.INSTALL ELECTRONIC TOLL COLLECTION DEVICE (w/ Electronic Toll Collection System)
8646C
10.INSTALL FORWARD RECOGNITION CAMERA (w/ Toyota Supra Safety)
89941
11.INSTALL RAIN SENSOR
87810
12.INSTALL INNER REAR VIEW MIRROR ASSEMBLY
87834
13.INSTALL INNER REAR VIEW MIRROR STAY HOLDER COVER
14. PUTTING THE ELECTRONIC TOLL COLLECTION DEVICE INTO OPERATION (w/ Electronic Toll Collection System)