1UR-FE ENGINE CONTROL SFI SYSTEM P0037 Oxygen Sensor Heater Control Circuit Low (Bank 1 Sensor 2) P0038 Oxygen Sensor Heater Control Circuit High (Bank 1 Sensor 2) P0057 Oxygen Sensor Heater Control Circuit Low (Bank 2 Sensor 2) P0058 Oxygen Sensor Heater Control Circuit High (Bank 2 Sensor 2) P0141 Oxygen Sensor Heater Circuit (Bank 1 Sensor 2) P0161 Oxygen Sensor Heater Circuit (Bank 2 Sensor 2) P102D O2 Sensor Heater Circuit Performance Bank 1 Sensor 2 Stuck ON P105D O2 Sensor Heater Circuit Performance Bank 2 Sensor 2 Stuck ON
DESCRIPTION
Refer to DTC P0136 (See page Engine / Hybrid System>1UR-FE ENGINE CONTROL>SFI SYSTEM>P0136).
- HINT:
- ·
When any of these DTCs are stored, the ECM enters fail-safe mode. The ECM turns off the Heated Oxygen (HO2) sensor heater in fail-safe mode. Fail-safe mode continues until the ignition switch is turned off.
·The ECM provides a pulse width modulated control circuit to adjust the current through the heater. The HO2 sensor heater circuit uses a relay on the +B side of the circuit.
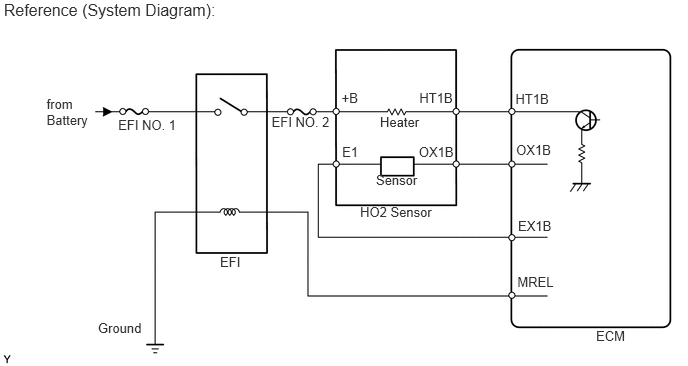 0.039,0.007 2.909,0.307 2.869,0.300 12 Reference (System Diagram): 2.829,1.184 3.509,1.365 0.680,0.181 10 EFI NO. 2 2.292,2.646 2.560,2.827 0.269,0.181 10 EFI 1.231,1.217 1.885,1.398 0.653,0.181 10 EFI NO. 1 1.02,3.33 1.500,3.512 0.480,0.181 10 Ground 3.751,2.121 4.585,2.302 0.834,0.181 10 HO2 Sensor 3.557,0.937 3.782,1.118 0.226,0.181 10 +B 4.368,0.937 4.748,1.118 0.380,0.181 10 HT1B 3.564,1.5 3.821,1.681 0.258,0.181 10 E1 4.362,1.5 4.786,1.681 0.424,0.181 10 OX1B 5.376,1.48 5.800,1.661 0.424,0.181 10 OX1B 5.396,2.269 5.820,2.450 0.424,0.181 10 EX1B 3.958,1.184 4.394,1.365 0.436,0.181 10 Heater 3.916,1.792 4.375,1.973 0.459,0.181 10 Sensor 6.209,3.416 6.535,3.598 0.326,0.181 10 ECM 5.369,0.949 5.749,1.131 0.380,0.181 10 HT1B 5.389,2.852 5.792,3.033 0.403,0.181 10 MREL 0.485,1.002 0.977,1.363 0.492,0.360 10 from Battery
| DTC No. | DTC Detection Condition | Trouble Area |
|---|---|---|
| P0037
P0057 |
The heater current is less than the specified value while the heater is operating.
(1 trip detection logic) |
·
Open in HO2 sensor heater circuit ·
HO2 sensor heater (for Sensor 2) ·
Integration relay ·
ECM |
| P0038
P0058 |
The heater current is higher than the specified value while the heater is operating.
(1 trip detection logic) |
·
Short in HO2 sensor heater circuit ·
HO2 sensor heater (for Sensor 2) ·
Integration relay ·
ECM |
| P0141
P0161 |
The cumulative heater resistance correction value exceeds the threshold.
(2 trip detection logic) |
·
Open or short in HO2 sensor heater circuit ·
HO2 sensor heater (for Sensor 2) ·
Integration relay ·
ECM |
| P102D
P105D |
The heater current is higher than the specified value while the heater is not operating.
(1 trip detection logic) |
ECM |
MONITOR DESCRIPTION
The sensing portion of the Heated Oxygen (HO2) sensor has a zirconia element which is used to detect the oxygen concentration in the exhaust gas. If the zirconia element is at the appropriate temperature, and the difference between the oxygen concentrations surrounding the inside and outside surfaces of the sensor is large, the zirconia element generates voltage signals. In order to increase the oxygen concentration detecting capacity of the zirconia element, the ECM supplements the heat from the exhaust with heat from a heating element inside the sensor.
- Heated oxygen sensor heater range check (P0037, P0038, P0057, P0058, P102D and P105D):
-
The ECM monitors the current applied to the HO2 sensor heater to check the heater for malfunctions.
-
If the heater current is outside the normal range, the signal transmitted by the HO2 sensor becomes inaccurate. When the current in the HO2 sensor heater is outside the normal operating range, the ECM interprets this as a malfunction in the sensor heater and stores a DTC.
- Heated oxygen sensor heater performance (P0141 and P0161):
-
After the accumulated heater ON time exceeds 100 seconds, the ECM calculates the heater resistance using the battery voltage and the current applied to the heater.
-
If the resistance is above the threshold value, the ECM determines that there is a malfunction in the HO2 sensor heater and stores DTC P0141 or P0161.
MONITOR STRATEGY
| Related DTCs | P0037: Heated oxygen sensor heater (for Bank 1) range check (Low electrical current)
P0038: Heated oxygen sensor heater (for Bank 1) range check (High electrical current) P0057: Heated oxygen sensor heater (for Bank 2) range check (Low electrical current) P0058: Heated oxygen sensor heater (for Bank 2) range check (High electrical current) P0141: Heated oxygen sensor heater performance (for Bank 1) P0161: Heated oxygen sensor heater performance (for Bank 2) P102D: Heated oxygen sensor heater stuck ON (for Bank 1 Sensor 2) P105D: Heated oxygen sensor heater stuck ON (for Bank 2 Sensor 2) |
| Required Sensors/Components (Main) | Heated oxygen sensor heater |
| Required Sensors/Components (Related) | - |
| Frequency of Operation | Continuous: P0037, P0038, P0057, P0058 P102D and P105D
Once per driving cycle: P0141 and P0161 |
| Duration | 0.5 seconds: P0037 and P0057
Within 3 seconds: P0038 and P0058 10 seconds: P0141 and P0161 0.5 seconds: P102D and P105D |
| MIL Operation | Immediate: P0037, P0038, P0057, P0058, P102D and P105D
2 driving cycles: P0141 and P0161 |
| Sequence of Operation | None |
TYPICAL ENABLING CONDITIONS
| Monitor runs whenever following DTCs not stored | P0038, P0058 (Rear oxygen sensor heater) |
| Battery voltage | 10.5 V or higher |
| Engine | Running |
| Starter | OFF |
| Catalyst active A/F control | Not operating |
| Time after heater ON | 10 seconds or more |
| Learned heater OFF current operation | Complete |
| Heater OFF current operation | Succeeded |
| Heater ON current - Learned heater OFF current | 0.3 A or less |
| Heater output | ON |
| Monitor runs whenever following DTCs not stored | P0038, P0058 (Rear oxygen sensor heater) |
| Battery voltage | 10.5 V or higher |
| Engine | Running |
| Starter | OFF |
| Catalyst active A/F control | Not operating |
| Time after heater ON | 10 seconds or more |
| Learned heater OFF current operation | Complete |
| Heated oxygen sensor heater OFF current | Higher than 3.5 A |
| Hybrid IC high current limiter port | Fail |
| Monitor runs whenever following DTCs not stored | None |
| Battery voltage | 10.5 V or higher |
| Engine | Running |
| Starter | OFF |
| Catalyst active A/F control | Not operating |
| Time after heater ON | 10 seconds or more |
| Learned heater OFF current operation | Complete |
| Monitor runs whenever following DTCs not stored | P0037, P0038, P0057, P0058, P102D, P105D (Rear oxygen sensor heater) |
| Battery voltage | 10.5 V or higher |
| Fuel cut | OFF |
| Time after fuel cut ON to OFF | 30 seconds or more |
| Accumulated heater ON time | 100 seconds or more |
| Learned heater OFF current operation | Complete |
| Monitor runs whenever following DTCs not stored | None |
| Duration that rear heated oxygen sensor impedance is less than 15 kΩ | 2 seconds or more |
| Monitor runs whenever following DTCs not stored | P0037, P0038, P0057, P0058 (Rear oxygen sensor heater) |
| Battery voltage | 10.5 V or higher |
| Engine | Running |
| Starter | OFF |
| Catalyst active A/F control | Not operating |
| Time after heater ON | 10 seconds or more |
| Learned heater OFF current operation | Complete |
| Hybrid IC high current limiter port | Fail |
TYPICAL MALFUNCTION THRESHOLDS
| Heater current - Learned heater OFF current | 0.3 A or less |
| Heated oxygen sensor heater ON current | 1 A or less |
| Hybrid IC high current limiter port | Fail |
| Heated oxygen sensor heater output | ON |
| Accumulated heater resistance | Varies with sensor element temperature (Example: Higher than 23 Ω) |
| Heated oxygen sensor heater ON current | Higher than 1 A |
COMPONENT OPERATING RANGE
| Heated Oxygen (HO2) sensor heater current | 0.4 to 1 A (when engine idles, HO2 sensor warmed up and battery voltage 11 to 14 V) |
MONITOR RESULT
Refer to Checking Monitor Status (See page Engine / Hybrid System>1UR-FE ENGINE CONTROL>SFI SYSTEM>CHECKING MONITOR STATUS).
CONFIRMATION DRIVING PATTERN
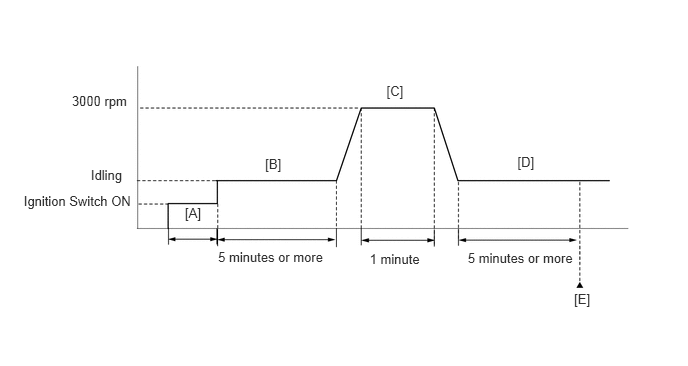
Connect the Techstream to the DLC3.
Turn the ignition switch to ON and turn the Techstream ON.
Clear DTCs (even if no DTCs are stored, perform the clear DTC operation).
Turn the ignition switch off and wait for at least 30 seconds.
Turn the ignition switch to ON and turn the Techstream on [A].
Start the engine and idle it for 5 minutes or more [B].
With the vehicle stationary, depress the accelerator pedal and maintain an engine speed of 3000 rpm for 1 minute [C].
Idle the engine for 5 minutes or more [D].
Enter the following menus: Powertrain / Engine and ECT / Trouble Codes [E].
Read the pending DTCs.
- HINT:
- ·
If a pending DTC is output, the system is malfunctioning.
·If a pending DTC is not output, perform the following procedure.
Enter the following menus: Powertrain / Engine and ECT / Utility / All Readiness.
Input the DTC: P0037, P0038, P0057, P0058, P0141, P0161, P102D or P105D.
Check the DTC judgment result.
| Tester Display | Description |
|---|---|
| NORMAL | ·
DTC judgment completed ·
System normal |
| ABNORMAL | ·
DTC judgment completed ·
System abnormal |
| INCOMPLETE | ·
DTC judgment not completed ·
Perform driving pattern after confirming DTC enabling conditions |
| N/A | ·
Unable to perform DTC judgment ·
Number of DTCs which do not fulfill DTC preconditions has reached ECU memory limit |
If the judgment result shows INCOMPLETE or N/A, perform steps [B] through [E] again.
If no pending DTC is output, perform a universal trip and check for permanent DTCs (See page Engine / Hybrid System>1UR-FE ENGINE CONTROL>SFI SYSTEM>DTC CHECK / CLEAR).
- HINT:
- ·
If a permanent DTC is output, the system is malfunctioning.
·If no permanent DTC is output, the system is normal.
WIRING DIAGRAM
Refer to DTC P0136 (See page Engine / Hybrid System>1UR-FE ENGINE CONTROL>SFI SYSTEM>P0136).
CAUTION / NOTICE / HINT
- HINT:
- ·
Bank 1 refers to the bank that includes the No. 1 cylinder*.
*: The No. 1 cylinder is the cylinder which is farthest from the transmission.
·Bank 2 refers to the bank that does not include the No. 1 cylinder.
·Sensor 1 refers to the sensor closest to the engine assembly.
·Sensor 2 refers to the sensor farthest away from the engine assembly.
·Read freeze frame data using the Techstream. Freeze frame data records the engine condition when malfunctions are detected. When troubleshooting, freeze frame data can help determine if the vehicle was moving or stationary, if the engine was warmed up or not, if the air-fuel ratio was lean or rich, and other data from the time the malfunction occurred.
PROCEDURE
Inspect the heated oxygen sensor (See page Engine / Hybrid System>1UR-FE ENGINE CONTROL>HEATED OXYGEN SENSOR>ON-VEHICLE INSPECTION).
- HINT:
-
Perform "Inspection After Repair" after replacing the heated oxygen sensor (See page Engine / Hybrid System>1UR-FE ENGINE CONTROL>SFI SYSTEM>INITIALIZATION).
OK
NG
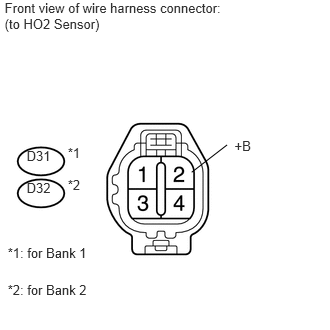
Disconnect the HO2 sensor connector.
Turn the ignition switch to ON.
Measure the voltage according to the value(s) in the table below.
- Standard Voltage:
Tester Connection Switch Condition Specified Condition D31-2 (+B) - Body ground Ignition switch ON 11 to 14 V D32-2 (+B) - Body ground Ignition switch ON 11 to 14 V
| Result | Proceed to |
|---|---|
| NG | A |
| OK | B |
A
B
Remove the integration relay from the engine room relay block.
Inspect the EFI NO. 1 fuse.
Remove the EFI NO. 1 fuse from the integration relay.
Measure the resistance according to the value(s) in the table below.
- Standard Resistance:
Tester Connection Condition Specified Condition EFI NO. 1 fuse Always Below 1 Ω
Reinstall the EFI NO. 1 fuse.
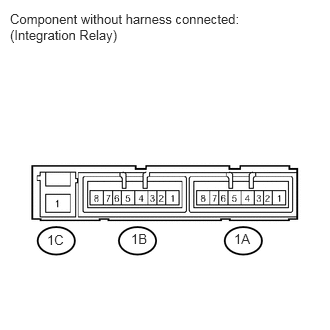
Inspect the EFI relay.
Measure the resistance according to the value(s) in the table below.
- Standard Resistance:
Tester Connection Condition Specified Condition 1C-1 - 1B-4 No battery voltage applied to terminals 1B-2 and 1B-3 10 kΩ or higher Battery voltage applied to terminals 1B-2 and 1B-3 Below 1 Ω
OK
NG
Check the EFI NO. 2 fuse.
Remove the EFI NO. 2 fuse from the engine room relay block.
Measure the resistance according to the value(s) in the table below.
- Standard Resistance:
Tester Connection Condition Specified Condition EFI NO. 2 fuse Always Below 1 Ω
Reinstall the EFI NO. 2 fuse.
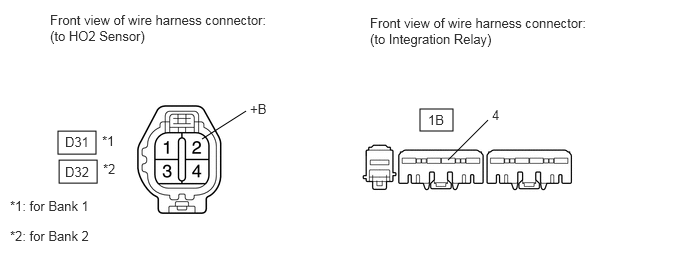
Disconnect the HO2 sensor connector.
Remove the integration relay from the engine room relay block.
Measure the resistance according to the value(s) in the table below.
- Standard Resistance:
Tester Connection Condition Specified Condition D31-2 (+B) - 1B-4 Always Below 1 Ω D32-2 (+B) - 1B-4 Always Below 1 Ω D31-2 (+B) or 1B-4 - Body ground Always 10 kΩ or higher D32-2 (+B) or 1B-4 - Body ground Always 10 kΩ or higher
OK
NG
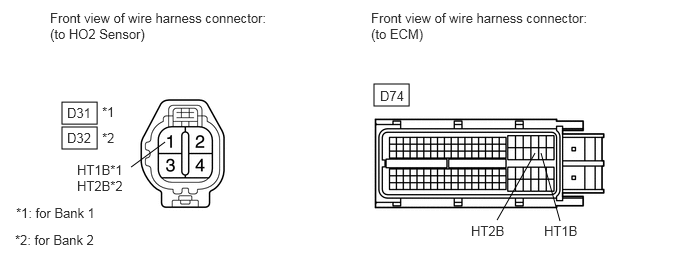
Disconnect the HO2 sensor connector.
Disconnect the ECM connector.
Measure the resistance according to the value(s) in the table below.
- Standard Resistance:
Tester Connection Condition Specified Condition D31-1 (HT1B) - D74-45 (HT1B) Always Below 1 Ω D32-1 (HT2B) - D74-44 (HT2B) Always Below 1 Ω D31-1 (HT1B) or D74-45 (HT1B) - Body ground Always 10 kΩ or higher D32-1 (HT2B) or D74-44 (HT2B) - Body ground Always 10 kΩ or higher
OK
NG
Connect the Techstream to the DLC3.
Turn the ignition switch to ON.
Turn the Techstream on.
Clear DTCs (See page Engine / Hybrid System>1UR-FE ENGINE CONTROL>SFI SYSTEM>DTC CHECK / CLEAR).
Start the engine.
Drive the vehicle in accordance with the driving pattern described in the Confirmation Driving Pattern.
Read the output pending DTCs using the Techstream.
| Result | Proceed to |
|---|---|
| No pending DTC is output | A |
| Pending DTC P0037, P0038, P0057, P0058, P0141, P0161, P102D and/or P105D is output | B |
A
B