PARK ASSIST / MONITORING ULTRASONIC SENSOR(for Rear Side) REMOVAL
CAUTION / NOTICE / HINT
- CAUTION:
-
As the rear bumper cover is extremely heavy, the engine lifter may suddenly drop if the instructions listed in the repair manual are not followed. Therefore, always follow the instructions listed in the repair manual when performing this procedure.
PROCEDURE

 82821A
1.REMOVE CONNECTOR COVER (for Steel Type Bumper)
82821A
2.REMOVE CONNECTOR COVER (for Resin Type Bumper)
82824X
3.REMOVE WIRING HARNESS CONNECTOR (for Steel Type Bumper)
82824X
4.REMOVE WIRING HARNESS CONNECTOR (for Resin Type Bumper)
5.REMOVE REAR BUMPER COVER (for Steel Type Bumper)
6.REMOVE REAR BUMPER COVER (for Resin Type Bumper)
52164A
7.REMOVE REAR BUMPER PLATE LH (for Steel Type Bumper)
52164A
8.REMOVE REAR BUMPER PLATE LH (for Resin Type Bumper)
52163A
9.REMOVE REAR BUMPER PLATE RH (for Steel Type Bumper)
52163A
10.REMOVE REAR BUMPER PLATE RH (for Resin Type Bumper)
52057
11.REMOVE REAR BUMPER PAD SUB-ASSEMBLY (for Steel Type Bumper)
52057
12.REMOVE REAR BUMPER PAD SUB-ASSEMBLY (for Resin Type Bumper)
81690A
13.REMOVE LICENSE PLATE LIGHT ASSEMBLY LH
81270D
14.REMOVE LICENSE PLATE LIGHT ASSEMBLY RH
- HINT:
-
Use the same procedure described for the LH side.
52156E
15.REMOVE REAR BUMPER EXTENSION INSERT LH (for Resin Type Bumper)
52155E
16.REMOVE REAR BUMPER EXTENSION INSERT RH (for Resin Type Bumper)
52179A
17.REMOVE REAR BUMPER BAR CORNER REINFORCEMENT LH (for Steel Type Bumper)
52178A
18.REMOVE REAR BUMPER BAR CORNER REINFORCEMENT RH (for Steel Type Bumper)
82165
19.REMOVE NO. 2 FRAME WIRE (for Steel Type Bumper)
89348A
20.REMOVE NO. 2 ULTRASONIC SENSOR RETAINER (for Steel Type Bumper)
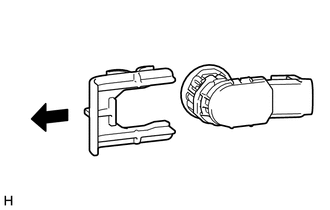
Remove the No. 2 ultrasonic sensor retainer as shown in the illustration.
- HINT:
-
The illustration shows the No. 2 ultrasonic sensor retainer for the LH. The horizontal orientation of the No. 2 ultrasonic sensor retainer for the RH is opposite that of the image shown in the illustration.
89341B
21.REMOVE NO. 2 ULTRASONIC SENSOR (for Steel Type Bumper)
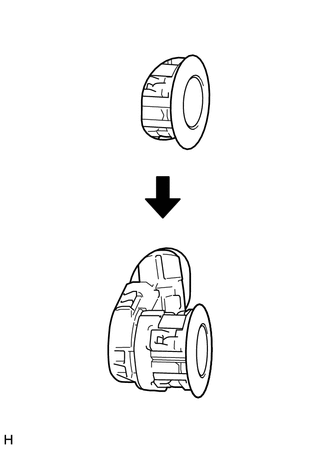
Remove the No. 2 ultrasonic sensor as shown in the illustration.
- HINT:
-
The illustration shows the No. 2 ultrasonic sensor for the LH. The horizontal orientation of the No. 1 ultrasonic sensor for the RH is opposite that of the image shown in the illustration.
89341B
22.REMOVE NO. 2 ULTRASONIC SENSOR (for Resin Type Bumper)
Detach the 4 claws and remove the No. 2 ultrasonic sensor as shown in the illustration.
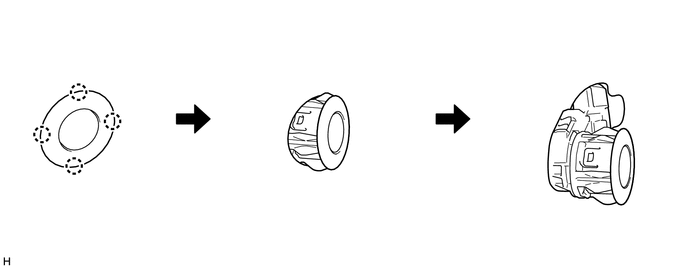
- HINT:
-
The illustration shows the No. 2 ultrasonic sensor for the RH. The horizontal orientation of the No. 2 ultrasonic sensor for the LH is opposite that of the image shown in the illustration.
89341C
23.REMOVE NO. 3 ULTRASONIC SENSOR
Detach the 4 claws and remove the No. 3 ultrasonic sensor as shown in the illustration.
- HINT:
-
The illustration shows the No. 3 ultrasonic sensor for the RH. The horizontal orientation of the No. 3 ultrasonic sensor for the LH is opposite that of the image shown in the illustration.