WINDOW / GLASS POWER WINDOW REGULATOR MOTOR(for Front Door) REMOVAL
CAUTION / NOTICE / HINT
- HINT:
- ·
Use the same procedure for the LH side and RH side.
·The procedure listed below is for the LH side.
PROCEDURE

 1.DISCONNECT CABLE FROM NEGATIVE BATTERY TERMINAL
- CAUTION:
-
Wait at least 90 seconds after disconnecting the cable from the negative (-) battery terminal to disable the SRS system.
- NOTICE:
-
When disconnecting the cable, some systems need to be initialized after the cable is reconnected (See page General>INTRODUCTION>REPAIR INSTRUCTION>INITIALIZATION).
69284C
2.REMOVE FRONT DOOR INSIDE HANDLE BEZEL PLUG LH
for Regular Cab:
Remove the front door inside handle bezel plug LH (See page Vehicle Interior>ENGINE HOOD / DOOR>FRONT DOOR(for Regular Cab)>DISASSEMBLY).
for Double Cab:
Remove the front door inside handle bezel plug LH (See page Vehicle Interior>ENGINE HOOD / DOOR>FRONT DOOR(for Double Cab)>DISASSEMBLY).
for CrewMax:
Remove the front door inside handle bezel plug LH (See page Vehicle Interior>ENGINE HOOD / DOOR>FRONT DOOR(for CrewMax)>DISASSEMBLY).
74232
3.REMOVE FRONT UPPER ARMREST BASE PANEL LH
67492A
4.REMOVE FRONT LOWER DOOR FRAME BRACKET GARNISH LH
for Regular Cab:
Remove the front lower door frame bracket garnish LH (See page Vehicle Interior>ENGINE HOOD / DOOR>FRONT DOOR(for Regular Cab)>DISASSEMBLY).
for Double Cab:
Remove the front lower door frame bracket garnish LH (See page Vehicle Interior>ENGINE HOOD / DOOR>FRONT DOOR(for Double Cab)>DISASSEMBLY).
for CrewMax:
Remove the front lower door frame bracket garnish LH (See page Vehicle Interior>ENGINE HOOD / DOOR>FRONT DOOR(for CrewMax)>DISASSEMBLY).
67602
5.REMOVE FRONT DOOR TRIM BOARD SUB-ASSEMBLY LH
for Regular Cab:
Remove the front door trim board sub-assembly LH (See page Vehicle Interior>ENGINE HOOD / DOOR>FRONT DOOR(for Regular Cab)>DISASSEMBLY).
for Double Cab:
Remove the front door trim board sub-assembly LH (See page Vehicle Interior>ENGINE HOOD / DOOR>FRONT DOOR(for Double Cab)>DISASSEMBLY).
for CrewMax:
Remove the front door trim board sub-assembly LH (See page Vehicle Interior>ENGINE HOOD / DOOR>FRONT DOOR(for CrewMax)>DISASSEMBLY).
86160
6.REMOVE FRONT NO. 1 SPEAKER ASSEMBLY
for Regular Cab:
Remove the front No. 1 speaker assembly (See page Audio / Visual / Telematics>AUDIO / VIDEO>FRONT DOOR SPEAKER(for Regular Cab)>REMOVAL).
for Double Cab:
Remove the front No. 1 speaker assembly (See page Audio / Visual / Telematics>AUDIO / VIDEO>FRONT DOOR SPEAKER(for Double Cab)>REMOVAL).
for CrewMax:
Remove the front No. 1 speaker assembly (See page Audio / Visual / Telematics>AUDIO / VIDEO>FRONT DOOR SPEAKER(for CrewMax)>REMOVAL).
67625A
7.REMOVE FRONT NO. 1 DOOR TRIM BRACKET
for Regular Cab:
Remove the front No. 1 door trim bracket (See page Vehicle Interior>ENGINE HOOD / DOOR>FRONT DOOR(for Regular Cab)>DISASSEMBLY).
for Double Cab:
Remove the front No. 1 door trim bracket (See page Vehicle Interior>ENGINE HOOD / DOOR>FRONT DOOR(for Double Cab)>DISASSEMBLY).
for CrewMax:
Remove the front No. 1 door trim bracket (See page Vehicle Interior>ENGINE HOOD / DOOR>FRONT DOOR(for CrewMax)>DISASSEMBLY).
67832
8.REMOVE FRONT DOOR SERVICE HOLE COVER LH
for Regular Cab:
Remove the front door service hole cover LH (See page Vehicle Interior>ENGINE HOOD / DOOR>FRONT DOOR(for Regular Cab)>DISASSEMBLY).
for Double Cab:
Remove the front door service hole cover LH (See page Vehicle Interior>ENGINE HOOD / DOOR>FRONT DOOR(for Double Cab)>DISASSEMBLY).
for CrewMax:
Remove the front door service hole cover LH (See page Vehicle Interior>ENGINE HOOD / DOOR>FRONT DOOR(for CrewMax)>DISASSEMBLY).
68102
9.REMOVE FRONT DOOR GLASS SUB-ASSEMBLY LH
for Regular Cab:
Remove the front door glass sub-assembly LH (See page Vehicle Interior>ENGINE HOOD / DOOR>FRONT DOOR(for Regular Cab)>DISASSEMBLY).
for Double Cab:
Remove the front door glass sub-assembly LH (See page Vehicle Interior>ENGINE HOOD / DOOR>FRONT DOOR(for Double Cab)>DISASSEMBLY).
for CrewMax:
Remove the front door glass sub-assembly LH (See page Vehicle Interior>ENGINE HOOD / DOOR>FRONT DOOR(for CrewMax)>DISASSEMBLY).
69802
10.REMOVE FRONT DOOR WINDOW REGULATOR SUB-ASSEMBLY LH
for Regular Cab:
Remove the front door window regulator sub-assembly LH (See page Vehicle Interior>ENGINE HOOD / DOOR>FRONT DOOR(for Regular Cab)>DISASSEMBLY).
for Double Cab:
Remove the front door window regulator sub-assembly LH (See page Vehicle Interior>ENGINE HOOD / DOOR>FRONT DOOR(for Double Cab)>DISASSEMBLY).
for CrewMax:
Remove the front door window regulator sub-assembly LH (See page Vehicle Interior>ENGINE HOOD / DOOR>FRONT DOOR(for CrewMax)>DISASSEMBLY).
85720A
11.REMOVE FRONT POWER WINDOW REGULATOR MOTOR ASSEMBLY LH
Using a T25 "TORX" driver, remove the 3 screws and motor.
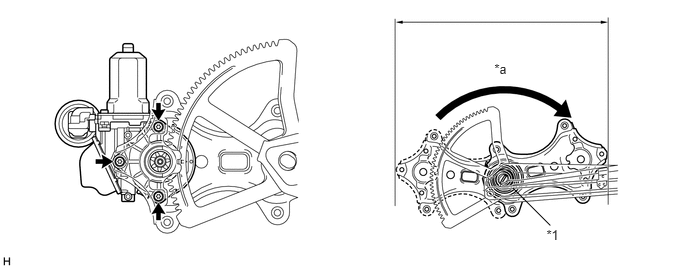
| *1 | SPRING | - | - |
| *a | Range of Movement | - | - |
- CAUTION:
-
Do not place your finger, etc. within the range of movement of the window regulator. When removing the power window regulator motor, the force of the spring causes the window regulator to move in the direction of the arrow shown in the illustration (the direction in which the window rises), which may cause injury.
- NOTICE:
-
Be careful when removing the screws as the motor may fall and become damaged.